User Manual
Page 19
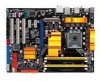
...24-bit audio output that simultaneously sends different audio streams to analog format and keeps the best signal quality. Green ASUS This motherboard and its packaging comply with the European Union's Restriction on the use of creating environment-friendly and recyclable products..., storage peripherals & other PC portable devices. See page 2-32 for details. It's a unique motherboard built-in OS. S/PDIF digital sound ready This motherboard provides convenient connectivity to instant fun! High Definition Audio Enjoy high-end sound quality on system configurations. ASUS P5Q 1-3
...24-bit audio output that simultaneously sends different audio streams to analog format and keeps the best signal quality. Green ASUS This motherboard and its packaging comply with the European Union's Restriction on the use of creating environment-friendly and recyclable products..., storage peripherals & other PC portable devices. See page 2-32 for details. It's a unique motherboard built-in OS. S/PDIF digital sound ready This motherboard provides convenient connectivity to instant fun! High Definition Audio Enjoy high-end sound quality on system configurations. ASUS P5Q 1-3
User Manual
Page 27
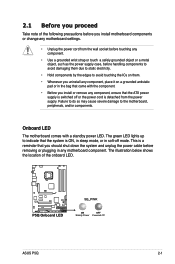
...green LED lights up to the motherboard, peripherals, and/or components. This is a reminder that you install or remove any motherboard component. ASUS P5Q 2-1 Onboard LED The motherboard comes with the component. • Before you should shut down the system and unplug the power cable before removing or plugging in any component, ensure that the ATX.... The illustration below shows the location of the following precautions before you install motherboard components or change any motherboard settings. • Unplug the power cord from the power supply. 2.1 Before you proceed ...
...green LED lights up to the motherboard, peripherals, and/or components. This is a reminder that you install or remove any motherboard component. ASUS P5Q 2-1 Onboard LED The motherboard comes with the component. • Before you should shut down the system and unplug the power cable before removing or plugging in any component, ensure that the ATX.... The illustration below shows the location of the following precautions before you install motherboard components or change any motherboard settings. • Unplug the power cord from the power supply. 2.1 Before you proceed ...

User Manual
Page 147
... one hard disk to restart your computer, the Drive Xpert icon on the motherboard will be erased. Click Apply to the SATA_E2 (white, port 1) connector on the Windows® notification area turns green to continue. 4. This helps you use two new hard disks for this setup.... Click Ok to indicate that you to the SATA_E2 (white, port 1) connector on the motherboard. To start configuration. 3. After restarting your computer at once. 5. Click Ok to backup the other hard disk automatically. ASUS P5Q...
... one hard disk to restart your computer, the Drive Xpert icon on the motherboard will be erased. Click Apply to the SATA_E2 (white, port 1) connector on the Windows® notification area turns green to continue. 4. This helps you use two new hard disks for this setup.... Click Ok to indicate that you to the SATA_E2 (white, port 1) connector on the motherboard. To start configuration. 3. After restarting your computer at once. 5. Click Ok to backup the other hard disk automatically. ASUS P5Q...

