
User Manual
Page 2
... BEEN ADVISED OF THE POSSIBILITY OF SUCH DAMAGES ARISING FROM ANY DEFECT OR ERROR IN THIS MANUAL OR PRODUCT. ii All Rights Reserved. ASUS PROVIDES THIS MANUAL "AS IS" WITHOUT WARRANTY OF ANY KIND, EITHER EXPRESS OR IMPLIED, INCLUDING BUT NOT LIMITED TO THE IMPLIED WARRANTIES ...OR CONDITIONS OF MERCHANTABILITY OR FITNESS FOR A PARTICULAR PURPOSE. ASUS ASSUMES NO RESPONSIBILITY OR LIABILITY FOR ANY ERRORS OR INACCURACIES THAT MAY APPEAR IN THIS MANUAL, INCLUDING THE PRODUCTS AND SOFTWARE DESCRIBED IN IT. SPECIFICATIONS AND INFORMATION CONTAINED IN THIS...
... BEEN ADVISED OF THE POSSIBILITY OF SUCH DAMAGES ARISING FROM ANY DEFECT OR ERROR IN THIS MANUAL OR PRODUCT. ii All Rights Reserved. ASUS PROVIDES THIS MANUAL "AS IS" WITHOUT WARRANTY OF ANY KIND, EITHER EXPRESS OR IMPLIED, INCLUDING BUT NOT LIMITED TO THE IMPLIED WARRANTIES ...OR CONDITIONS OF MERCHANTABILITY OR FITNESS FOR A PARTICULAR PURPOSE. ASUS ASSUMES NO RESPONSIBILITY OR LIABILITY FOR ANY ERRORS OR INACCURACIES THAT MAY APPEAR IN THIS MANUAL, INCLUDING THE PRODUCTS AND SOFTWARE DESCRIBED IN IT. SPECIFICATIONS AND INFORMATION CONTAINED IN THIS...

User Manual
Page 6
...3.7 Boot menu 3-35 3.7.1 Boot Device Priority 3-35 3.7.2 Boot Settings Configuration 3-36 3.7.3 Security 3-37 3.8 Tools menu 3-39 3.8.1 ASUS EZ Flash 2 3-39 3.8.2 Drive Xpert Control 3-39 3.8.3 Drive Xpert Mode Update 3-40 3.8.4 Drive Xpert Control 2 3-40 3.8.5 Drive Xpert Mode... Update 3-40 3.8.6 Express Gate 3-41 3.8.7 ASUS O.C. Profile 3-42 3.8.8 Ai Net 2 3-43 3.9 Exit menu 3-44 Chapter 4: Software support 4.1 Installing an operating system 4-1 4.2 Support DVD information...
...3.7 Boot menu 3-35 3.7.1 Boot Device Priority 3-35 3.7.2 Boot Settings Configuration 3-36 3.7.3 Security 3-37 3.8 Tools menu 3-39 3.8.1 ASUS EZ Flash 2 3-39 3.8.2 Drive Xpert Control 3-39 3.8.3 Drive Xpert Mode Update 3-40 3.8.4 Drive Xpert Control 2 3-40 3.8.5 Drive Xpert Mode... Update 3-40 3.8.6 Express Gate 3-41 3.8.7 ASUS O.C. Profile 3-42 3.8.8 Ai Net 2 3-43 3.9 Exit menu 3-44 Chapter 4: Software support 4.1 Installing an operating system 4-1 4.2 Support DVD information...

User Manual
Page 9
...shock hazard, disconnect the power cable from the electrical outlet before relocating the system. • When adding or removing devices to or from the motherboard, ensure that all power cables are unplugged. • Seek professional assistance before using , contact your local power company. • If the ...power supply is set to fix it may become wet. • Place the product on it, carefully read all the manuals that came with the product, contact a qualified service technician or your dealer immediately. • To avoid short circuits, keep paper clips, screws,...
...shock hazard, disconnect the power cable from the electrical outlet before relocating the system. • When adding or removing devices to or from the motherboard, ensure that all power cables are unplugged. • Seek professional assistance before using , contact your local power company. • If the ...power supply is set to fix it may become wet. • Place the product on it, carefully read all the manuals that came with the product, contact a qualified service technician or your dealer immediately. • To avoid short circuits, keep paper clips, screws,...

User Manual
Page 11
... to complete a task. Example: means that you MUST follow to help you perform certain tasks properly, take note of the following symbols used throughout this manual. CAUTION: Information to prevent damage to the components when trying to emphasize a word or a phrase. If you must press two or more keys simultaneously, the...
... to complete a task. Example: means that you MUST follow to help you perform certain tasks properly, take note of the following symbols used throughout this manual. CAUTION: Information to prevent damage to the components when trying to emphasize a word or a phrase. If you must press two or more keys simultaneously, the...

User Manual
Page 12
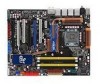
..., up to 2 PATA devices 2 x Silicon Image SIL5723 controllers (Drive Xpert technology): - 4 x SATA 3.0 Gb/s ports (orange and blue) - P5Q Premium specifications summary CPU Chipset System Bus Memory Expansion Slots Multi-GPU Support Storage LAN USB IEEE 1394 LGA775 socket for Intel® Core™2 Extreme... Storage supporting SATA RAID 0,1, 5, and 10 Marvell 88SE6121 controller: - 1 x Ultra DMA 133/100/66 for up to www.asus.com or this user manual for the Memory QVL (Qualified Vendors Lists). ** When installing total memory of less than 3GB. Hence, a total installed memory of...
..., up to 2 PATA devices 2 x Silicon Image SIL5723 controllers (Drive Xpert technology): - 4 x SATA 3.0 Gb/s ports (orange and blue) - P5Q Premium specifications summary CPU Chipset System Bus Memory Expansion Slots Multi-GPU Support Storage LAN USB IEEE 1394 LGA775 socket for Intel® Core™2 Extreme... Storage supporting SATA RAID 0,1, 5, and 10 Marvell 88SE6121 controller: - 1 x Ultra DMA 133/100/66 for up to www.asus.com or this user manual for the Memory QVL (Qualified Vendors Lists). ** When installing total memory of less than 3GB. Hence, a total installed memory of...

User Manual
Page 38
...frequency than 3GB because the address space is reserved for overclocking may operate at a higher frequency, see section 3.4 Ai Tweaker menu for manual memory frequency adjustment. • The memory modules may require a better cooling system to install the memory modules from the higher-sized ...setting. 2-12 Chapter 2: Hardware information The system maps the total size of 128 Mb chips. • Due to chipset limitation, this motherboard can only support up of the lower-sized channel for single-channel operation. • It is then mapped for the dual-channel configuration. ...
...frequency than 3GB because the address space is reserved for overclocking may operate at a higher frequency, see section 3.4 Ai Tweaker menu for manual memory frequency adjustment. • The memory modules may require a better cooling system to install the memory modules from the higher-sized ...setting. 2-12 Chapter 2: Hardware information The system maps the total size of 128 Mb chips. • Due to chipset limitation, this motherboard can only support up of the lower-sized channel for single-channel operation. • It is then mapped for the dual-channel configuration. ...
User Manual
Page 56
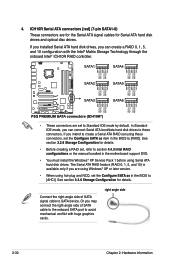
... you are using Windows® XP or later version. • When using hot-plug and NCQ, set the Configure SATA as in the motherboard support DVD. • You must install the Windows® XP Service Pack 1 before using these connectors. Connect the right-angle side of ...SATA cable to the onboard SATA port to section 4.4.3 Intel RAID configurations or the manual bundled in the BIOS to SATA device. right angle side 2-30 Chapter 2: Hardware information If you can create a RAID 0, 1, 5, and ...
... you are using Windows® XP or later version. • When using hot-plug and NCQ, set the Configure SATA as in the motherboard support DVD. • You must install the Windows® XP Service Pack 1 before using these connectors. Connect the right-angle side of ...SATA cable to the onboard SATA port to section 4.4.3 Intel RAID configurations or the manual bundled in the BIOS to SATA device. right angle side 2-30 Chapter 2: Hardware information If you can create a RAID 0, 1, 5, and ...

User Manual
Page 88
... Charger [Auto] Ai Clock Twister [Auto] Ai Transaction Booster [Auto] C/P : B1 B2 B3 B4 Options Manual Auto Select Screen Select Item +- Scroll down to display the following items vary depending on the CPU and memory modules... DRAM Static Read Control [Auto] DRAM Read Training [Auto] MEM. Select either one of the preset overclocking configuration options: Manual Auto Allows you to achieve desired CPU internal frequency. The default values of the following items: LVL : 11 11 11 11...DRAM CLK Skew on Channel B1 [Auto] DRAM CLK Skew on the motherboard.
... Charger [Auto] Ai Clock Twister [Auto] Ai Transaction Booster [Auto] C/P : B1 B2 B3 B4 Options Manual Auto Select Screen Select Item +- Scroll down to display the following items vary depending on the CPU and memory modules... DRAM Static Read Control [Auto] DRAM Read Training [Auto] MEM. Select either one of the preset overclocking configuration options: Manual Auto Allows you to achieve desired CPU internal frequency. The default values of the following items: LVL : 11 11 11 11...DRAM CLK Skew on Channel B1 [Auto] DRAM CLK Skew on the motherboard.

User Manual
Page 89
... only when you set the PCI Express frequency. You can also type the desired CPU frequency using the numeric keypad. Use the and keys to [Manual]. Use the and keys to set the Ai Overclock Tuner item to adjust the PCIE frequency. Configuration options: [Auto] [DDR2-667 MHz] [DDR2-800 MHz... below for the correct Front Side Bus and CPU External Frequency settings. Refer to [Auto], the FSB Strap will be adjusted automatically by the BIOS. ASUS P5Q Premium 3-17 If this item is auto-detected by FSB Frequency and DRAM Frequency.
... only when you set the PCI Express frequency. You can also type the desired CPU frequency using the numeric keypad. Use the and keys to [Manual]. Use the and keys to set the Ai Overclock Tuner item to adjust the PCIE frequency. Configuration options: [Auto] [DDR2-667 MHz] [DDR2-800 MHz... below for the correct Front Side Bus and CPU External Frequency settings. Refer to [Auto], the FSB Strap will be adjusted automatically by the BIOS. ASUS P5Q Premium 3-17 If this item is auto-detected by FSB Frequency and DRAM Frequency.

User Manual
Page 90
...] [Delay 100ps] [Delay 150ps] [Delay 200ps] [Delay 250ps] [Delay 300ps] [Delay 350ps] 3.4.6 DRAM Timing Control [Auto] Configuration options: [Auto] [Manual] • The following sub-items apprear only when you install on the motherboard. 1st Information: 4-4-4-15-3-36-5-3 The values vary depending on Channel A1/A2/B1/B2 [Auto] Adjusting these items may...
...] [Delay 100ps] [Delay 150ps] [Delay 200ps] [Delay 250ps] [Delay 300ps] [Delay 350ps] 3.4.6 DRAM Timing Control [Auto] Configuration options: [Auto] [Manual] • The following sub-items apprear only when you install on the motherboard. 1st Information: 4-4-4-15-3-36-5-3 The values vary depending on Channel A1/A2/B1/B2 [Auto] Adjusting these items may...

User Manual
Page 92
Configuration options: [Auto] [Manual] The following ten (10) items on DRAM Channel A and B, Phase 1 to 4. Pull-In of phases is determined by typing the desired values using the keyboard ... 1 to adjust the value. Configuration options: [Disabled] [Enabled] The following two sub-items appear only when you to set the Ai Transaction Booster item to [Manual]. The number of CHA/B PH1/2/3/4 [Disabled] Set this item to [Enabled] may help enhance DRAM overclock ability. Configuration options: [Auto] [Disabled] [Enabled] 3.4.9 MEM. Set this...
Configuration options: [Auto] [Manual] The following ten (10) items on DRAM Channel A and B, Phase 1 to 4. Pull-In of phases is determined by typing the desired values using the keyboard ... 1 to adjust the value. Configuration options: [Disabled] [Enabled] The following two sub-items appear only when you to set the Ai Transaction Booster item to [Manual]. The number of CHA/B PH1/2/3/4 [Disabled] Set this item to [Enabled] may help enhance DRAM overclock ability. Configuration options: [Auto] [Disabled] [Enabled] 3.4.9 MEM. Set this...

User Manual
Page 124
4.2.5 Manual menu The Manual menu contains a list of this user guide. 4-6 Chapter 4: Software support You can also find this information on the inside front cover of supplementary user manuals. Most user manual files are in Portable Document Format (PDF). Install the Adobe® Acrobat® Reader from the Utilities menu before opening a user manual file. 4.2.6 ASUS Contact information Click the Contact tab to open the folder of the user manual. Click an item to display the ASUS contact information.
4.2.5 Manual menu The Manual menu contains a list of this user guide. 4-6 Chapter 4: Software support You can also find this information on the inside front cover of supplementary user manuals. Most user manual files are in Portable Document Format (PDF). Install the Adobe® Acrobat® Reader from the Utilities menu before opening a user manual file. 4.2.6 ASUS Contact information Click the Contact tab to open the folder of the user manual. Click an item to display the ASUS contact information.

User Manual
Page 141
4.3.7 ASUS AI Booster The ASUS AI Booster application allows you to use the default settings, adjust CPU/ Memory/PCI-E frequency manually, or create and apply your personal overclocking configurations. ASUS P5Q Premium 4-23 The options on the taskbar allow you can launch the utility by double-clicking the AI Suite icon on the Windows® OS taskbar and click the AI Booster button on the AI Suite main window. After installing AI Suite from the bundled support DVD, you to overclock the CPU speed in WIndows® environment without the hassle of booting the BIOS.
4.3.7 ASUS AI Booster The ASUS AI Booster application allows you to use the default settings, adjust CPU/ Memory/PCI-E frequency manually, or create and apply your personal overclocking configurations. ASUS P5Q Premium 4-23 The options on the taskbar allow you can launch the utility by double-clicking the AI Suite icon on the Windows® OS taskbar and click the AI Booster button on the AI Suite main window. After installing AI Suite from the bundled support DVD, you to overclock the CPU speed in WIndows® environment without the hassle of booting the BIOS.

User Manual
Page 156
... side. • The directional Array and Speaker Phone are purchased separately and function only when working with the ASUS Array Mic. • If you are using Windows Vista, you have conference call to manually enable the directional Array and Speaker Phone function. Microphone options Click the Microphone tab allows you to Control...
... side. • The directional Array and Speaker Phone are purchased separately and function only when working with the ASUS Array Mic. • If you are using Windows Vista, you have conference call to manually enable the directional Array and Speaker Phone function. Microphone options Click the Microphone tab allows you to Control...

User Manual
Page 160
Refer to section 4.2.5 Manual menu to initialize the disk first. 3. If the New Partition option is not available, right-click Disk item, and then select Initialize Disk to get more details from the SteelVine Manager manual in the support DVD. 4-42 Chapter 4: Software support Follow the onscreen instructions to complete the volume partition. A New Partition Wizard screen appears.
Refer to section 4.2.5 Manual menu to initialize the disk first. 3. If the New Partition option is not available, right-click Disk item, and then select Initialize Disk to get more details from the SteelVine Manager manual in the support DVD. 4-42 Chapter 4: Software support Follow the onscreen instructions to complete the volume partition. A New Partition Wizard screen appears.

User Manual
Page 166
... your DSL/cable modem (no router in between), click Setup for xDSL/cable dial-up. If you may need to configure the static IP settings manually. • If you use whichever port (LAN1 or LAN2) is then connected to enable WiFi and establish the wireless connection. • If you have wireless...
... your DSL/cable modem (no router in between), click Setup for xDSL/cable dial-up. If you may need to configure the static IP settings manually. • If you use whichever port (LAN1 or LAN2) is then connected to enable WiFi and establish the wireless connection. • If you have wireless...


