
User Manual
Page 9
... not damaged. These devices could interrupt the grounding circuit. • Make sure that your area. Operation safety • Before installing the motherboard and adding devices on a stable surface. • If you detect any damage, contact your retailer. If you encounter technical problems with ...the package. • Before using the product, make sure all the manuals that the product (electrical, electronic equipment and mercury-containing button cell battery) should not be placed in any area where it may...
... not damaged. These devices could interrupt the grounding circuit. • Make sure that your area. Operation safety • Before installing the motherboard and adding devices on a stable surface. • If you detect any damage, contact your retailer. If you encounter technical problems with ...the package. • Before using the product, make sure all the manuals that the product (electrical, electronic equipment and mercury-containing button cell battery) should not be placed in any area where it may...

User Manual
Page 38
... To operate at the vendormarked or at a lower frequency than 3GB is recommended that you obtain memory modules from the yellow slots for manual memory frequency adjustment. • The memory modules may operate at a higher frequency, see section 3.4 Ai Tweaker menu for better overclocking capability...the same CAS latency. For optimum compatibility, it is recommended. • This motherboard does not support memory modules made up of 128 Mb chips. • Due to chipset limitation, this motherboard can only support up to install the memory modules from the same vendor. •...
... To operate at the vendormarked or at a lower frequency than 3GB is recommended that you obtain memory modules from the yellow slots for manual memory frequency adjustment. • The memory modules may operate at a higher frequency, see section 3.4 Ai Tweaker menu for better overclocking capability...the same CAS latency. For optimum compatibility, it is recommended. • This motherboard does not support memory modules made up of 128 Mb chips. • Due to chipset limitation, this motherboard can only support up to install the memory modules from the same vendor. •...
User Manual
Page 56
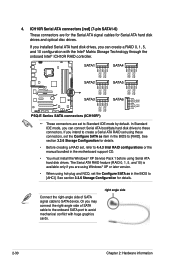
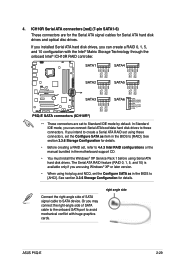
...disk drives and optical disc drives. 4. If you intend to create a Serial ATA RAID set , refer to 4.4.3 Intel RAID configurations or the manual bundled in the BIOS to SATA device. See section 3.3.6 Storage Configuration for details. • Before creating a RAID set using these connectors. right...and 10 configuration with huge graphics cards. If you installed Serial ATA hard disk drives, you are set the Configure SATA as item in the motherboard support CD. • You must install the Windows® XP Service Pack 1 before using hot-plug and NCQ, set to [AHCI]. ...
...disk drives and optical disc drives. 4. If you intend to create a Serial ATA RAID set , refer to 4.4.3 Intel RAID configurations or the manual bundled in the BIOS to SATA device. See section 3.3.6 Storage Configuration for details. • Before creating a RAID set using these connectors. right...and 10 configuration with huge graphics cards. If you installed Serial ATA hard disk drives, you are set the Configure SATA as item in the motherboard support CD. • You must install the Windows® XP Service Pack 1 before using hot-plug and NCQ, set to [AHCI]. ...
User Manual
Page 85
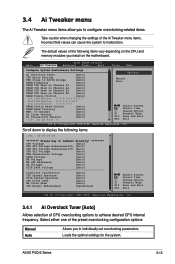
...either one of the preset overclocking configuration options: Manual Auto Allows you to configure overclocking-related items. Take caution when changing the settings of the Ai Tweaker menu items. Incorrect field values can cause the system to malfunction. ASUS P5Q-E Series 3-15 The default values of CPU ...overclocking options to North Bridge [Auto] DRAM Frequency [Auto] DRAM CLK Skew on Channel A1 [Auto] DRAM CLK Skew on Channel A2 [Auto] DRAM CLK Skew on Channel B1 [Auto] DRAM CLK Skew on the motherboard. Scroll...
...either one of the preset overclocking configuration options: Manual Auto Allows you to configure overclocking-related items. Take caution when changing the settings of the Ai Tweaker menu items. Incorrect field values can cause the system to malfunction. ASUS P5Q-E Series 3-15 The default values of CPU ...overclocking options to North Bridge [Auto] DRAM Frequency [Auto] DRAM CLK Skew on Channel A1 [Auto] DRAM CLK Skew on Channel A2 [Auto] DRAM CLK Skew on Channel B1 [Auto] DRAM CLK Skew on the motherboard. Scroll...

User Manual
Page 87
... options: [Auto] [1 DRAM Clocks] - [15 DRAM Clocks] Read to Precharge Time [Auto] Configuration options: [Auto] [1 DRAM Clocks] - [15 DRAM Clocks] ASUS P5Q-E Series 3-17 Configuration options: [Auto] [Advance 350ps] [Advance 300ps] [Advance 250ps] [Advance 200ps] [Advance 150ps] [Advance 100ps] [Advance 50ps] [Normal] [Delay...appear only when you set the DRAM Timing Control item to [Manual]. • The configuration options for some of the following items vary depending on the DIMMs you install on the motherboard. 1st Information: 5-5-5-15-3-36-5-3 The values vary depending on ...
... options: [Auto] [1 DRAM Clocks] - [15 DRAM Clocks] Read to Precharge Time [Auto] Configuration options: [Auto] [1 DRAM Clocks] - [15 DRAM Clocks] ASUS P5Q-E Series 3-17 Configuration options: [Auto] [Advance 350ps] [Advance 300ps] [Advance 250ps] [Advance 200ps] [Advance 150ps] [Advance 100ps] [Advance 50ps] [Normal] [Delay...appear only when you set the DRAM Timing Control item to [Manual]. • The configuration options for some of the following items vary depending on the DIMMs you install on the motherboard. 1st Information: 5-5-5-15-3-36-5-3 The values vary depending on ...

User Manual
Page 9
...all power cables are using an adpater or extension cord. If you add a device. • Before connecting or removing signal cables from the motherboard, ensure that your power supply is broken, do not try to the correct voltage in municipal waste. This symbol of electronic products. If ...from the system, ensure that the power cables for the devices are unplugged before you detect any area where it , carefully read all the manuals that came with the product, contact a qualified service technician or your retailer. These devices could interrupt the grounding circuit. • Make ...
...all power cables are using an adpater or extension cord. If you add a device. • Before connecting or removing signal cables from the motherboard, ensure that your power supply is broken, do not try to the correct voltage in municipal waste. This symbol of electronic products. If ...from the system, ensure that the power cables for the devices are unplugged before you detect any area where it , carefully read all the manuals that came with the product, contact a qualified service technician or your retailer. These devices could interrupt the grounding circuit. • Make ...

User Manual
Page 38
...Windows® Vista x64 Edition • The default memory operation frequency is recommended. • This motherboard does not support memory modules made up of 128 Mb chips. • Due to chipset limitation, this motherboard can only support up to install the memory modules from the higher-sized channel is then mapped... four 1 GB memory modules, the system may only recognize less than the vendor-marked value. Under the default state, some memory modules for manual memory frequency adjustment. • The memory modules may install varying memory sizes in Channel A and Channel B.
...Windows® Vista x64 Edition • The default memory operation frequency is recommended. • This motherboard does not support memory modules made up of 128 Mb chips. • Due to chipset limitation, this motherboard can only support up to install the memory modules from the higher-sized channel is then mapped... four 1 GB memory modules, the system may only recognize less than the vendor-marked value. Under the default state, some memory modules for manual memory frequency adjustment. • The memory modules may install varying memory sizes in Channel A and Channel B.
User Manual
Page 55
...creating a RAID set the Configure SATA as item in the BIOS to 4.4.3 Intel RAID configurations or the manual bundled in the BIOS to SATA device. 4. The Serial ATA RAID feature (RAID 0, 1, 5, and ...available only if you intend to create a Serial ATA RAID set the Configure SATA as in the motherboard support CD. • You must install the Windows® XP Service Pack 1 before using these...connect Serial ATA boot/data hard disk drives to Standard IDE mode by default. right angle side ASUS P5Q-E 2-29 If you installed Serial ATA hard disk drives, you can create a RAID 0, 1,...
...creating a RAID set the Configure SATA as item in the BIOS to 4.4.3 Intel RAID configurations or the manual bundled in the BIOS to SATA device. 4. The Serial ATA RAID feature (RAID 0, 1, 5, and ...available only if you intend to create a Serial ATA RAID set the Configure SATA as in the motherboard support CD. • You must install the Windows® XP Service Pack 1 before using these...connect Serial ATA boot/data hard disk drives to Standard IDE mode by default. right angle side ASUS P5Q-E 2-29 If you installed Serial ATA hard disk drives, you can create a RAID 0, 1,...

User Manual
Page 85
... Item +- Select either one of the preset overclocking configuration options: Manual Auto Allows you to configure overclocking-related items. Take caution when changing the settings of the Ai Tweaker menu items. Incorrect field values can cause the system to malfunction. ASUS P5Q-E 3-15 Scroll down to display the following items vary depending on... CLK Skew on Channel A1 [Auto] DRAM CLK Skew on Channel A2 [Auto] DRAM CLK Skew on Channel B1 [Auto] DRAM CLK Skew on the motherboard. 3.4 Ai Tweaker menu The Ai Tweaker menu items allow you to individually set overclocking parameters.
... Item +- Select either one of the preset overclocking configuration options: Manual Auto Allows you to configure overclocking-related items. Take caution when changing the settings of the Ai Tweaker menu items. Incorrect field values can cause the system to malfunction. ASUS P5Q-E 3-15 Scroll down to display the following items vary depending on... CLK Skew on Channel A1 [Auto] DRAM CLK Skew on Channel A2 [Auto] DRAM CLK Skew on Channel B1 [Auto] DRAM CLK Skew on the motherboard. 3.4 Ai Tweaker menu The Ai Tweaker menu items allow you to individually set overclocking parameters.

User Manual
Page 87
...: [Auto] [1 DRAM Clocks] - [15 DRAM Clocks] Read to Precharge Time [Auto] Configuration options: [Auto] [1 DRAM Clocks] - [15 DRAM Clocks] ASUS P5Q-E 3-17 Configuration options: [Auto] [Advance 350ps] [Advance 300ps] [Advance 250ps] [Advance 200ps] [Advance 150ps] [Advance 100ps] [Advance 50ps] [Normal] [Delay...250ps] [Delay 300ps] [Delay 350ps] 3.4.6 DRAM Timing Control [Auto] Configuration options: [Auto] [Manual] • The following sub-items apprear only when you install on the motherboard. 1st Information: 4-4-4-15-3-36-5-3 The values vary depending on Channel A1/A2/B1/B2 [Auto] ...
...: [Auto] [1 DRAM Clocks] - [15 DRAM Clocks] Read to Precharge Time [Auto] Configuration options: [Auto] [1 DRAM Clocks] - [15 DRAM Clocks] ASUS P5Q-E 3-17 Configuration options: [Auto] [Advance 350ps] [Advance 300ps] [Advance 250ps] [Advance 200ps] [Advance 150ps] [Advance 100ps] [Advance 50ps] [Normal] [Delay...250ps] [Delay 300ps] [Delay 350ps] 3.4.6 DRAM Timing Control [Auto] Configuration options: [Auto] [Manual] • The following sub-items apprear only when you install on the motherboard. 1st Information: 4-4-4-15-3-36-5-3 The values vary depending on Channel A1/A2/B1/B2 [Auto] ...


