
User Manual
Page 4
... connectors 1-22 1.11 Software support 1-28 1.11.1 Installing an operating system 1-28 1.11.2 Support DVD information 1-28 Chapter 2: BIOS information 2.1 Managing and updating your BIOS 2-1 2.1.1 ASUS Update utility 2-1 2.1.2 ASUS EZ Flash 2 utility 2-2 2.1.3 ASUS CrashFree BIOS 3 utility 2-3 2.2 BIOS setup program 2-4 2.2.1 BIOS menu screen 2-5 2.2.2 Menu bar 2-5 2.2.3 Navigation keys 2-6 2.2.4 Menu items 2-6 2.2.5 Submenu items 2-6 2.2.6 Configuration fields 2-6 2.2.7 Pop-up window 2-6 2.2.8 Scroll bar 2-6 2.2.9 General...
... connectors 1-22 1.11 Software support 1-28 1.11.1 Installing an operating system 1-28 1.11.2 Support DVD information 1-28 Chapter 2: BIOS information 2.1 Managing and updating your BIOS 2-1 2.1.1 ASUS Update utility 2-1 2.1.2 ASUS EZ Flash 2 utility 2-2 2.1.3 ASUS CrashFree BIOS 3 utility 2-3 2.2 BIOS setup program 2-4 2.2.1 BIOS menu screen 2-5 2.2.2 Menu bar 2-5 2.2.3 Navigation keys 2-6 2.2.4 Menu items 2-6 2.2.5 Submenu items 2-6 2.2.6 Configuration fields 2-6 2.2.7 Pop-up window 2-6 2.2.8 Scroll bar 2-6 2.2.9 General...

User Manual
Page 8
...provided. IMPORTANT: Instructions that you perform certain tasks properly, take note of the standard package. Detailed descriptions of the BIOS parameters are not part of the following sources for additional information and for product and software updates. 1. Example: means...a phrase. Italics Used to complete a task. ASUS websites The ASUS website provides updated information on ASUS hardware and software products. Where to change system settings through the BIOS Setup menus. Example: ++ viii • Chapter 2: BIOS information This chapter tells how to find more keys...
...provided. IMPORTANT: Instructions that you perform certain tasks properly, take note of the standard package. Detailed descriptions of the BIOS parameters are not part of the following sources for additional information and for product and software updates. 1. Example: means...a phrase. Italics Used to complete a task. ASUS websites The ASUS website provides updated information on ASUS hardware and software products. Where to change system settings through the BIOS Setup menus. Example: ++ viii • Chapter 2: BIOS information This chapter tells how to find more keys...
User Manual
Page 9
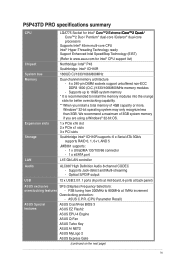
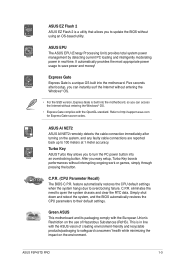
ASUS C.P.R. (CPU Parameter Recall) ASUS Special features ASUS CrashFree BIOS 3 ASUS EZ Flash2 ASUS EPU-4 Engine ASUS Q-Fan ASUS Turbo Key ASUS AI NET2 ASUS MyLogo 2 ASUS Express Gate (continued on the next page) ix Supports Jack-detect and Multi-streaming - Supports up to 16GB system ...you install a total memory of 4GB capacity or more, Windows® 32-bit operating system may only recognize less than 3GB. P5P43TD PRO specifications summary CPU Chipset System bus Memory Expansion slots Storage LAN LGA775 Socket for Intel® C��o�re�™&#...
ASUS C.P.R. (CPU Parameter Recall) ASUS Special features ASUS CrashFree BIOS 3 ASUS EZ Flash2 ASUS EPU-4 Engine ASUS Q-Fan ASUS Turbo Key ASUS AI NET2 ASUS MyLogo 2 ASUS Express Gate (continued on the next page) ix Supports Jack-detect and Multi-streaming - Supports up to 16GB system ...you install a total memory of 4GB capacity or more, Windows® 32-bit operating system may only recognize less than 3GB. P5P43TD PRO specifications summary CPU Chipset System bus Memory Expansion slots Storage LAN LGA775 Socket for Intel® C��o�re�™&#...
User Manual
Page 10
P5P43TD PRO specifications summary Rear panel ports Internal connectors BIOS features Manageability Accessories Support DVD Form factor 1 x PS/2 keyboard/mouse combo port 1 x ...1 x 24-pin EPS Power connector 1 x 4-pin ATX 12V Power connector 6 x SATA connectors 8 Mb Flash ROM, AMI BIOS, Special Hardware Write Protection, PnP, DMI v2.0, WfM2.0, SMBIOS v2.5, ACPI v2 0a WOL by PME, WOR by PME, PXE... 1 x UltraDMA 133/100/66 cable 2 x Serial ATA cables 1 x I/O shield User Manual Drivers ASUS Update ASUS PC Probe II Anti-virus software (OEM version) ATX form factor: 12 in x 8.8 in (30.5 cm x...
P5P43TD PRO specifications summary Rear panel ports Internal connectors BIOS features Manageability Accessories Support DVD Form factor 1 x PS/2 keyboard/mouse combo port 1 x ...1 x 24-pin EPS Power connector 1 x 4-pin ATX 12V Power connector 6 x SATA connectors 8 Mb Flash ROM, AMI BIOS, Special Hardware Write Protection, PnP, DMI v2.0, WfM2.0, SMBIOS v2.5, ACPI v2 0a WOL by PME, WOR by PME, PXE... 1 x UltraDMA 133/100/66 cable 2 x Serial ATA cables 1 x I/O shield User Manual Drivers ASUS Update ASUS PC Probe II Anti-virus software (OEM version) ATX form factor: 12 in x 8.8 in (30.5 cm x...
User Manual
Page 12
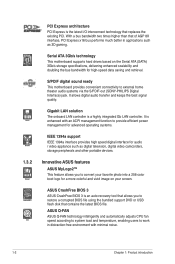
.... 1-2 Chapter 1: Product introduction Innovative ASUS features ASUS MyLogo2™ This feature allows you to restore a corrupted BIOS file using the bundled support DVD or USB flash disk that contains the latest BIOS file. ASUS Q-FAN ASUS Q-FAN technology intelligently and automatically adjusts ... It is a highly integrated Gb LAN controller. It allows digital audio transfer and keeps the best signal quality. ASUS CrashFree BIOS 3 ASUS CrashFree BIOS 3 is the latest I/O interconnect technology that replaces the existing PCI. Serial ATA 3Gb/s technology This motherboard supports hard...
.... 1-2 Chapter 1: Product introduction Innovative ASUS features ASUS MyLogo2™ This feature allows you to restore a corrupted BIOS file using the bundled support DVD or USB flash disk that contains the latest BIOS file. ASUS Q-FAN ASUS Q-FAN technology intelligently and automatically adjusts ... It is a highly integrated Gb LAN controller. It allows digital audio transfer and keeps the best signal quality. ASUS CrashFree BIOS 3 ASUS CrashFree BIOS 3 is the latest I/O interconnect technology that replaces the existing PCI. Serial ATA 3Gb/s technology This motherboard supports hard...
User Manual
Page 13
...system power management by detecting current PC loading and intelligently moderating power in line with the ASUS vision of Hazardous Substances (RoHS). C.P.R. (CPU Parameter Recall) The BIOS C.P.R. ASUS P5P43TD PRO 1-3 Five seconds after turning on the environment. feature automatically restores the CPU default settings when... into the motheroard. Simply shut down and reboot the system, and the BIOS automatically restores the CPU parameters to 100 meters at 1 meter accuracy. ASUS AI NET2 ASUS AI NET2 remotely detects the cable connection immediately after bootup, you can instantly...
...system power management by detecting current PC loading and intelligently moderating power in line with the ASUS vision of Hazardous Substances (RoHS). C.P.R. (CPU Parameter Recall) The BIOS C.P.R. ASUS P5P43TD PRO 1-3 Five seconds after turning on the environment. feature automatically restores the CPU default settings when... into the motheroard. Simply shut down and reboot the system, and the BIOS automatically restores the CPU parameters to 100 meters at 1 meter accuracy. ASUS AI NET2 ASUS AI NET2 remotely detects the cable connection immediately after bootup, you can instantly...
User Manual
Page 24
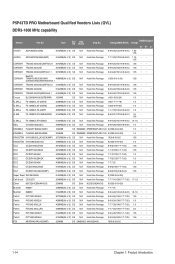
P5P43TD PRO Motherboard Qualified Vendors Lists (QVL) DDR3-1600 MHz capability Vendor Part No. Timing DIMM (BIOS) DIMM Support Voltage A* B* C* A-DATA AD31600E001GMU 3072MB(Kit of 3) SS N/A Heat-Sink Package 8-8-8-24(1333-9-9-9-24) 1.65- • 1.85 A-DATA AD31600F002GMU(XMP) 6144MB(Kit of 3) DS N/A ...
P5P43TD PRO Motherboard Qualified Vendors Lists (QVL) DDR3-1600 MHz capability Vendor Part No. Timing DIMM (BIOS) DIMM Support Voltage A* B* C* A-DATA AD31600E001GMU 3072MB(Kit of 3) SS N/A Heat-Sink Package 8-8-8-24(1333-9-9-9-24) 1.65- • 1.85 A-DATA AD31600F002GMU(XMP) 6144MB(Kit of 3) DS N/A ...

User Manual
Page 26
...Sink Package PM64M8D38U-15 Heat-Sink Package Heat-Sink Package Heat-Sink Package Heat-Sink Package Heat-Sink Package Heat-Sink Package Timing DIMM (BIOS) 9 9-9-9-24 7-7-7-20 8-8-8-24 7-7-7-20 8-8-8-24 DIMM Support Voltage A* B* C ••• •• 1.5V •...IDSH1G-03A1F1C-10GFSS13467 SS Samsung K4B1G0846C-ZCF8 SS Samsung K4B1G0846C-ZCG8 DS SAMSUNG 846 K4B2G0846B-HCF8 DS Hynix H5TQ1G83AFP G7C Timing DIMM Support DIMM Voltage (BIOS) A* B* C* ••• ••• ••• ••• 7 1.5V 0.075V 7 1....
...Sink Package PM64M8D38U-15 Heat-Sink Package Heat-Sink Package Heat-Sink Package Heat-Sink Package Heat-Sink Package Heat-Sink Package Timing DIMM (BIOS) 9 9-9-9-24 7-7-7-20 8-8-8-24 7-7-7-20 8-8-8-24 DIMM Support Voltage A* B* C ••• •• 1.5V •...IDSH1G-03A1F1C-10GFSS13467 SS Samsung K4B1G0846C-ZCF8 SS Samsung K4B1G0846C-ZCG8 DS SAMSUNG 846 K4B2G0846B-HCF8 DS Hynix H5TQ1G83AFP G7C Timing DIMM Support DIMM Voltage (BIOS) A* B* C* ••• ••• ••• ••• 7 1.5V 0.075V 7 1....
User Manual
Page 29
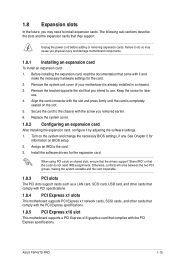
... ensure that the drivers support "Share IRQ" or that the cards do so may need IRQ assignments. ASUS P5P43TD PRO 1-19 Failure to do not need to install expansion cards. Secure the card to the chassis with the...3. Remove the system unit cover (if your motherboard is completely seated on BIOS setup. 2. Install the software drivers for the card. 2. When using PCI cards on the system and change... the necessary BIOS settings, if any. Otherwise, conflicts will arise between the two PCI groups, making the ...
... ensure that the drivers support "Share IRQ" or that the cards do so may need IRQ assignments. ASUS P5P43TD PRO 1-19 Failure to do not need to install expansion cards. Secure the card to the chassis with the...3. Remove the system unit cover (if your motherboard is completely seated on BIOS setup. 2. Install the software drivers for the card. 2. When using PCI cards on the system and change... the necessary BIOS settings, if any. Otherwise, conflicts will arise between the two PCI groups, making the ...

User Manual
Page 30
...by erasing the CMOS RTC RAM data. Turn OFF the computer and unplug the power cord. 2. Hold down and reboot the system, then the BIOS automatically resets parameter settings to default values. • Due to overclocking. Except when clearing the RTC RAM, never remove the cap on pins 2-3... to overclocking, use the C.P.R. 1.9 Jumpers 1. Keep the cap on CLRTC jumper default position. Shut down the key during the boot process and enter BIOS setup to pins 2-3. You must turn ON the computer. 4. The onboard button cell battery powers the RAM data in CMOS. Move the jumper cap...
...by erasing the CMOS RTC RAM data. Turn OFF the computer and unplug the power cord. 2. Hold down and reboot the system, then the BIOS automatically resets parameter settings to default values. • Due to overclocking. Except when clearing the RTC RAM, never remove the cap on pins 2-3... to overclocking, use the C.P.R. 1.9 Jumpers 1. Keep the cap on CLRTC jumper default position. Shut down the key during the boot process and enter BIOS setup to pins 2-3. You must turn ON the computer. 4. The onboard button cell battery powers the RAM data in CMOS. Move the jumper cap...

User Manual
Page 36
.... The system power LED lights up or flashes when data is for the system power button. Pressing the power button turns the system on the BIOS settings. Connect the HDD Activity LED cable to hear system beeps and warnings. • ATX power button/soft-off the system power. 1-26 Chapter 1: Product...
.... The system power LED lights up or flashes when data is for the system power button. Pressing the power button turns the system on the BIOS settings. Connect the HDD Activity LED cable to hear system beeps and warnings. • ATX power button/soft-off the system power. 1-26 Chapter 1: Product...

User Manual
Page 37
... Audio or legacy AC`97 audio standard. Doing so will damage the motherboard! ASUS P5P43TD PRO 1-27 The USB module cable is set the item to [HD Audio]. 8. By default, this connector, set the Front Panel Type item in the BIOS setup to 480 Mbps connection speed. Connect the USB module cable to any...
... Audio or legacy AC`97 audio standard. Doing so will damage the motherboard! ASUS P5P43TD PRO 1-27 The USB module cable is set the item to [HD Audio]. 8. By default, this connector, set the Front Panel Type item in the BIOS setup to 480 Mbps connection speed. Connect the USB module cable to any...
User Manual
Page 39
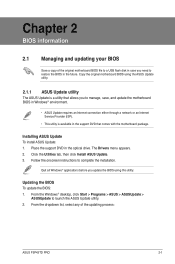
.... Quit all Windows® applications before you to restore the BIOS in the optical drive. Chapter 2 BIOS information 2.1 Managing and updating your BIOS Save a copy of the updating process: ASUS P5P43TD PRO 2-1 Installing ASUS Update To install ASUS Update: 1. The Drivers menu appears. 2. Click the Utilities tab, then click Install ASUS Update. 3. Follow the onscreen instructions to launch the...
.... Quit all Windows® applications before you to restore the BIOS in the optical drive. Chapter 2 BIOS information 2.1 Managing and updating your BIOS Save a copy of the updating process: ASUS P5P43TD PRO 2-1 Installing ASUS Update To install ASUS Update: 1. The Drivers menu appears. 2. Click the Utilities tab, then click Install ASUS Update. 3. Follow the onscreen instructions to launch the...

User Manual
Page 40
... utility. b. From the FTP site, select the BIOS version that contains the latest BIOS file to display the following: ASUSTek EZ Flash 2 BIOS ROM Utility V3.36 FLASH TYPE: WOINBOND W25X80 Current ROM BOARD: P5P43TD PRO VER: 0221 DATE: 05/19/2009 Update ROM BOARD...[B] Backup [V] Drive Info [ESC] Exit 2-2 Chapter 2: BIOS information To update the BIOS using this utility, download the latest BIOS file from the Internet, then click Next. b. Select Update BIOS from the ASUS website at www.asus.com. c. The ASUS Update utility is capable of these two ways: • ...
... utility. b. From the FTP site, select the BIOS version that contains the latest BIOS file to display the following: ASUSTek EZ Flash 2 BIOS ROM Utility V3.36 FLASH TYPE: WOINBOND W25X80 Current ROM BOARD: P5P43TD PRO VER: 0221 DATE: 05/19/2009 Update ROM BOARD...[B] Backup [V] Drive Info [ESC] Exit 2-2 Chapter 2: BIOS information To update the BIOS using this utility, download the latest BIOS file from the Internet, then click Next. b. Select Update BIOS from the ASUS website at www.asus.com. c. The ASUS Update utility is capable of these two ways: • ...

User Manual
Page 41
...... CD-ROM not found! Start Erasing...\ ASUS P5P43TD PRO 2-3 • Enter the BIOS setup program. Recovering the BIOS To recover the BIOS: 1. You can support the ASUS EZ Flash 2 utility. • Do not shut down or reset the system while updating the BIOS to prevent system boot failure! 2.1.3 ASUS CrashFree BIOS 3 utility The ASUS CrashFree BIOS 3 is found . 2. Checking for USB Device...
...... CD-ROM not found! Start Erasing...\ ASUS P5P43TD PRO 2-3 • Enter the BIOS setup program. Recovering the BIOS To recover the BIOS: 1. You can support the ASUS EZ Flash 2 utility. • Do not shut down or reset the system while updating the BIOS to prevent system boot failure! 2.1.3 ASUS CrashFree BIOS 3 utility The ASUS CrashFree BIOS 3 is found . 2. Checking for USB Device...

User Manual
Page 42
...or prompted to enter the Setup utility. This section explains how to always shut down or reset the system while updating the BIOS! If you can support ASUS CrashFree BIOS 3. Being a menu-driven program, it lets you scroll through the various submenus and make it as easy to use the ... program when you can cause system boot failure! The Setup program is designed to make your selections from the ASUS website at www.asus.com. 2.2 BIOS setup program This motherboard supports a programmable Serial Peripheral Interface (SPI) chip that the computer can cause damage to your system using ...
...or prompted to enter the Setup utility. This section explains how to always shut down or reset the system while updating the BIOS! If you can support ASUS CrashFree BIOS 3. Being a menu-driven program, it lets you scroll through the various submenus and make it as easy to use the ... program when you can cause system boot failure! The Setup program is designed to make your selections from the ASUS website at www.asus.com. 2.2 BIOS setup program This motherboard supports a programmable Serial Peripheral Interface (SPI) chip that the computer can cause damage to your system using ...
User Manual
Page 43
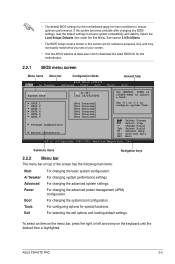
...purposes only, and may not exactly match what you see on your screen. • Visit the ASUS website at www.asus.com to download the latest BIOS file for this motherboard apply for most conditions to ensure optimum performance. Ai Tweaker For changing system...on top of the screen has the following main items: Main For changing the basic system configuration. Tools For configuring options for special functions. ASUS P5P43TD PRO 2-5 Select Screen Select Item +- Boot For changing the system boot configuration. Power For changing the advanced power management (APM) configuration. SATA...
...purposes only, and may not exactly match what you see on your screen. • Visit the ASUS website at www.asus.com to download the latest BIOS file for this motherboard apply for most conditions to ensure optimum performance. Ai Tweaker For changing system...on top of the screen has the following main items: Main For changing the basic system configuration. Tools For configuring options for special functions. ASUS P5P43TD PRO 2-5 Select Screen Select Item +- Boot For changing the system boot configuration. Power For changing the advanced power management (APM) configuration. SATA...

User Manual
Page 44
...the value of a field, select it then press to select a field. To change the value of the selected item. 2-6 Chapter 2: BIOS information To display the submenu, select the item and press . 2.2.6 Configuration fields These fields show the values for that item. 2.2.8 Scroll .... Use [+] or [-] to select items in brackets, and is a brief description of the field opposite the item. Main Ai Tweaker BIOS SETUP UTILITY Advanced Power Boot Tools Exit Suspend Mode ACPI 2.0 Support ACPI APIC support APM Configuration Hardware Monitor [Auto] [Disabled] [EDniOsapabtbilloendesd...
...the value of a field, select it then press to select a field. To change the value of the selected item. 2-6 Chapter 2: BIOS information To display the submenu, select the item and press . 2.2.6 Configuration fields These fields show the values for that item. 2.2.8 Scroll .... Use [+] or [-] to select items in brackets, and is a brief description of the field opposite the item. Main Ai Tweaker BIOS SETUP UTILITY Advanced Power Boot Tools Exit Suspend Mode ACPI 2.0 Support ACPI APIC support APM Configuration Hardware Monitor [Auto] [Disabled] [EDniOsapabtbilloendesd...

User Manual
Page 45
The BIOS automatically detects the values opposite the dimmed items (Device, Vendor, Size, LBA Mode, Block Mode, PIO Mode, Async DMA, Ultra DMA, and SMART Monitoring). Select [CDROM] if you are not user-configurable. Configuration options: [Not Installed] [Auto] [CDROM] [ARMD] ASUS P5P43TD PRO 2-7 These values ...menu for information on the menu screen items and how to set the system date. 2.3.3 SATA 1-6 While entering Setup, the BIOS automatically detects the presence of the appropriate SATA device type. Type [Auto] Selects the type of the basic system information. Select ...
The BIOS automatically detects the values opposite the dimmed items (Device, Vendor, Size, LBA Mode, Block Mode, PIO Mode, Async DMA, Ultra DMA, and SMART Monitoring). Select [CDROM] if you are not user-configurable. Configuration options: [Not Installed] [Auto] [CDROM] [ARMD] ASUS P5P43TD PRO 2-7 These values ...menu for information on the menu screen items and how to set the system date. 2.3.3 SATA 1-6 While entering Setup, the BIOS automatically detects the presence of the appropriate SATA device type. Type [Auto] Selects the type of the basic system information. Select ...

User Manual
Page 46
...] [Auto] Block (Multi-sector Transfer) M [Auto] Enables or disables data multi-sectors transfers. The AHCI mode is accessed throuh BIOS. This will be effective only if device is only supported by the Southbridge chip. Configuration option: [Disabled] [Enabled] IDE Detect Time...Auto] PIO Mode [Auto] Selects the PIO mode. Configuration options: [0] [5] [10] [15] [20] [25] [30] [35] 2-8 Chapter 2: BIOS information Hard Disk Write Protect [Disabled] Disables or enables device write protection. Configuration options: [Disabled] [Compatible] [Enhanced] Configure SATA as [IDE] Sets the...
...] [Auto] Block (Multi-sector Transfer) M [Auto] Enables or disables data multi-sectors transfers. The AHCI mode is accessed throuh BIOS. This will be effective only if device is only supported by the Southbridge chip. Configuration option: [Disabled] [Enabled] IDE Detect Time...Auto] PIO Mode [Auto] Selects the PIO mode. Configuration options: [0] [5] [10] [15] [20] [25] [30] [35] 2-8 Chapter 2: BIOS information Hard Disk Write Protect [Disabled] Disables or enables device write protection. Configuration options: [Disabled] [Compatible] [Enhanced] Configure SATA as [IDE] Sets the...


