User Manual
Page 2
... Source Software licenses. SPECIFICATIONS AND INFORMATION CONTAINED IN THIS MANUAL ARE FURNISHED FOR INFORMATIONAL USE ONLY, AND ARE SUBJECT TO CHANGE AT ANY TIME WITHOUT NOTICE, AND SHOULD NOT BE CONSTRUED AS A COMMITMENT BY ASUS. This offer is authorized in this manual may or may be no earlier than December 1, 2011, either (1) for backup purposes, without any problems...
... Source Software licenses. SPECIFICATIONS AND INFORMATION CONTAINED IN THIS MANUAL ARE FURNISHED FOR INFORMATIONAL USE ONLY, AND ARE SUBJECT TO CHANGE AT ANY TIME WITHOUT NOTICE, AND SHOULD NOT BE CONSTRUED AS A COMMITMENT BY ASUS. This offer is authorized in this manual may or may be no earlier than December 1, 2011, either (1) for backup purposes, without any problems...
User Manual
Page 10
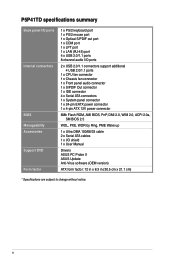
... ports 1 x CPU fan connector 1 x Chassis fan connector 1 x Front panel audio connector 1 x S/PDIF Out connector 1 x IDE connector 4 x Serial ATA connectors 1 x System panel connector 1 x 24-pin EATX power connector 1 x 4-pin ATX 12V power connector 8Mb Flash ROM, AMI BIOS, PnP, DMI 2.0, WfM 2.0, ACPI 2.0a, SM BIOS 2.5 WOL, PXE, WOR by Ring, PME Wake up 1 x Ultra DMA 100/66/33 cable 2 x Serial ATA cables 1 x I/O shield 1 x User Manual Drivers ASUS PC Probe II ASUS Update Anti-Virus software (OEM version) ATX form factor: 12 in x 8.3 in (30.5 cm x 21.1 cm) * Specifications are subject to change...
... ports 1 x CPU fan connector 1 x Chassis fan connector 1 x Front panel audio connector 1 x S/PDIF Out connector 1 x IDE connector 4 x Serial ATA connectors 1 x System panel connector 1 x 24-pin EATX power connector 1 x 4-pin ATX 12V power connector 8Mb Flash ROM, AMI BIOS, PnP, DMI 2.0, WfM 2.0, ACPI 2.0a, SM BIOS 2.5 WOL, PXE, WOR by Ring, PME Wake up 1 x Ultra DMA 100/66/33 cable 2 x Serial ATA cables 1 x I/O shield 1 x User Manual Drivers ASUS PC Probe II ASUS Update Anti-Virus software (OEM version) ATX form factor: 12 in x 8.3 in (30.5 cm x 21.1 cm) * Specifications are subject to change...
User Manual
Page 12
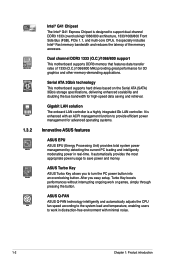
... onboard LAN controller is designed to support dual-channel DDR3 1333 (overclocking)/1066/800 architecture, 1333/1066/800 Front Side Bus (FSB), PCIe 1.1, and mutli-core CPUs. Dual channel DDR3 1333 (O.C.)/1066/800 support This motherboard supports DDR3 memory that features data transfer rates of the memory accesses. It automatically provides the most appropriate power usage to turn the PC power button into an overclocking button. Serial ATA 3Gb/s technology This motherboard supports hard drives based on the Serial ATA (SATA) 3Gb/s storage specifications...
... onboard LAN controller is designed to support dual-channel DDR3 1333 (overclocking)/1066/800 architecture, 1333/1066/800 Front Side Bus (FSB), PCIe 1.1, and mutli-core CPUs. Dual channel DDR3 1333 (O.C.)/1066/800 support This motherboard supports DDR3 memory that features data transfer rates of the memory accesses. It automatically provides the most appropriate power usage to turn the PC power button into an overclocking button. Serial ATA 3Gb/s technology This motherboard supports hard drives based on the Serial ATA (SATA) 3Gb/s storage specifications...
User Manual
Page 13
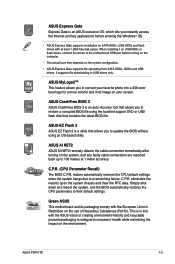
...1.2GB free disk space. ASUS CrashFree BIOS 3 ASUS CrashFree BIOS 3 is an auto-recovery tool that contains the latest BIOS file. ASUS AI NET2 ASUS AI NET2 remotely detects the cable connection immediately after turning on USB HDDs or flash drives, connect the drives to overclocking failure. feature automatically restores the CPU default settings when the system hangs due to the motherboard USB port before entering the Windows® OS. • ASUS Express Gate supports installation on SATA HDDs, USB HDDs and flash drives with at 1 meter accuracy. Green ASUS This motherboard and...
...1.2GB free disk space. ASUS CrashFree BIOS 3 ASUS CrashFree BIOS 3 is an auto-recovery tool that contains the latest BIOS file. ASUS AI NET2 ASUS AI NET2 remotely detects the cable connection immediately after turning on USB HDDs or flash drives, connect the drives to overclocking failure. feature automatically restores the CPU default settings when the system hangs due to the motherboard USB port before entering the Windows® OS. • ASUS Express Gate supports installation on SATA HDDs, USB HDDs and flash drives with at 1 meter accuracy. Green ASUS This motherboard and...
User Manual
Page 23
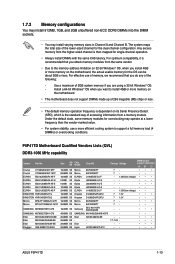
Any excess memory from a memory module. Under the default state, some memory modules for the dual-channel configuration. Size SS/ Chip DS Brand Chip NO. Use a maximum of 3GB system memory if you are using a 32-bit Windows® OS. - Hynix H5TQ1G83AFP G7C Timings Voltage DIMM socket support (Optional) A* B* C* 7- •• • 7- •• - 1.35V(low voltage) • • • -- •• • -- •• • -- •• - 1.35V(low voltage) •...
Any excess memory from a memory module. Under the default state, some memory modules for the dual-channel configuration. Size SS/ Chip DS Brand Chip NO. Use a maximum of 3GB system memory if you are using a 32-bit Windows® OS. - Hynix H5TQ1G83AFP G7C Timings Voltage DIMM socket support (Optional) A* B* C* 7- •• • 7- •• - 1.35V(low voltage) • • • -- •• • -- •• • -- •• - 1.35V(low voltage) •...
User Manual
Page 27
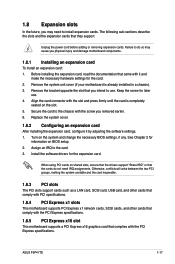
... expansion card, configure it and make the necessary hardware settings for later use . See Chapter 2 for the expansion card. Assign an IRQ to the chassis with the slot and press firmly until the card is already installed in a chassis). 3. Install the software drivers for information on the slot. 5. ASUS P5P41TD 1-17 Align the card connector with the screw you intend to use . 4. When using PCI cards on the system and change the necessary BIOS settings...
... expansion card, configure it and make the necessary hardware settings for later use . See Chapter 2 for the expansion card. Assign an IRQ to the chassis with the slot and press firmly until the card is already installed in a chassis). 3. Install the software drivers for information on the slot. 5. ASUS P5P41TD 1-17 Align the card connector with the screw you intend to use . 4. When using PCI cards on the system and change the necessary BIOS settings...
User Manual
Page 36
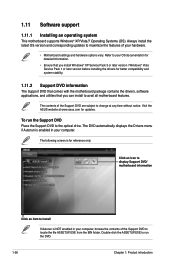
... Support DVD to locate the file ASSETUP.EXE from the BIN folder. Always install the latest OS version and corresponding updates to change at www.asus.com for better compatibility and system stability. 1.11.2 Support DVD information The Support DVD that comes with the motherboard package contains the drivers, software applications, and utilities that you install Windows® XP Service Pack 3 or later version / Windows® Vista Service Pack 1 or later version before installing the drivers for updates...
... Support DVD to locate the file ASSETUP.EXE from the BIN folder. Always install the latest OS version and corresponding updates to change at www.asus.com for better compatibility and system stability. 1.11.2 Support DVD information The Support DVD that comes with the motherboard package contains the drivers, software applications, and utilities that you install Windows® XP Service Pack 3 or later version / Windows® Vista Service Pack 1 or later version before installing the drivers for updates...
User Manual
Page 37
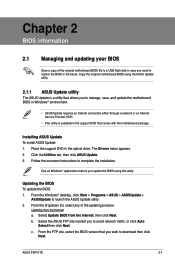
Place the support DVD in the support DVD that you update the BIOS using the ASUS Update utility. 2.1.1 ASUS Update utility The ASUS Update is a utility that allows you to manage, save, and update the motherboard BIOS in Windows® environment. • ASUS Update requires an Internet connection either through a network or an Internet Service Provider (ISP). • This utility is available in the optical drive. b. The Drivers menu appears. 2. Updating the BIOS To update the BIOS: 1. From the Windows® desktop, click Start > Programs > ASUS > ASUSUpdate > ASUSUpdate...
Place the support DVD in the support DVD that you update the BIOS using the ASUS Update utility. 2.1.1 ASUS Update utility The ASUS Update is a utility that allows you to manage, save, and update the motherboard BIOS in Windows® environment. • ASUS Update requires an Internet connection either through a network or an Internet Service Provider (ISP). • This utility is available in the optical drive. b. The Drivers menu appears. 2. Updating the BIOS To update the BIOS: 1. From the Windows® desktop, click Start > Programs > ASUS > ASUSUpdate > ASUSUpdate...
User Manual
Page 38
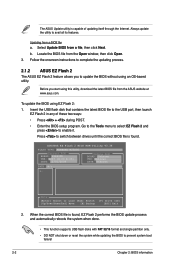
... using EZ Flash 2: 1. b. Before you to the USB port, then launch EZ Flash 2 in any of updating itself through the Internet. Select Update BIOS from a BIOS file a. Press to enable it. When the correct BIOS file is found . ASUSTek EZ Flash 2 BIOS ROM Utility V3.36 FLASH TYPE: WINBOND W25X80 Current ROM BOARD: P5P41TD VER: 0207 (H:00 B:03) DATE: 12/01/2009 Update ROM BOARD: Unknown VER: Unknown DATE: Unknown PATH: A:\ A: Note [Enter] Select or Load [Tab] Switch...
... using EZ Flash 2: 1. b. Before you to the USB port, then launch EZ Flash 2 in any of updating itself through the Internet. Select Update BIOS from a BIOS file a. Press to enable it. When the correct BIOS file is found . ASUSTek EZ Flash 2 BIOS ROM Utility V3.36 FLASH TYPE: WINBOND W25X80 Current ROM BOARD: P5P41TD VER: 0207 (H:00 B:03) DATE: 12/01/2009 Update ROM BOARD: Unknown VER: Unknown DATE: Unknown PATH: A:\ A: Note [Enter] Select or Load [Tab] Switch...
User Manual
Page 39
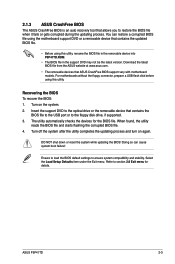
... the Load Setup Defaults item under the Exit menu. 2.1.3 ASUS CrashFree BIOS The ASUS CrashFree BIOS is an auto recovery tool that contains the updated BIOS file. • Before using this utility. You can cause system boot failure! ASUS P5P41TD 2-3 Download the latest BIOS file from the ASUS website at www.asus.com. • The removable devices that contains the BIOS file to the USB port or to the floppy disk drive, if supported. 3. Recovering the BIOS To recover the BIOS: 1. Insert the support DVD to restore the BIOS file...
... the Load Setup Defaults item under the Exit menu. 2.1.3 ASUS CrashFree BIOS The ASUS CrashFree BIOS is an auto recovery tool that contains the updated BIOS file. • Before using this utility. You can cause system boot failure! ASUS P5P41TD 2-3 Download the latest BIOS file from the ASUS website at www.asus.com. • The removable devices that contains the BIOS file to the USB port or to the floppy disk drive, if supported. 3. Recovering the BIOS To recover the BIOS: 1. Insert the support DVD to restore the BIOS file...
User Manual
Page 42
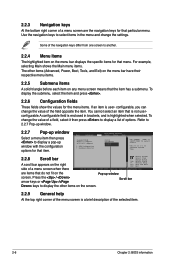
... corner of the menu screen is enclosed in the menu and change the settings. 2.2.3 Navigation keys At the bottom right corner of a menu screen are items that menu. For example, selecting Main shows the Main menu items. The other items on the menu bar displays the specific items for that the item has a submenu. Main Advanced BIOS SETUP UTILITY Power Boot Tools Exit Suspend Mode ACPI 2.0 Support ACPI APIC support APM Configuration Hardware Monitor [Auto] [Disabled] [EDniOsapabtbilloendesd] Enabled Use [ENTER], [TAB] or [SHIFT...
... corner of the menu screen is enclosed in the menu and change the settings. 2.2.3 Navigation keys At the bottom right corner of a menu screen are items that menu. For example, selecting Main shows the Main menu items. The other items on the menu bar displays the specific items for that the item has a submenu. Main Advanced BIOS SETUP UTILITY Power Boot Tools Exit Suspend Mode ACPI 2.0 Support ACPI APIC support APM Configuration Hardware Monitor [Auto] [Disabled] [EDniOsapabtbilloendesd] Enabled Use [ENTER], [TAB] or [SHIFT...
User Manual
Page 43
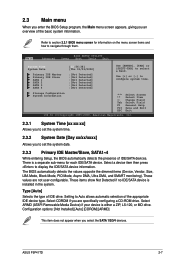
... show Not Detected if no IDE/SATA device is a separate sub-menu for information on the menu screen items and how to section 2.2.1 BIOS menu screen for each IDE/SATA device. Configuration options: [Not Installed] [Auto] [CDROM] [ARMD] This item does not appear when you an overview of IDE/SATA devices. 2.3 Main menu When you enter the BIOS Setup program, the Main menu screen appears, giving you select the SATA 1/2/3/4 devices. Use [+] or [-] to display the IDE/SATA device information. Change Field Tab Select Field...
... show Not Detected if no IDE/SATA device is a separate sub-menu for information on the menu screen items and how to section 2.2.1 BIOS menu screen for each IDE/SATA device. Configuration options: [Not Installed] [Auto] [CDROM] [ARMD] This item does not appear when you an overview of IDE/SATA devices. 2.3 Main menu When you enter the BIOS Setup program, the Main menu screen appears, giving you select the SATA 1/2/3/4 devices. Use [+] or [-] to display the IDE/SATA device information. Change Field Tab Select Field...
User Manual
Page 44
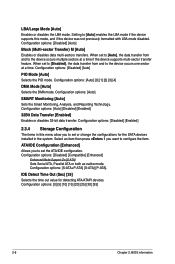
Configuration options: [Disabled] [Auto] PIO Mode [Auto] Selects the PIO mode. Configuration options: [Auto] [Disabled] [Enabled] 32Bit Data Transfer [Enabled] Enables or disables 32-bit data transfer. Configuration options: [Disabled] [Compatible] [Enhanced] Enhanced Mode Support On [S-ATA] Sets Serial ATA, Parallel ATA or both as native mode. When set to [Disabled], the data transfer from and to the device occurs multiple sectors at a time. Configuration options: [Auto] SMART Monitoring [Auto] Sets the Smart Monitoring, Analysis, and Reporting Technology. ATA/IDE Configuration [...
Configuration options: [Disabled] [Auto] PIO Mode [Auto] Selects the PIO mode. Configuration options: [Auto] [Disabled] [Enabled] 32Bit Data Transfer [Enabled] Enables or disables 32-bit data transfer. Configuration options: [Disabled] [Compatible] [Enhanced] Enhanced Mode Support On [S-ATA] Sets Serial ATA, Parallel ATA or both as native mode. When set to [Disabled], the data transfer from and to the device occurs multiple sectors at a time. Configuration options: [Auto] SMART Monitoring [Auto] Sets the Smart Monitoring, Analysis, and Reporting Technology. ATA/IDE Configuration [...

User Manual
Page 45
... for the system. System Memory Displays the auto-detected system memory. 2.4 Advanced menu The Advanced menu items allow you to individually set overclocking parameters. Ai Overclocking [Auto] Allows selection of the preset overclocking configuration options: Manual - Auto - The BIOS automatically detects the items in this menu. Main Advanced Power BIOS SETUP UTILITY Boot Tools Exit JumperFree Configuration CPU Configuration Chipset Onboard Devices Configuration USB Configuration PCIPnP Adjust System frequency/voltage. 2.4.1 JumperFree Configuration The items in this...
... for the system. System Memory Displays the auto-detected system memory. 2.4 Advanced menu The Advanced menu items allow you to individually set overclocking parameters. Ai Overclocking [Auto] Allows selection of the preset overclocking configuration options: Manual - Auto - The BIOS automatically detects the items in this menu. Main Advanced Power BIOS SETUP UTILITY Boot Tools Exit JumperFree Configuration CPU Configuration Chipset Onboard Devices Configuration USB Configuration PCIPnP Adjust System frequency/voltage. 2.4.1 JumperFree Configuration The items in this...
User Manual
Page 48
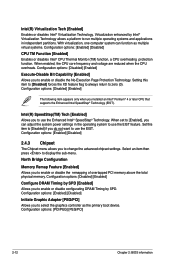
...® Virtualization Technology allows a platform to run multiple operating systems and applications in the operating system to use the EIST feature. When set to select the graphics controller as multiple virtual systems. Configuration options: [Enabled] [Disabled] CPU TM Function [Enabled] Enables or disables Intel® CPU Thermal Monitor (TM) function, a CPU overheating protection function. North Bridge Configuration Memory Remap Feature [Enabled] Allows you to enable or disable the remapping of overlapped PCI memory above the...
...® Virtualization Technology allows a platform to run multiple operating systems and applications in the operating system to use the EIST feature. When set to select the graphics controller as multiple virtual systems. Configuration options: [Enabled] [Disabled] CPU TM Function [Enabled] Enables or disables Intel® CPU Thermal Monitor (TM) function, a CPU overheating protection function. North Bridge Configuration Memory Remap Feature [Enabled] Allows you to enable or disable the remapping of overlapped PCI memory above the...
User Manual
Page 49
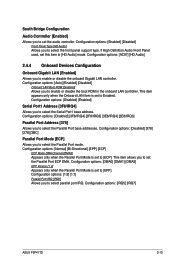
...] [Bi-Directional] [EPP] [ECP] ECP Mode DMA Channel [DMA3] Appears only when the Parallel Port Mode is set to [ECP]. Configuration options: [1.9] [1.7] Parallel Port IRQ [IRQ7] Allows you to enable or disable the boot ROM in the onboard LAN controller. If High Definition Audio Front Panel used, set the audio controller. Configuration options: [Auto] [Enabled] [Disabled] Onboard LAN Boot ROM [Disabled] Allows you to select parallel port IRQ. This item appears only when the Onboard LAN item is set to Enabled. Configuration options: [Disabled] [3F8/IRQ4] [2F8/IRQ3] [3E8/IRQ4...
...] [Bi-Directional] [EPP] [ECP] ECP Mode DMA Channel [DMA3] Appears only when the Parallel Port Mode is set to [ECP]. Configuration options: [1.9] [1.7] Parallel Port IRQ [IRQ7] Allows you to enable or disable the boot ROM in the onboard LAN controller. If High Definition Audio Front Panel used, set the audio controller. Configuration options: [Auto] [Enabled] [Disabled] Onboard LAN Boot ROM [Disabled] Allows you to select parallel port IRQ. This item appears only when the Onboard LAN item is set to Enabled. Configuration options: [Disabled] [3F8/IRQ4] [2F8/IRQ3] [3E8/IRQ4...

User Manual
Page 50
... or disable USB 2.0 controller. Configuration options: [Auto] [Floppy] [Forced FDD] [Hard Disk] [CDROM] 2-14 Chapter 2: BIOS information Configuration options: [Enabled] [Disabled] Legacy USB Support [Auto] Allows you to initialize. If detected, the USB controller legacy mode is plugged. Configuration options: [FullSpeed] [HiSpeed] The following items may only appear when a USB storage device is enabled. The Module Version and USB Devices Enabled items show the auto-detected values. USB Mass Storage Device Configuration USB Mass Storage Reset Delay [20 Sec] Allows you to set the...
... or disable USB 2.0 controller. Configuration options: [Auto] [Floppy] [Forced FDD] [Hard Disk] [CDROM] 2-14 Chapter 2: BIOS information Configuration options: [Enabled] [Disabled] Legacy USB Support [Auto] Allows you to initialize. If detected, the USB controller legacy mode is plugged. Configuration options: [FullSpeed] [HiSpeed] The following items may only appear when a USB storage device is enabled. The Module Version and USB Devices Enabled items show the auto-detected values. USB Mass Storage Device Configuration USB Mass Storage Reset Delay [20 Sec] Allows you to set the...
User Manual
Page 51
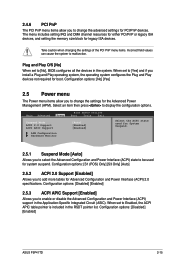
... press to malfunction. Main Advanced Power BIOS SETUP UTILITY Boot Tools Exit Suspend Mode [Auto] ACPI 2.0 Support [Enabled] ACPI APIC Support [Enabled] APM Configuration Hardware Monitor Select the ACPI state used for System Suspend. 2.5.1 Suspend Mode [Auto] Allows you to select the Advanced Configuration and Power Interface (ACPI) state to be used for boot. Configuration options: [Disabled] [Enabled] ASUS P5P41TD 2-15 When set to [Yes] and if you install a Plug and Play operating system, the operating system configures the Plug and Play devices not required for system...
... press to malfunction. Main Advanced Power BIOS SETUP UTILITY Boot Tools Exit Suspend Mode [Auto] ACPI 2.0 Support [Enabled] ACPI APIC Support [Enabled] APM Configuration Hardware Monitor Select the ACPI state used for System Suspend. 2.5.1 Suspend Mode [Auto] Allows you to select the Advanced Configuration and Power Interface (ACPI) state to be used for boot. Configuration options: [Disabled] [Enabled] ASUS P5P41TD 2-15 When set to [Yes] and if you install a Plug and Play operating system, the operating system configures the Plug and Play devices not required for system...
User Manual
Page 54
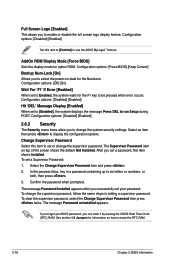
... Change Supervisor Password then press twice. After you successfully set your BIOS password, you can clear it by erasing the CMOS Real Time Clock (RTC) RAM. To set a Supervisor Password: 1. See section 1.9 Jumpers for the NumLock. Configuration options: [Disabled] [Enabled] Set this item to enable or disable the full screen logo display feature. Configuration options: [Force BIOS] [Keep Current] Bootup Num-Lock [On] Allows you to use the ASUS MyLogo2™ feature. Configuration options: [Disabled] [Enabled] Hit 'DEL' Message Display [Enabled] When set...
... Change Supervisor Password then press twice. After you successfully set your BIOS password, you can clear it by erasing the CMOS Real Time Clock (RTC) RAM. To set a Supervisor Password: 1. See section 1.9 Jumpers for the NumLock. Configuration options: [Disabled] [Enabled] Set this item to enable or disable the full screen logo display feature. Configuration options: [Force BIOS] [Keep Current] Bootup Num-Lock [On] Allows you to use the ASUS MyLogo2™ feature. Configuration options: [Disabled] [Enabled] Hit 'DEL' Message Display [Enabled] When set...
User Manual
Page 56
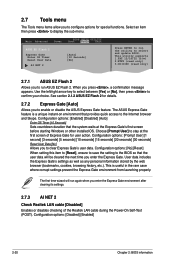
... Express Gate's first screen before starting Windows or other installed OS. The ASUS Express Gate feature is useful in the rare case where corrupt settings prevent the Express Gate environment from launching properly. The first time wizard will be cleared the next time you press , a confirmation message appears. Main Advanced Power BIOS SETUP UTILITY Boot Tools Exit ASUS EZ Flash 2 Express Gate Enter OS Timer Reset User Data AI NET 2 [Auto] [10 Seconds] [No] Press ENTER...
... Express Gate's first screen before starting Windows or other installed OS. The ASUS Express Gate feature is useful in the rare case where corrupt settings prevent the Express Gate environment from launching properly. The first time wizard will be cleared the next time you press , a confirmation message appears. Main Advanced Power BIOS SETUP UTILITY Boot Tools Exit ASUS EZ Flash 2 Express Gate Enter OS Timer Reset User Data AI NET 2 [Auto] [10 Seconds] [No] Press ENTER...


