
User Guide
Page 6
... entering the OS.... 5-63 5.5.2 Creating a SATA RAID driver disk in Windows 5-63 Chapter 6: NVIDIA® SLI™ technology support 6.1 Overview 6-1 Requirements 6-1 6.2 Graphics card setup 6-2 6.2.1 Installing three SLI-ready graphics cards 6-2 6.2.2 Installing two SLI-ready graphics cards 6-5 6.2.3 Installing the device drivers 6-6 6.2.4 Enabling the NVIDIA® SLI™ technology in Windows®..... 6-6 Appendix: CPU features A.1 Intel® EM64T A-1 vi Contents 5.2.2 Drivers menu 5-2 5.2.3 Utilities menu 5-3 5.2.4 Make Disk menu 5-5 5.2.5 Manual menu 5-6 5.2.6 ASUS...
... entering the OS.... 5-63 5.5.2 Creating a SATA RAID driver disk in Windows 5-63 Chapter 6: NVIDIA® SLI™ technology support 6.1 Overview 6-1 Requirements 6-1 6.2 Graphics card setup 6-2 6.2.1 Installing three SLI-ready graphics cards 6-2 6.2.2 Installing two SLI-ready graphics cards 6-5 6.2.3 Installing the device drivers 6-6 6.2.4 Enabling the NVIDIA® SLI™ technology in Windows®..... 6-6 Appendix: CPU features A.1 Intel® EM64T A-1 vi Contents 5.2.2 Drivers menu 5-2 5.2.3 Utilities menu 5-3 5.2.4 Make Disk menu 5-5 5.2.5 Manual menu 5-6 5.2.6 ASUS...
User Guide
Page 23
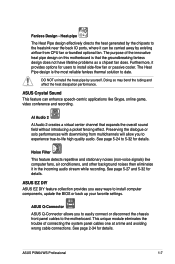
.... ASUS P5N64 WS Professional 1-7 Fanless Design - ASUS Q-Connector ASUS Q-Connector allows you to experience true-to date. DO NOT uninstall the heat-pipe by existing airflow from multichannels will allow you to easily connect or disconnect the chassis front panel cables to install side-flow fan or passive cooler. AI Audio 2 AI Audio 2 creates a virtual center channel that the groundbreaking fanless design does not have lifetime problems as a chipset fan...
.... ASUS P5N64 WS Professional 1-7 Fanless Design - ASUS Q-Connector ASUS Q-Connector allows you to experience true-to date. DO NOT uninstall the heat-pipe by existing airflow from multichannels will allow you to easily connect or disconnect the chassis front panel cables to install side-flow fan or passive cooler. AI Audio 2 AI Audio 2 creates a virtual center channel that the groundbreaking fanless design does not have lifetime problems as a chipset fan...
User Guide
Page 48
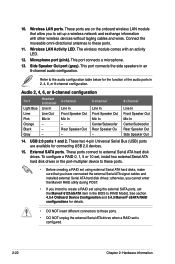
... LAN Activity LED. These two 4-pin Universal Serial Bus (USB) ports are on the onboard wireless LAN module that allow you to set using external Serial ATA hard disks, make sure that you intend to these ports. • Before creating a RAID set using the external SATA ports, set is configured. 2-22 Chapter 2: Hardware information Connect the moveable omni-directional antennas to create a RAID set up a wireless network and exchange information with an activity LED. 12. Audio 2, 4, 6, or 8-channel configuration Port Light Blue...
... LAN Activity LED. These two 4-pin Universal Serial Bus (USB) ports are on the onboard wireless LAN module that allow you to set using external Serial ATA hard disks, make sure that you intend to these ports. • Before creating a RAID set using the external SATA ports, set is configured. 2-22 Chapter 2: Hardware information Connect the moveable omni-directional antennas to create a RAID set up a wireless network and exchange information with an activity LED. 12. Audio 2, 4, 6, or 8-channel configuration Port Light Blue...
User Guide
Page 54
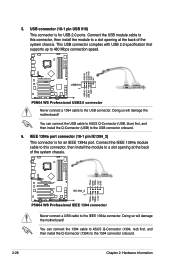
... Q-Connector (USB) to the USB connector onboard. 6. IEEE 1394a port connector (10-1 pin IE1394_2) This connector is for an IEEE 1394a port. This USB connector complies with USB 2.0 specification that supports up to the IEEE 1394a connector. You can connect the 1394 cable to ASUS Q-Connector (1394, red) first, and then install the Q-Connector (1394) to a slot opening at the back of the system chassis. TPA2GND TPB2+12V GND TPA2+ GND TPB2+ +12V P5N64 WS PRO IE1394_2 PIN 1 P5N64 WS...
... Q-Connector (USB) to the USB connector onboard. 6. IEEE 1394a port connector (10-1 pin IE1394_2) This connector is for an IEEE 1394a port. This USB connector complies with USB 2.0 specification that supports up to the IEEE 1394a connector. You can connect the 1394 cable to ASUS Q-Connector (1394, red) first, and then install the Q-Connector (1394) to a slot opening at the back of the system chassis. TPA2GND TPB2+12V GND TPA2+ GND TPB2+ +12V P5N64 WS PRO IE1394_2 PIN 1 P5N64 WS...

User Guide
Page 69
... case you to manage and update the motherboard Basic Input/Output System (BIOS) setup. 1. Copy the original motherboard BIOS using a floppy disk or USB flash disk.) 3. Click the Utilities tab, then click Install ASUS Update VX.XX.XX. 3. This utility is a utility that comes with the motherboard package. The Drivers menu appears. 2. ASUS Update requires an Internet connection either through a network or an Internet Service Provider (ISP). Save a copy of the original motherboard BIOS file to a bootable floppy disk or USB flash disk in the support DVD...
... case you to manage and update the motherboard Basic Input/Output System (BIOS) setup. 1. Copy the original motherboard BIOS using a floppy disk or USB flash disk.) 3. Click the Utilities tab, then click Install ASUS Update VX.XX.XX. 3. This utility is a utility that comes with the motherboard package. The Drivers menu appears. 2. ASUS Update requires an Internet connection either through a network or an Internet Service Provider (ISP). Save a copy of the original motherboard BIOS file to a bootable floppy disk or USB flash disk in the support DVD...
User Guide
Page 76
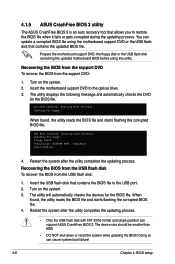
... the motherboard support DVD to restore the BIOS file when it fails or gets corrupted during the updating process. Starting BIOS recovery... Starting BIOS recovery... Insert the USB flash disk that contains the updated BIOS file. Restart the system after the utility completes the updating process. Turn on the system. 3. The utility displays the following message and automatically checks the DVD for floppy... The device size should be smaller than 8GB. • DO NOT shut down or reset...
... the motherboard support DVD to restore the BIOS file when it fails or gets corrupted during the updating process. Starting BIOS recovery... Starting BIOS recovery... Insert the USB flash disk that contains the updated BIOS file. Restart the system after the utility completes the updating process. Turn on the system. 3. The utility displays the following message and automatically checks the DVD for floppy... The device size should be smaller than 8GB. • DO NOT shut down or reset...
User Guide
Page 81
... options: [Not Installed] [Auto] [CDROM] [ARMD] LBA/Large Mode [Auto] Enables or disables the LBA mode. Configuration options: [Auto] [0] [1] [2] [3] [4] ASUS P5N64 WS Professional 4-13 When set to [Disabled], the data transfer from and to the system. 4.3.5 Primary IDE Master/Slave While entering Setup, the BIOS automatically detects the presence of IDE drive. There is a separate sub-menu for each IDE device. These values are specifically configuring a CD-ROM drive. Setting to display the IDE device information. Configuration options: [Disabled] [Auto] PIO Mode [Auto...
... options: [Not Installed] [Auto] [CDROM] [ARMD] LBA/Large Mode [Auto] Enables or disables the LBA mode. Configuration options: [Auto] [0] [1] [2] [3] [4] ASUS P5N64 WS Professional 4-13 When set to [Disabled], the data transfer from and to the system. 4.3.5 Primary IDE Master/Slave While entering Setup, the BIOS automatically detects the presence of IDE drive. There is a separate sub-menu for each IDE device. These values are specifically configuring a CD-ROM drive. Setting to display the IDE device information. Configuration options: [Disabled] [Auto] PIO Mode [Auto...

User Guide
Page 82
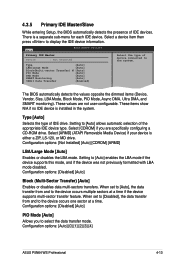
... UTILITY Third IDE Master Device : Hard Disk Vendor : HDT722516DLA380 Size : 164.7GB LBA Mode : Supported Block Mode : 16Sectors PIO Mode : 4 Async DMA : MultiWord DMA-2 Ultra DMA : Ultra DMA-6 SMART Monitoring: Supported Select the type of SATA devices. Configuration options: [Disabled] [Auto] 4-14 Chapter 4: BIOS setup These items show N/A if no SATA device is a separate sub-menu for each SATA device. Configuration options: [Disabled] [Enabled] 4.3.6 SATA 1~6 While entering Setup, the BIOS automatically detects the presence of device connected to display...
... UTILITY Third IDE Master Device : Hard Disk Vendor : HDT722516DLA380 Size : 164.7GB LBA Mode : Supported Block Mode : 16Sectors PIO Mode : 4 Async DMA : MultiWord DMA-2 Ultra DMA : Ultra DMA-6 SMART Monitoring: Supported Select the type of SATA devices. Configuration options: [Disabled] [Auto] 4-14 Chapter 4: BIOS setup These items show N/A if no SATA device is a separate sub-menu for each SATA device. Configuration options: [Disabled] [Enabled] 4.3.6 SATA 1~6 While entering Setup, the BIOS automatically detects the presence of device connected to display...
User Guide
Page 83
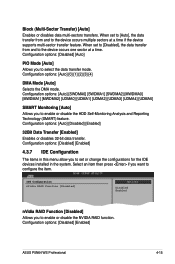
... options: [Auto] [0] [1] [2] [3] [4] DMA Mode [Auto] Selects the DMA mode. Configuration options: [Auto] [Disabled] [Enabled] 32Bit Data Transfer [Enabled] Enables or disables 32-bit data transfer. Block (Multi-Sector Transfer) [Auto] Enables or disables data multi-sectors transfers. When set or change the configurations for the IDE devices installed in this menu allow you to configure the item. Select an item then press if you to enable or disable the HDD Self-Monitoring Analysis and Reporting Technology (SMART) feature. Configuration options: [Disabled] [Auto] PIO Mode [Auto...
... options: [Auto] [0] [1] [2] [3] [4] DMA Mode [Auto] Selects the DMA mode. Configuration options: [Auto] [Disabled] [Enabled] 32Bit Data Transfer [Enabled] Enables or disables 32-bit data transfer. Block (Multi-Sector Transfer) [Auto] Enables or disables data multi-sectors transfers. When set or change the configurations for the IDE devices installed in this menu allow you to configure the item. Select an item then press if you to enable or disable the HDD Self-Monitoring Analysis and Reporting Technology (SMART) feature. Configuration options: [Disabled] [Auto] PIO Mode [Auto...
User Guide
Page 85
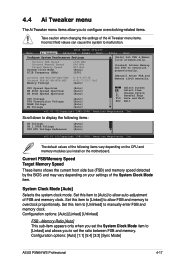
... the Ai Tweaker menu items. Incorrect field values can cause the system to malfunction. System Clock Mode [Auto] Selects the system clock mode. Set this item to [Unlinked] to overclock proportionally. [Manual] Enter FSB and Memory clock manually. Configuration options: [Auto] [1:1] [5:4] [3:2] [Sync Mode] ASUS P5N64 WS Professional 4-17 The default values of FSB and memory clock. Main Ai Tweaker BIOS SETUP UTILITY Advanced Power Boot Configure System Performance Settings Current FSB Speed Current Memory Speed Target Memory Speed System Clock Mode PCIE Frequency (MHz...
... the Ai Tweaker menu items. Incorrect field values can cause the system to malfunction. System Clock Mode [Auto] Selects the system clock mode. Set this item to [Unlinked] to overclock proportionally. [Manual] Enter FSB and Memory clock manually. Configuration options: [Auto] [1:1] [5:4] [3:2] [Sync Mode] ASUS P5N64 WS Professional 4-17 The default values of FSB and memory clock. Main Ai Tweaker BIOS SETUP UTILITY Advanced Power Boot Configure System Performance Settings Current FSB Speed Current Memory Speed Target Memory Speed System Clock Mode PCIE Frequency (MHz...
User Guide
Page 89
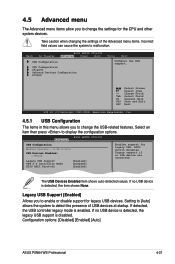
... UTILITY USB Configuration Module Version - 2.24.3-13.4 USB Devices Enabled: 1 Mouse Legacy USB Support [Enabled] USB 2.0 Controller Mode [HiSpeed] BIOS EHCI Hand-off [Enabled] Enables support for the CPU and other system devices. Configuration options: [Disabled] [Enabled] [Auto] ASUS P5N64 WS Professional 4-21 Change Field Tab Select Field F1 General Help F10 Save and Exit ESC Exit v02.61 (C)Copyright 1985-2008, American Megatrends, Inc. 4.5.1 USB Configuration The items in this menu allows you to enable or disable support for legacy USB devices. The USB Devices Enabled...
... UTILITY USB Configuration Module Version - 2.24.3-13.4 USB Devices Enabled: 1 Mouse Legacy USB Support [Enabled] USB 2.0 Controller Mode [HiSpeed] BIOS EHCI Hand-off [Enabled] Enables support for the CPU and other system devices. Configuration options: [Disabled] [Enabled] [Auto] ASUS P5N64 WS Professional 4-21 Change Field Tab Select Field F1 General Help F10 Save and Exit ESC Exit v02.61 (C)Copyright 1985-2008, American Megatrends, Inc. 4.5.1 USB Configuration The items in this menu allows you to enable or disable support for legacy USB devices. The USB Devices Enabled...

User Guide
Page 90
... can also use the and keys to set the ratio between CPU Core Clock and the FSB Frequency. USB 2.0 Controller Mode [HiSpeed] Allows you to set the USB 2.0 controller mode to cool down. Configuration options: [Disabled] [Enabled] CPU TM function [Enabled] This function enables the overheated CPU to throttle the clock speed to HiSpeed (480 Mbps) or FullSpeed (12 Mbps). This item appears only when you set the Legacy USB Support item to [Enabled] or [Auto]. BIOS SETUP UTILITY Advanced Configure advanced CPU settings Manufacturer:Intel...
... can also use the and keys to set the ratio between CPU Core Clock and the FSB Frequency. USB 2.0 Controller Mode [HiSpeed] Allows you to set the USB 2.0 controller mode to cool down. Configuration options: [Disabled] [Enabled] CPU TM function [Enabled] This function enables the overheated CPU to throttle the clock speed to HiSpeed (480 Mbps) or FullSpeed (12 Mbps). This item appears only when you set the Legacy USB Support item to [Enabled] or [Auto]. BIOS SETUP UTILITY Advanced Configure advanced CPU settings Manufacturer:Intel...
User Guide
Page 91
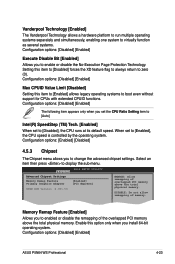
BIOS SETUP UTILITY Advanced Advanced Chipset Settings Memory Remap Feature Primary Graphics Adapter [Enabled] [PCI Express] NVMM ROM Version :4.081.59 ENABLE: Allow remapping of overlapped PCI memory above the total physical memory. Select an item then press to [Enabled], the CPU speed is controlled by the operating system. Memory Remap Feature [Enabled] Allows you to enabled or disable the remapping of memory. Configuration options: [Disabled] [Enabled] ASUS P5N64 WS Professional 4-23 Setting this item to [Enabled] allows legacy operating systems to boot even ...
BIOS SETUP UTILITY Advanced Advanced Chipset Settings Memory Remap Feature Primary Graphics Adapter [Enabled] [PCI Express] NVMM ROM Version :4.081.59 ENABLE: Allow remapping of overlapped PCI memory above the total physical memory. Select an item then press to [Enabled], the CPU speed is controlled by the operating system. Memory Remap Feature [Enabled] Allows you to enabled or disable the remapping of memory. Configuration options: [Disabled] [Enabled] ASUS P5N64 WS Professional 4-23 Setting this item to [Enabled] allows legacy operating systems to boot even ...

User Guide
Page 94
Main Ai Tweaker BIOS SETUP UTILITY Advanced Power Boot Tools Exit Suspend Mode Repost Video on S3/STR resume. APM Configuration Hardware Monitor Select Screen Select Item +- Change Option F1 General Help F10 Save and Exit ESC Exit v02.61 (C)Copyright 1985-2008, American Megatrends, Inc. 4.6.1 Suspend Mode [Auto] Allows you to select the Advanced Configuration and Power Interface (ACPI) state to enable or disable the Advanced Configuration and Power Interface (ACPI) support in the...
Main Ai Tweaker BIOS SETUP UTILITY Advanced Power Boot Tools Exit Suspend Mode Repost Video on S3/STR resume. APM Configuration Hardware Monitor Select Screen Select Item +- Change Option F1 General Help F10 Save and Exit ESC Exit v02.61 (C)Copyright 1985-2008, American Megatrends, Inc. 4.6.1 Suspend Mode [Auto] Allows you to select the Advanced Configuration and Power Interface (ACPI) state to enable or disable the Advanced Configuration and Power Interface (ACPI) support in the...

User Guide
Page 100
... on how to disabled password. If you forget your password. The message "Password Installed" appears after you successfully set or change the supervisor password. 4.7.3 Security The Security menu items allow you to change other items appear to allow you to change the system security settings. Confirm the password when prompted. BIOS SETUP UTILITY Boot Security Settings Supervisor Password User Password :Not Installed :Not Installed to display the configuration options. Change Supervisor Password Change User Password Select Screen Select Item Enter Change F1 General Help...
... on how to disabled password. If you forget your password. The message "Password Installed" appears after you successfully set or change the supervisor password. 4.7.3 Security The Security menu items allow you to change other items appear to allow you to change the system security settings. Confirm the password when prompted. BIOS SETUP UTILITY Boot Security Settings Supervisor Password User Password :Not Installed :Not Installed to display the configuration options. Change Supervisor Password Change User Password Select Screen Select Item Enter Change F1 General Help...

User Guide
Page 102
... Screen Select Item +- ASUSTek EZ Flash 2 BIOS ROM Utility V3.24 FLASH TYPE: SST 49LF080/A LPC Current ROM BOARD: P5N64-WS PRO VER: 0136 DATE: 03/19/2008 Update ROM BOARD: Unknown VER: Unknown DATE: Unknown PATH: A:\ A: C: Note [Enter] Select or Load [Tab] Switch [B] Backup [ESC] Exit [Up/Down/Home/End] Move 4-34 Chapter 4: BIOS setup Profile AI NET 2 Press ENTER to run ASUS EZ Flash 2. Main Ai Tweaker BIOS SETUP UTILITY Advanced Power Boot Tools Exit ASUS EZ Flash 2 Express Gate [Enabled] Reset User...
... Screen Select Item +- ASUSTek EZ Flash 2 BIOS ROM Utility V3.24 FLASH TYPE: SST 49LF080/A LPC Current ROM BOARD: P5N64-WS PRO VER: 0136 DATE: 03/19/2008 Update ROM BOARD: Unknown VER: Unknown DATE: Unknown PATH: A:\ A: C: Note [Enter] Select or Load [Tab] Switch [B] Backup [ESC] Exit [Up/Down/Home/End] Move 4-34 Chapter 4: BIOS setup Profile AI NET 2 Press ENTER to run ASUS EZ Flash 2. Main Ai Tweaker BIOS SETUP UTILITY Advanced Power Boot Tools Exit ASUS EZ Flash 2 Express Gate [Enabled] Reset User...

User Guide
Page 109
... install Windows® XP Service Pack 2 or later versions before installing the drivers for better compatibility and system stability. 5.2 Support DVD information The support DVD that came with the motherboard package contains the drivers, software applications, and utilities that you can install to change at any time without notice. Visit the ASUS website(www.asus.com) for reference only. ASUS P5N64 WS Professional 5-1 Click an icon to display support DVD/motherboard information Click an item to install...
... install Windows® XP Service Pack 2 or later versions before installing the drivers for better compatibility and system stability. 5.2 Support DVD information The support DVD that came with the motherboard package contains the drivers, software applications, and utilities that you can install to change at any time without notice. Visit the ASUS website(www.asus.com) for reference only. ASUS P5N64 WS Professional 5-1 Click an icon to display support DVD/motherboard information Click an item to install...

User Guide
Page 149
... installing the hard disk drives, make sure to configure as RAID. Save your RAID setup. See section 4.3.7 IDE Configuration for six independent Serial ATA channels. For optimal performance, install identical drives of the same model and capacity when creating a disk array. Enable the SATA 1/2/3/4/5/6 drive(s) that you want to set the BIOS RAID items: 1. ASUS P5N64 WS Professional 5-41 Connect the SATA signal cables. 3. Refer to enter the BIOS Setup Utility. 2. Boot the system and press during the Power-On Self-Test (POST) to the RAID controllers user manual...
... installing the hard disk drives, make sure to configure as RAID. Save your RAID setup. See section 4.3.7 IDE Configuration for six independent Serial ATA channels. For optimal performance, install identical drives of the same model and capacity when creating a disk array. Enable the SATA 1/2/3/4/5/6 drive(s) that you want to set the BIOS RAID items: 1. ASUS P5N64 WS Professional 5-41 Connect the SATA signal cables. 3. Refer to enter the BIOS Setup Utility. 2. Boot the system and press during the Power-On Self-Test (POST) to the RAID controllers user manual...

User Guide
Page 172
... floppy disk drive. 3. Follow the succeeding screen instructions to complete the installation. Follow the succeeding screen instructions to complete the installation. 5-64 Chapter 5: Software support To install the RAID driver in Windows® XP: 1. During the OS installation, the system prompts you to press the F6 key to install third-party SCSI or RAID driver. 2. During the OS installation, select NVIDIA nForce Serial ATA Controller. 3. Insert the floppy disk with RAID driver into the floppy disk drive. 2. To install the RAID driver in Windows...
... floppy disk drive. 3. Follow the succeeding screen instructions to complete the installation. Follow the succeeding screen instructions to complete the installation. 5-64 Chapter 5: Software support To install the RAID driver in Windows® XP: 1. During the OS installation, the system prompts you to press the F6 key to install third-party SCSI or RAID driver. 2. During the OS installation, select NVIDIA nForce Serial ATA Controller. 3. Insert the floppy disk with RAID driver into the floppy disk drive. 2. To install the RAID driver in Windows...

User Guide
Page 180
6.2.3 Installing the device drivers Refer to the documentation that your PCI Express graphics card driver supports the NVIDIA® SLI™ technology. Download the latest driver from the NVIDIA website (www.nvidia.com). • If you cannot see the NVIDIA Control Panel item in NVIDIA® Control Panel under Windows® Vista™ OS. Launching the NVIDIA Control Panel You can launch the NVIDIA Control Panel by Windows® Vista™ only. 6.2.4 Enabling the NVIDIA...
6.2.3 Installing the device drivers Refer to the documentation that your PCI Express graphics card driver supports the NVIDIA® SLI™ technology. Download the latest driver from the NVIDIA website (www.nvidia.com). • If you cannot see the NVIDIA Control Panel item in NVIDIA® Control Panel under Windows® Vista™ OS. Launching the NVIDIA Control Panel You can launch the NVIDIA Control Panel by Windows® Vista™ only. 6.2.4 Enabling the NVIDIA...


