
User Manual
Page 11
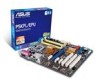
... contents Check your motherboard package for the following items. Motherboard Cables Accessories Application DVD Documentation ASUS P5KPL/EPU motherboard 1 x Serial ATA cable 1 x Ultra DMA 100/66 cable 1 x I/O shield ASUS motherboard support DVD User Manual If any of ASUS quality motherboards! ASUS P5KPL/EPU 1-1 Thank you start installing the motherboard, and hardware devices on it another standout in the...
... contents Check your motherboard package for the following items. Motherboard Cables Accessories Application DVD Documentation ASUS P5KPL/EPU motherboard 1 x Serial ATA cable 1 x Ultra DMA 100/66 cable 1 x I/O shield ASUS motherboard support DVD User Manual If any of ASUS quality motherboards! ASUS P5KPL/EPU 1-1 Thank you start installing the motherboard, and hardware devices on it another standout in the...

User Manual
Page 13
... key applications before entering the Windows® OS. • The actual boot time depends on the system configuration. • ASUS Express Gate supports file uploading from SATA HDDs, ODDs and USB drives and downloading to USB drives only. feature automatically restores the...are reported back up to 100 meters at 1 meter accuracy. ASUS P5KPL/EPU 1-3 ASUS AI NET2 ASUS AI NET2 remotely detects the cable connection immediately after turning on the environment. C.P.R. ASUS EZ Flash 2 ASUS EZ Flash 2 is an ASUS exclusive OS that provides you to their default settings. Simply ...
... key applications before entering the Windows® OS. • The actual boot time depends on the system configuration. • ASUS Express Gate supports file uploading from SATA HDDs, ODDs and USB drives and downloading to USB drives only. feature automatically restores the...are reported back up to 100 meters at 1 meter accuracy. ASUS P5KPL/EPU 1-3 ASUS AI NET2 ASUS AI NET2 remotely detects the cable connection immediately after turning on the environment. C.P.R. ASUS EZ Flash 2 ASUS EZ Flash 2 is an ASUS exclusive OS that provides you to their default settings. Simply ...

User Manual
Page 15
.... 1.5 Motherboard overview Before you install the motherboard, study the configuration of your chassis to the chassis. Place this side towards the rear of the chassis ASUS P5KPL/EPU 1-5 Failure to do so can damage the motherboard.
.... 1.5 Motherboard overview Before you install the motherboard, study the configuration of your chassis to the chassis. Place this side towards the rear of the chassis ASUS P5KPL/EPU 1-5 Failure to do so can damage the motherboard.

User Manual
Page 17
...; Technology (EIST) and Hyper-Threading Technology. 1.6.1 Installing the CPU To install a CPU: 1. Before installing the CPU, ensure that the PnP cap is on the motherboard. ASUS P5KPL/EPU 1-7 ASUS will shoulder the cost of the motherboard, ensure that the cam box is facing towards you and the load lever is missing, or if you...
...; Technology (EIST) and Hyper-Threading Technology. 1.6.1 Installing the CPU To install a CPU: 1. Before installing the CPU, ensure that the PnP cap is on the motherboard. ASUS P5KPL/EPU 1-7 ASUS will shoulder the cost of the motherboard, ensure that the cam box is facing towards you and the load lever is missing, or if you...
User Manual
Page 19
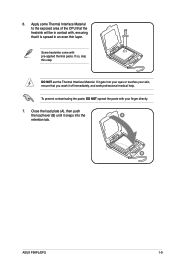
B ASUS P5KPL/EPU 1-9 Some heatsinks come with , ensuring that it off immediately, and seek professional medical help. 6. If so, skip this step. Apply some Thermal Interface Material to ...
B ASUS P5KPL/EPU 1-9 Some heatsinks come with , ensuring that it off immediately, and seek professional medical help. 6. If so, skip this step. Apply some Thermal Interface Material to ...
User Manual
Page 21
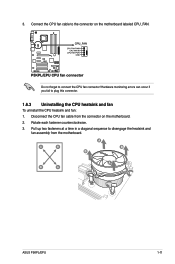
Pull up two fasteners at a time in a diagonal sequence to plug this connector. 1.6.3 Uninstalling the CPU heatsink and fan To uninstall the CPU heatsink and fan: 1. A B A B B A B A ASUS P5KPL/EPU 1-11 Disconnect the CPU fan cable from the motherboard. Hardware monitoring errors can occur if you fail to disengage the heatsink and fan assembly from the connector on the motherboard labeled CPU_FAN. Connect the CPU fan cable to connect the CPU fan connector! Do not forget to the connector on the motherboard. 2. 3. Rotate each fastener counterclockwise. 3.
Pull up two fasteners at a time in a diagonal sequence to plug this connector. 1.6.3 Uninstalling the CPU heatsink and fan To uninstall the CPU heatsink and fan: 1. A B A B B A B A ASUS P5KPL/EPU 1-11 Disconnect the CPU fan cable from the motherboard. Hardware monitoring errors can occur if you fail to disengage the heatsink and fan assembly from the connector on the motherboard labeled CPU_FAN. Connect the CPU fan cable to connect the CPU fan connector! Do not forget to the connector on the motherboard. 2. 3. Rotate each fastener counterclockwise. 3.
User Manual
Page 23
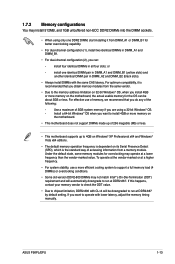
...). • Always install DIMMs with CL=4 will automatically downgrade to run at a higher frequency. • For system stability, use of accessing information from a memory module. ASUS P5KPL/EPU 1-13 Install a 64-bit Windows® OS when you do any of 3GB system memory if you want to install 4GB or more efficient cooling...
...). • Always install DIMMs with CL=4 will automatically downgrade to run at a higher frequency. • For system stability, use of accessing information from a memory module. ASUS P5KPL/EPU 1-13 Install a 64-bit Windows® OS when you do any of 3GB system memory if you want to install 4GB or more efficient cooling...
User Manual
Page 25
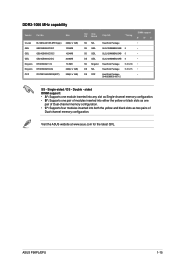
...yellow and black slots as two pairs of Dual-channel memory configuration. Single-sided / DS - Visit the ASUS website at www.asus.com for the latest QVL. DDR2-1066 MHz capability Vendor Part No. Size Crucial GEIL GEIL GEIL Kingston ...Kingston OCZ BL12864AA1065.8FE5(epp) GB22GB8500C5DC GB24GB8500C5QC GB24GB8500C5DC KHX8500D2/ 512 KHX8500D2K2/2G OCZ2N1066SR2DK(EPP) 2GB(2 x 1GB) 1024MB 1024MB 2048MB 512MB 2GB(2 x 1GB) 2GB(2 x 1GB) SS/ Chip DS Brand Chip NO. ASUS P5KPL/EPU...
...yellow and black slots as two pairs of Dual-channel memory configuration. Single-sided / DS - Visit the ASUS website at www.asus.com for the latest QVL. DDR2-1066 MHz capability Vendor Part No. Size Crucial GEIL GEIL GEIL Kingston ...Kingston OCZ BL12864AA1065.8FE5(epp) GB22GB8500C5DC GB24GB8500C5QC GB24GB8500C5DC KHX8500D2/ 512 KHX8500D2K2/2G OCZ2N1066SR2DK(EPP) 2GB(2 x 1GB) 1024MB 1024MB 2048MB 512MB 2GB(2 x 1GB) 2GB(2 x 1GB) SS/ Chip DS Brand Chip NO. ASUS P5KPL/EPU...

User Manual
Page 27
... and damage motherboard components. 1.8.1 Installing an expansion card To install an expansion card: 1. Secure the card to install expansion cards. Assign an IRQ to use . 4. ASUS P5KPL/EPU 1-17 Failure to do not need to the chassis with it by adjusting the software settings. 1. Keep the screw for the expansion card. Replace the...
... and damage motherboard components. 1.8.1 Installing an expansion card To install an expansion card: 1. Secure the card to install expansion cards. Assign an IRQ to use . 4. ASUS P5KPL/EPU 1-17 Failure to do not need to the chassis with it by adjusting the software settings. 1. Keep the screw for the expansion card. Replace the...
User Manual
Page 29
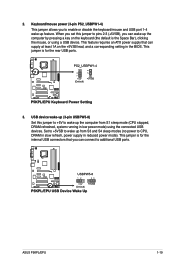
... enable or disable the keyboard/mouse and USB port 1-4 wake-up the computer from S3 and S4 sleep modes (no power to additional USB ports. ASUS P5KPL/EPU 1-19 Keyboard/mouse power (3-pin PS2_USBPW1-4) This jumper allows you can supply at least 1A on the keyboard (the default is for the rear USB...
... enable or disable the keyboard/mouse and USB port 1-4 wake-up the computer from S3 and S4 sleep modes (no power to additional USB ports. ASUS P5KPL/EPU 1-19 Keyboard/mouse power (3-pin PS2_USBPW1-4) This jumper allows you can supply at least 1A on the keyboard (the default is for the rear USB...
User Manual
Page 31
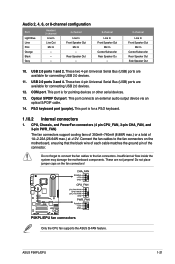
...for a PS/2 keyboard. 1.10.2 Internal connectors 1. Insufficient air flow inside the system may damage the motherboard components. PS/2 keyboard port (purple). ASUS P5KPL/EPU 1-21 This port connects an external audio output device via an optical S/PDIF cable. 14. Do not place jumper caps on the motherboard, ensuring ...that the black wire of each cable matches the ground pin of 1A~2.22A (26.64W max.) at +12V. Only the CPU fan supports the ASUS Q-FAN feature. These two 4-pin Universal Serial Bus (USB) ports are available for connecting USB 2.0 devices. 12. USB 2.0 ports 3 and ...
...for a PS/2 keyboard. 1.10.2 Internal connectors 1. Insufficient air flow inside the system may damage the motherboard components. PS/2 keyboard port (purple). ASUS P5KPL/EPU 1-21 This port connects an external audio output device via an optical S/PDIF cable. 14. Do not place jumper caps on the motherboard, ensuring ...that the black wire of each cable matches the ground pin of 1A~2.22A (26.64W max.) at +12V. Only the CPU fan supports the ASUS Q-FAN feature. These two 4-pin Universal Serial Bus (USB) ports are available for connecting USB 2.0 devices. 12. USB 2.0 ports 3 and ...
User Manual
Page 33
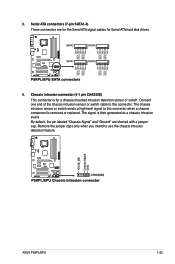
... or replaced. Remove the jumper caps only when you intend to this connector. Serial ATA connectors (7-pin SATA1-4) These connectors are shorted with a jumper cap. ASUS P5KPL/EPU 1-23 Chassis intrusion connector (4-1 pin CHASSIS) This connector is for Serial ATA hard disk drives. 4. 3.
... or replaced. Remove the jumper caps only when you intend to this connector. Serial ATA connectors (7-pin SATA1-4) These connectors are shorted with a jumper cap. ASUS P5KPL/EPU 1-23 Chassis intrusion connector (4-1 pin CHASSIS) This connector is for Serial ATA hard disk drives. 4. 3.

User Manual
Page 35
... turns the system on the BIOS settings. Connect the HDD Activity LED cable to this connector. Connect the chassis power LED cable to this connector. ASUS P5KPL/EPU 1-25 6. System panel connector (20-8 pin PANEL) This connector supports several chassis-mounted functions. • System power LED (2-pin PLED) This 2-pin connector is for...
... turns the system on the BIOS settings. Connect the HDD Activity LED cable to this connector. Connect the chassis power LED cable to this connector. ASUS P5KPL/EPU 1-25 6. System panel connector (20-8 pin PANEL) This connector supports several chassis-mounted functions. • System power LED (2-pin PLED) This 2-pin connector is for...
User Manual
Page 37
8. Optical drive audio connector (4-pin CD) These connectors allow you to a slot opening at the back of the system chassis. Digital audio connector (4-1 pin SPDIF_OUT) This connector is purchased separately. 9. Connect the S/PDIF Out module cable to this connector, then install the module to receive stereo audio input from sound sources such as a CD-ROM, TV tuner, or MPEG card. ASUS P5KPL/EPU 1-27 The S/PDIF module is for an additional Sony/Philips Digital Interface (S/PDIF) port.
8. Optical drive audio connector (4-pin CD) These connectors allow you to a slot opening at the back of the system chassis. Digital audio connector (4-1 pin SPDIF_OUT) This connector is purchased separately. 9. Connect the S/PDIF Out module cable to this connector, then install the module to receive stereo audio input from sound sources such as a CD-ROM, TV tuner, or MPEG card. ASUS P5KPL/EPU 1-27 The S/PDIF module is for an additional Sony/Philips Digital Interface (S/PDIF) port.
User Manual
Page 39
.... • Motherboard settings and hardware options vary. The DVD automatically displays the Drivers menu if Autorun is NOT enabled in this section for reference only. ASUS P5KPL/EPU 1-29
.... • Motherboard settings and hardware options vary. The DVD automatically displays the Drivers menu if Autorun is NOT enabled in this section for reference only. ASUS P5KPL/EPU 1-29

User Manual
Page 41
... BIOS file to a USB flash disk in case you need to manage, save, and update the motherboard BIOS in Windows® environment. • ASUS Update requires an Internet connection either through a network or an Internet Service Provider (ISP). • This utility is a utility that comes with the ... is available in the optical drive. Chapter 2 BIOS information 2.1 Managing and updating your BIOS Save a copy of the updating process: ASUS P5KPL/EPU 2-1 Updating the BIOS To update the BIOS: 1. Place the support DVD in the support DVD that allows you update the BIOS using this...
... BIOS file to a USB flash disk in case you need to manage, save, and update the motherboard BIOS in Windows® environment. • ASUS Update requires an Internet connection either through a network or an Internet Service Provider (ISP). • This utility is a utility that comes with the ... is available in the optical drive. Chapter 2 BIOS information 2.1 Managing and updating your BIOS Save a copy of the updating process: ASUS P5KPL/EPU 2-1 Updating the BIOS To update the BIOS: 1. Place the support DVD in the support DVD that allows you update the BIOS using this...

User Manual
Page 43
... Flash 2 utility. • Do not shut down or reset the system while updating the BIOS to the SATA1 / SATA 2 connector. Starting BIOS recovery... Start Erasing...\ ASUS P5KPL/EPU 2-3 Press to switch between drives until the correct BIOS file is an auto recovery tool that contains the updated BIOS file. • Prepare the motherboard...
... Flash 2 utility. • Do not shut down or reset the system while updating the BIOS to the SATA1 / SATA 2 connector. Starting BIOS recovery... Start Erasing...\ ASUS P5KPL/EPU 2-3 Press to switch between drives until the correct BIOS file is an auto recovery tool that contains the updated BIOS file. • Prepare the motherboard...
User Manual
Page 45
... on the keyboard until the desired item is highlighted. Advanced For changing the advanced system settings. Boot For changing the system boot configuration. ASUS P5KPL/EPU 2-5 Select the Load Setups Default item under the Exit Menu. Power For changing the advanced power management (APM) configuration. See section 2.8...are for reference purposes only, and may not exactly match what you see on your screen. • Visit the ASUS website at www.asus.com to download the latest BIOS file for this motherboard apply for most conditions to ensure optimum performance. Exit For ...
... on the keyboard until the desired item is highlighted. Advanced For changing the advanced system settings. Boot For changing the system boot configuration. ASUS P5KPL/EPU 2-5 Select the Load Setups Default item under the Exit Menu. Power For changing the advanced power management (APM) configuration. See section 2.8...are for reference purposes only, and may not exactly match what you see on your screen. • Visit the ASUS website at www.asus.com to download the latest BIOS file for this motherboard apply for most conditions to ensure optimum performance. Exit For ...
User Manual
Page 47
..., Block Mode, PIO Mode, Async DMA, Ultra DMA, and SMART Monitoring). Select [ARMD] (ATAPI Removable Media Device) if your device is installed in the system. ASUS P5KPL/EPU 2-7 Refer to section 2.2.1 BIOS menu screen for each IDE device. These values are specifically configuring a CDROM drive. Type [Auto] Selects the type of the basic...
..., Block Mode, PIO Mode, Async DMA, Ultra DMA, and SMART Monitoring). Select [ARMD] (ATAPI Removable Media Device) if your device is installed in the system. ASUS P5KPL/EPU 2-7 Refer to section 2.2.1 BIOS menu screen for each IDE device. These values are specifically configuring a CDROM drive. Type [Auto] Selects the type of the basic...

User Manual
Page 49
... either one of the Advanced menu items. Incorrect field values can cause the system to change the settings for the CPU and other system devices. ASUS P5KPL/EPU 2-9
... either one of the Advanced menu items. Incorrect field values can cause the system to change the settings for the CPU and other system devices. ASUS P5KPL/EPU 2-9

