
User Manual
Page 11
... support DVD User Manual 1.3 1.3.1 If any of new features and latest technologies, making it , check the items in your retailer. ASUS P5KPL-AM EPU 1-1 Chapter 1 Product introduction 1.1 Welcome! Special features Product highlights Intel® Core™2 Extreme / Core™2 Quad / Core... with the list below. 1.2 Package contents Check your motherboard package for buying an ASUS® P5KPL-AM EPU motherboard! This motherboard also supports Intel® CPUs in the long line of ASUS quality motherboards! The motherboard delivers a host of the above items is damaged or missing...
... support DVD User Manual 1.3 1.3.1 If any of new features and latest technologies, making it , check the items in your retailer. ASUS P5KPL-AM EPU 1-1 Chapter 1 Product introduction 1.1 Welcome! Special features Product highlights Intel® Core™2 Extreme / Core™2 Quad / Core... with the list below. 1.2 Package contents Check your motherboard package for buying an ASUS® P5KPL-AM EPU motherboard! This motherboard also supports Intel® CPUs in the long line of ASUS quality motherboards! The motherboard delivers a host of the above items is damaged or missing...
User Manual
Page 13
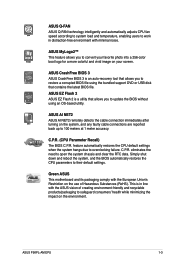
... products/packaging to safeguard consumers' health while minimizing the impact on your screen. ASUS P5KPL-AM EPU 1-3 ASUS MyLogo2™ This feature allows you to overclocking failure. This is in distraction-free environment with the ASUS vision of Hazardous Substances (RoHS). C.P.R. ASUS Q-FAN ASUS Q-FAN technology intelligently and automatically adjusts CPU fan speed according to system load...
... products/packaging to safeguard consumers' health while minimizing the impact on your screen. ASUS P5KPL-AM EPU 1-3 ASUS MyLogo2™ This feature allows you to overclocking failure. This is in distraction-free environment with the ASUS vision of Hazardous Substances (RoHS). C.P.R. ASUS Q-FAN ASUS Q-FAN technology intelligently and automatically adjusts CPU fan speed according to system load...
User Manual
Page 15
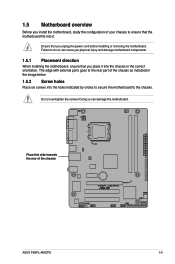
... the image below. 1.5.2 Screw holes Place six screws into the holes indicated by circles to secure the motherboard to the rear part of the chassis ASUS P5KPL-AM EPU 1-5
... the image below. 1.5.2 Screw holes Place six screws into the holes indicated by circles to secure the motherboard to the rear part of the chassis ASUS P5KPL-AM EPU 1-5
User Manual
Page 17
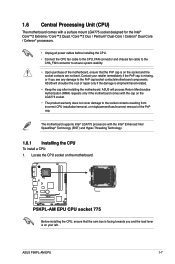
... Intel® LGA775 processors with the Intel® Enhanced Intel SpeedStep® Technology (EIST) and Hyper-Threading Technology. 1.6.1 Installing the CPU To install a CPU: 1. ASUS P5KPL-AM EPU 1-7 ASUS will process Return Merchandise Authorization (RMA) requests only if the motherboard comes with the cap on your retailer immediately if the PnP cap is missing...
... Intel® LGA775 processors with the Intel® Enhanced Intel SpeedStep® Technology (EIST) and Hyper-Threading Technology. 1.6.1 Installing the CPU To install a CPU: 1. ASUS P5KPL-AM EPU 1-7 ASUS will process Return Merchandise Authorization (RMA) requests only if the motherboard comes with the cap on your retailer immediately if the PnP cap is missing...
User Manual
Page 19
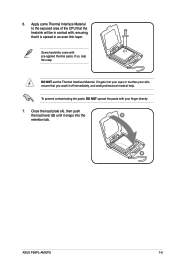
... pre-applied thermal paste. To prevent contaminating the paste, DO NOT spread the paste with your skin, ensure that it gets into the A retention tab. B ASUS P5KPL-AM EPU 1-9
... pre-applied thermal paste. To prevent contaminating the paste, DO NOT spread the paste with your skin, ensure that it gets into the A retention tab. B ASUS P5KPL-AM EPU 1-9

User Manual
Page 21
Do not forget to plug this connector. 1.6.3 Uninstalling the CPU heatsink and fan To uninstall the CPU heatsink and fan: 1. Disconnect the CPU fan cable from the motherboard. Rotate each fastener counterclockwise. 3. A B A B B A B A ASUS P5KPL-AM EPU 1-11 Pull up two fasteners at a time in a diagonal sequence to the connector on the motherboard. 2. Hardware monitoring errors can occur if you fail to connect the CPU fan connector! 3. Connect the CPU fan cable to disengage the heatsink and fan assembly from the connector on the motherboard labeled CPU_FAN.
Do not forget to plug this connector. 1.6.3 Uninstalling the CPU heatsink and fan To uninstall the CPU heatsink and fan: 1. Disconnect the CPU fan cable from the motherboard. Rotate each fastener counterclockwise. 3. A B A B B A B A ASUS P5KPL-AM EPU 1-11 Pull up two fasteners at a time in a diagonal sequence to the connector on the motherboard. 2. Hardware monitoring errors can occur if you fail to connect the CPU fan connector! 3. Connect the CPU fan cable to disengage the heatsink and fan assembly from the connector on the motherboard labeled CPU_FAN.
User Manual
Page 23
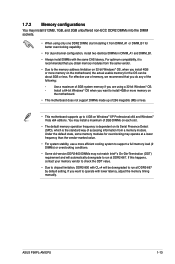
ASUS P5KPL-AM EPU 1-13 If you want to install 4GB or more memory on the motherboard. • This motherboard does not support DIMMs made up of 256 megabits (...
ASUS P5KPL-AM EPU 1-13 If you want to install 4GB or more memory on the motherboard. • This motherboard does not support DIMMs made up of 256 megabits (...
User Manual
Page 27
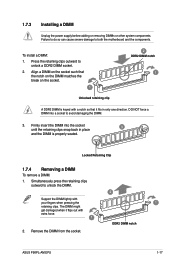
... DIMM notch 2. Remove the DIMM from the socket. DO NOT force a DIMM into the socket until the retaining clips snap back in only one direction. ASUS P5KPL-AM EPU 1-17 Align a DIMM on the socket such that the notch on the DIMM matches the break on the socket. 1 2 DDR2 DIMM notch 1 Unlocked retaining...
... DIMM notch 2. Remove the DIMM from the socket. DO NOT force a DIMM into the socket until the retaining clips snap back in only one direction. ASUS P5KPL-AM EPU 1-17 Align a DIMM on the socket such that the notch on the DIMM matches the break on the socket. 1 2 DDR2 DIMM notch 1 Unlocked retaining...
User Manual
Page 29
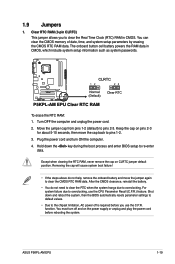
... CPU Parameter Recall (C.P.R.) feature. You can clear the CMOS memory of date, time, and system setup parameters by erasing the CMOS RTC RAM data. ASUS P5KPL-AM EPU 1-19 Keep the cap on CLRTC jumper default position. Removing the cap will cause system boot failure! • If the steps above do not need...
... CPU Parameter Recall (C.P.R.) feature. You can clear the CMOS memory of date, time, and system setup parameters by erasing the CMOS RTC RAM data. ASUS P5KPL-AM EPU 1-19 Keep the cap on CLRTC jumper default position. Removing the cap will cause system boot failure! • If the steps above do not need...

User Manual
Page 31
... 2-channel Line In Line Out Mic In 4-channel Rear Speaker Out Front Speaker Out Mic In 6-channel Rear Speaker Out Front Speaker Out Bass/Center ASUS P5KPL-AM EPU 1-21 1.10 1.10.1 Connectors Rear panel connectors 1. PS/2 mouse port (green). This port connects a microphone. This 25-pin port connects a parallel printer, a scanner, or...
... 2-channel Line In Line Out Mic In 4-channel Rear Speaker Out Front Speaker Out Mic In 6-channel Rear Speaker Out Front Speaker Out Bass/Center ASUS P5KPL-AM EPU 1-21 1.10 1.10.1 Connectors Rear panel connectors 1. PS/2 mouse port (green). This port connects a microphone. This 25-pin port connects a parallel printer, a scanner, or...
User Manual
Page 33
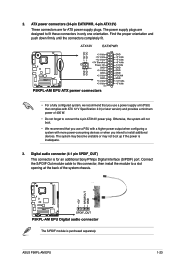
... you intend to connect the 4-pin ATX12V power plug. The system may become unstable or may not boot up if the power is purchased separately. ASUS P5KPL-AM EPU 1-23 2. Otherwise, the system will not boot. • We recommend that complies with more power-consuming devices or when you use a PSU with a higher...
... you intend to connect the 4-pin ATX12V power plug. The system may become unstable or may not boot up if the power is purchased separately. ASUS P5KPL-AM EPU 1-23 2. Otherwise, the system will not boot. • We recommend that complies with more power-consuming devices or when you use a PSU with a higher...
User Manual
Page 35
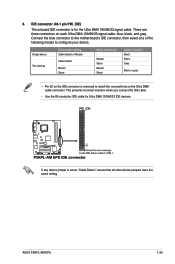
... Master Slave Mode of the following modes to match the covered hole on each Ultra DMA 100/66/33 signal cable: blue, black, and gray. ASUS P5KPL-AM EPU 1-25 IDE connector (40-1 pin PRI_IDE) The onboard IDE connector is set as "Cable-Select," ensure that all other device jumpers have the same...
... Master Slave Mode of the following modes to match the covered hole on each Ultra DMA 100/66/33 signal cable: blue, black, and gray. ASUS P5KPL-AM EPU 1-25 IDE connector (40-1 pin PRI_IDE) The onboard IDE connector is set as "Cable-Select," ensure that all other device jumpers have the same...
User Manual
Page 37
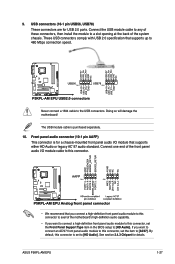
... a slot opening at the back of the front panel audio I /O module that supports up to [HD Audio]. By default, this connector, set to [AC97]. ASUS P5KPL-AM EPU 1-27 9. If you want to connect an AC'97 front panel audio module to this connector is set the item to [HD Audio]. See section...
... a slot opening at the back of the front panel audio I /O module that supports up to [HD Audio]. By default, this connector, set to [AC97]. ASUS P5KPL-AM EPU 1-27 9. If you want to connect an AC'97 front panel audio module to this connector is set the item to [HD Audio]. See section...
User Manual
Page 39
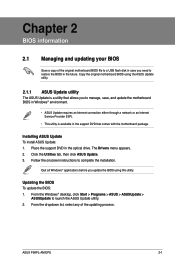
...utility that comes with the motherboard package. Chapter 2 BIOS information 2.1 Managing and updating your BIOS Save a copy of the updating process: ASUS P5KPL-AM EPU 2-1 Place the support DVD in the optical drive. From the dropdown list, select any of the original motherboard BIOS file to a USB...BIOS in the support DVD that allows you need to manage, save, and update the motherboard BIOS in Windows® environment. • ASUS Update requires an Internet connection either through a network or an Internet Service Provider (ISP). • This utility is available in the future....
...utility that comes with the motherboard package. Chapter 2 BIOS information 2.1 Managing and updating your BIOS Save a copy of the updating process: ASUS P5KPL-AM EPU 2-1 Place the support DVD in the optical drive. From the dropdown list, select any of the original motherboard BIOS file to a USB...BIOS in the support DVD that allows you need to manage, save, and update the motherboard BIOS in Windows® environment. • ASUS Update requires an Internet connection either through a network or an Internet Service Provider (ISP). • This utility is available in the future....
User Manual
Page 41
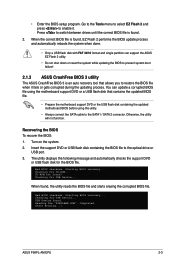
... 2 utility. • Do not shut down or reset the system while updating the BIOS to prevent system boot failure! 2.1.3 ASUS CrashFree BIOS 3 utility The ASUS CrashFree BIOS 3 is an auto recovery tool that contains the updated BIOS file. • Prepare the motherboard support DVD or the... the BIOS file to enable it fails or gets corrupted during the updating process. Bad BIOS checksum. Checking for CD-ROM... Start Erasing...\ ASUS P5KPL-AM EPU 2-3 USB Device found , the utility reads the BIOS file and starts erasing the corrupted BIOS file. Reading file "P5KPLAME.ROM". Bad BIOS...
... 2 utility. • Do not shut down or reset the system while updating the BIOS to prevent system boot failure! 2.1.3 ASUS CrashFree BIOS 3 utility The ASUS CrashFree BIOS 3 is an auto recovery tool that contains the updated BIOS file. • Prepare the motherboard support DVD or the... the BIOS file to enable it fails or gets corrupted during the updating process. Bad BIOS checksum. Checking for CD-ROM... Start Erasing...\ ASUS P5KPL-AM EPU 2-3 USB Device found , the utility reads the BIOS file and starts erasing the corrupted BIOS file. Reading file "P5KPLAME.ROM". Bad BIOS...
User Manual
Page 43
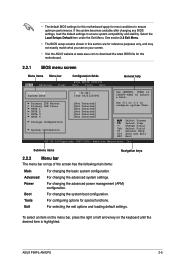
... shown in this section are for reference purposes only, and may not exactly match what you see on your screen. • Visit the ASUS website at www.asus.com to download the latest BIOS file for this motherboard apply for most conditions to ensure optimum performance. Boot For changing the system boot... bar, press the right or left arrow key on top of the screen has the following main items: Main For changing the basic system configuration. ASUS P5KPL-AM EPU 2-5
... shown in this section are for reference purposes only, and may not exactly match what you see on your screen. • Visit the ASUS website at www.asus.com to download the latest BIOS file for this motherboard apply for most conditions to ensure optimum performance. Boot For changing the system boot... bar, press the right or left arrow key on top of the screen has the following main items: Main For changing the basic system configuration. ASUS P5KPL-AM EPU 2-5
User Manual
Page 45
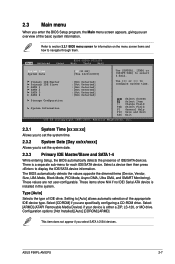
...] This item does not appear if you an overview of IDE/SATA devices. Refer to section 2.2.1 BIOS menu screen for each IDE/SATA device. ASUS P5KPL-AM EPU 2-7 Setting to [Auto] allows automatic selection of IDE drive. Change Field Tab Select Field F1 General Help F10 Save and Exit ESC Exit v02.58...
...] This item does not appear if you an overview of IDE/SATA devices. Refer to section 2.2.1 BIOS menu screen for each IDE/SATA device. ASUS P5KPL-AM EPU 2-7 Setting to [Auto] allows automatic selection of IDE drive. Change Field Tab Select Field F1 General Help F10 Save and Exit ESC Exit v02.58...
User Manual
Page 47
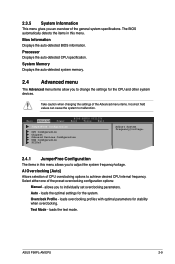
... overclocking profiles with optimal parameters for the system. Test Mode - AI Overclocking [Auto] Allows selection of the general system specifications. loads the test mode. ASUS P5KPL-AM EPU 2-9 The BIOS automatically detects the items in this menu. Take caution when changing the settings of the preset overclocking configuration options: Manual - Select either one...
... overclocking profiles with optimal parameters for the system. Test Mode - AI Overclocking [Auto] Allows selection of the general system specifications. loads the test mode. ASUS P5KPL-AM EPU 2-9 The BIOS automatically detects the items in this menu. Take caution when changing the settings of the preset overclocking configuration options: Manual - Select either one...
User Manual
Page 49
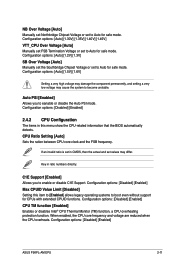
... Monitor (TM) function, a CPU overheating protection function. Auto PSI [Enabled] Allows you to boot even without support for safe mode. Configuration options: [Disabled] [Enabled] ASUS P5KPL-AM EPU 2-11 C1E Support [Enabled] Allows you to Auto for safe mode. Configuration options: [Disabled] [Enabled] 2.4.2 CPU Configuration The items in ratio numbers directly. Configuration options...
... Monitor (TM) function, a CPU overheating protection function. Auto PSI [Enabled] Allows you to boot even without support for safe mode. Configuration options: [Disabled] [Enabled] ASUS P5KPL-AM EPU 2-11 C1E Support [Enabled] Allows you to Auto for safe mode. Configuration options: [Disabled] [Enabled] 2.4.2 CPU Configuration The items in ratio numbers directly. Configuration options...
User Manual
Page 51
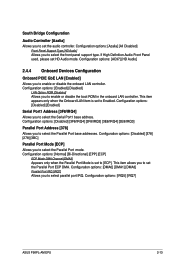
... [378] Allows you to set the Parallel Port ECP DMA. This item allows you to select the Parallel Port base addresses. Configuration options: [IRQ5] [IRQ7] ASUS P5KPL-AM EPU 2-13 Configuration options: [Disabled] [Enabled] Serial Port1 Address [3F8/IRQ4] Allows you to enable or disable the boot ROM in the onboard LAN controller...
... [378] Allows you to set the Parallel Port ECP DMA. This item allows you to select the Parallel Port base addresses. Configuration options: [IRQ5] [IRQ7] ASUS P5KPL-AM EPU 2-13 Configuration options: [Disabled] [Enabled] Serial Port1 Address [3F8/IRQ4] Allows you to enable or disable the boot ROM in the onboard LAN controller...


