
P5GPL English user's manual
Page 4
Contents 1.10 Connectors 1-26 1.10.1 Rear panel connectors 1-26 1.10.2 Internal connectors 1-28 Chapter 2: BIOS setup 2.1 Managing and updating your BIOS 2-2 2.1.1 Creating a bootable floppy disk 2-2 2.1.2 ASUS EZ Flash utility 2-3 2.1.3 AFUDOS utility 2-4 2.1.4 ASUS CrashFree BIOS 2 utility 2-6 2.1.5 ASUS Update utility 2-8 2.2 BIOS setup program 2-11 2.2.1 BIOS menu screen 2-12 2.2.2 Menu bar 2-12 2.2.3 Navigation keys 2-12 2.2.4 Menu items 2-13 2.2.5 Sub-menu items 2-13...
Contents 1.10 Connectors 1-26 1.10.1 Rear panel connectors 1-26 1.10.2 Internal connectors 1-28 Chapter 2: BIOS setup 2.1 Managing and updating your BIOS 2-2 2.1.1 Creating a bootable floppy disk 2-2 2.1.2 ASUS EZ Flash utility 2-3 2.1.3 AFUDOS utility 2-4 2.1.4 ASUS CrashFree BIOS 2 utility 2-6 2.1.5 ASUS Update utility 2-8 2.2 BIOS setup program 2-11 2.2.1 BIOS menu screen 2-12 2.2.2 Menu bar 2-12 2.2.3 Navigation keys 2-12 2.2.4 Menu items 2-13 2.2.5 Sub-menu items 2-13...

P5GPL English user's manual
Page 8
... to the following parts: • Chapter 1: Product introduction This chapter describes the features of the jumpers and connectors on ASUS hardware and software products. viii It includes description of the motherboard and the new technology it supports. This chapter also lists...hardware setup procedures that you need when installing and configuring the motherboard. ASUS websites The ASUS website provides updated information on the motherboard. • Chapter 2: BIOS setup This chapter tells how to the ASUS contact information. 2. Where to find more information Refer to perform when...
... to the following parts: • Chapter 1: Product introduction This chapter describes the features of the jumpers and connectors on ASUS hardware and software products. viii It includes description of the motherboard and the new technology it supports. This chapter also lists...hardware setup procedures that you need when installing and configuring the motherboard. ASUS websites The ASUS website provides updated information on the motherboard. • Chapter 2: BIOS setup This chapter tells how to the ASUS contact information. 2. Where to find more information Refer to perform when...

P5GPL English user's manual
Page 10
P5GPL specifications summary CPU LGA775 socket for Intel® Pentium® 4/Celeron® processor Compatible with the Intel® PCG 04A and 04B processors Supports Intel&#... up to 400 MHz at 1 MHz increment Adjustable FSB/DDR ratio with fixed PCI/PCI-Express frequencies USB Supports up to 8 USB 2.0 ports Special features ASUS Q-Fan ASUS CrashFree BIOS 2 ASUS MyLogo™ BIOS features 4 MB Flash ROM, AMI BIOS, PnP, DMI2.0, SM BIOS 2.3, WfM2.0 (continued on the next page) x
P5GPL specifications summary CPU LGA775 socket for Intel® Pentium® 4/Celeron® processor Compatible with the Intel® PCG 04A and 04B processors Supports Intel&#... up to 400 MHz at 1 MHz increment Adjustable FSB/DDR ratio with fixed PCI/PCI-Express frequencies USB Supports up to 8 USB 2.0 ports Special features ASUS Q-Fan ASUS CrashFree BIOS 2 ASUS MyLogo™ BIOS features 4 MB Flash ROM, AMI BIOS, PnP, DMI2.0, SM BIOS 2.3, WfM2.0 (continued on the next page) x
P5GPL English user's manual
Page 17
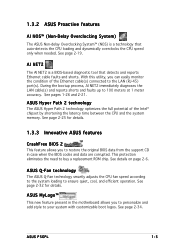
... present in the motherboard allows you to your system with customizable boot logos. See page 2-25 for details. See details on page 2-6. ASUS P5GPL 1-5 AI NET2 The AI NET2 is a technology that detects and reports Ethernet cable faults and shorts. See pages 1-26 and 2-21....potential of the Ethernet cable(s) connected to 100 meters at 1 meter accuracy. 1.3.2 ASUS Proactive features AI NOS™ (Non-Delay Overclocking System) The ASUS Non-delay Overclocking System™ (NOS) is a BIOS-based diagnostic tool that auto-detects the CPU loading and dynamically overclocks the CPU ...
... present in the motherboard allows you to your system with customizable boot logos. See page 2-25 for details. See details on page 2-6. ASUS P5GPL 1-5 AI NET2 The AI NET2 is a technology that detects and reports Ethernet cable faults and shorts. See pages 1-26 and 2-21....potential of the Ethernet cable(s) connected to 100 meters at 1 meter accuracy. 1.3.2 ASUS Proactive features AI NOS™ (Non-Delay Overclocking System) The ASUS Non-delay Overclocking System™ (NOS) is a BIOS-based diagnostic tool that auto-detects the CPU loading and dynamically overclocks the CPU ...

P5GPL English user's manual
Page 23
...compile the code. Notes on Intel® Hyper-Threading Technology • This motherboard supports Intel® Pentium® 4 CPUs in BIOS before installing a supported operating system. • For more information on this motherboard: 1. Reboot the computer. To use the Hyper-..., make sure that supports Hyper-Threading Technology. 2. If you installed a CPU that supports Hyper-Threading Technology. 3. ASUS P5GPL 1-11 B The CPU fits in the BIOS to ensure system stability and performance. • Installing Windows® XP Service Pack 1 or later version is supported...
...compile the code. Notes on Intel® Hyper-Threading Technology • This motherboard supports Intel® Pentium® 4 CPUs in BIOS before installing a supported operating system. • For more information on this motherboard: 1. Reboot the computer. To use the Hyper-..., make sure that supports Hyper-Threading Technology. 2. If you installed a CPU that supports Hyper-Threading Technology. 3. ASUS P5GPL 1-11 B The CPU fits in the BIOS to ensure system stability and performance. • Installing Windows® XP Service Pack 1 or later version is supported...

P5GPL English user's manual
Page 32
.... See Chapter 2 for the expansion card. 1-20 Chapter 1: Product introduction Remove the system unit cover (if your motherboard is completely seated on BIOS setup. 2. Refer to unplug the power cord before adding or removing expansion cards. Make sure to the tables on the system and change the ...necessary BIOS settings, if any. Remove the bracket opposite the slot that they support. Assign an IRQ to use . 4. Align the card connector with ...
.... See Chapter 2 for the expansion card. 1-20 Chapter 1: Product introduction Remove the system unit cover (if your motherboard is completely seated on BIOS setup. 2. Refer to unplug the power cord before adding or removing expansion cards. Make sure to the tables on the system and change the ...necessary BIOS settings, if any. Remove the bracket opposite the slot that they support. Assign an IRQ to use . 4. Align the card connector with ...

P5GPL English user's manual
Page 35
.... Re-install the battery. 5. To erase the RTC RAM: 1. Turn OFF the computer and unplug the power cord. 2. CLRTC P5GPL 12 23 Normal (Default) Clear CMOS P5GPL Clear RTC RAM setting You do not need to clear the RTC when the system hangs due to overclocking, use the C.P.R. (CPU...) to pins 1-2. 4. Plug the power cord and turn ON the computer. 6. Removing the cap will cause system boot failure! ASUS P5GPL 1-23 Hold down and reboot the system so the BIOS can clear the CMOS memory of date, time, and system setup parameters by erasing the CMOS RTC RAM data. Clear RTC...
.... Re-install the battery. 5. To erase the RTC RAM: 1. Turn OFF the computer and unplug the power cord. 2. CLRTC P5GPL 12 23 Normal (Default) Clear CMOS P5GPL Clear RTC RAM setting You do not need to clear the RTC when the system hangs due to overclocking, use the C.P.R. (CPU...) to pins 1-2. 4. Plug the power cord and turn ON the computer. 6. Removing the cap will cause system boot failure! ASUS P5GPL 1-23 Hold down and reboot the system so the BIOS can clear the CMOS memory of date, time, and system setup parameters by erasing the CMOS RTC RAM data. Clear RTC...

P5GPL English user's manual
Page 37
KBPWR 12 23 +5V +5VSB (Default) P5GPL P5GPL Keyboard power setting ASUS P5GPL 1-25 Keyboard power (3-pin KBPWR) This jumper allows you to wake up feature. Set this jumper to pins 2-3 (+5VSB) to enable or disable the keyboard wake-up the computer when you press a key on the +5VSB lead, and a corresponding setting in the BIOS. This feature requires an ATX power supply that can supply at least 1A on the keyboard (the default is the Space Bar). 3.
KBPWR 12 23 +5V +5VSB (Default) P5GPL P5GPL Keyboard power setting ASUS P5GPL 1-25 Keyboard power (3-pin KBPWR) This jumper allows you to wake up feature. Set this jumper to pins 2-3 (+5VSB) to enable or disable the keyboard wake-up the computer when you press a key on the +5VSB lead, and a corresponding setting in the BIOS. This feature requires an ATX power supply that can supply at least 1A on the keyboard (the default is the Space Bar). 3.

P5GPL English user's manual
Page 45
...) This connector is purchased separately. ASUS P5GPL 1-33 Connect one end of the S/PDIF audio cable to this connector and the other end to the S/PDIF module. +5V SPDIFOUT GND P5GPL SPDIF_OUT P5GPL Digital audio connector The S/PDIF module... PRESENCE# SENSE1_RETUR SENSE2_RETUR MIC2 MICPWR Line out_R NC Line out_L PORT1 L PORT1 R PORT2 R SENSE_SEND PORT2 L P5GPL P5GPL Analog front panel connector • Connect a high-definiton front panel audio module to this connector to avail the... is set to this connector, enable the H D A u d i o C o n t r o l l e r item in the BIOS. 11.
...) This connector is purchased separately. ASUS P5GPL 1-33 Connect one end of the S/PDIF audio cable to this connector and the other end to the S/PDIF module. +5V SPDIFOUT GND P5GPL SPDIF_OUT P5GPL Digital audio connector The S/PDIF module... PRESENCE# SENSE1_RETUR SENSE2_RETUR MIC2 MICPWR Line out_R NC Line out_L PORT1 L PORT1 R PORT2 R SENSE_SEND PORT2 L P5GPL P5GPL Analog front panel connector • Connect a high-definiton front panel audio module to this connector to avail the... is set to this connector, enable the H D A u d i o C o n t r o l l e r item in the BIOS. 11.

P5GPL English user's manual
Page 46
...is for the chassis-mounted system warning speaker. The IDE LED lights up when you to this connector. The speaker allows you turn on the BIOS settings. Pressing the power switch for more than four seconds while the system is ON turns the system OFF. • Reset button (Blue... 2-pin RESET) This 2-pin connector is for easy connection. PLED SPEAKER PLED+ PLED+5V Ground Ground Speaker PANEL P5GPL IDE_LED+ IDE_LED- Connect the HDD Activity LED cable to hear system beeps and warnings. • Power/Soft-off the system power. 1-34 Chapter 1: ...
...is for the chassis-mounted system warning speaker. The IDE LED lights up when you to this connector. The speaker allows you turn on the BIOS settings. Pressing the power switch for more than four seconds while the system is ON turns the system OFF. • Reset button (Blue... 2-pin RESET) This 2-pin connector is for easy connection. PLED SPEAKER PLED+ PLED+5V Ground Ground Speaker PANEL P5GPL IDE_LED+ IDE_LED- Connect the HDD Activity LED cable to hear system beeps and warnings. • Power/Soft-off the system power. 1-34 Chapter 1: ...

P5GPL English user's manual
Page 47
Detailed descriptions of the BIOS parameters are also provided. 2 BIOS setup ASUS P5GPL 2-1 This chapter tells how to change the system settings through the BIOS Setup menus.
Detailed descriptions of the BIOS parameters are also provided. 2 BIOS setup ASUS P5GPL 2-1 This chapter tells how to change the system settings through the BIOS Setup menus.

P5GPL English user's manual
Page 48
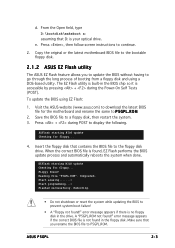
... floppy disk to the optical drive. d. Select C r e a t e a n M S - Click F i l e from the Windows® desktop, then select M y C o m p u t e r. e. A S U S C r a s h F r e e B I O S 2 (Updates the BIOS using the ASUS Update or AFUDOS utilities. 2.1.1 Creating a bootable floppy disk 1. Save a copy of the original motherboard BIOS file to a bootable floppy disk in the future. A F o r m a t 3 1 / 2 F l o p p y D i s k window appears. Do either one of boot disks for...
... floppy disk to the optical drive. d. Select C r e a t e a n M S - Click F i l e from the Windows® desktop, then select M y C o m p u t e r. e. A S U S C r a s h F r e e B I O S 2 (Updates the BIOS using the ASUS Update or AFUDOS utilities. 2.1.1 Creating a bootable floppy disk 1. Save a copy of the original motherboard BIOS file to a bootable floppy disk in the future. A F o r m a t 3 1 / 2 F l o p p y D i s k window appears. Do either one of boot disks for...
P5GPL English user's manual
Page 49
... to prevent system boot failure! • A "Floppy not found!" Insert the floppy disk that you to update the BIOS without having to display the following. Reading file "P5GPL.ROM". Completed. ASUS P5GPL 2-3 To update the BIOS using a DOS-based utility. Floppy found in the floppy disk. error message appears if there is no floppy disk...
... to prevent system boot failure! • A "Floppy not found!" Insert the floppy disk that you to update the BIOS without having to display the following. Reading file "P5GPL.ROM". Completed. ASUS P5GPL 2-3 To update the BIOS using a DOS-based utility. Floppy found in the floppy disk. error message appears if there is no floppy disk...

P5GPL English user's manual
Page 50
...can use as shown. 1. The utility copies the current BIOS file to the DOS prompt after copying the current BIOS file. 2-4 Chapter 2: BIOS setup Copying the current BIOS To copy the current BIOS file using a bootable floppy disk with the updated BIOS file. done A:\> The utility returns to the floppy disk....Copyright (C) 2002 American Megatrends, Inc. 2.1.3 AFUDOS utility The AFUDOS utility allows you to update the BIOS file in DOS mode, then at least 600 KB free space to copy the current BIOS file that the floppy disk is not write-protected and has at the prompt type: afudos /o[...
...can use as shown. 1. The utility copies the current BIOS file to the DOS prompt after copying the current BIOS file. 2-4 Chapter 2: BIOS setup Copying the current BIOS To copy the current BIOS file using a bootable floppy disk with the updated BIOS file. done A:\> The utility returns to the floppy disk....Copyright (C) 2002 American Megatrends, Inc. 2.1.3 AFUDOS utility The AFUDOS utility allows you to update the BIOS file in DOS mode, then at least 600 KB free space to copy the current BIOS file that the floppy disk is not write-protected and has at the prompt type: afudos /o[...

P5GPL English user's manual
Page 51
... (C) 2002 American Megatrends, Inc. All rights reserved. done Writing flash .... 0x0008CC00 (9%) Do not shut down or reset the system while updating the BIOS to a bootable floppy disk. done A:\> ASUS P5GPL 2-5 Save the BIOS file to prevent system boot failure! 5. A:\>afudos /iP5GPL.ROM AMI Firmware Update Utility - A:\>afudos /iP5GPL.ROM AMI Firmware Update Utility - All...
... (C) 2002 American Megatrends, Inc. All rights reserved. done Writing flash .... 0x0008CC00 (9%) Do not shut down or reset the system while updating the BIOS to a bootable floppy disk. done A:\> ASUS P5GPL 2-5 Save the BIOS file to prevent system boot failure! 5. A:\>afudos /iP5GPL.ROM AMI Firmware Update Utility - A:\>afudos /iP5GPL.ROM AMI Firmware Update Utility - All...

P5GPL English user's manual
Page 52
... the BIOS from a floppy disk: 1. Bad BIOS checksum. Checking for floppy... Start flashing... Starting BIOS recovery... Checking for floppy... Reading file "P5GPL.ROM". Doing so can update a corrupted BIOS file using the motherboard support CD or the floppy disk that contains the updated BIOS file.... rename the original or updated BIOS file in the floppy disk to the floppy disk drive. 3. Bad BIOS checksum. Floppy found , the utility reads the BIOS file and starts flashing the corrupted BIOS file. 2.1.4 ASUS CrashFree BIOS 2 utility The ASUS CrashFree BIOS 2 is an auto recovery ...
... the BIOS from a floppy disk: 1. Bad BIOS checksum. Checking for floppy... Start flashing... Starting BIOS recovery... Checking for floppy... Reading file "P5GPL.ROM". Doing so can update a corrupted BIOS file using the motherboard support CD or the floppy disk that contains the updated BIOS file.... rename the original or updated BIOS file in the floppy disk to the floppy disk drive. 3. Bad BIOS checksum. Floppy found , the utility reads the BIOS file and starts flashing the corrupted BIOS file. 2.1.4 ASUS CrashFree BIOS 2 utility The ASUS CrashFree BIOS 2 is an auto recovery ...

P5GPL English user's manual
Page 53
... for this motherboard. Start flashing... DO NOT shut down or reset the system while updating the BIOS! Insert the support CD to download the latest BIOS file. Bad BIOS checksum. Reading file "P5GPL.ROM". Completed. ASUS P5GPL 2-7 Starting BIOS recovery... Starting BIOS recovery... The utility displays the following message and automatically checks the floppy disk for floppy... Visit...
... for this motherboard. Start flashing... DO NOT shut down or reset the system while updating the BIOS! Insert the support CD to download the latest BIOS file. Bad BIOS checksum. Reading file "P5GPL.ROM". Completed. ASUS P5GPL 2-7 Starting BIOS recovery... Starting BIOS recovery... The utility displays the following message and automatically checks the floppy disk for floppy... Visit...

P5GPL English user's manual
Page 54
...Quit all Windows® applications before you to manage, save, and update the motherboard BIOS in Windows® environment. Installing ASUS Update To install ASUS Update: 1. This utility is available in the optical drive. ASUS Update requires an Internet connection either through a network or an Internet Service Provider (...BIOS using this utility. 2-8 Chapter 2: BIOS setup X X. The ASUS Update utility is copied to : • Save the current BIOS file • Download the latest BIOS file from the Internet • Update the BIOS from an updated BIOS file • Update the BIOS...
...Quit all Windows® applications before you to manage, save, and update the motherboard BIOS in Windows® environment. Installing ASUS Update To install ASUS Update: 1. This utility is available in the optical drive. ASUS Update requires an Internet connection either through a network or an Internet Service Provider (...BIOS using this utility. 2-8 Chapter 2: BIOS setup X X. The ASUS Update utility is copied to : • Save the current BIOS file • Download the latest BIOS file from the Internet • Update the BIOS from an updated BIOS file • Update the BIOS...

P5GPL English user's manual
Page 55
N e x t. Click N e x t. The ASUS Update main window appears. 2. Launch the ASUS Update utility from the nearest you to avoid network drop-down menu, then click traffic, or click A u t o S e l e c t. ASUS P5GPL 2-9 Select U p d a t e B I n t e r n e t option from the Windows® desktop by clicking S t a r t > P r o g r a m s > A S U S > A S U S U p d a t e > A S U S U p d a t e. Select the ASUS FTP site t h e I O S f r o m 3. Updating the BIOS through the Internet To update the BIOS through the Internet: 1.
N e x t. Click N e x t. The ASUS Update main window appears. 2. Launch the ASUS Update utility from the nearest you to avoid network drop-down menu, then click traffic, or click A u t o S e l e c t. ASUS P5GPL 2-9 Select U p d a t e B I n t e r n e t option from the Windows® desktop by clicking S t a r t > P r o g r a m s > A S U S > A S U S U p d a t e > A S U S U p d a t e. Select the ASUS FTP site t h e I O S f r o m 3. Updating the BIOS through the Internet To update the BIOS through the Internet: 1.

P5GPL English user's manual
Page 56
... you wish to avail all its features. Always update the utility to download. 4. Updating the BIOS through a BIOS file To update the BIOS through the Internet. Locate the BIOS file from the Windows® desktop by clicking S t a r t > P r o g r a m s > A S U S > A S U S U p d a t e > A S U S U p d a t e. Launch the ASUS Update utility from the O p e n window, then click S a v e. 4. Select U p d a t e B I O S f r o m a f i l e option from the drop-down menu, then...
... you wish to avail all its features. Always update the utility to download. 4. Updating the BIOS through a BIOS file To update the BIOS through the Internet. Locate the BIOS file from the Windows® desktop by clicking S t a r t > P r o g r a m s > A S U S > A S U S U p d a t e > A S U S U p d a t e. Launch the ASUS Update utility from the O p e n window, then click S a v e. 4. Select U p d a t e B I O S f r o m a f i l e option from the drop-down menu, then...


