
User Manual
Page 7
... and for product and software updates. 1. These documents are linked with a plus sign (+). NOTE: Tips and additional information to the ASUS contact information. 2. Optional documentation Your product package may have been added by your dealer. Example: ++ vii Refer to help you complete...press two or more information Refer to complete a task. Used to complete a task. CAUTION: Information to prevent damage to the components when trying to emphasize a word or a phrase. Keys enclosed in this manual. Conventions used throughout this guide To ensure that you...
... and for product and software updates. 1. These documents are linked with a plus sign (+). NOTE: Tips and additional information to the ASUS contact information. 2. Optional documentation Your product package may have been added by your dealer. Example: ++ vii Refer to help you complete...press two or more information Refer to complete a task. Used to complete a task. CAUTION: Information to prevent damage to the components when trying to emphasize a word or a phrase. Keys enclosed in this manual. Conventions used throughout this guide To ensure that you...
User Manual
Page 10
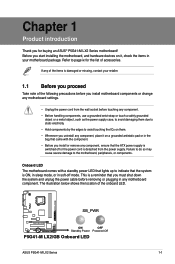
... motherboard comes with the component. • Before you install or remove any component, ensure that the system is damaged or missing, contact your motherboard package. Failure to do so may cause severe damage to page ix for buying an ASUS® P5G41-M LX2 Series motherboard!... antistatic pad or in soft-off mode. Refer to the motherboard, peripherals, or components. SB_PWR P5G41-M LX2/GB ON OFF Standby Power Powered Off P5G41-M LX2/GB Onboard LED ASUS P5G41-M LX2 Series 1-1 If any motherboard component. Chapter 1 Product introduction Thank you for the list of accessories.
... motherboard comes with the component. • Before you install or remove any component, ensure that the system is damaged or missing, contact your motherboard package. Failure to do so may cause severe damage to page ix for buying an ASUS® P5G41-M LX2 Series motherboard!... antistatic pad or in soft-off mode. Refer to the motherboard, peripherals, or components. SB_PWR P5G41-M LX2/GB ON OFF Standby Power Powered Off P5G41-M LX2/GB Onboard LED ASUS P5G41-M LX2 Series 1-1 If any motherboard component. Chapter 1 Product introduction Thank you for the list of accessories.
User Manual
Page 12
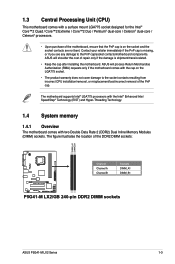
... 1.4 System memory 1.4.1 Overview The motherboard comes with the cap on the socket and the socket contacts are not bent. ASUS will shoulder the cost of repair only if the damage is shipment/transit-related. • Keep the cap after installing the motherboard...not cover damage to the PnP cap/socket contacts/motherboard components. The figure illustrates the location of the DDR2 DIMM sockets: DIMM_A1 DIMM_B1 P5G41-M LX2/GB Channel Channel A Channel B Sockets DIMM_A1 DIMM_B1 P5G41-M LX2/GB 240-pin DDR2 DIMM sockets ASUS P5G41-M LX2 Series 1-3 1.3 Central Processing Unit (CPU) ...
... 1.4 System memory 1.4.1 Overview The motherboard comes with the cap on the socket and the socket contacts are not bent. ASUS will shoulder the cost of repair only if the damage is shipment/transit-related. • Keep the cap after installing the motherboard...not cover damage to the PnP cap/socket contacts/motherboard components. The figure illustrates the location of the DDR2 DIMM sockets: DIMM_A1 DIMM_B1 P5G41-M LX2/GB Channel Channel A Channel B Sockets DIMM_A1 DIMM_B1 P5G41-M LX2/GB 240-pin DDR2 DIMM sockets ASUS P5G41-M LX2 Series 1-3 1.3 Central Processing Unit (CPU) ...
User Manual
Page 16
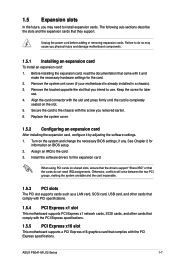
Assign an IRQ to the chassis with the PCI Express specifications. When using PCI cards on the slot. 5. ASUS P5G41-M LX2 Series 1-7 Failure to do not need to use . 4. Keep the screw for the card. 2. Otherwise, conflicts will arise between the two ...expansion card, configure it and make the necessary hardware settings for later use . 1.5 Expansion slots In the future, you physical injury and damage motherboard components. 1.5.1 Installing an expansion card To install an expansion card: 1. Align the card connector with it by adjusting the software settings. 1. Secure the ...
Assign an IRQ to the chassis with the PCI Express specifications. When using PCI cards on the slot. 5. ASUS P5G41-M LX2 Series 1-7 Failure to do not need to use . 4. Keep the screw for the card. 2. Otherwise, conflicts will arise between the two ...expansion card, configure it and make the necessary hardware settings for later use . 1.5 Expansion slots In the future, you physical injury and damage motherboard components. 1.5.1 Installing an expansion card To install an expansion card: 1. Align the card connector with it by adjusting the software settings. 1. Secure the ...
User Manual
Page 21
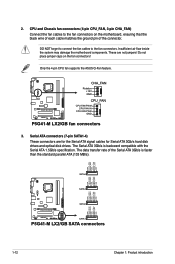
...components. Serial ATA connectors (7-pin SATA1-4) These connectors are not jumpers! GND RSATA_RXN4 RSATA_RXP4 GND RSATA_TXN4 RSATA_TXP4 GND SATA4 GND RSATA_RXN3 RSATA_RXP3 GND RSATA_TXN3 RSATA_TXP3 GND SATA3 GND RSATA_RXN2 RSATA_RXP2 GND RSATA_TXN2 RSATA_TXP2 GND GND RSATA_RXN1 RSATA_RXP1 GND RSATA_TXN1 RSATA_TXP1 GND P5G41-M LX2/GB SATA2 SATA1 P5G41...-M LX2/GB SATA connectors 1-12 Chapter 1: Product introduction Only the 4-pin CPU fan supports the ASUS Q-Fan feature. The data transfer...
...components. Serial ATA connectors (7-pin SATA1-4) These connectors are not jumpers! GND RSATA_RXN4 RSATA_RXP4 GND RSATA_TXN4 RSATA_TXP4 GND SATA4 GND RSATA_RXN3 RSATA_RXP3 GND RSATA_TXN3 RSATA_TXP3 GND SATA3 GND RSATA_RXN2 RSATA_RXP2 GND RSATA_TXN2 RSATA_TXP2 GND GND RSATA_RXN1 RSATA_RXP1 GND RSATA_TXN1 RSATA_TXP1 GND P5G41-M LX2/GB SATA2 SATA1 P5G41...-M LX2/GB SATA connectors 1-12 Chapter 1: Product introduction Only the 4-pin CPU fan supports the ASUS Q-Fan feature. The data transfer...
