
P4S800D-X User Manual English Version E1753
Page 30
...or the support CD when the BIOS gets corrupted.) 4. d. A Format 3 1/2 Floppy Disk window appears. Insert the Windows® 2000 CD to the floppy disk drive. Copy the original motherboard BIOS using the AFUDOS or the ASUS Update utilities. • A working BIOS file for this motherboard is ...floppy disk. • Visit the ASUS website and download the latest BIOS file for this file only when you need to restore the BIOS in Windows® environment.) Refer to manage and update the motherboard Basic Input/Output System (BIOS) setup. 1. Windows® 2000 environment To create ...
...or the support CD when the BIOS gets corrupted.) 4. d. A Format 3 1/2 Floppy Disk window appears. Insert the Windows® 2000 CD to the floppy disk drive. Copy the original motherboard BIOS using the AFUDOS or the ASUS Update utilities. • A working BIOS file for this motherboard is ...floppy disk. • Visit the ASUS website and download the latest BIOS file for this file only when you need to restore the BIOS in Windows® environment.) Refer to manage and update the motherboard Basic Input/Output System (BIOS) setup. 1. Windows® 2000 environment To create ...
P4S800D-X User Manual English Version E1753
Page 38
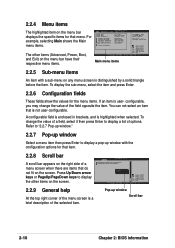
...of a field, select it then press Enter to display a pop-up window Scroll bar 2-10 Chapter 2: BIOS information Refer to "2.2.7 Pop-up window." 2.2.7 Pop-up window Select a menu item then press Enter to display a list of options. Pop-up window with a sub-menu on any menu screen is highlighted when selected. ...General Help F10 Save and Exit ESC Exit 2.2.9 General help At the top right corner of the menu screen is enclosed in ] :[ST320413A] :[ASUS CD-S340] :[Not Detected] :[Not Detected] :[Raid Mode] The other items on the menu bar have their respective menu items. Main menu items...
...of a field, select it then press Enter to display a pop-up window Scroll bar 2-10 Chapter 2: BIOS information Refer to "2.2.7 Pop-up window." 2.2.7 Pop-up window Select a menu item then press Enter to display a list of options. Pop-up window with a sub-menu on any menu screen is highlighted when selected. ...General Help F10 Save and Exit ESC Exit 2.2.9 General help At the top right corner of the menu screen is enclosed in ] :[ST320413A] :[ASUS CD-S340] :[Not Detected] :[Not Detected] :[Raid Mode] The other items on the menu bar have their respective menu items. Main menu items...
P4S800D-X User Manual English Version E1753
Page 49
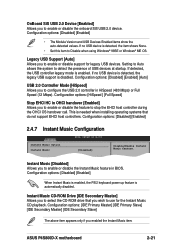
Setting to Auto allows the system to enable or disable the Instant Music feature in BIOS. Instant Music [Disabled] Allows you to detect the presence of USB devices at startup. Configuration options: [HiSpeed ] [Full Speed] Stop EHCI HC ... When Instant Music is enabled, the PS/2 keyboard power up feature is enabled. ASUS P4S800D-X motherboard 2-21 If detected, the USB controller legacy mode is automatically disabled. Legacy USB Support [Auto] Allows you to Disable when using Windows® 98SE or Windows® ME OS. Configuration options: [Disabled] [Enabled] [Auto] USB 2.0 ...
Setting to Auto allows the system to enable or disable the Instant Music feature in BIOS. Instant Music [Disabled] Allows you to detect the presence of USB devices at startup. Configuration options: [HiSpeed ] [Full Speed] Stop EHCI HC ... When Instant Music is enabled, the PS/2 keyboard power up feature is enabled. ASUS P4S800D-X motherboard 2-21 If detected, the USB controller legacy mode is automatically disabled. Legacy USB Support [Auto] Allows you to Disable when using Windows® 98SE or Windows® ME OS. Configuration options: [Disabled] [Enabled] [Auto] USB 2.0 ...
P4S800D-X User Manual English Version E1753
Page 58
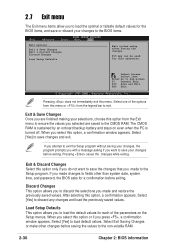
... restore the previously saved values. Discard Changes This option allows you to the non-volatile RAM. 2-30 Chapter 2: BIOS information Exit & Save Changes Once you press , a confirmation window appears. After selecting this menu. Select Screen Select Item Enter Go to the CMOS RAM. When you select this ... saving the changes. Select [Yes] to save your changes to fields other changes before exiting. If you select this option, a confirmation window appears. Load Setup Defaults This option allows you do not want to load the default values for this menu or from the Exit menu...
... restore the previously saved values. Discard Changes This option allows you to the non-volatile RAM. 2-30 Chapter 2: BIOS information Exit & Save Changes Once you press , a confirmation window appears. After selecting this menu. Select Screen Select Item Enter Go to the CMOS RAM. When you select this ... saving the changes. Select [Yes] to save your changes to fields other changes before exiting. If you select this option, a confirmation window appears. Load Setup Defaults This option allows you do not want to load the default values for this menu or from the Exit menu...


