
Motherboard DIY Troubleshooting Guide
Page 8
... the correct voltage in any damage, contact your dealer immediately. • To avoid short circuits, keep paper clips, screws, and staples away from connectors, slots, sockets and circuitry. • Avoid dust, humidity, and temperature extremes. Operation safety • Before installing the motherboard and adding devices on a stable surface. • If you...
... the correct voltage in any damage, contact your dealer immediately. • To avoid short circuits, keep paper clips, screws, and staples away from connectors, slots, sockets and circuitry. • Avoid dust, humidity, and temperature extremes. Operation safety • Before installing the motherboard and adding devices on a stable surface. • If you...
Motherboard DIY Troubleshooting Guide
Page 11
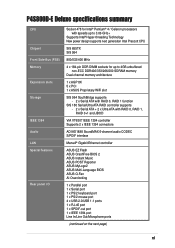
P4S800D-E Deluxe specifications summary CPU Chipset Front Side Bus (FSB) Memory Expansion slots Storage IEEE 1394 Audio LAN Special features Rear panel I/O Socket 478 for Intel® Pentium® 4 / Celeron processors with speeds up to 3.06...controller Supports 2 x IEEE 1394 connectors ADI AD1888 SoundMAX 6-channel audio CODEC S/PDIF interface Marvell® Gigabit Ethernet controller ASUS EZ Flash ASUS CrashFree BIOS 2 ASUS Instant Music ASUS POST Reporter ASUS MyLogo2 ASUS Multi-Language BIOS ASUS Q-Fan AI Overclocking 1 x Parallel port 1 x Serial port 1 x PS/2 keyboard port 1 x PS/2 mouse...
P4S800D-E Deluxe specifications summary CPU Chipset Front Side Bus (FSB) Memory Expansion slots Storage IEEE 1394 Audio LAN Special features Rear panel I/O Socket 478 for Intel® Pentium® 4 / Celeron processors with speeds up to 3.06...controller Supports 2 x IEEE 1394 connectors ADI AD1888 SoundMAX 6-channel audio CODEC S/PDIF interface Marvell® Gigabit Ethernet controller ASUS EZ Flash ASUS CrashFree BIOS 2 ASUS Instant Music ASUS POST Reporter ASUS MyLogo2 ASUS Multi-Language BIOS ASUS Q-Fan AI Overclocking 1 x Parallel port 1 x Serial port 1 x PS/2 keyboard port 1 x PS/2 mouse...
Motherboard DIY Troubleshooting Guide
Page 16
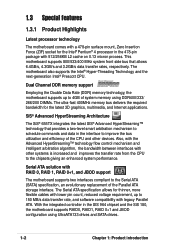
1.3 Special features 1.3.1 Product Highlights Latest processor technology The motherboard comes with a 478-pin surface mount, Zero Insertion Force (ZIF) socket for the Intel® Pentium® 4 processor in the 478-pin package with lower pin count, reduced voltage requirement, up to improve the bus utilization ...
1.3 Special features 1.3.1 Product Highlights Latest processor technology The motherboard comes with a 478-pin surface mount, Zero Insertion Force (ZIF) socket for the Intel® Pentium® 4 processor in the 478-pin package with lower pin count, reduced voltage requirement, up to improve the bus utilization ...

Motherboard DIY Troubleshooting Guide
Page 23
2.1 Before you proceed Take note of the onboard LED. ® P4S800D-E P4S800D-E Onboard LED SB_PWR1 ON Standby Power OFF Powered Off ASUS P4S800D-E Deluxe motherboard 2-1 Use a grounded wrist strap or touch a safely grounded object or to a metal object, such as the power supply case, before ... antistatic pad or in the bag that the ATX power supply is switched off mode, a reminder that the system is detached from the wall socket before handling components to avoid damaging them . 4. Failure to do so may cause severe damage to static electricity. 3. Onboard LED The motherboard ...
2.1 Before you proceed Take note of the onboard LED. ® P4S800D-E P4S800D-E Onboard LED SB_PWR1 ON Standby Power OFF Powered Off ASUS P4S800D-E Deluxe motherboard 2-1 Use a grounded wrist strap or touch a safely grounded object or to a metal object, such as the power supply case, before ... antistatic pad or in the bag that the ATX power supply is switched off mode, a reminder that the system is detached from the wall socket before handling components to avoid damaging them . 4. Failure to do so may cause severe damage to static electricity. 3. Onboard LED The motherboard ...

Motherboard DIY Troubleshooting Guide
Page 25
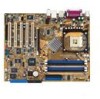
30.5cm (12.0in) 2.2.3 Motherboard layout 24.5cm (9.6in) PS/2KBMS T: Mouse B: Keyboard Socket 478 PWR_FAN1 CPU_FAN1 SPDIF_O ATX Power Connector SEC_IDE1 PRI_IDE1 DDR DIMM_A1 (64 bit,184-pin module) DDR DIMM_A2 (64 bit,184-pin ...SPDIF_OUT FP_AUDIO Accelerated Graphics Port (AGP1) PCI1 PCI2 ® PCI3 P4S800D-E PCI4 USB56 USBPW56 USBPW78 USB78 VIA VT6307 SiS 180 SiS 964 CR2032 3V Lithium Cell CMOS Power SATA2 SATA1 CLRTC1 SATA4 PRI_RAID1 4Mbit Firmware Hub Super I/O PCI5 SB_PWR1 WIFI IE1394_2 SATA3 COM2 GAME1 CHASSIS1 CHA_FAN1 PANEL1 ASUS P4S800D-E Deluxe motherboard 2-3
30.5cm (12.0in) 2.2.3 Motherboard layout 24.5cm (9.6in) PS/2KBMS T: Mouse B: Keyboard Socket 478 PWR_FAN1 CPU_FAN1 SPDIF_O ATX Power Connector SEC_IDE1 PRI_IDE1 DDR DIMM_A1 (64 bit,184-pin module) DDR DIMM_A2 (64 bit,184-pin ...SPDIF_OUT FP_AUDIO Accelerated Graphics Port (AGP1) PCI1 PCI2 ® PCI3 P4S800D-E PCI4 USB56 USBPW56 USBPW78 USB78 VIA VT6307 SiS 180 SiS 964 CR2032 3V Lithium Cell CMOS Power SATA2 SATA1 CLRTC1 SATA4 PRI_RAID1 4Mbit Firmware Hub Super I/O PCI5 SB_PWR1 WIFI IE1394_2 SATA3 COM2 GAME1 CHASSIS1 CHA_FAN1 PANEL1 ASUS P4S800D-E Deluxe motherboard 2-3

Motherboard DIY Troubleshooting Guide
Page 28
...Install the CPU. 2. 2.3 Central Processing Unit (CPU) 2.3.1 Overview The motherboard comes with a surface mount 478-pin Zero Insertion Force (ZIF) socket designed for the Intel® Pentium® 4 processor. Notes on this motherboard: 1. To use the Hyper-Threading compliler to ensure system stability ...This mark should match a specific corner on Hyper-Threading Technology, visit www.intel.com/info/hyperthreading. For more information on the socket to enable the Hyper-Threading Technology item in BIOS to compile the code. Make sure to ensure correct installation. Reboot the ...
...Install the CPU. 2. 2.3 Central Processing Unit (CPU) 2.3.1 Overview The motherboard comes with a surface mount 478-pin Zero Insertion Force (ZIF) socket designed for the Intel® Pentium® 4 processor. Notes on this motherboard: 1. To use the Hyper-Threading compliler to ensure system stability ...This mark should match a specific corner on Hyper-Threading Technology, visit www.intel.com/info/hyperthreading. For more information on the socket to enable the Hyper-Threading Technology item in BIOS to compile the code. Make sure to ensure correct installation. Reboot the ...

Motherboard DIY Troubleshooting Guide
Page 29
Socket Lever 90 - 100 Make sure that the socket lever is lifted up to a 90°-100° angle. Locate the 478-pin ZIF socket on the motherboard. 2. ASUS P4S800D-E Deluxe motherboard 2-7 Unlock the socket by pressing the lever sideways, then lift it up to install a CPU. 1. 2.3.2 Installing the CPU Follow these steps to 90°-100° angle, otherwise the CPU does not fit in completely.
Socket Lever 90 - 100 Make sure that the socket lever is lifted up to a 90°-100° angle. Locate the 478-pin ZIF socket on the motherboard. 2. ASUS P4S800D-E Deluxe motherboard 2-7 Unlock the socket by pressing the lever sideways, then lift it up to install a CPU. 1. 2.3.2 Installing the CPU Follow these steps to 90°-100° angle, otherwise the CPU does not fit in completely.

Motherboard DIY Troubleshooting Guide
Page 30
Position the CPU above the socket such that it fits in one correct orientation. The lever clicks on the side tab to secure the CPU. DO NOT force the CPU into the socket until it is in place, push down the socket lever to indicate that its marked corner matches the base of the socket lever. 4. Carefully insert the CPU into the socket to prevent bending the pins and damaging the CPU! 5. Gold Mark The CPU fits only in place. When the CPU is locked. 2-8 Chapter 2: Hardware information 3.
Position the CPU above the socket such that it fits in one correct orientation. The lever clicks on the side tab to secure the CPU. DO NOT force the CPU into the socket until it is in place, push down the socket lever to indicate that its marked corner matches the base of the socket lever. 4. Carefully insert the CPU into the socket to prevent bending the pins and damaging the CPU! 5. Gold Mark The CPU fits only in place. When the CPU is locked. 2-8 Chapter 2: Hardware information 3.

Motherboard DIY Troubleshooting Guide
Page 34
... 3+GB (a little less than the recommended configurations may install 64MB, 128MB, 256MB, 512MB, and 1GB DDR DIMMs into the DIMM sockets using the memory configurations in Table 1. 2. 2.4 System memory 2.4.1 Overview The motherboard comes with the same CAS latency. DIMM_A1 DIMM_A2 ...DIMM_B1 DIMM_B2 80 Pins 104 Pins ® P4S800D-E P4S800D-E 184-Pin DDR DIMM Sockets 2.4.2 Memory configurations You may cause memory sizing error or system boot failure. See list of Qualified Vendors List on memory ...
... 3+GB (a little less than the recommended configurations may install 64MB, 128MB, 256MB, 512MB, and 1GB DDR DIMMs into the DIMM sockets using the memory configurations in Table 1. 2. 2.4 System memory 2.4.1 Overview The motherboard comes with the same CAS latency. DIMM_A1 DIMM_A2 ...DIMM_B1 DIMM_B2 80 Pins 104 Pins ® P4S800D-E P4S800D-E 184-Pin DDR DIMM Sockets 2.4.2 Memory configurations You may cause memory sizing error or system boot failure. See list of Qualified Vendors List on memory ...

Motherboard DIY Troubleshooting Guide
Page 35
... and DIMM_B2 (black sockets) 2.4.3 Qualified Vendor List The following table lists the DDR400 memory modules that have been tested and qualified for the latest QVL. Populated - support for 4 modules inserted into either the blue slots or the yellow slots as two pairs of Dual-channel memory configuration . Populated - ASUS P4S800D-E Deluxe motherboard 2-13 Populated...
... and DIMM_B2 (black sockets) 2.4.3 Qualified Vendor List The following table lists the DDR400 memory modules that have been tested and qualified for the latest QVL. Populated - support for 4 modules inserted into either the blue slots or the yellow slots as two pairs of Dual-channel memory configuration . Populated - ASUS P4S800D-E Deluxe motherboard 2-13 Populated...

Motherboard DIY Troubleshooting Guide
Page 36
... the DIMM is keyed with a notch so that the notch on the DIMM matches the break on the socket. Support the DIMM lightly with extra force. 2. Firmly insert the DIMM into a socket to avoid damaging the DIMM. 3. Failure to do so may cause severe damage to unlock the DIMM.... DIMM Make sure to remove a DIMM. 1. DDR DIMM NOTCH Unlocked Retaining Clip A DDR DIMM is properly seated. DO NOT force a DIMM into the socket until the retaining clips snap back in only one direction. Locked Retaining Clip 2.4.5 Removing a DIMM Follow these steps to unplug the power supply before adding...
... the DIMM is keyed with a notch so that the notch on the DIMM matches the break on the socket. Support the DIMM lightly with extra force. 2. Firmly insert the DIMM into a socket to avoid damaging the DIMM. 3. Failure to do so may cause severe damage to unlock the DIMM.... DIMM Make sure to remove a DIMM. 1. DDR DIMM NOTCH Unlocked Retaining Clip A DDR DIMM is properly seated. DO NOT force a DIMM into the socket until the retaining clips snap back in only one direction. Locked Retaining Clip 2.4.5 Removing a DIMM Follow these steps to unplug the power supply before adding...

Motherboard DIY Troubleshooting Guide
Page 59
.... • Install supported DDR DIMMs into the CPU socket. See section "2.3 Central Processing Unit (CPU)" for supported processors. • Check the CPU if properly installed. • Call ASUS technical support for instruction on installing a DIMM. • Install a PCI VGA card into one of the problem. ASUS P4S800D-E Deluxe motherboard 3-3 These POST messages are not defective...
.... • Install supported DDR DIMMs into the CPU socket. See section "2.3 Central Processing Unit (CPU)" for supported processors. • Check the CPU if properly installed. • Call ASUS technical support for instruction on installing a DIMM. • Install a PCI VGA card into one of the problem. ASUS P4S800D-E Deluxe motherboard 3-3 These POST messages are not defective...


