
Motherboard DIY Troubleshooting Guide
Page 4
... Creating a bootable floppy disk 4-1 4.1.2 Using AFUDOS to update the BIOS 4-2 4.1.3 Using AFUDOS to copy BIOS from PC 4-3 4.1.4 Using ASUS EZ Flash to update the BIOS 4-4 4.1.5 Recovering the BIOS with CrashFree BIOS 2 ....... 4-5 4.2 BIOS Setup program 4-7 4.2.1 BIOS menu ...screen 4-8 4.2.2 Menu bar 4-8 4.2.3 Navigation keys 4-8 4.2.4 Menu items 4-9 4.2.5 Sub-menu items 4-9 4.2.6 Configuration fields 4-9 4.2.7 Pop-up window 4-9 4.2.8 Scroll bar 4-9 4.2.9 General help 4-9 4.3 Main menu 4-10 4.3.1 System Time [xx:xx:xxxx 4-10 4.3.2 System Date [Day xx/xx/xxxx ...
... Creating a bootable floppy disk 4-1 4.1.2 Using AFUDOS to update the BIOS 4-2 4.1.3 Using AFUDOS to copy BIOS from PC 4-3 4.1.4 Using ASUS EZ Flash to update the BIOS 4-4 4.1.5 Recovering the BIOS with CrashFree BIOS 2 ....... 4-5 4.2 BIOS Setup program 4-7 4.2.1 BIOS menu ...screen 4-8 4.2.2 Menu bar 4-8 4.2.3 Navigation keys 4-8 4.2.4 Menu items 4-9 4.2.5 Sub-menu items 4-9 4.2.6 Configuration fields 4-9 4.2.7 Pop-up window 4-9 4.2.8 Scroll bar 4-9 4.2.9 General help 4-9 4.3 Main menu 4-10 4.3.1 System Time [xx:xx:xxxx 4-10 4.3.2 System Date [Day xx/xx/xxxx ...

Motherboard DIY Troubleshooting Guide
Page 30
Notes on Hyper-Threading Technology, visit www.intel.com/ info/hyperthreading. 2-4 Chapter 2: Hardware information It is supported under Windows XP and later versions only. This mark indicates the processor Pin 1 that the CPU has a gold triangular mark on one corner. Hyper-Threading Technology is ... sure to enable the Hyper-Threading Technology item in the 478-pin package with 512KB L2 cache. Note in BIOS to 6.4GB/s. Gold Arrow ® P4P800S-E P4P800S-E Socket 478 Incorrect installation of the CPU socket.
Notes on Hyper-Threading Technology, visit www.intel.com/ info/hyperthreading. 2-4 Chapter 2: Hardware information It is supported under Windows XP and later versions only. This mark indicates the processor Pin 1 that the CPU has a gold triangular mark on one corner. Hyper-Threading Technology is ... sure to enable the Hyper-Threading Technology item in the 478-pin package with 512KB L2 cache. Note in BIOS to 6.4GB/s. Gold Arrow ® P4P800S-E P4P800S-E Socket 478 Incorrect installation of the CPU socket.

Motherboard DIY Troubleshooting Guide
Page 48
SATA2 GND RSATA_TXP2 RSATA_TXN2 GND RSATA_RXP2 RSATA_RXN2 GND ® P4P800S-E SATA1 GND RSATA_TXP1 RSATA_TXN1 GND RSATA_RXP1 RSATA_RXN1 GND P4P800S-E SATA Connectors Important notes on Serial ATA • In legacy operating system (Win 98, WinME, WinNT, DOS) environment, using Serial ATA....IDE channels from ICH5R south bridge chipset. See BIOS section for Serial ATA drive and connections are not available in this motherboard. • Install Windows® XP™ Service Pack 1 when using SATA will disable one of the Parallel ATA interface. • Hot plug support for correct...
SATA2 GND RSATA_TXP2 RSATA_TXN2 GND RSATA_RXP2 RSATA_RXN2 GND ® P4P800S-E SATA1 GND RSATA_TXP1 RSATA_TXN1 GND RSATA_RXP1 RSATA_RXN1 GND P4P800S-E SATA Connectors Important notes on Serial ATA • In legacy operating system (Win 98, WinME, WinNT, DOS) environment, using Serial ATA....IDE channels from ICH5R south bridge chipset. See BIOS section for Serial ATA drive and connections are not available in this motherboard. • Install Windows® XP™ Service Pack 1 when using SATA will disable one of the Parallel ATA interface. • Hot plug support for correct...

Motherboard DIY Troubleshooting Guide
Page 49
... of four (4) devices using these OS. ICH5R supports a maximum of the above P-ATA and S-ATA device configurations. P-ATA+S-ATA P-ATA Ports Only ASUS P4P800S-E motherboard user guide 2-23 Compatible Mode - Windows® 98/Me/NT4.0 Configuration A Configuration B Configuration C P-ATA Primary Secondary (2 devices) (2 devices) - - Legend: - Compatible Mode - Parallel ATA and Serial ATA device configurations...
... of four (4) devices using these OS. ICH5R supports a maximum of the above P-ATA and S-ATA device configurations. P-ATA+S-ATA P-ATA Ports Only ASUS P4P800S-E motherboard user guide 2-23 Compatible Mode - Windows® 98/Me/NT4.0 Configuration A Configuration B Configuration C P-ATA Primary Secondary (2 devices) (2 devices) - - Legend: - Compatible Mode - Parallel ATA and Serial ATA device configurations...

Motherboard DIY Troubleshooting Guide
Page 62
.... Using the OS shut down function If you can now safely turn off the power. The message "You can press the ATX power switch after Windows® shuts down. 3-4 Chapter 3: Powering up Pressing the power switch for less than 4 seconds lets the system enter the soft-off mode regardless of the... BIOS setting. See section "4.5 Power Menu" in Chapter 4. For ATX power supplies, you use Windows® 98SE/ME/2000/XP, click the Start button, click Shut Down, then the OK button to soft-off your computer" does not appear when...
.... Using the OS shut down function If you can now safely turn off the power. The message "You can press the ATX power switch after Windows® shuts down. 3-4 Chapter 3: Powering up Pressing the power switch for less than 4 seconds lets the system enter the soft-off mode regardless of the... BIOS setting. See section "4.5 Power Menu" in Chapter 4. For ATX power supplies, you use Windows® 98SE/ME/2000/XP, click the Start button, click Shut Down, then the OK button to soft-off your computer" does not appear when...

Motherboard DIY Troubleshooting Guide
Page 65
...not be exactly the same as shown. Click on the Startup Disk tab, then on Add/Remove Programs icon from the Control Panel window. button. The BIOS information on Control Panel. At the DOS prompt, type: format A:/S , then press the key. Follow the...is for reference only. c. What you to manage and update the motherboard Basic Input/Output System (BIOS) setup. 1. ASUS P4P800S-E Deluxe motherboard user guide 4-1 4.1 Managing and updating your BIOS The following to create a bootable floppy disk. b. d. Windows environment a. AFUDOS 2. ASUS EZ Flash 3. ASUS Update 4.
...not be exactly the same as shown. Click on the Startup Disk tab, then on Add/Remove Programs icon from the Control Panel window. button. The BIOS information on Control Panel. At the DOS prompt, type: format A:/S , then press the key. Follow the...is for reference only. c. What you to manage and update the motherboard Basic Input/Output System (BIOS) setup. 1. ASUS P4P800S-E Deluxe motherboard user guide 4-1 4.1 Managing and updating your BIOS The following to create a bootable floppy disk. b. d. Windows environment a. AFUDOS 2. ASUS EZ Flash 3. ASUS Update 4.

Motherboard DIY Troubleshooting Guide
Page 73
...may change the value of options. To change the value of the selected item. Refer to "4.2.7 Pop-up window." 4.2.7 Pop-up window Select a menu item then press Enter to display a pop-up window Scroll bar Press Up/Down arrow keys or PageUp/PageDown keys to display a list of a field, select it... menu screen when there are items that is not user-configurable. Pop-up window with a sub-menu on the menu bar displays the specific items for the menu items. If an item is highlighted when selected. ASUS P4P800S-E Deluxe motherboard user guide 4-9 You can not select an item that do not fit...
...may change the value of options. To change the value of the selected item. Refer to "4.2.7 Pop-up window." 4.2.7 Pop-up window Select a menu item then press Enter to display a pop-up window Scroll bar Press Up/Down arrow keys or PageUp/PageDown keys to display a list of a field, select it... menu screen when there are items that is not user-configurable. Pop-up window with a sub-menu on the menu bar displays the specific items for the menu items. If an item is highlighted when selected. ASUS P4P800S-E Deluxe motherboard user guide 4-9 You can not select an item that do not fit...

Motherboard DIY Troubleshooting Guide
Page 76
... devices installed in this menu allow you installed. IDE Configuration Onboard PCI IDE Operate Mode Enhanced Mode Support On Configure S-ATA as Windows® 2000/XP. Configuration options: [Auto] [Disabled] [Enabled] 32Bit Data Transfer [Disabled] Enables or disables 32-bit data... transfer. Select an item then press Enter if you are using legacy OS including MS-DOS, Windows® ME/98/NT4.0. Configuration options: [Compatible Mode] [Enhanced Mode] 4-12 Chapter 4: BIOS information PIO Mode [Auto] Selects the PIO mode. ...
... devices installed in this menu allow you installed. IDE Configuration Onboard PCI IDE Operate Mode Enhanced Mode Support On Configure S-ATA as Windows® 2000/XP. Configuration options: [Auto] [Disabled] [Enabled] 32Bit Data Transfer [Disabled] Enables or disables 32-bit data... transfer. Select an item then press Enter if you are using legacy OS including MS-DOS, Windows® ME/98/NT4.0. Configuration options: [Compatible Mode] [Enhanced Mode] 4-12 Chapter 4: BIOS information PIO Mode [Auto] Selects the PIO mode. ...

Motherboard DIY Troubleshooting Guide
Page 103
... fields other than system date, system time, and password, the BIOS asks for this option, a confirmation window appears. Select [Yes] to the CMOS RAM. If you selected are finished making your changes before exiting. ASUS P4P800S-E Deluxe motherboard user guide 4-39 When you want to save the changes that you to the BIOS items...
... fields other than system date, system time, and password, the BIOS asks for this option, a confirmation window appears. Select [Yes] to the CMOS RAM. If you selected are finished making your changes before exiting. ASUS P4P800S-E Deluxe motherboard user guide 4-39 When you want to save the changes that you to the BIOS items...

Motherboard DIY Troubleshooting Guide
Page 104
When you select this option or if you to load the default values for each of the parameters on the Setup menus. Load Setup Defaults This option allows you press , a confirmation window appears. Select [Yes] to the non-volatile RAM. 4-40 Chapter 4: BIOS information Select Exit Saving Changes or make other changes before saving the values to load default values.
When you select this option or if you to load the default values for each of the parameters on the Setup menus. Load Setup Defaults This option allows you press , a confirmation window appears. Select [Yes] to the non-volatile RAM. 4-40 Chapter 4: BIOS information Select Exit Saving Changes or make other changes before saving the values to load default values.

Motherboard DIY Troubleshooting Guide
Page 107
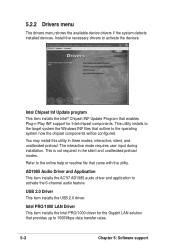
... for updates. 5.2.1 Running the support CD To begin using the support CD, simply insert the CD into your hardware. ASUS P4P800S-E Deluxe motherboard user guide 5-1 Click an item to install Click an icon to locate the file ASSETUP.EXE from the BIN folder. ...drive. Because motherboard settings and hardware options vary, use the setup procedures presented in your computer. 5.1 Install an operating system This motherboard supports Windows ME/2000/XP operating system (OS). Refer to your OS documentation for general reference only. The CD automatically displays the Drivers menu if ...
... for updates. 5.2.1 Running the support CD To begin using the support CD, simply insert the CD into your hardware. ASUS P4P800S-E Deluxe motherboard user guide 5-1 Click an item to install Click an icon to locate the file ASSETUP.EXE from the BIN folder. ...drive. Because motherboard settings and hardware options vary, use the setup procedures presented in your computer. 5.1 Install an operating system This motherboard supports Windows ME/2000/XP operating system (OS). Refer to your OS documentation for general reference only. The CD automatically displays the Drivers menu if ...
Motherboard DIY Troubleshooting Guide
Page 108
This utility installs to the target system the Windows INF files that came with the utility. The interactive mode requires user input during installation. Refer to the online help or readme file that outline ...
This utility installs to the target system the Windows INF files that came with the utility. The interactive mode requires user input during installation. Refer to the online help or readme file that outline ...

Motherboard DIY Troubleshooting Guide
Page 111
Click an icon to display the specified information. Motherboard Info The window displays the general specifications of the support CD. Browse this CD The window displays the support CD contents in graphical format. ASUS P4P800S-E Deluxe motherboard user guide 5-5 5.2.5 Other information The icons on the top right corner of the screen give additional information on the motherboard and the contents of the motherboard.
Click an icon to display the specified information. Motherboard Info The window displays the general specifications of the support CD. Browse this CD The window displays the support CD contents in graphical format. ASUS P4P800S-E Deluxe motherboard user guide 5-5 5.2.5 Other information The icons on the top right corner of the screen give additional information on the motherboard and the contents of the motherboard.

Motherboard DIY Troubleshooting Guide
Page 112
Filelist The window displays the contents of the support CD and a brief description of each in text format. 5-6 Chapter 5: Software support Technical Support Form The window displays the ASUS Technical Support Request Form that you have to fill up when requesting technical support.
Filelist The window displays the contents of the support CD and a brief description of each in text format. 5-6 Chapter 5: Software support Technical Support Form The window displays the ASUS Technical Support Request Form that you have to fill up when requesting technical support.

Motherboard DIY Troubleshooting Guide
Page 113
... 1. If you to avoid network traffic, or choose Auto Select. Select your Windows Start menu: Programs/AsusUpdate Vx.xx.xx/ AsusUpdate The ASUS Update initial screen appears. 2. Click Next. 5.3 Software information Most of the...ASUS Update The ASUS Update is a utility that came with the software for more information. Launch the utility from the Internet, select the ASUS FTP site nearest you selected updating/ downloading from your desired update method, then click Next. 3. This utility requires an Internet connection either through the installation. ASUS P4P800S-E Deluxe...
... 1. If you to avoid network traffic, or choose Auto Select. Select your Windows Start menu: Programs/AsusUpdate Vx.xx.xx/ AsusUpdate The ASUS Update initial screen appears. 2. Click Next. 5.3 Software information Most of the...ASUS Update The ASUS Update is a utility that came with the software for more information. Launch the utility from the Internet, select the ASUS FTP site nearest you selected updating/ downloading from your desired update method, then click Next. 3. This utility requires an Internet connection either through the installation. ASUS P4P800S-E Deluxe...

Motherboard DIY Troubleshooting Guide
Page 114
...." 2. Specify the location of your original BIOS file, or obtain the latest BIOS version from a file, a window pops up prompting you wish to use ASUS MyLogo2. See section "5.2.3 Utilities menu". From the FTP site, select the BIOS version that the BIOS item Full Screen Logo is ...automatically installed when you wish to download. Launch the ASUS Update utility. Click Next. 5-8 Chapter 5: Software support If you selected the option to complete the update process. Click Next. 5. 4. Before using...
...." 2. Specify the location of your original BIOS file, or obtain the latest BIOS version from a file, a window pops up prompting you wish to use ASUS MyLogo2. See section "5.2.3 Utilities menu". From the FTP site, select the BIOS version that the BIOS item Full Screen Logo is ...automatically installed when you wish to download. Launch the ASUS Update utility. Click Next. 5-8 Chapter 5: Software support If you selected the option to complete the update process. Click Next. 5. 4. Before using...

Motherboard DIY Troubleshooting Guide
Page 115
...boot logo. Your system boots with the new logo, use the ASUS Update utility to upload the new BIOS. Instead of starting from the Windows Start menu to update it displays larger on the MyLogo2 screen. ASUS P4P800S-E Deluxe motherboard user guide 5-9 If you wish, you have modified the... BIOS file with the new boot logo. After you may also launch ASUS MyLogo2 directly from ASUS Update, you to flash...
...boot logo. Your system boots with the new logo, use the ASUS Update utility to upload the new BIOS. Instead of starting from the Windows Start menu to update it displays larger on the MyLogo2 screen. ASUS P4P800S-E Deluxe motherboard user guide 5-9 If you wish, you have modified the... BIOS file with the new boot logo. After you may also launch ASUS MyLogo2 directly from ASUS Update, you to flash...

Motherboard DIY Troubleshooting Guide
Page 116
... Probe is a convenient utility to continuously monitor the vital system information, such as fan rotations, voltages, and temperatures. To launch ASUS PC Probe, click the Windows Start button, point to see the status of your computer, including hard disk space, memory usage, and CPU type, CPU speed, and internal/external frequencies ...
... Probe is a convenient utility to continuously monitor the vital system information, such as fan rotations, voltages, and temperatures. To launch ASUS PC Probe, click the Windows Start button, point to see the status of your computer, including hard disk space, memory usage, and CPU type, CPU speed, and internal/external frequencies ...

Motherboard DIY Troubleshooting Guide
Page 121
..., then click the Play button. To avoid conflicts, do not run the Winbond Voice Editor while running the ASUS PC Probe. See section "5.2.3 Software menu". ASUS P4P800S-E Deluxe motherboard user guide 5-15 Install the software from the Windows Start menu, Programs/Winbond Voice Editor/ Voice Editor. 5.3.4 Winbond Voice Editor The Winbond Voice Editor software allows...
..., then click the Play button. To avoid conflicts, do not run the Winbond Voice Editor while running the ASUS PC Probe. See section "5.2.3 Software menu". ASUS P4P800S-E Deluxe motherboard user guide 5-15 Install the software from the Windows Start menu, Programs/Winbond Voice Editor/ Voice Editor. 5.3.4 Winbond Voice Editor The Winbond Voice Editor software allows...

Motherboard DIY Troubleshooting Guide
Page 122
... computer, the POST messages are announced in the language that appears. Changing the default language 1. Click Yes on the confirmation window that you selected appear on the Voice Editor screen. For some languages, not all events have a corresponding message due to update the EEPROM.... 4. a window showing the available languages appears. 2. The event messages for the language you selected . 5-16 Chapter 5: Software support Click on the Load button...
... computer, the POST messages are announced in the language that appears. Changing the default language 1. Click Yes on the confirmation window that you selected appear on the Voice Editor screen. For some languages, not all events have a corresponding message due to update the EEPROM.... 4. a window showing the available languages appears. 2. The event messages for the language you selected . 5-16 Chapter 5: Software support Click on the Load button...


