User Guide
Page 27
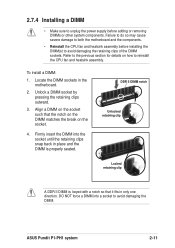
...DIMM into a socket to avoid damaging the DIMM. DO NOT force a DIMM into the socket until the retaining clips snap back in the motherboard. 2. ASUS Pundit P1-PH1 system 2-11 Locate the DIMM sockets in place and the DIMM is keyed with a notch so that the notch on the DIMM matches the break...on the socket. 4. Align a DIMM on the socket such that it fits in only one direction. 2.7.4 Installing a DIMM • Make sure to unplug the power supply before installing the DIMM(s) to avoid damaging the retaining clips of the DIMM sockets. Failure to do so may cause severe damage to both the...
...DIMM into a socket to avoid damaging the DIMM. DO NOT force a DIMM into the socket until the retaining clips snap back in the motherboard. 2. ASUS Pundit P1-PH1 system 2-11 Locate the DIMM sockets in place and the DIMM is keyed with a notch so that the notch on the DIMM matches the break...on the socket. 4. Align a DIMM on the socket such that it fits in only one direction. 2.7.4 Installing a DIMM • Make sure to unplug the power supply before installing the DIMM(s) to avoid damaging the retaining clips of the DIMM sockets. Failure to do so may cause severe damage to both the...
User Guide
Page 33
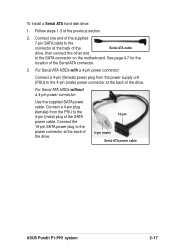
...the power supply unit (PSU) to the power connector at the back of the drive. 15-pin 4-pin (male) Serial ATA power cable ASUS Pundit P1-PH1 system 2-17 Connect the 15-pin SATA power plug to the 4-pin (male) power connector at the back of the drive. For Serial ATA HDDs with a 4-pin power connector...: Connect a 4-pin (female) power plug from the PSU to the 4-pin ...
...the power supply unit (PSU) to the power connector at the back of the drive. 15-pin 4-pin (male) Serial ATA power cable ASUS Pundit P1-PH1 system 2-17 Connect the 15-pin SATA power plug to the 4-pin (male) power connector at the back of the drive. For Serial ATA HDDs with a 4-pin power connector...: Connect a 4-pin (female) power plug from the PSU to the 4-pin ...
User Guide
Page 39
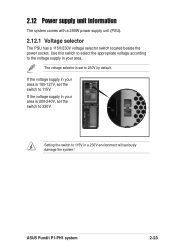
... the switch to 230V by default. If the voltage supply in a 230V environment will seriously damage the system! 2.12 Power supply unit information The system comes with a 250W power supply unit (PSU). 2.12.1 Voltage selector The PSU has a 115V/230V voltage selector switch located beside the power socket. ASUS Pundit P1-PH1 system 2-23 The voltage selector is 100-127V...
... the switch to 230V by default. If the voltage supply in a 230V environment will seriously damage the system! 2.12 Power supply unit information The system comes with a 250W power supply unit (PSU). 2.12.1 Voltage selector The PSU has a 115V/230V voltage selector switch located beside the power socket. ASUS Pundit P1-PH1 system 2-23 The voltage selector is 100-127V...
User Guide
Page 55
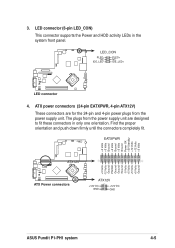
...# Ground Ground Ground -5 Volts +5 Volts +5 Volts +5 Volts Ground ATX12V ® ATX Power connectors ATX12V +12V DC GND +12V DC GND ASUS Pundit P1-PH1 system 4-5 ATX power connectors (24-pin EATXPWR, 4-pin ATX12V) These connectors are for the 24-pin and 4-pin power plugs from the power supply unit are designed to fit these connectors in the system front...
...# Ground Ground Ground -5 Volts +5 Volts +5 Volts +5 Volts Ground ATX12V ® ATX Power connectors ATX12V +12V DC GND +12V DC GND ASUS Pundit P1-PH1 system 4-5 ATX power connectors (24-pin EATXPWR, 4-pin ATX12V) These connectors are for the 24-pin and 4-pin power plugs from the power supply unit are designed to fit these connectors in the system front...

User Guide
Page 79
... Key-in a value (Min=0, Max=23), then press . 3. Press tab to move to the minutes field, then press . 4. This feature requires an ATX power supply that provides at least 1A on the system through a PCI modem. Configuration options: [Min=0] [Max=31] Time (hh:mm:ss) Alarm [0 : 0 :...[Disabled] [Enabled] Power On By RTC Alarm [Disabled] Allows you to monitor power management. Video Off Option [Suspend -> Off] This item determines when to activate the video off feature to turn on the +5VSB lead. Key-in a minute value (Min=0, Max=59), then press . 5. ASUS Pundit P1-PH1 system 5-21
... Key-in a value (Min=0, Max=23), then press . 3. Press tab to move to the minutes field, then press . 4. This feature requires an ATX power supply that provides at least 1A on the system through a PCI modem. Configuration options: [Min=0] [Max=31] Time (hh:mm:ss) Alarm [0 : 0 :...[Disabled] [Enabled] Power On By RTC Alarm [Disabled] Allows you to monitor power management. Video Off Option [Suspend -> Off] This item determines when to activate the video off feature to turn on the +5VSB lead. Key-in a minute value (Min=0, Max=59), then press . 5. ASUS Pundit P1-PH1 system 5-21