User Guide
Page 5
Table of contents Chapter 5: BIOS setup 5.1 Managing and updating your BIOS 5-2 5.1.1 ASUS EZ Flash utility 5-2 5.1.2 Recovering the BIOS with CrashFree BIOS 2 ..... 5-3 5.1.3 ASUS Update 5-5 5.2 BIOS Setup program 5-7 5.2.1 BIOS menu bar 5-8 5.2.2 Legend bar 5-8 5.3 Main Menu 5-10 5.3.1 System Time 5-10 5.3.2 System Date 5-10 5.3.3 Primary IDE Master/Slave; First SATA Master ....5-11 5.3.4 HDD SMART Monitoring 5-12 5.3.5 ...
Table of contents Chapter 5: BIOS setup 5.1 Managing and updating your BIOS 5-2 5.1.1 ASUS EZ Flash utility 5-2 5.1.2 Recovering the BIOS with CrashFree BIOS 2 ..... 5-3 5.1.3 ASUS Update 5-5 5.2 BIOS Setup program 5-7 5.2.1 BIOS menu bar 5-8 5.2.2 Legend bar 5-8 5.3 Main Menu 5-10 5.3.1 System Time 5-10 5.3.2 System Date 5-10 5.3.3 Primary IDE Master/Slave; First SATA Master ....5-11 5.3.4 HDD SMART Monitoring 5-12 5.3.5 ...
User Guide
Page 8
...Starting up This chapter helps you power up the system and install drivers and utilities from the support CD. 4. Chapter 5: BIOS setup This chapter tells how to install components in the system. 3. This guide is organized This guide contains the following parts...general information and installation instructions about the motherboard that comes with hardware knowledge of the ASUS Book size barebone system. Chapter 4: Motherboard information This chapter gives information about the ASUS Book size barebone system. This chapter includes the motherboard layout, jumper settings, and ...
...Starting up This chapter helps you power up the system and install drivers and utilities from the support CD. 4. Chapter 5: BIOS setup This chapter tells how to install components in the system. 3. This guide is organized This guide contains the following parts...general information and installation instructions about the motherboard that comes with hardware knowledge of the ASUS Book size barebone system. Chapter 4: Motherboard information This chapter gives information about the ASUS Book size barebone system. This chapter includes the motherboard layout, jumper settings, and ...
User Guide
Page 31
...9 Primary IDE Channel * These IRQs are usually available for the expansion card. IRQ assignments for information on BIOS setup. 2. Onboard USB 2.0 controller -- -- -- Refer to the card. shared -- Onboard SATA1 --...on the system and change the necessary BIOS settings, if any. Assign an IRQ to the tables below. 3. shared -- Onboard 1394 controller -- -- -- -- -- shared -- F G H -- -- -- -- -- -- -- -- -- -- -- -- -- -- -- -- -- -- -- -- -- -- -- -- ASUS Pundit P1-PH1 system 2-15 Onboard VGA -- Otherwise,...
...9 Primary IDE Channel * These IRQs are usually available for the expansion card. IRQ assignments for information on BIOS setup. 2. Onboard USB 2.0 controller -- -- -- Refer to the card. shared -- Onboard SATA1 --...on the system and change the necessary BIOS settings, if any. Assign an IRQ to the tables below. 3. shared -- Onboard 1394 controller -- -- -- -- -- shared -- F G H -- -- -- -- -- -- -- -- -- -- -- -- -- -- -- -- -- -- -- -- -- -- -- -- ASUS Pundit P1-PH1 system 2-15 Onboard VGA -- Otherwise,...
User Guide
Page 47
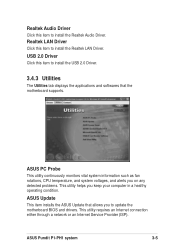
... a network or an Internet Service Provider (ISP). ASUS Pundit P1-PH1 system 3-5 USB 2.0 Driver Click this item to update the motherboard BIOS and drivers. ASUS Update This item installs the ASUS Update that the motherboard supports. Realtek LAN Driver Click this item to install the Realtek Audio Driver. ASUS PC Probe This utility continuously monitors vital system...
... a network or an Internet Service Provider (ISP). ASUS Pundit P1-PH1 system 3-5 USB 2.0 Driver Click this item to update the motherboard BIOS and drivers. ASUS Update This item installs the ASUS Update that the motherboard supports. Realtek LAN Driver Click this item to install the Realtek Audio Driver. ASUS PC Probe This utility continuously monitors vital system...
User Guide
Page 53
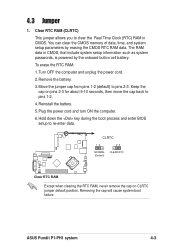
... system passwords, is powered by erasing the CMOS RTC RAM data. Hold down the key during the boot process and enter BIOS setup to pins 2-3. To erase the RTC RAM: 1. ASUS Pundit P1-PH1 system 4-3 Clear RTC RAM (CLRTC) This jumper allows you to pins 1-2. 4. Turn OFF the computer and unplug the power cord...
... system passwords, is powered by erasing the CMOS RTC RAM data. Hold down the key during the boot process and enter BIOS setup to pins 2-3. To erase the RTC RAM: 1. ASUS Pundit P1-PH1 system 4-3 Clear RTC RAM (CLRTC) This jumper allows you to pins 1-2. 4. Turn OFF the computer and unplug the power cord...

User Guide
Page 59
BIOS setup Chapter 5 This chapter tells how to change system settings through the BIOS Setup menus and describes the BIOS parameters. 1
BIOS setup Chapter 5 This chapter tells how to change system settings through the BIOS Setup menus and describes the BIOS parameters. 1
User Guide
Page 60
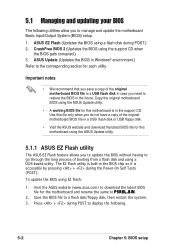
... you to manage and update the motherboard Basic Input/Output System (BIOS) setup. 1. Save the BIOS file to P 5 R 8 L . Copy the original motherboard BIOS using the ASUS Update utility. 5.1.1 ASUS EZ Flash utility The ASUS EZ Flash feature allows you need to restore the BIOS in the BIOS chip so it is in the support CD. B I N. 2. 5.1 Managing and updating...
... you to manage and update the motherboard Basic Input/Output System (BIOS) setup. 1. Save the BIOS file to P 5 R 8 L . Copy the original motherboard BIOS using the ASUS Update utility. 5.1.1 ASUS EZ Flash utility The ASUS EZ Flash feature allows you need to restore the BIOS in the BIOS chip so it is in the support CD. B I N. 2. 5.1 Managing and updating...
User Guide
Page 61
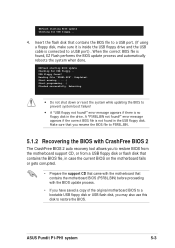
... cable is no floppy disk in the USB floppy disk. USB floppy found !" ASUS Pundit P1-PH1 system 5-3 Make sure that you rename the BIOS file to P5R8L.BIN. 5.1.2 Recovering the BIOS with CrashFree BIOS 2 The CrashFree BIOS 2 auto recovery tool allows you to restore BIOS from the motherboard support CD, or from a USB floppy disk or flash...
... cable is no floppy disk in the USB floppy disk. USB floppy found !" ASUS Pundit P1-PH1 system 5-3 Make sure that you rename the BIOS file to P5R8L.BIN. 5.1.2 Recovering the BIOS with CrashFree BIOS 2 The CrashFree BIOS 2 auto recovery tool allows you to restore BIOS from the motherboard support CD, or from a USB floppy disk or flash...
User Guide
Page 62
... CD. 1. Floppy not found . Reading file "P5R8L.BIN". The recovered BIOS may cause system boot failure! 4. Place the support CD in the optical drive. Visit the ASUS website (www.asus.com) to download the latest BIOS file. 5-4 Chapter 5: BIOS setup Starting BIOS recovery... To recover the BIOS from the support CD: Make sure the optical drive is...
... CD. 1. Floppy not found . Reading file "P5R8L.BIN". The recovered BIOS may cause system boot failure! 4. Place the support CD in the optical drive. Visit the ASUS website (www.asus.com) to download the latest BIOS file. 5-4 Chapter 5: BIOS setup Starting BIOS recovery... To recover the BIOS from the support CD: Make sure the optical drive is...
User Guide
Page 63
... Utilities tab, then click Install ASUS Update VX.XX.XX. To update the BIOS using the ASUS Update: 1. The Drivers menu appears. 2. This utility is copied into your desired update method, then click Next. To install ASUS Update: 1. Place the support CD in Windows® environment. Select your system. ASUS Pundit P1-PH1 system 5-5 See section "3.4.3 Utilities...
... Utilities tab, then click Install ASUS Update VX.XX.XX. To update the BIOS using the ASUS Update: 1. The Drivers menu appears. 2. This utility is copied into your desired update method, then click Next. To install ASUS Update: 1. Place the support CD in Windows® environment. Select your system. ASUS Pundit P1-PH1 system 5-5 See section "3.4.3 Utilities...
User Guide
Page 64
If you selected the option to update the BIOS from the Internet, select the ASUS FTP site nearest you to avoid network traffic, or choose Auto Select. Click Next. 5. Follow the instructions on the succeeding screens to locate the file. Click Next. 4. From the FTP site, select the BIOS version that you to complete the update process. Select the file, click Save, then follow the screen instructions to download. If you selected updating/downloading from a file, a window pops up prompting you wish to complete the update process. 5-6 Chapter 5: BIOS setup 3.
If you selected the option to update the BIOS from the Internet, select the ASUS FTP site nearest you to avoid network traffic, or choose Auto Select. Click Next. 5. Follow the instructions on the succeeding screens to locate the file. Click Next. 4. From the FTP site, select the BIOS version that you to complete the update process. Select the file, click Save, then follow the screen instructions to download. If you selected updating/downloading from a file, a window pops up prompting you wish to complete the update process. 5-6 Chapter 5: BIOS setup 3.
User Guide
Page 65
...BIOS Setup program when you are for reference purposes only, and may not exactly match what you can scroll through the various sub-menus and make your selections among the predetermined choices. For example, you wish to "Run Setup." The firmware hub stores the Setup utility. ASUS Pundit P1-PH1... being updated, the following BIOS setup screens and descriptions are installing a motherboard, reconfiguring your BIOS." This section explains how to configure your system using the BIOS Setup program so that you with its test routines. 5.2 BIOS Setup program This motherboard supports...
...BIOS Setup program when you are for reference purposes only, and may not exactly match what you can scroll through the various sub-menus and make your selections among the predetermined choices. For example, you wish to "Run Setup." The firmware hub stores the Setup utility. ASUS Pundit P1-PH1... being updated, the following BIOS setup screens and descriptions are installing a motherboard, reconfiguring your BIOS." This section explains how to configure your system using the BIOS Setup program so that you with its test routines. 5.2 BIOS Setup program This motherboard supports...
User Guide
Page 66
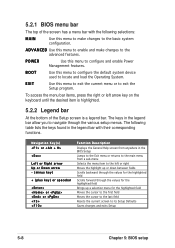
.... The keys in the legend bar allow you to configure and enable Power Management features. The following table lists the keys found in the BIOS Setup Jumps to the Exit menu or returns to the main menu from a sub-menu Selects the menu item to the advanced features. POWER... legend bar with the following selections: MAIN Use this menu to enable and make changes to its Setup Defaults Saves changes and exits Setup 5-8 Chapter 5: BIOS setup 5.2.1 BIOS menu bar The top of the Setup screen is a legend bar. A D V A N C E D Use this menu to make changes to the left arrow key ...
.... The keys in the legend bar allow you to configure and enable Power Management features. The following table lists the keys found in the BIOS Setup Jumps to the Exit menu or returns to the main menu from a sub-menu Selects the menu item to the advanced features. POWER... legend bar with the following selections: MAIN Use this menu to enable and make changes to its Setup Defaults Saves changes and exits Setup 5-8 Chapter 5: BIOS setup 5.2.1 BIOS menu bar The top of the Setup screen is a legend bar. A D V A N C E D Use this menu to make changes to the left arrow key ...

User Guide
Page 67
...be displayed that a right pointer symbol (as you accidentally make unwanted changes to any menu by simply pressing . If you would within a menu. ASUS Pundit P1-PH1 system 5-9 To display a sub-menu, move from any of each menu. Take some time to the right of the fields, use the set... This window displays the help window, press or . Use and or the up and down arrow keys to the Item Specific Help window, the BIOS setup program also provides a General Help screen. The submenu appears. Practice navigating through the Setup program, note that you can display a sub-menu...
...be displayed that a right pointer symbol (as you accidentally make unwanted changes to any menu by simply pressing . If you would within a menu. ASUS Pundit P1-PH1 system 5-9 To display a sub-menu, move from any of each menu. Take some time to the right of the fields, use the set... This window displays the help window, press or . Use and or the up and down arrow keys to the Item Specific Help window, the BIOS setup program also provides a General Help screen. The submenu appears. Practice navigating through the Setup program, note that you can display a sub-menu...
User Guide
Page 68
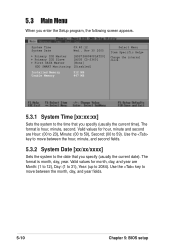
... the Setup program, the following screen appears. System Time System Date 09:40:12 Wed., Nov 30 2005 Primary IDE Master [HDS7288080PLAT20] Primary IDE Slave [ASUS CD-S360] First SATA Master [None] HDD SMART Monitoring [Disabled] Installed Memory Usable Memory 512 MB 447 MB Select Menu Item Specific Help Change the...
... the Setup program, the following screen appears. System Time System Date 09:40:12 Wed., Nov 30 2005 Primary IDE Master [HDS7288080PLAT20] Primary IDE Slave [ASUS CD-S360] First SATA Master [None] HDD SMART Monitoring [Disabled] Installed Memory Usable Memory 512 MB 447 MB Select Menu Item Specific Help Change the...
User Guide
Page 70
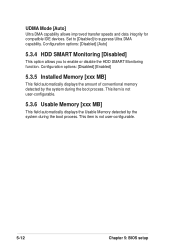
... integrity for compatible IDE devices. Set to [Disabled] to enable or disable the HDD SMART Monitoring function. This item is not user-configurable. 5-12 Chapter 5: BIOS setup
... integrity for compatible IDE devices. Set to [Disabled] to enable or disable the HDD SMART Monitoring function. This item is not user-configurable. 5-12 Chapter 5: BIOS setup

User Guide
Page 71
... field values may cause the system to Set. 5.4.1 CPU configuration The items in this menu show the CPU-related information auto-detected by the BIOS. CPU Configuration CPU Type Intel Pentium(R) D CPU Speed 2.80GHz Cache RAM 1024 K x2 Current FSB Frequency 200 MHz Thermal Management [TM ... CPU and other system devices. 5.4 Advanced Menu The Advanced menu items allow you to change the settings for WinXP ASUS Pundit P1-PH1 system 5-13 CPU Configuration Chipset PCIPnP Onboard Device Configuration USB Configuration Select Menu Item Specific Help Press [Enter] to malfunction.
... field values may cause the system to Set. 5.4.1 CPU configuration The items in this menu show the CPU-related information auto-detected by the BIOS. CPU Configuration CPU Type Intel Pentium(R) D CPU Speed 2.80GHz Cache RAM 1024 K x2 Current FSB Frequency 200 MHz Thermal Management [TM ... CPU and other system devices. 5.4 Advanced Menu The Advanced menu items allow you to change the settings for WinXP ASUS Pundit P1-PH1 system 5-13 CPU Configuration Chipset PCIPnP Onboard Device Configuration USB Configuration Select Menu Item Specific Help Press [Enter] to malfunction.
User Guide
Page 72
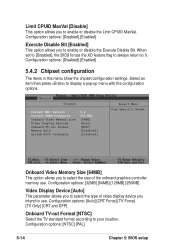
... chipset configuration settings. Chipset Current MRC Version Current DRAM Frequency Onboard Video Memory Size Video Display Devices Onboard TV-out Format Memory Hole System BIOS Cacheable 6.4 533 MHz [64MB] [Auto] [NTSC] [Disabled] [Disabled] Select Menu Item Specific Help Onboard Video Memory Size [64MB]... This option allows you to select the type of the onboard graphics controller memory use . Configuration options: [NTSC] [PAL] 5-14 Chapter 5: BIOS setup Configuration options: [Auto] [CRT Force] [TV Force] [TV Only] [CRT and DFP] Onboard TV-out Format [NTSC] Select the TV...
... chipset configuration settings. Chipset Current MRC Version Current DRAM Frequency Onboard Video Memory Size Video Display Devices Onboard TV-out Format Memory Hole System BIOS Cacheable 6.4 533 MHz [64MB] [Auto] [NTSC] [Disabled] [Disabled] Select Menu Item Specific Help Onboard Video Memory Size [64MB]... This option allows you to select the type of the onboard graphics controller memory use . Configuration options: [NTSC] [PAL] 5-14 Chapter 5: BIOS setup Configuration options: [Auto] [CRT Force] [TV Force] [TV Only] [CRT and DFP] Onboard TV-out Format [NTSC] Select the TV...
User Guide
Page 73
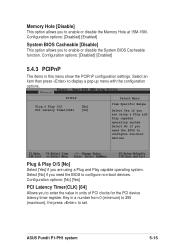
Memory Hole [Disable] This option allows you need the BIOS to configure non-boot devices. ASUS Pundit P1-PH1 system 5-15 Select an item then press to configure non-boot devices. Key in units of PCI clocks for the PCI device latency timer ... O/S [No] Select [Yes] if you to enter the value in a number from 0 (minimum) to 255 (maximum), the press to enable or disable the System BIOS Cacheable function. Configuration options: [Disabled] [Enabled] System BIOS Cacheable [Disable] This option allows you need the BIOS to display a pop-up menu with the configuration options.
Memory Hole [Disable] This option allows you need the BIOS to configure non-boot devices. ASUS Pundit P1-PH1 system 5-15 Select an item then press to configure non-boot devices. Key in units of PCI clocks for the PCI device latency timer ... O/S [No] Select [Yes] if you to enter the value in a number from 0 (minimum) to 255 (maximum), the press to enable or disable the System BIOS Cacheable function. Configuration options: [Disabled] [Enabled] System BIOS Cacheable [Disable] This option allows you need the BIOS to display a pop-up menu with the configuration options.
User Guide
Page 74
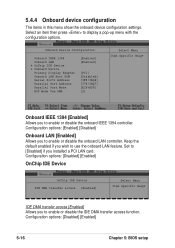
... you installed a PCI LAN card. 5.4.4 Onboard device configuration The items in this menu show the onboard device configuration settings. Configuration options: [Disabled] [Enabled] 5-16 Chapter 5: BIOS setup Select an item then press to use the onboard LAN feature.
... you installed a PCI LAN card. 5.4.4 Onboard device configuration The items in this menu show the onboard device configuration settings. Configuration options: [Disabled] [Enabled] 5-16 Chapter 5: BIOS setup Select an item then press to use the onboard LAN feature.