User Manual
Page 2
...and up to date. Every effort has been made to make changes without the express written permission of their respective owners. All Rights Reserved. No part of this manual may or may not be reproduced, transmitted, transcribed, ...ASUS"). However, the manufacturer makes no guarantee regarding the accuracy of its contents, and reserves the right to ensure that the contents of this manual are the property of their respective companies, and are used for backup purposes, without prior notice. Products and corporate names mentioned in this manual, including the products and software...
...and up to date. Every effort has been made to make changes without the express written permission of their respective owners. All Rights Reserved. No part of this manual may or may not be reproduced, transmitted, transcribed, ...ASUS"). However, the manufacturer makes no guarantee regarding the accuracy of its contents, and reserves the right to ensure that the contents of this manual are the property of their respective companies, and are used for backup purposes, without prior notice. Products and corporate names mentioned in this manual, including the products and software...

User Manual
Page 3
... your NOVA PX24 Front view 11 Rear view...12 Using the Media Center remote 14 Positioning your NOVA PX24 17 Using the optical drive 18 Inserting an optical disc 18 Ejecting an optical disc 18 Setting up your NOVA PX24 Connecting to a display (HDMI 19 Connecting to a display (DVI 19 Connecting to USB devices 20 Connecting to a network device 20 Turning on the system 21 Configuring audio output 22 Connecting to analog speakers 23 Connecting to digital speakers 24 Using your NOVA PX24 Configuring wireless connection 25 Configuring audio output settings 27...
... your NOVA PX24 Front view 11 Rear view...12 Using the Media Center remote 14 Positioning your NOVA PX24 17 Using the optical drive 18 Inserting an optical disc 18 Ejecting an optical disc 18 Setting up your NOVA PX24 Connecting to a display (HDMI 19 Connecting to a display (DVI 19 Connecting to USB devices 20 Connecting to a network device 20 Turning on the system 21 Configuring audio output 22 Connecting to analog speakers 23 Connecting to digital speakers 24 Using your NOVA PX24 Configuring wireless connection 25 Configuring audio output settings 27...

User Manual
Page 5
... connection of the FCC Rules. Changes or modifications to the graphics card is connected. • Consult the dealer or an experienced radio/TV technician for compliance could void the user's authority to operate this equipment does cause harmful interference to radio or television reception, which can radiate radio frequency energy and, if not installed and used in accordance with Part...
... connection of the FCC Rules. Changes or modifications to the graphics card is connected. • Consult the dealer or an experienced radio/TV technician for compliance could void the user's authority to operate this equipment does cause harmful interference to radio or television reception, which can radiate radio frequency energy and, if not installed and used in accordance with Part...

User Manual
Page 7
... or cover these openings. Always unplug all instructions in environments with the product, unplug the power cord and contact a qualified service technician or your retailer. • The power cord or plug is important that the total ampere rating of the devices plugged into the extension cord does not exceed its ampere rating. English Safety information Your ASUS NOVA PX24 is turned off...
... or cover these openings. Always unplug all instructions in environments with the product, unplug the power cord and contact a qualified service technician or your retailer. • The power cord or plug is important that the total ampere rating of the devices plugged into the extension cord does not exceed its ampere rating. English Safety information Your ASUS NOVA PX24 is turned off...

User Manual
Page 11
... any software player. 3 Power switch (touch-sensitive) The power switch allows powering ON and OFF the system. 4 Infrared port The infrared (IrDA) communication port allows convenient wireless data communication with PDAs or mobile phones and even wireless printing to load or eject optical discs easily. The slot-in optical disc drive that allows you to printers. This allows easy wireless synchronization with infraredequipped devices or computer. ASUS NOVA LITE PX24...
... any software player. 3 Power switch (touch-sensitive) The power switch allows powering ON and OFF the system. 4 Infrared port The infrared (IrDA) communication port allows convenient wireless data communication with PDAs or mobile phones and even wireless printing to load or eject optical discs easily. The slot-in optical disc drive that allows you to printers. This allows easy wireless synchronization with infraredequipped devices or computer. ASUS NOVA LITE PX24...

User Manual
Page 12
...) The supplied power adapter converts AC power to DC power for use with some peripherals acting as additional plug-in use the supplied power adapter. Do not cover the adapter and keep it away from your body. 6 USB port The USB (Universal Serial Bus) port is compatible with USB devices such as an LCD TV or monitor to allow viewing on a larger external display. 12 ASUS NOVA LITE PX24 English Rear view Refer to the diagram below...
...) The supplied power adapter converts AC power to DC power for use with some peripherals acting as additional plug-in use the supplied power adapter. Do not cover the adapter and keep it away from your body. 6 USB port The USB (Universal Serial Bus) port is compatible with USB devices such as an LCD TV or monitor to allow viewing on a larger external display. 12 ASUS NOVA LITE PX24 English Rear view Refer to the diagram below...

User Manual
Page 13
... connect the microphone used to connect the system's audio out signal to allow viewing on a larger external display. ASUS NOVA LITE PX24 13 Using this jack automatically disables the built-in the package when connecting the display. 9 LAN port The eight-pin RJ-45 LAN port supports a standard Ethernet cable for connection to a local network. 10 Audio In (S/PDIF IN) jack Plug a 3.5mm mini-jack audio cable into this jack for video conferencing, voice narrations, or simple audio...
... connect the microphone used to connect the system's audio out signal to allow viewing on a larger external display. ASUS NOVA LITE PX24 13 Using this jack automatically disables the built-in the package when connecting the display. 9 LAN port The eight-pin RJ-45 LAN port supports a standard Ethernet cable for connection to a local network. 10 Audio In (S/PDIF IN) jack Plug a 3.5mm mini-jack audio cable into this jack for video conferencing, voice narrations, or simple audio...

User Manual
Page 15
... models only. 15 Shift:Toggles between numerical and alphabetical input. 16 Clear: Press to clear input information. 17 Numeric buttons: Press to enter a channel number. 18 Recorded TV: Press to display a list of your recorded TV programs.* 19 EPG (Electronic Program Guide): Press to display the electronic program guide screen.* 20 Volume up/down: Press to increase/decrease the volume. ASUS NOVA LITE PX24...
... models only. 15 Shift:Toggles between numerical and alphabetical input. 16 Clear: Press to clear input information. 17 Numeric buttons: Press to enter a channel number. 18 Recorded TV: Press to display a list of your recorded TV programs.* 19 EPG (Electronic Program Guide): Press to display the electronic program guide screen.* 20 Volume up/down: Press to increase/decrease the volume. ASUS NOVA LITE PX24...

User Manual
Page 18
Ejecting an optical disc 1. While the system power is on, press the eject button. 2. Place the disc to the slot-in optical drive with the label side facing up. 2. English Using the optical drive Inserting an optical disc 1. Slide the disc into the drive. Remove the disc from the opening. 18 ASUS NOVA LITE PX24
Ejecting an optical disc 1. While the system power is on, press the eject button. 2. Place the disc to the slot-in optical drive with the label side facing up. 2. English Using the optical drive Inserting an optical disc 1. Slide the disc into the drive. Remove the disc from the opening. 18 ASUS NOVA LITE PX24

User Manual
Page 19
... an HDMI cable. English Setting up your NOVA PX24 You need to connect peripherals before using your display. Connecting to a display (HDMI) Connect one end of an HDMI cable to the display ( 1 ) and the other end to D-Sub adapter in the package when connecting the display. 1 ASUS NOVA LITE PX24 19 Connecting to a display (DVI) Connect one end of a DVI cable to the display ( 1 ) and the other end to the HDMI port on the system rear panel ( 2 ). 2 If your display...
... an HDMI cable. English Setting up your NOVA PX24 You need to connect peripherals before using your display. Connecting to a display (HDMI) Connect one end of an HDMI cable to the display ( 1 ) and the other end to D-Sub adapter in the package when connecting the display. 1 ASUS NOVA LITE PX24 19 Connecting to a display (DVI) Connect one end of a DVI cable to the display ( 1 ) and the other end to the HDMI port on the system rear panel ( 2 ). 2 If your display...

User Manual
Page 20
Purchase USB peripherals based on the system rear panel. English The package contents does not include USB keyboard and mouse. Connecting to USB devices Connect USB devices like keyboards, mouse devices, and printers to a hub or switch. Network hub or switch 20 ASUS NOVA LITE PX24 Network cable with RJ-45 connectors Connecting to a network device Connect one end of a network cable to the LAN port on the system rear panel and the other end to the USB ports on your needs.
Purchase USB peripherals based on the system rear panel. English The package contents does not include USB keyboard and mouse. Connecting to USB devices Connect USB devices like keyboards, mouse devices, and printers to a hub or switch. Network hub or switch 20 ASUS NOVA LITE PX24 Network cable with RJ-45 connectors Connecting to a network device Connect one end of a network cable to the LAN port on the system rear panel and the other end to the USB ports on your needs.
User Manual
Page 22
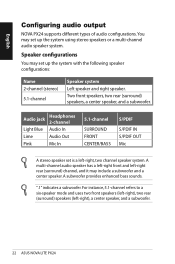
... may set is a left -right), a center speaker, and a subwoofer. 22 ASUS NOVA LITE PX24 For instance, 5.1-channel refers to a six-speaker mode and uses two front speakers (left-right), two rear (surround) speakers (left -right, two channel speaker system. ".1" indicates a subwoofer. Speaker configurations You may include a subwoofer and a center speaker. Two front speakers, two rear (surround) speakers, a center speaker, and a subwoofer. A subwoofer provides enhanced bass sounds. Audio jack Headphones 2-channel Light Blue Audio In Lime Audio...
... may set is a left -right), a center speaker, and a subwoofer. 22 ASUS NOVA LITE PX24 For instance, 5.1-channel refers to a six-speaker mode and uses two front speakers (left-right), two rear (surround) speakers (left -right, two channel speaker system. ".1" indicates a subwoofer. Speaker configurations You may include a subwoofer and a center speaker. Two front speakers, two rear (surround) speakers, a center speaker, and a subwoofer. A subwoofer provides enhanced bass sounds. Audio jack Headphones 2-channel Light Blue Audio In Lime Audio...
User Manual
Page 23
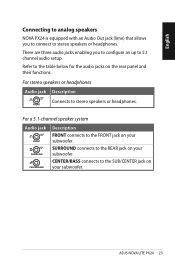
... subwoofer. For stereo speakers or headphones Audio jack S/PDIF OUT FRONT Description Connects to 5.1 channel audio setup. Refer to the SUB/CENTER jack on your subwoofer. SURROUND connects to stereo speakers or headphones. There are three audio jacks enabling you to connect to the REAR jack on the rear panel and their functions. English Connecting to analog speakers NOVA PX24 is equipped with an Audio Out jack (lime...
... subwoofer. For stereo speakers or headphones Audio jack S/PDIF OUT FRONT Description Connects to 5.1 channel audio setup. Refer to the SUB/CENTER jack on your subwoofer. SURROUND connects to stereo speakers or headphones. There are three audio jacks enabling you to connect to the REAR jack on the rear panel and their functions. English Connecting to analog speakers NOVA PX24 is equipped with an Audio Out jack (lime...

User Manual
Page 24
Use the supplied mini jack to S/PDIF adapter to connect to your amplifier. Subwoofer Center speaker Front speakers Rear speakers Amplifier S/PDIF OUT FRONT 24 ASUS NOVA LITE PX24 Connect an optical (Toslink) digital audio cable with a mini jack to S/PDIF adapter from the S/PDIF OUT jack on the system rear panel to your existing speaker system. English Connecting to digital speakers You can also connect NOVA PX24 to your home stereo or home theater multi-channel audio amplifier to use your amplifier.
Use the supplied mini jack to S/PDIF adapter to connect to your amplifier. Subwoofer Center speaker Front speakers Rear speakers Amplifier S/PDIF OUT FRONT 24 ASUS NOVA LITE PX24 Connect an optical (Toslink) digital audio cable with a mini jack to S/PDIF adapter from the S/PDIF OUT jack on the system rear panel to your existing speaker system. English Connecting to digital speakers You can also connect NOVA PX24 to your home stereo or home theater multi-channel audio amplifier to use your amplifier.
User Manual
Page 27
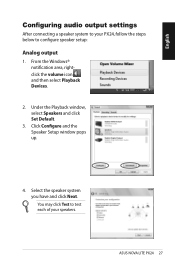
Under the Playback window, select Speakers and click Set Default. 3. Click Configure and the Speaker Setup window pops up. 4. English Configuring audio output settings After connecting a speaker system to configure speaker setup: Analog output 1. Select the speaker system you have and click Next. ASUS NOVA LITE PX24 27 You may click Test to test each of your PX24, follow the steps below to your speakers. From the Windows® notification area, rightclick the volume icon and then select Playback Devices. 2.
Under the Playback window, select Speakers and click Set Default. 3. Click Configure and the Speaker Setup window pops up. 4. English Configuring audio output settings After connecting a speaker system to configure speaker setup: Analog output 1. Select the speaker system you have and click Next. ASUS NOVA LITE PX24 27 You may click Test to test each of your PX24, follow the steps below to your speakers. From the Windows® notification area, rightclick the volume icon and then select Playback Devices. 2.
User Manual
Page 32
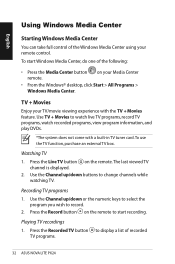
... DVDs. *The system does not come with the TV + Movies feature. English Using Windows Media Center Starting Windows Media Center You can take full control of recorded 32 ASUS NOVA LITE PX24 Use TV + Movies to display a list of the Windows Media Center using your Media Center • From the Windows® desktop, click Start > All Programs > Windows Media Center. Press the Record button on the remote to record. 2. on the remote.The last viewed TV channel is displayed. 2. To start recording. Use...
... DVDs. *The system does not come with the TV + Movies feature. English Using Windows Media Center Starting Windows Media Center You can take full control of recorded 32 ASUS NOVA LITE PX24 Use TV + Movies to display a list of the Windows Media Center using your Media Center • From the Windows® desktop, click Start > All Programs > Windows Media Center. Press the Record button on the remote to record. 2. on the remote.The last viewed TV channel is displayed. 2. To start recording. Use...

User Manual
Page 35
... the buttons on the Windows® desktop. 2. We recommend that you launch the CyberLink PowerDVD software to enjoy optimum visual performance. The PowerDVD player launches. ASUS NOVA LITE PX24 35 Double-click the PowerDVD icon on the control panel, and the pop-up messages will help you connect to a display through the HDMI port to play DVDs or media files. To use PowerDVD 1. English Using CyberLink...
... the buttons on the Windows® desktop. 2. We recommend that you launch the CyberLink PowerDVD software to enjoy optimum visual performance. The PowerDVD player launches. ASUS NOVA LITE PX24 35 Double-click the PowerDVD icon on the control panel, and the pop-up messages will help you connect to a display through the HDMI port to play DVDs or media files. To use PowerDVD 1. English Using CyberLink...

User Manual
Page 36
... optical drive ("DVDROM: XXX") as network settings). 1. Select where to enter the Please select boot device menu. 2. Insert the recovery DVD into the optical drive when you are : Recover Windows to a partition This option will lose all partitions from below, allowing you make note of any customized configuration settings (such as the boot device. Turn on your system at the factory.The recovery DVD, working with the support DVD, provides a comprehensive recovery solution that quickly restores your hard disk drive and create a new system partition...
... optical drive ("DVDROM: XXX") as network settings). 1. Select where to enter the Please select boot device menu. 2. Insert the recovery DVD into the optical drive when you are : Recover Windows to a partition This option will lose all partitions from below, allowing you make note of any customized configuration settings (such as the boot device. Turn on your system at the factory.The recovery DVD, working with the support DVD, provides a comprehensive recovery solution that quickly restores your hard disk drive and create a new system partition...

User Manual
Page 37
... NOVA PX24 only. Change the boot priority and boot from the support DVD in case the BIOS update fails or the BIOS codes and data are damaged. power LED Follow the instructions below to start restoring the BIOS. (No display on other computers. Insert the support DVD.The system will begin system configurations and install drivers and utilities. 7. English 6. Press the power switch to restore your BIOS. DO NOT use it on screen) 2. ASUS NOVA LITE PX24 37 If the system enters Windows®...
... NOVA PX24 only. Change the boot priority and boot from the support DVD in case the BIOS update fails or the BIOS codes and data are damaged. power LED Follow the instructions below to start restoring the BIOS. (No display on other computers. Insert the support DVD.The system will begin system configurations and install drivers and utilities. 7. English 6. Press the power switch to restore your BIOS. DO NOT use it on screen) 2. ASUS NOVA LITE PX24 37 If the system enters Windows®...

User Manual
Page 38
... floppy disks or to a network drive and make note of the operating system, drivers, and utilities installed on -screen instructions to complete the recovery process. 6. English Using the hidden partition The recovery partition includes an image of any customized configuration settings (such as network settings). Before using the recovery partition, copy your hard disk drive is in good working order. DO NOT delete the partition named "RECOVERY."The recovery partition is completed. 7. Select Recover Windows to select Windows Setup [EMS Enabled]. 3. Press to a partition. 4. Follow...
... floppy disks or to a network drive and make note of the operating system, drivers, and utilities installed on -screen instructions to complete the recovery process. 6. English Using the hidden partition The recovery partition includes an image of any customized configuration settings (such as network settings). Before using the recovery partition, copy your hard disk drive is in good working order. DO NOT delete the partition named "RECOVERY."The recovery partition is completed. 7. Select Recover Windows to select Windows Setup [EMS Enabled]. 3. Press to a partition. 4. Follow...


