
User's Manual for English Edition
Page 3
... to open the display panel 30 Press the power button 30 Gestures for the touch screen* and touchpad 31 Using the touch screen 31 Using the touchpad...33 Using the keyboard 40 Function keys...40 Function keys for ASUS Apps 41 Windows®8 keys...42 Multimedia control keys 42 Numeric keypad*...43 Using...
... to open the display panel 30 Press the power button 30 Gestures for the touch screen* and touchpad 31 Using the touch screen 31 Using the touchpad...33 Using the keyboard 40 Function keys...40 Function keys for ASUS Apps 41 Windows®8 keys...42 Multimedia control keys 42 Numeric keypad*...43 Using...

User's Manual for English Edition
Page 15
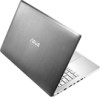
... panel allows you to take pictures or record videos using touch gestures. Instant Key button This preset button is in camera allows you to operate your Notebook PC. By default, quickly pressing this manual. Display panel ... microphones The array microphones feature echo canceling, noise suppression, and beam forming functions for photos, videos, and other multimedia files on using the ASUS Console app, refer to the ASUS Console section in camera is a unique feature of your Notebook PC using your Notebook PC. Camera The built-in use. Camera indicator...
... panel allows you to take pictures or record videos using touch gestures. Instant Key button This preset button is in camera allows you to operate your Notebook PC. By default, quickly pressing this manual. Display panel ... microphones The array microphones feature echo canceling, noise suppression, and beam forming functions for photos, videos, and other multimedia files on using the ASUS Console app, refer to the ASUS Console section in camera is a unique feature of your Notebook PC using your Notebook PC. Camera The built-in use. Camera indicator...

User's Manual for English Edition
Page 31
Refer to the following illustrations when using hand gestures on selected models only Notebook PC E-Manual 31 Swipe from the left edge of the screen to shuffle your running apps. Using the touch screen* Left edge swipe Right edge swipe Swipe from the right edge of the screen to launch the Charms bar. * on your Notebook PC. Gestures for the touch screen* and touchpad Gestures allow you to launch programs and access the settings of your touch screen* and touchpad.
Refer to the following illustrations when using hand gestures on selected models only Notebook PC E-Manual 31 Swipe from the left edge of the screen to shuffle your running apps. Using the touch screen* Left edge swipe Right edge swipe Swipe from the right edge of the screen to launch the Charms bar. * on your Notebook PC. Gestures for the touch screen* and touchpad Gestures allow you to launch programs and access the settings of your touch screen* and touchpad.

User's Manual for English Edition
Page 32
bar. • In a running app, swipe from the top edge of the screen to view its menu. 32 Notebook PC E-Manual Finger slide • In the Start screen, swipe Slide your finger to scroll up from the top edge of the and down and slide your two fingers on the touch panel. Zoom out Zoom in Bring together your finger screen to view the All Apps to pan the screen left or right. Top edge swipe Spread apart your two fingers on the touch panel.
bar. • In a running app, swipe from the top edge of the screen to view its menu. 32 Notebook PC E-Manual Finger slide • In the Start screen, swipe Slide your finger to scroll up from the top edge of the and down and slide your two fingers on the touch panel. Zoom out Zoom in Bring together your finger screen to view the All Apps to pan the screen left or right. Top edge swipe Spread apart your two fingers on the touch panel.

User's Manual for English Edition
Page 44
Using the optical disc drive NOTE: The actual location of the electronic eject button may get jammed under the drive tray. 3. Ensure that there are no objects that may vary depending on , press the electronic eject button to touch the optical disc drive lens. Inserting an optical disc 1. While the Notebook PC is on your Notebook PC model. Be careful not to partially eject the optical disc drive tray. 2. Hold the disc by the edge, with its printed side up, then gently place it inside the hub. 44 Notebook PC E-Manual Gently pull out the drive tray. IMPORTANT!
Using the optical disc drive NOTE: The actual location of the electronic eject button may get jammed under the drive tray. 3. Ensure that there are no objects that may vary depending on , press the electronic eject button to touch the optical disc drive lens. Inserting an optical disc 1. While the Notebook PC is on your Notebook PC model. Be careful not to partially eject the optical disc drive tray. 2. Hold the disc by the edge, with its printed side up, then gently place it inside the hub. 44 Notebook PC E-Manual Gently pull out the drive tray. IMPORTANT!
User's Manual for English Edition
Page 57
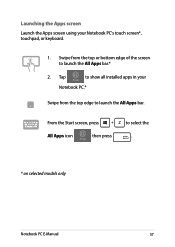
Tap to show all installed apps in your Notebook PC's touch screen*, touchpad, or keyboard. 1. Launching the Apps screen Launch the Apps screen using your Notebook PC.* Swipe from the top or bottom edge of the screen to launch the All Apps bar. Swipe from the top edge to launch the All Apps bar.* 2. From the Start screen, press All Apps icon then press to select the . * on selected models only Notebook PC E-Manual 57
Tap to show all installed apps in your Notebook PC's touch screen*, touchpad, or keyboard. 1. Launching the Apps screen Launch the Apps screen using your Notebook PC.* Swipe from the top or bottom edge of the screen to launch the All Apps bar. Swipe from the top edge to launch the All Apps bar.* 2. From the Start screen, press All Apps icon then press to select the . * on selected models only Notebook PC E-Manual 57

User's Manual for English Edition
Page 58
Right-click on the app to pin the selected app on the Start screen. 2. Tap screen.* to activate its settings. 3. Position the mouse pointer over the app you want to select and launch the settings bar.* 2. Tap on the icon. * on the Start screen using your touch screen* or touchpad. 1. In the Apps screen, swipe down the app to pin on the Start 1. Pinning more apps on the Start screen You can pin more apps on selected models only 58 Notebook PC E-Manual
Right-click on the app to pin the selected app on the Start screen. 2. Tap screen.* to activate its settings. 3. Position the mouse pointer over the app you want to select and launch the settings bar.* 2. Tap on the icon. * on the Start screen using your touch screen* or touchpad. 1. In the Apps screen, swipe down the app to pin on the Start 1. Pinning more apps on the Start screen You can pin more apps on selected models only 58 Notebook PC E-Manual
User's Manual for English Edition
Page 60
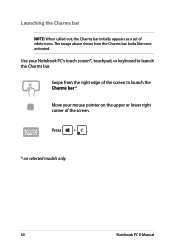
Swipe from the right edge of the screen to launch the Charms bar. The image above shows how the Charms bar looks like once activated. Use your Notebook PC's touch screen*, touchpad, or keyboard to launch the Charms bar.* Move your mouse pointer on selected models only 60 Notebook PC E-Manual Press . * on the upper or lower right corner of white icons. Launching the Charms bar NOTE: When called out, the Charms bar initially appears as a set of the screen.
Swipe from the right edge of the screen to launch the Charms bar. The image above shows how the Charms bar looks like once activated. Use your Notebook PC's touch screen*, touchpad, or keyboard to launch the Charms bar.* Move your mouse pointer on selected models only 60 Notebook PC E-Manual Press . * on the upper or lower right corner of white icons. Launching the Charms bar NOTE: When called out, the Charms bar initially appears as a set of the screen.

User's Manual for English Edition
Page 63
... the left or right side of the display panel. 4. Launch another app.* 1. To switch between apps, press . * on the top side of your Notebook PC's touch screen*, touchpad, or keyboard to snap. 2. Press . 3. Using Snap Use your screen. 3. Launch another app. 1. Hover the mouse point on selected models only Notebook PC...
... the left or right side of the display panel. 4. Launch another app.* 1. To switch between apps, press . * on the top side of your Notebook PC's touch screen*, touchpad, or keyboard to snap. 2. Press . 3. Using Snap Use your screen. 3. Launch another app. 1. Hover the mouse point on selected models only Notebook PC...

User's Manual for English Edition
Page 66
... off before enabling the Wi-Fi connection of available Wi-Fi connections. 66 Notebook PC E-Manual Select an access point from the list of your touch screen* or touchpad. 1. or 3. Connecting to wireless networks Wi-Fi Access emails, surf the Internet, and share applications via social networking sites using the following...
... off before enabling the Wi-Fi connection of available Wi-Fi connections. 66 Notebook PC E-Manual Select an access point from the list of your touch screen* or touchpad. 1. or 3. Connecting to wireless networks Wi-Fi Access emails, surf the Internet, and share applications via social networking sites using the following...
User's Manual for English Edition
Page 68
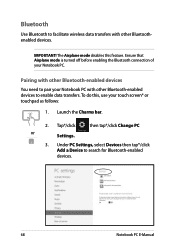
... Change PC 3. The Airplane mode disables this , use your Notebook PC. Ensure that Airplane mode is turned off before enabling the Bluetooth connection of your touch screen* or touchpad as follows: 1.
... Change PC 3. The Airplane mode disables this , use your Notebook PC. Ensure that Airplane mode is turned off before enabling the Bluetooth connection of your touch screen* or touchpad as follows: 1.

User's Manual for English Edition
Page 88
Tutorial Launch the ASUS Tutorial and ASUS Smart Gesture videos by tapping*/clicking on the icons inside the Tutorial app. 88 Notebook PC E-Manual Move this switch to the left or right to activate or deactivate the touchpad of your Notebook PC so you can use the keyboard more conveniently. Touch Pad This app allows you to toggle between OFF and ON.
Tutorial Launch the ASUS Tutorial and ASUS Smart Gesture videos by tapping*/clicking on the icons inside the Tutorial app. 88 Notebook PC E-Manual Move this switch to the left or right to activate or deactivate the touchpad of your Notebook PC so you can use the keyboard more conveniently. Touch Pad This app allows you to toggle between OFF and ON.

User's Manual for English Edition
Page 113
...PC to your touchpad while you type on selected models only Notebook PC E-Manual 113 Instead of the following suggestions: • Check if ASUS Smart Gesture is not working. Why does audio still come out from my Notebook PC's audio speakers even if I do keystrokes correctly because... my cursor keeps on my keyboard displays numbers. Make sure that nothing accidentally touches or presses on your Notebook PC. You can also disable your touchpad by connecting an external pointing device to turn off this feature and...
...PC to your touchpad while you type on selected models only Notebook PC E-Manual 113 Instead of the following suggestions: • Check if ASUS Smart Gesture is not working. Why does audio still come out from my Notebook PC's audio speakers even if I do keystrokes correctly because... my cursor keeps on my keyboard displays numbers. Make sure that nothing accidentally touches or presses on your Notebook PC. You can also disable your touchpad by connecting an external pointing device to turn off this feature and...


