
User Manual
Page 3
Table of contents Notices iv Safety information v Care & Cleaning vi Chapter 1: Product introduction 1.1 Welcome 1-1 1.2 Package contents 1-1 1.3 Monitor introduction 1-2 1.3.1 Front of the LCD monitor 1-2 1.3.2 Rear of the LCD monitor 1-3 Chapter 2: Setup 2.1 Connecting the cables 2-1 2.2 Turning the monitor on 2-1 2.3 Adjusting the monitor 2-2 2.4 Detaching the arm/stand (for VESA wall mount 2-3 Chapter 3: General Instruction 3.1 OSD (...
Table of contents Notices iv Safety information v Care & Cleaning vi Chapter 1: Product introduction 1.1 Welcome 1-1 1.2 Package contents 1-1 1.3 Monitor introduction 1-2 1.3.1 Front of the LCD monitor 1-2 1.3.2 Rear of the LCD monitor 1-3 Chapter 2: Setup 2.1 Connecting the cables 2-1 2.2 Turning the monitor on 2-1 2.3 Adjusting the monitor 2-2 2.4 Detaching the arm/stand (for VESA wall mount 2-3 Chapter 3: General Instruction 3.1 OSD (...
User Manual
Page 6
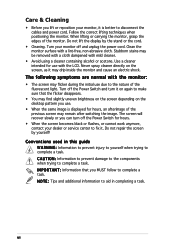
... the monitor, grasp the edges of the previous screen may remain after switching the image. Stubborn stains may be removed with a cloth dampened with the LCD. The screen will recover slowly or you can turn it on again to make sure that you MUST follow to complete a task. C A U T I M P O R T A N T : Information that the...
... the monitor, grasp the edges of the previous screen may remain after switching the image. Stubborn stains may be removed with a cloth dampened with the LCD. The screen will recover slowly or you can turn it on again to make sure that you MUST follow to complete a task. C A U T I M P O R T A N T : Information that the...
User Manual
Page 9
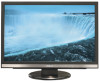
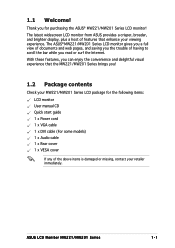
... and delightful visual experience that enhance your retailer immediately. 1.1 Welcome! Thank you read or surf the Internet. ASUS LCD Monitor MW221/MW201 Series 1-1 The ASUS® MW221/MW201 Series LCD monitor gives you a full view of documents and web pages, and saving you the trouble of having to ...scroll the bar while you for the following items: LCD monitor User manual CD Quick start guide 1 x Power cord 1 x VGA cable 1...
... and delightful visual experience that enhance your retailer immediately. 1.1 Welcome! Thank you read or surf the Internet. ASUS LCD Monitor MW221/MW201 Series 1-1 The ASUS® MW221/MW201 Series LCD monitor gives you a full view of documents and web pages, and saving you the trouble of having to ...scroll the bar while you for the following items: LCD monitor User manual CD Quick start guide 1 x Power cord 1 x VGA cable 1...

User Manual
Page 10
... menu or go back to the previous menu as the OSD menu is purchased separately. 2. S P L E N D I D B u t t o n : • Use this button to decrease the value of the LCD monitor Stereo speaker Base 1 2 3 4 5 6 1. H e a d p h o n e p o r t . Button: • Press this hotkey to switch from five video preset modes (Game Mode, Night View Mode, Scenery Mode, Standard Mode...
... menu or go back to the previous menu as the OSD menu is purchased separately. 2. S P L E N D I D B u t t o n : • Use this button to decrease the value of the LCD monitor Stereo speaker Base 1 2 3 4 5 6 1. H e a d p h o n e p o r t . Button: • Press this hotkey to switch from five video preset modes (Game Mode, Night View Mode, Scenery Mode, Standard Mode...

User Manual
Page 11
... V G A p o r t . This 15-pin port is activated. 5. Status Blue Amber OFF Description ON Standby mode OFF 1.3.2 Rear of the LCD monitor Rear connectors Rear connectors (from the bundled power cord. 2. This 24-pin port is also a hotkey for PC (Personal Computer) DVI-D digital signal ...power indicator is as the below table. i n p o r t . This port connects PC audio source by the bundled audio cable. 3. ASUS LCD Monitor MW221/MW201 Series 1-3 Power button/power indicator • Press this button to the next fuction. • This is for Brightness adjustment. 6.
... V G A p o r t . This 15-pin port is activated. 5. Status Blue Amber OFF Description ON Standby mode OFF 1.3.2 Rear of the LCD monitor Rear connectors Rear connectors (from the bundled power cord. 2. This 24-pin port is also a hotkey for PC (Personal Computer) DVI-D digital signal ...power indicator is as the below table. i n p o r t . This port connects PC audio source by the bundled audio cable. 3. ASUS LCD Monitor MW221/MW201 Series 1-3 Power button/power indicator • Press this button to the next fuction. • This is for Brightness adjustment. 6.

User Manual
Page 13
... 2.2 Turning the monitor on Gently touch the power sensor . ASUS LCD Monitor MW221/MW201 Series 2-1 Connect the cables as the following instructions: • To connect the audio cable: connect one end of the monitor, then close the cover carefully. c. Align the cover to the LCD monitor's VGA/DVI port. A click indicates that the...
... 2.2 Turning the monitor on Gently touch the power sensor . ASUS LCD Monitor MW221/MW201 Series 2-1 Connect the cables as the following instructions: • To connect the audio cable: connect one end of the monitor, then close the cover carefully. c. Align the cover to the LCD monitor's VGA/DVI port. A click indicates that the...

User Manual
Page 15
Have the front of the MW221/MW201 Series LCD monitor is purchased separately. 2.4 Detaching the arm/stand (for VESA wall mount. VESA cover Rear cover Button 1 Screws Button 2 The VESA wall mount kit (100 ... to prevent damage to remove the VESA cover. • We recommend that you cover the table surface with the other hand at the same time. 3. ASUS LCD Monitor MW221/MW201 Series 2-3 Push Button 2 to the monitor. Push Button 1 on the arm/stand as the below drawing shows. 4. Remove the rear cover. 2. To...
Have the front of the MW221/MW201 Series LCD monitor is purchased separately. 2.4 Detaching the arm/stand (for VESA wall mount. VESA cover Rear cover Button 1 Screws Button 2 The VESA wall mount kit (100 ... to prevent damage to remove the VESA cover. • We recommend that you cover the table surface with the other hand at the same time. 3. ASUS LCD Monitor MW221/MW201 Series 2-3 Push Button 2 to the monitor. Push Button 1 on the arm/stand as the below drawing shows. 4. Remove the rear cover. 2. To...
User Manual
Page 17
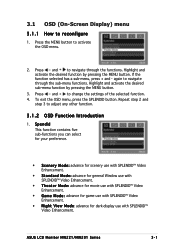
... SPLENDID™ Video Enhancement. • Night View Mode: advance for dark-display use with SPLENDID™ Video Enhancement. Press and to navigate through the functions. ASUS LCD Monitor MW221/MW201 Series 3-1 Highlight and activate the desired sub-menu function by pressing the MENU button.
... SPLENDID™ Video Enhancement. • Night View Mode: advance for dark-display use with SPLENDID™ Video Enhancement. Press and to navigate through the functions. ASUS LCD Monitor MW221/MW201 Series 3-1 Highlight and activate the desired sub-menu function by pressing the MENU button.

User Manual
Page 19
... the monitor information. • R e s e t : "Yes" allows you to adjust the system. • V o l u m e : the adjusting range is from 0 to 100. is from 0 to the preset mode. ASUS LCD Monitor MW221/MW201 Series 3-3 In p u t S e l e c t In this function. S y s t e m S e t u p Allow you to revert to 100. activate this function, you can adjust the OSD timeout from 10...
... the monitor information. • R e s e t : "Yes" allows you to adjust the system. • V o l u m e : the adjusting range is from 0 to 100. is from 0 to the preset mode. ASUS LCD Monitor MW221/MW201 Series 3-3 In p u t S e l e c t In this function. S y s t e m S e t u p Allow you to revert to 100. activate this function, you can adjust the OSD timeout from 10...

User Manual
Page 21
ASUS LCD Monitor MW221/MW201 Series 3-5 For optimal resolution, we recommend that you choose a mode listed in the table may not be supported. 3.3 Supported operating modes Standard ...
ASUS LCD Monitor MW221/MW201 Series 3-5 For optimal resolution, we recommend that you choose a mode listed in the table may not be supported. 3.3 Supported operating modes Standard ...


