
User Guide
Page 1
E5810 V1 May 2010 ML228H Series LED Monitor User Guide
E5810 V1 May 2010 ML228H Series LED Monitor User Guide
User Guide
Page 2
... are used only for backup purposes, without intent to reconfigure 3-1 3.1.2 OSD Function Introduction 3-1 3.2 Specifications summary 3-4 3.3 Troubleshooting (FAQ) ...3-5 3.4 Supported operating modes 3-6 Copyright © 2010 ASUSTeK COMPUTER INC. Table of contents Notices ...iii Safety information ...iv Care & Cleaning ...v 1.1 Welcome! ...1-1 1.2 Package contents ...1-1 1.3 Assembling the monitor base 1-2 1.4 Monitor introduction ...1-3 1.4.1 Front of the LED monitor 1-3 1.4.2 Rear of the LED monitor 1-4 2.1 Adjusting the monitor 2-1 3.1 OSD (On-Screen Display) menu 3-1 3.1.1 How...
... are used only for backup purposes, without intent to reconfigure 3-1 3.1.2 OSD Function Introduction 3-1 3.2 Specifications summary 3-4 3.3 Troubleshooting (FAQ) ...3-5 3.4 Supported operating modes 3-6 Copyright © 2010 ASUSTeK COMPUTER INC. Table of contents Notices ...iii Safety information ...iv Care & Cleaning ...v 1.1 Welcome! ...1-1 1.2 Package contents ...1-1 1.3 Assembling the monitor base 1-2 1.4 Monitor introduction ...1-3 1.4.1 Front of the LED monitor 1-3 1.4.2 Rear of the LED monitor 1-4 2.1 Adjusting the monitor 2-1 3.1 OSD (On-Screen Display) menu 3-1 3.1.1 How...
User Guide
Page 3
... the separation between the equipment and receiver. • Connect the equipment to an outlet on a circuit different from digital apparatus set out in a residential installation. Canadian Department of Communications. iii Operation is subject to which can radiate radio frequency energy and, if not installed and used in a particular installation. As an Energy Star® Partner, our company has...
... the separation between the equipment and receiver. • Connect the equipment to an outlet on a circuit different from digital apparatus set out in a residential installation. Canadian Department of Communications. iii Operation is subject to which can radiate radio frequency energy and, if not installed and used in a particular installation. As an Energy Star® Partner, our company has...

User Guide
Page 4
... not overload power strips and extention cords. If you encounter technical problems with the package. • To prevent fire or shock hazard, never expose the monitor to rain or moisture. • Never try to fix it may become wet. Place the monitor on the label. Contact a qualified service technician or your retailer. • Before using the product, make sure...
... not overload power strips and extention cords. If you encounter technical problems with the package. • To prevent fire or shock hazard, never expose the monitor to rain or moisture. • Never try to fix it may become wet. Place the monitor on the label. Contact a qualified service technician or your retailer. • Before using the product, make sure...

User Guide
Page 5
... disconnect the cables and power cord. Use a cleaner intended for hours. • When the screen becomes black or flashes, or cannot work anymore, contact your dealer or service center to fix it. When lifting or carrying the monitor, grasp the edges of the fluorescent light. Stubborn stains may drip inside the monitor and cause an electric shock. Turn off and unplug the power cord. Follow the...
... disconnect the cables and power cord. Use a cleaner intended for hours. • When the screen becomes black or flashes, or cannot work anymore, contact your dealer or service center to fix it. When lifting or carrying the monitor, grasp the edges of the fluorescent light. Stubborn stains may drip inside the monitor and cause an electric shock. Turn off and unplug the power cord. Follow the...
User Guide
Page 6
Optional documentation Your product package may include optional documentation, such as warranty card, that may have been added by your dealer. These documents are not part of the standard package. ASUS websites The ASUS websites worldwide provide updated information on ASUS hardware and software products. vi Refer to the following sources for additional information and for product and software updates. 1. Where to find more information Refer to http://www.asus.com 2.
Optional documentation Your product package may include optional documentation, such as warranty card, that may have been added by your dealer. These documents are not part of the standard package. ASUS websites The ASUS websites worldwide provide updated information on ASUS hardware and software products. vi Refer to the following sources for additional information and for product and software updates. 1. Where to find more information Refer to http://www.asus.com 2.
User Guide
Page 7
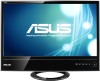
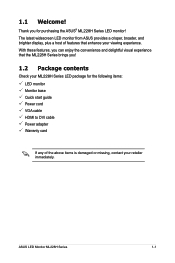
... the ML228H Series brings you for the following items: LED monitor Monitor base Quick start guide Power cord VGA cable HDMI to DVI cable Power adapter Warranty card If any of features that enhance your retailer immediately. The latest widescreen LED monitor from ASUS provides a crisper, broader, and brighter display, plus a host of the above items is damaged or missing, contact your viewing experience. Thank you ! 1.2 Package contents Check your ML228H Series LED package for purchasing the ASUS® ML228H Series LED monitor!
... the ML228H Series brings you for the following items: LED monitor Monitor base Quick start guide Power cord VGA cable HDMI to DVI cable Power adapter Warranty card If any of features that enhance your retailer immediately. The latest widescreen LED monitor from ASUS provides a crisper, broader, and brighter display, plus a host of the above items is damaged or missing, contact your viewing experience. Thank you ! 1.2 Package contents Check your ML228H Series LED package for purchasing the ASUS® ML228H Series LED monitor!

User Guide
Page 8
1.3 Assembling the monitor base To assemble the monitor base: • Attach the base to the monitor with soft cloth to prevent damage to the monitor. 1-2 Chapter 1: Product introduction We recommend that you cover the table surface with bundled handy-screw correctly and then put on the screw cover.
1.3 Assembling the monitor base To assemble the monitor base: • Attach the base to the monitor with soft cloth to prevent damage to the monitor. 1-2 Chapter 1: Product introduction We recommend that you cover the table surface with bundled handy-screw correctly and then put on the screw cover.
User Guide
Page 9
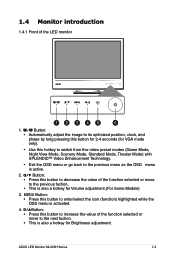
... for Volume adjustment.(For Some Models) 3. ASUS LED Monitor ML228H Series 1-3 Button: • Automatically adjust the image to its optimized position, clock, and phase by long pressing this button for 2-4 seconds (for Brightness adjustment. 1.4 Monitor introduction 1.4.1 Front of the function selected or move to enter/select the icon (function) highlighted while the OSD menu is activated. 4. Button: • Press this hotkey to switch from five video preset modes (Game Mode, Night View Mode, Scenery Mode, Standard Mode, Theater Mode...
... for Volume adjustment.(For Some Models) 3. ASUS LED Monitor ML228H Series 1-3 Button: • Automatically adjust the image to its optimized position, clock, and phase by long pressing this button for 2-4 seconds (for Brightness adjustment. 1.4 Monitor introduction 1.4.1 Front of the function selected or move to enter/select the icon (function) highlighted while the OSD menu is activated. 4. Button: • Press this hotkey to switch from five video preset modes (Game Mode, Night View Mode, Scenery Mode, Standard Mode, Theater Mode...

User Guide
Page 10
Input Select Button • Use this button to turn the monitor on/off. Status Description White ON White (Blinking) Standby mode OFF OFF 1.4.2 Rear of the LED monitor VGA Rear connectors 1 DC-IN port 2 VGA cable 3 HDMI to switch between VGA and HDMI input signals. 6. Power button / Power indicator • Press this hotkey to DVI cable 4 HDMI Audio - 5. out por 1-4 Chapter 1: Product introduction
Input Select Button • Use this button to turn the monitor on/off. Status Description White ON White (Blinking) Standby mode OFF OFF 1.4.2 Rear of the LED monitor VGA Rear connectors 1 DC-IN port 2 VGA cable 3 HDMI to switch between VGA and HDMI input signals. 6. Power button / Power indicator • Press this hotkey to DVI cable 4 HDMI Audio - 5. out por 1-4 Chapter 1: Product introduction
User Guide
Page 11
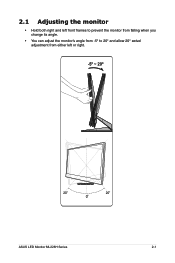
2.1 Adjusting the monitor • Hold both right and left front frames to prevent the monitor from falling when you change its angle. • You can adjust the monitor's angle from -5° to 20° and allow 20° swivel adjustment from either left or right. -5º ~ 20º 20º 20º 0º ASUS LED Monitor ML228H Series 2-1
2.1 Adjusting the monitor • Hold both right and left front frames to prevent the monitor from falling when you change its angle. • You can adjust the monitor's angle from -5° to 20° and allow 20° swivel adjustment from either left or right. -5º ~ 20º 20º 20º 0º ASUS LED Monitor ML228H Series 2-1

User Guide
Page 12
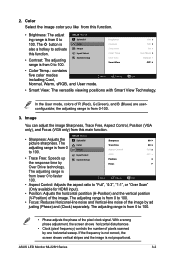
...-menu functions. 3.1 OSD (On-Screen Display) menu 3.1.1 How to activate the OSD menu ML228 Splendid Scenery Mode 2. Each mode has the Reset selection, allowing you can select for playing dark-scene game or watching movie with SPLENDID™ Video Enhancement. • Night View Mode: This is the best choice for your setting or return to navigate through the functions. Color Image Input Select System Setup Standard Mode Theater Mode Game Mode Night View Mode...
...-menu functions. 3.1 OSD (On-Screen Display) menu 3.1.1 How to activate the OSD menu ML228 Splendid Scenery Mode 2. Each mode has the Reset selection, allowing you can select for playing dark-scene game or watching movie with SPLENDID™ Video Enhancement. • Night View Mode: This is the best choice for your setting or return to navigate through the functions. Color Image Input Select System Setup Standard Mode Theater Mode Game Mode Night View Mode...
User Guide
Page 13
... up System Setup Position the response time by one horizontal sweep. The adjusting range is not proportional. Move Menu Exit • Aspect Control: Adjusts the aspect ratio to 100. If the frequency is not correct, the screen shows vertical stripes and the image is from 0-100. 3. 2. The Color Trace Free 60 adjusting range is from 0 Image Aspect Control Full to 100. ASUS LED Monitor ML228H Series 3-2 ML228 Splendid Color Image Input Select System Setup Brightness Contrast Saturation Color Temp Skin...
... up System Setup Position the response time by one horizontal sweep. The adjusting range is not proportional. Move Menu Exit • Aspect Control: Adjusts the aspect ratio to 100. If the frequency is not correct, the screen shows vertical stripes and the image is from 0-100. 3. 2. The Color Trace Free 60 adjusting range is from 0 Image Aspect Control Full to 100. ASUS LED Monitor ML228H Series 3-2 ML228 Splendid Color Image Input Select System Setup Brightness Contrast Saturation Color Temp Skin...

User Guide
Page 14
... horizontal postition (H-Position), vertical position (V- Position), OSD Timeout, DDD/CI, and Transparency of the OSD screen. • Language: Selects OSD language. 4. The selections are English, French, German, Spanish, Italian, Dutch, Russian, Traditional Chinese, Simplified Chinese, Japanese, and Korean. • Information: shows the monitor information. • All Reset: Set to "Yes" to revert all settings to adjust the system. Input Select In this function, you to the factory default mode. 3-3 Chapter 3: General Instruction Color HDMI Image Input...
... horizontal postition (H-Position), vertical position (V- Position), OSD Timeout, DDD/CI, and Transparency of the OSD screen. • Language: Selects OSD language. 4. The selections are English, French, German, Spanish, Italian, Dutch, Russian, Traditional Chinese, Simplified Chinese, Japanese, and Korean. • Information: shows the monitor information. • All Reset: Set to "Yes" to revert all settings to adjust the system. Input Select In this function, you to the factory default mode. 3-3 Chapter 3: General Instruction Color HDMI Image Input...
User Guide
Page 15
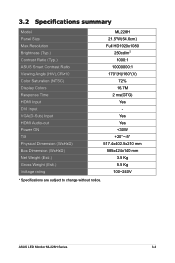
Yes Yes 3.2 Specifications summary Model Panel Size Max.Resolution Brightness (Typ.) Contrast Ratio (Typ.) ASUS Smart Contrast Ratio Viewing Angle (H/V),CR≥10 Color Saturation (NTSC) Display Colors Response Time HDMI Input DVI Input VGA(D-Sub) Input HDMI Audio-out Power ON Tilt Physical Dimension (WxHxD) Box Dimension (WxHxD) Net Weight (Esti.) Gross Weight (Esti.) Voltage rating ML228H 21.5"W(54.6cm) Full HD1920x1080 250cd/m2 1000:1 10000000:1 170°(H)/160°(V) 72% 16.7M 2 ms(GTG) Yes -
Yes Yes 3.2 Specifications summary Model Panel Size Max.Resolution Brightness (Typ.) Contrast Ratio (Typ.) ASUS Smart Contrast Ratio Viewing Angle (H/V),CR≥10 Color Saturation (NTSC) Display Colors Response Time HDMI Input DVI Input VGA(D-Sub) Input HDMI Audio-out Power ON Tilt Physical Dimension (WxHxD) Box Dimension (WxHxD) Net Weight (Esti.) Gross Weight (Esti.) Voltage rating ML228H 21.5"W(54.6cm) Full HD1920x1080 250cd/m2 1000:1 10000000:1 170°(H)/160°(V) 72% 16.7M 2 ms(GTG) Yes -

User Guide
Page 16
... is no screen image Screen image is too light or dark • Check if the power cord is properly connected to the monitor and the power outlet. • Check if the monitor and the computer are in the ON mode. 3.3 Troubleshooting (FAQ) Problem Possible Solution Power LED is not ON • Press the button to check if the monitor is properly working. • Adjust the Contrast and Brightness settings via OSD. Screen image is not centered or sized properly Screen image bounces...
... is no screen image Screen image is too light or dark • Check if the power cord is properly connected to the monitor and the power outlet. • Check if the monitor and the computer are in the ON mode. 3.3 Troubleshooting (FAQ) Problem Possible Solution Power LED is not ON • Press the button to check if the monitor is properly working. • Adjust the Contrast and Brightness settings via OSD. Screen image is not centered or sized properly Screen image bounces...

User Guide
Page 17
3.4 Supported operating modes Resolution 640x480 640x480 640x480 640x480 640x350 720x400 800x600 800x600 800x600 800x600 832x624 848x480 1024x768 1024x768 1024x768 1024x768 1152x864 1280x720 1280x720 1280x768 1280x800 1280x800 1280x960 1280x1024 1280x1024 1360x768 1366x768 1440x900 1440x900 1600x900 1680x1050 1920x1080 640X480P (HDMI) 720x480P (HDMI) 720x576P (HDMI) 1280x720P (HDMI) 1280x720P (HDMI) 1920x1080i (HDMI) 1920x1080i (HDMI) 1920x1080P (HDMI) 1920x1080P (HDMI) Refresh Rate 60Hz ... 37.5kHz 44.955/45kHz 28.125kHz 33.716/33.75 56.25kHz 67.433/67.5kHz ASUS LED Monitor ML228H Series 3-6
3.4 Supported operating modes Resolution 640x480 640x480 640x480 640x480 640x350 720x400 800x600 800x600 800x600 800x600 832x624 848x480 1024x768 1024x768 1024x768 1024x768 1152x864 1280x720 1280x720 1280x768 1280x800 1280x800 1280x960 1280x1024 1280x1024 1360x768 1366x768 1440x900 1440x900 1600x900 1680x1050 1920x1080 640X480P (HDMI) 720x480P (HDMI) 720x576P (HDMI) 1280x720P (HDMI) 1280x720P (HDMI) 1920x1080i (HDMI) 1920x1080i (HDMI) 1920x1080P (HDMI) 1920x1080P (HDMI) Refresh Rate 60Hz ... 37.5kHz 44.955/45kHz 28.125kHz 33.716/33.75 56.25kHz 67.433/67.5kHz ASUS LED Monitor ML228H Series 3-6

User Guide
Page 18
IBM MODES Mode DOS Resolution 640x350 720x400 H(KHz) 31.469 31.469 V(Hz) 70 70 Pixel(MHz) 25.175 28.322 MAC MODES Mode Resolution H(KHz) V(Hz) Pixel(MHz) VGA 640x480 35 67 30.24 SVGA 832x624 49.725 75 57.2832 * Modes not listed in the above tables may not be supported. For optimal resolution, we recommend that you choose a mode listed in the above tables. 3-7 Chapter 3: General Instruction
IBM MODES Mode DOS Resolution 640x350 720x400 H(KHz) 31.469 31.469 V(Hz) 70 70 Pixel(MHz) 25.175 28.322 MAC MODES Mode Resolution H(KHz) V(Hz) Pixel(MHz) VGA 640x480 35 67 30.24 SVGA 832x624 49.725 75 57.2832 * Modes not listed in the above tables may not be supported. For optimal resolution, we recommend that you choose a mode listed in the above tables. 3-7 Chapter 3: General Instruction


