

User Guide
Page 4
... 2.3.1 Rear I/O connection 2-19 2.3.2 Audio I/O connections 2-21 2.4 Starting up for the first time 2-24 2.5 Turning off the computer 2-24 Chapter 3: BIOS setup 3.1 Knowing BIOS 3-1 3.2 BIOS setup program 3-2 3.2.1 EZ Mode 3-3 3.2.2 Advanced Mode 3-4 3.2.3 QFan Control 3-7 3.2.4 EZ Tuning Wizard 3-9 3.3 My Favorites 3-11 3.4 Extreme Tweaker menu...(R) Rapid Storage Technology 3-55 3.7 Monitor menu 3-56 3.8 Boot menu 3-59 3.9 Tools menu 3-65 3.9.1 ASUS EZ Flash 2 Utility 3-65 3.9.2 Secure Erase 3-65 3.9.3 Setup Animator 3-66 3.9.4 Graphics Card Information 3-66...
... 2.3.1 Rear I/O connection 2-19 2.3.2 Audio I/O connections 2-21 2.4 Starting up for the first time 2-24 2.5 Turning off the computer 2-24 Chapter 3: BIOS setup 3.1 Knowing BIOS 3-1 3.2 BIOS setup program 3-2 3.2.1 EZ Mode 3-3 3.2.2 Advanced Mode 3-4 3.2.3 QFan Control 3-7 3.2.4 EZ Tuning Wizard 3-9 3.3 My Favorites 3-11 3.4 Extreme Tweaker menu...(R) Rapid Storage Technology 3-55 3.7 Monitor menu 3-56 3.8 Boot menu 3-59 3.9 Tools menu 3-65 3.9.1 ASUS EZ Flash 2 Utility 3-65 3.9.2 Secure Erase 3-65 3.9.3 Setup Animator 3-66 3.9.4 Graphics Card Information 3-66...

User Guide
Page 5
3.10 Exit menu 3-70 3.11 Updating BIOS 3-71 3.11.1 EZ Update 3-71 3.11.2 ASUS EZ Flash 2 3-72 3.11.3 ASUS CrashFree BIOS 3 3-73 Chapter 4: Software support 4.1 Installing an operating system 4-1 4.2 Support DVD information 4-1 4.2.1 Running the support DVD 4-1 4.2.2 Obtaining the software manuals 4-2 4.3 Software information 4-3 4.4 AI Suite 3...4-3 4.4.1 Dual Intelligent Processors 5 4-7 4.4.2 USB 3.0 Boost 4-19 4.4.3 USB BIOS Flashback 4-20 4.4.4 USB Charger...
3.10 Exit menu 3-70 3.11 Updating BIOS 3-71 3.11.1 EZ Update 3-71 3.11.2 ASUS EZ Flash 2 3-72 3.11.3 ASUS CrashFree BIOS 3 3-73 Chapter 4: Software support 4.1 Installing an operating system 4-1 4.2 Support DVD information 4-1 4.2.1 Running the support DVD 4-1 4.2.2 Obtaining the software manuals 4-2 4.3 Software information 4-3 4.4 AI Suite 3...4-3 4.4.1 Dual Intelligent Processors 5 4-7 4.4.2 USB 3.0 Boost 4-19 4.4.3 USB BIOS Flashback 4-20 4.4.4 USB Charger...
User Guide
Page 6
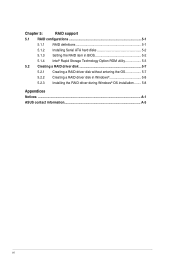
Chapter 5: RAID support 5.1 RAID configurations 5-1 5.1.1 RAID definitions 5-1 5.1.2 Installing Serial ATA hard disks 5-2 5.1.3 Setting the RAID item in BIOS 5-2 5.1.4 Intel® Rapid Storage Technology Option ROM utility 5-3 5.2 Creating a RAID driver disk 5-7 5.2.1 Creating a RAID driver disk without entering the OS 5-7 5.2.2 Creating a RAID driver disk in Windows 5-8 5.2.3 Installing the RAID driver during Windows® OS installation......... 5-8 Appendices Notices ...A-1 ASUS contact information A-5 vi
Chapter 5: RAID support 5.1 RAID configurations 5-1 5.1.1 RAID definitions 5-1 5.1.2 Installing Serial ATA hard disks 5-2 5.1.3 Setting the RAID item in BIOS 5-2 5.1.4 Intel® Rapid Storage Technology Option ROM utility 5-3 5.2 Creating a RAID driver disk 5-7 5.2.1 Creating a RAID driver disk without entering the OS 5-7 5.2.2 Creating a RAID driver disk in Windows 5-8 5.2.3 Installing the RAID driver during Windows® OS installation......... 5-8 Appendices Notices ...A-1 ASUS contact information A-5 vi

User Guide
Page 8
.... 5. Detailed descriptions of the motherboard and the new technology it supports. Chapter 3: BIOS setup This chapter tells how to the following parts: 1. ASUS website The ASUS website (www.asus.com) provides updated information on the motherboard. 2. Optional documentation Your product package may.... 3. viii Where to find more information Refer to change system settings through the BIOS Setup menus. It includes description of the switches, jumpers, and connectors on ASUS hardware and software products. 2. Chapter 2: Basic Installation This chapter lists the hardware ...
.... 5. Detailed descriptions of the motherboard and the new technology it supports. Chapter 3: BIOS setup This chapter tells how to the following parts: 1. ASUS website The ASUS website (www.asus.com) provides updated information on the motherboard. 2. Optional documentation Your product package may.... 3. viii Where to find more information Refer to change system settings through the BIOS Setup menus. It includes description of the switches, jumpers, and connectors on ASUS hardware and software products. 2. Chapter 2: Basic Installation This chapter lists the hardware ...

User Guide
Page 12
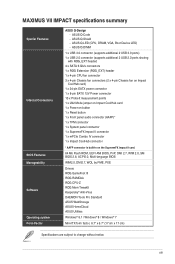
... Metallic Capacitors mPCIe Combo IV (mPCIe/M.2 combo card) KeyBot - Profile - MAXIMUS VII IMPACT specifications summary Back I/O Ports ROG Exclusive Features Special Features 1 x PS/2 Keyboard/mouse combo port 1 x Anti-surge LAN (RJ-45) port 3 x Audio jacks* * Audio jacks are located on the next page) xii Impact CoolHub SupremeFX Impact II Impact Power II - ASUS Dual Intelligent Processors 5 - ASUS CrashFree BIOS 3 -
... Metallic Capacitors mPCIe Combo IV (mPCIe/M.2 combo card) KeyBot - Profile - MAXIMUS VII IMPACT specifications summary Back I/O Ports ROG Exclusive Features Special Features 1 x PS/2 Keyboard/mouse combo port 1 x Anti-surge LAN (RJ-45) port 3 x Audio jacks* * Audio jacks are located on the next page) xii Impact CoolHub SupremeFX Impact II Impact Power II - ASUS Dual Intelligent Processors 5 - ASUS CrashFree BIOS 3 -
User Guide
Page 13
...-Virus DAEMON Tools Pro Standard ASUS WebStorage ASUS HomeCloud ASUS Utilities Windows® 8.1 / Windows® 8 / Windows® 7 Mini-ITX form factor, 6.7" x 6.7" (17 cm x 17 cm) Specifications are subject to change without notice. xiii ASUS Q-Code - ASUS Q-LED (CPU, DRAM, VGA, Boot Device LED) - ASUS Q-Shield - MAXIMUS VII IMPACT specifications summary Special Features Internal Connectors BIOS Features Manageability Software Operating system...
...-Virus DAEMON Tools Pro Standard ASUS WebStorage ASUS HomeCloud ASUS Utilities Windows® 8.1 / Windows® 8 / Windows® 7 Mini-ITX form factor, 6.7" x 6.7" (17 cm x 17 cm) Specifications are subject to change without notice. xiii ASUS Q-Code - ASUS Q-LED (CPU, DRAM, VGA, Boot Device LED) - ASUS Q-Shield - MAXIMUS VII IMPACT specifications summary Special Features Internal Connectors BIOS Features Manageability Software Operating system...

User Guide
Page 18
... SenseAmp makes tuning your high-quality headphones as simple as radar signals on your PC to BIOS mode. This feature supports USB keyboards only. GameFirst III ASUS GameFirst III is an audio tuning software that improves audio experience when you the advantage to ...perform specific or several task at the same time. Sonic Studio Sonic Studio is a network management software that deliver best audio. 1.1.2 ROG Gaming Features SupremeFX Impact II The bundled SupremeFX Impact...
... SenseAmp makes tuning your high-quality headphones as simple as radar signals on your PC to BIOS mode. This feature supports USB keyboards only. GameFirst III ASUS GameFirst III is an audio tuning software that improves audio experience when you the advantage to ...perform specific or several task at the same time. Sonic Studio Sonic Studio is a network management software that deliver best audio. 1.1.2 ROG Gaming Features SupremeFX Impact II The bundled SupremeFX Impact...

User Guide
Page 20
... automatically updated even without the need to fine-tune your ultimate convenience. USB BIOS FlashBack USB BIOS Flashback offers a hassle-free updating solution for UEFI BIOS updates, and download the latest BIOS automatically. USB 3.0 Boost ASUS USB 3.0 Boost, which supports USB 3.0 standard UASP (USB Attached SCSI Protocol...for compatible USB 3.0 peripherals without entering the existing BIOS or operating system. CPU Level Up With ROG's CPU Level Up, overclocking has never been so easy, or cost-free. This all the exclusive ASUS features into one simple-to , and the motherboard ...
... automatically updated even without the need to fine-tune your ultimate convenience. USB BIOS FlashBack USB BIOS Flashback offers a hassle-free updating solution for UEFI BIOS updates, and download the latest BIOS automatically. USB 3.0 Boost ASUS USB 3.0 Boost, which supports USB 3.0 standard UASP (USB Attached SCSI Protocol...for compatible USB 3.0 peripherals without entering the existing BIOS or operating system. CPU Level Up With ROG's CPU Level Up, overclocking has never been so easy, or cost-free. This all the exclusive ASUS features into one simple-to , and the motherboard ...

User Guide
Page 21
DAEMON Tools Pro Standard DAEMON Tools Pro offers essential functionality to the UEFI BIOS for malicious program detection rates that allows you to post and share your audio entertainment across all data from an SSD while recovering lost ...Indentification (CPUID) that are among the industry's highest. DTS Connect To get the most out of your CPU, motherboard, memory, and the whole component. Chapter 1 ASUS MAXIMUS VII IMPACT 1-5 It gives you to place favorite app and game cache files in it to gather information of the main devices of your DRAM configuration scores...
DAEMON Tools Pro Standard DAEMON Tools Pro offers essential functionality to the UEFI BIOS for malicious program detection rates that allows you to post and share your audio entertainment across all data from an SSD while recovering lost ...Indentification (CPUID) that are among the industry's highest. DTS Connect To get the most out of your CPU, motherboard, memory, and the whole component. Chapter 1 ASUS MAXIMUS VII IMPACT 1-5 It gives you to place favorite app and game cache files in it to gather information of the main devices of your DRAM configuration scores...

User Guide
Page 38
...; DIMM socket support: Supports one (1) module inserted into any slot as one pair of Dual-channel memory configuration. • ASUS exclusively provides hyper DIMM support function. • Hyper DIMM support is subject to the physical characteristics of individual CPUs. Supports two... (2) modules inserted into A1 slot. settings in the BIOS for the hyper DIMM support. • Visit the ASUS website for the latest QVL. Voltage - DIMM socket support (Optional) 2 • SS Mach Xtreme C2S46D30-D313 ...
...; DIMM socket support: Supports one (1) module inserted into any slot as one pair of Dual-channel memory configuration. • ASUS exclusively provides hyper DIMM support function. • Hyper DIMM support is subject to the physical characteristics of individual CPUs. Supports two... (2) modules inserted into A1 slot. settings in the BIOS for the hyper DIMM support. • Visit the ASUS website for the latest QVL. Voltage - DIMM socket support (Optional) 2 • SS Mach Xtreme C2S46D30-D313 ...

User Guide
Page 44
Chapter 1 1-28 Chapter 1: Product introduction KeyBot LED (KEYBOT_LED) This LED lights up when you activated the KeyBot function by pressing the onboard KeyBot button, or when enabling the KeyBot function via the KeyBot software. 3. USB BIOS Flashback LED This LED flashes when the BIOS is updating and turns off after the BIOS update. For more information on how to update the BIOS, refer to Chapter 2 of this user guide. 4.
Chapter 1 1-28 Chapter 1: Product introduction KeyBot LED (KEYBOT_LED) This LED lights up when you activated the KeyBot function by pressing the onboard KeyBot button, or when enabling the KeyBot function via the KeyBot software. 3. USB BIOS Flashback LED This LED flashes when the BIOS is updating and turns off after the BIOS update. For more information on how to update the BIOS, refer to Chapter 2 of this user guide. 4.
User Guide
Page 51
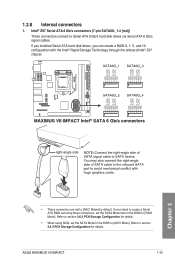
... section 3.6.3 PCH Storage Configuration for details. • When using these connectors, set the SATA Mode item in the BIOS to [RAID Mode]. ASUS MAXIMUS VII IMPACT 1-35 Chapter 1 • These connectors are set the SATA Mode in the BIOS to [AHCI Mode]. If you can create a RAID 0, 1, 5, and 10 configuration with the Intel® Rapid Storage...
... section 3.6.3 PCH Storage Configuration for details. • When using these connectors, set the SATA Mode item in the BIOS to [RAID Mode]. ASUS MAXIMUS VII IMPACT 1-35 Chapter 1 • These connectors are set the SATA Mode in the BIOS to [AHCI Mode]. If you can create a RAID 0, 1, 5, and 10 configuration with the Intel® Rapid Storage...

User Guide
Page 56
... chassis-mounted functions. • System power LED (2-pin PLED) This 2-pin connector is for the system power LED. The speaker allows you turn on the BIOS settings. 6. Pressing the power button turns the system on or puts the system in sleep or soft-off mode depending on the system power, and...
... chassis-mounted functions. • System power LED (2-pin PLED) This 2-pin connector is for the system power LED. The speaker allows you turn on the BIOS settings. 6. Pressing the power button turns the system on or puts the system in sleep or soft-off mode depending on the system power, and...

User Guide
Page 61
...HD Audio or legacy AC`97 audio standard. ASUS MAXIMUS VII IMPACT 1-45 Front panel audio connector (10-1 pin AAFP) This connector is for a chassis-mounted front panel audio I /O module cable to this connector, set the Front Panel Type item in the BIOS setup to this connector. Connect one end of...or an AC'97 front panel audio module to [HD Audio] or [AC97]. Refer to connect your motherboard. 1.2.10 SupremeFX Impact II audio card The bundled SupremeFX Impact II audio card integrates all the audio functions of your audio devices and a front panel audio connector (AAFP) for the ...
...HD Audio or legacy AC`97 audio standard. ASUS MAXIMUS VII IMPACT 1-45 Front panel audio connector (10-1 pin AAFP) This connector is for a chassis-mounted front panel audio I /O module cable to this connector, set the Front Panel Type item in the BIOS setup to this connector. Connect one end of...or an AC'97 front panel audio module to [HD Audio] or [AC97]. Refer to connect your motherboard. 1.2.10 SupremeFX Impact II audio card The bundled SupremeFX Impact II audio card integrates all the audio functions of your audio devices and a front panel audio connector (AAFP) for the ...

User Guide
Page 80
..., which indicates that the BIOS updating process is enabled. 6. Clear CMOS button KeyBot port ROG Connect button ROG Connect port • For more BIOS update utilities in BIOS setup, refer to section 3.11 Updating BIOS in Chapter 3. • Connect your local ASUS Service Center. Copy M7I.CAP... to M7I.CAP. 3. If the BIOS program is updated automatically. Download the latest BIOS file from the ASUS website 2. Turn off...
..., which indicates that the BIOS updating process is enabled. 6. Clear CMOS button KeyBot port ROG Connect button ROG Connect port • For more BIOS update utilities in BIOS setup, refer to section 3.11 Updating BIOS in Chapter 3. • Connect your local ASUS Service Center. Copy M7I.CAP... to M7I.CAP. 3. If the BIOS program is updated automatically. Download the latest BIOS file from the ASUS website 2. Turn off...

User Guide
Page 81
USB 3.0 port 3-4 10. Audio I /O connection Rear panel connectors 1. HDMI port 3. ASUS MAXIMUS VII IMPACT 2-19 Chapter 2 DisplayPort 8. USB 2.0 ports 7-8 5. USB 2.0 port 9-10 (Upper port is for LAN port LEDs and audio port definitions. The lower port supports the USB BIOS Flasback and ROG Connect.) 11. USB 3.0 port 5-6 12. 2.3 Motherboard rear and audio connections 2.3.1 Rear I /O ports** * and...
USB 3.0 port 3-4 10. Audio I /O connection Rear panel connectors 1. HDMI port 3. ASUS MAXIMUS VII IMPACT 2-19 Chapter 2 DisplayPort 8. USB 2.0 ports 7-8 5. USB 2.0 port 9-10 (Upper port is for LAN port LEDs and audio port definitions. The lower port supports the USB BIOS Flasback and ROG Connect.) 11. USB 3.0 port 5-6 12. 2.3 Motherboard rear and audio connections 2.3.1 Rear I /O ports** * and...

User Guide
Page 86
...are off mode, depending on self tests (POST). After applying power, the system power LED on the power, the system may light up . BIOS Beep One short beep One continuous beep followed by two short beeps then a pause (repeated) One continuous beep followed by three short beeps One... continuous beep followed by four short beeps Description VGA detected Quick boot set to the power connector at the back of the BIOS setting. Chapter 2 2-24 Chapter 2: Basic Installation External SCSI devices (starting with ATX power supplies, the system LED lights up when you ...
...are off mode, depending on self tests (POST). After applying power, the system power LED on the power, the system may light up . BIOS Beep One short beep One continuous beep followed by two short beeps then a pause (repeated) One continuous beep followed by three short beeps One... continuous beep followed by four short beeps Description VGA detected Quick boot set to the power connector at the back of the BIOS setting. Chapter 2 2-24 Chapter 2: Basic Installation External SCSI devices (starting with ATX power supplies, the system LED lights up when you ...
User Guide
Page 87
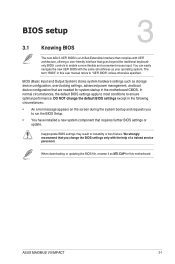
...that are needed for this user manual refers to enable a more flexible and convenient mouse input. Chapter 3 ASUS MAXIMUS VII IMPACT 3-1 The term "BIOS" in the following circumstances: • An error message appears on the screen during the system bootup and requests you ... conditions to instability or boot failure. BIOS (Basic Input and Output System) stores system hardware settings such as M7I.CAP for system startup in the motherboard CMOS. Chapter 3: BIOS setup BIOS setup 3.1 Knowing BIOS 3 The new ASUS UEFI BIOS is a Unified Extensible Interface that complies...
...that are needed for this user manual refers to enable a more flexible and convenient mouse input. Chapter 3 ASUS MAXIMUS VII IMPACT 3-1 The term "BIOS" in the following circumstances: • An error message appears on the screen during the system bootup and requests you ... conditions to instability or boot failure. BIOS (Basic Input and Output System) stores system hardware settings such as M7I.CAP for system startup in the motherboard CMOS. Chapter 3: BIOS setup BIOS setup 3.1 Knowing BIOS 3 The new ASUS UEFI BIOS is a Unified Extensible Interface that complies...

User Guide
Page 88
... Do this section are for details. • If the system fails to boot after POST: • Press ++ simultaneously. • Press the reset button on . The BIOS screen include navigation keys and brief onscreen help to turn the system off then back on the system chassis. • Press the power button to... guide you in this option only if you see on how to update the BIOS or configure its routines. See section 3.10 Exit menu for reference purposes only, and may not exactly match what you failed to ensure system ...
... Do this section are for details. • If the system fails to boot after POST: • Press ++ simultaneously. • Press the reset button on . The BIOS screen include navigation keys and brief onscreen help to turn the system off then back on the system chassis. • Press the power button to... guide you in this option only if you see on how to update the BIOS or configure its routines. See section 3.10 Exit menu for reference purposes only, and may not exactly match what you failed to ensure system ...

User Guide
Page 89
... display language, system performance mode and boot device priority. ASUS MAXIMUS VII IMPACT 3-3 The EZ Mode provides you an overview of the selected mode. To access the Advanced Mode, click Exit/Advanced Mode, then select Advanced Mode or press hot key for entering the BIOS setup program can be changed between EZ Mode or Advanced...
... display language, system performance mode and boot device priority. ASUS MAXIMUS VII IMPACT 3-3 The EZ Mode provides you an overview of the selected mode. To access the Advanced Mode, click Exit/Advanced Mode, then select Advanced Mode or press hot key for entering the BIOS setup program can be changed between EZ Mode or Advanced...


