
User Guide
Page 3
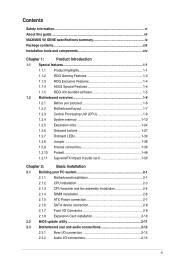
...information...vi About this guide...vii MAXIMUS VII GENE specifications summary ix Package contents...xiii Installation tools and components xiv Chapter 1: Product Introduction 1.1 Special features 1-1 1.1.1 Product highlights 1-1 1.1.2 ROG Gaming Features 1-3 1.1.3 ROG Exclusive Features 1-4 1.1.4 ASUS Special Features 1-4 1.1.5 ROG ...device connection 2-8 2.1.7 Front I/O Connector 2-9 2.1.8 Expansion Card installation 2-10 2.2 BIOS update utility 2-11 2.3 Motherboard rear and audio connections 2-12 2.3.1 Rear I/O connection 2-12 2.3.2 Audio I/O connections 2-14 iii
...information...vi About this guide...vii MAXIMUS VII GENE specifications summary ix Package contents...xiii Installation tools and components xiv Chapter 1: Product Introduction 1.1 Special features 1-1 1.1.1 Product highlights 1-1 1.1.2 ROG Gaming Features 1-3 1.1.3 ROG Exclusive Features 1-4 1.1.4 ASUS Special Features 1-4 1.1.5 ROG ...device connection 2-8 2.1.7 Front I/O Connector 2-9 2.1.8 Expansion Card installation 2-10 2.2 BIOS update utility 2-11 2.3 Motherboard rear and audio connections 2-12 2.3.1 Rear I/O connection 2-12 2.3.2 Audio I/O connections 2-14 iii

User Guide
Page 4
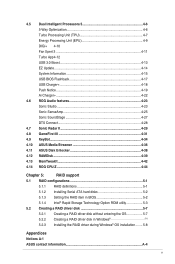
2.4 Starting up for the first time 2-17 2.5 Turning off the computer 2-17 Chapter 3: BIOS setup 3.1 Knowing BIOS 3-1 3.2 BIOS setup program 3-2 3.2.1 EZ Mode 3-3 3.2.2 Advanced Mode 3-4 3.3 My Favorites 3-7 3.4 Extreme Tweaker menu 3-8 3.5 Main menu... 3-51 3.9.2 ROG SSD Secure Erase 3-51 3.9.3 Graphics Card Information 3-53 3.9.4 ASUS Overclocking Profile 3-53 3.9.5 ASUS SPD Information 3-54 3.9.6 ROG OC Panel H-Key Configure 3-55 3.10 Exit menu 3-56 3.11 Updating BIOS 3-57 Chapter 4: Software support 4.1 Installing an operating system 4-1 4.2 Support DVD ...
2.4 Starting up for the first time 2-17 2.5 Turning off the computer 2-17 Chapter 3: BIOS setup 3.1 Knowing BIOS 3-1 3.2 BIOS setup program 3-2 3.2.1 EZ Mode 3-3 3.2.2 Advanced Mode 3-4 3.3 My Favorites 3-7 3.4 Extreme Tweaker menu 3-8 3.5 Main menu... 3-51 3.9.2 ROG SSD Secure Erase 3-51 3.9.3 Graphics Card Information 3-53 3.9.4 ASUS Overclocking Profile 3-53 3.9.5 ASUS SPD Information 3-54 3.9.6 ROG OC Panel H-Key Configure 3-55 3.10 Exit menu 3-56 3.11 Updating BIOS 3-57 Chapter 4: Software support 4.1 Installing an operating system 4-1 4.2 Support DVD ...
User Guide
Page 5
... Streamer 4-36 4.11 ASUS Disk Unlocker 4-38 4.12 RAMDisk...4-39 4.13 MemTweakIt 4-42 4.14 ROG CPU-Z 4-44 Chapter 5: RAID support 5.1 RAID configurations 5-1 5.1.1 RAID definitions 5-1 5.1.2 Installing Serial ATA hard disks 5-2 5.1.3 Setting the RAID item in BIOS 5-2 5.1.4 Intel® Rapid Storage Technology Option ROM utility 5-3 5.2 Creating a RAID driver disk 5-7 5.2.1 Creating a RAID driver disk without...
... Streamer 4-36 4.11 ASUS Disk Unlocker 4-38 4.12 RAMDisk...4-39 4.13 MemTweakIt 4-42 4.14 ROG CPU-Z 4-44 Chapter 5: RAID support 5.1 RAID configurations 5-1 5.1.1 RAID definitions 5-1 5.1.2 Installing Serial ATA hard disks 5-2 5.1.3 Setting the RAID item in BIOS 5-2 5.1.4 Intel® Rapid Storage Technology Option ROM utility 5-3 5.2 Creating a RAID driver disk 5-7 5.2.1 Creating a RAID driver disk without...

User Guide
Page 7
...you have been added by your dealer. Where to find more information Refer to change system settings through the BIOS Setup menus. vii These documents are also provided. • Chapter 4: Software support This chapter describes the contents of the switches, jumpers..., and connectors on ASUS hardware and software products. 2. ASUS website The ASUS website (www.asus.com) provides updated information on the motherboard. • Chapter 2: Basic...
...you have been added by your dealer. Where to find more information Refer to change system settings through the BIOS Setup menus. vii These documents are also provided. • Chapter 4: Software support This chapter describes the contents of the switches, jumpers..., and connectors on ASUS hardware and software products. 2. ASUS website The ASUS website (www.asus.com) provides updated information on the motherboard. • Chapter 2: Basic...

User Guide
Page 11
... DIGI+ Power Control, TPU, EPU, and Fan Xpert 3 ASUS Exclusive Features - USB BIOS Flashback - Extreme Tweaker - ASUS Q-Code - Full digital CPU/DRAM power - ASUS Q-Slot - ASUS C.P.R. (CPU Parameter Recall) MemOK! ROG SSD Secure Erase - ASUS Q-DIMM (continued on the next page) xi ASUS EZ Flash 2 - GPU.DIMM Post - MAXIMUS VII GENE specifications summary ROG Exclusive Features Special Features Extreme Engine...
... DIGI+ Power Control, TPU, EPU, and Fan Xpert 3 ASUS Exclusive Features - USB BIOS Flashback - Extreme Tweaker - ASUS Q-Code - Full digital CPU/DRAM power - ASUS Q-Slot - ASUS C.P.R. (CPU Parameter Recall) MemOK! ROG SSD Secure Erase - ASUS Q-DIMM (continued on the next page) xi ASUS EZ Flash 2 - GPU.DIMM Post - MAXIMUS VII GENE specifications summary ROG Exclusive Features Special Features Extreme Engine...
User Guide
Page 12
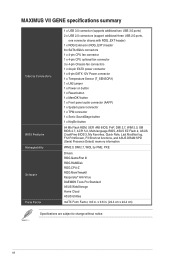
xii MAXIMUS VII GENE specifications summary Internal Connectors BIOS Features Manageability Software Form Factor 1 x USB 3.0 connector (supports additional two USB 3.0 ports) 2 x USB 2.0 connectors (support additional three USB 2.0 ports, ... Sonic SoundStage button 1 x KeyBot button 64 Mb Flash ROM, UEFI AMI BIOS, PnP, DMI 2.7, WfM 2.0, SM BIOS 2.7, ACPI 5.0, Multi-language BIOS, ASUS EZ Flash 2, ASUS CrashFree BIOS 3, My Favorites, Quick Note, Last Modified log, F12 PrintScreen, F3 Shortcut functions, and ASUS DRAM SPD (Serial Presence Detect) memory information WfM2.0, DMI2.7, WOL by PME...
xii MAXIMUS VII GENE specifications summary Internal Connectors BIOS Features Manageability Software Form Factor 1 x USB 3.0 connector (supports additional two USB 3.0 ports) 2 x USB 2.0 connectors (support additional three USB 2.0 ports, ... Sonic SoundStage button 1 x KeyBot button 64 Mb Flash ROM, UEFI AMI BIOS, PnP, DMI 2.7, WfM 2.0, SM BIOS 2.7, ACPI 5.0, Multi-language BIOS, ASUS EZ Flash 2, ASUS CrashFree BIOS 3, My Favorites, Quick Note, Last Modified log, F12 PrintScreen, F3 Shortcut functions, and ASUS DRAM SPD (Serial Presence Detect) memory information WfM2.0, DMI2.7, WOL by PME...

User Guide
Page 18
...ASUS features into actual storage, so you to regularly check for compatible USB 3.0 peripherals without entering the existing BIOS or operating system. It automatically accelerates data speeds for UEFI BIOS updates, and download the latest BIOS automatically. Install a USB storage device containing the BIOS...8482; Power Block MOSFETs combine great durability and up to -use functions, with 20% wider temperature tolerance. USB BIOS Flashback USB BIOS Flashback offers a hassle-free updating solution for your main storage optimized for a challenging and extreme gaming enjoyment. ...
...ASUS features into actual storage, so you to regularly check for compatible USB 3.0 peripherals without entering the existing BIOS or operating system. It automatically accelerates data speeds for UEFI BIOS updates, and download the latest BIOS automatically. Install a USB storage device containing the BIOS...8482; Power Block MOSFETs combine great durability and up to -use functions, with 20% wider temperature tolerance. USB BIOS Flashback USB BIOS Flashback offers a hassle-free updating solution for your main storage optimized for a challenging and extreme gaming enjoyment. ...

User Guide
Page 19
... DAEMON Tools Pro offers essential functionality to a home theatre system. MemTweakIt MemTweakIt is a DRAM efficiency tool that are among the industry's highest. Chapter 1 ASUS MAXIMUS VII GENE 1-5 DTS Interactive is capable of performing multichannel encoding of reporting your keyboard. Use the ROG look of DTS bitstreams on your audio entertainment across all... backup CD, DVD and Blu-ray discs. 1.1.5 ROG rich bundled software KeyBot KeyBot is a built-in CPU Level UP, XMP, or directly to BIOS mode. DTS Connect To get the most out of incredible surround sound.
... DAEMON Tools Pro offers essential functionality to a home theatre system. MemTweakIt MemTweakIt is a DRAM efficiency tool that are among the industry's highest. Chapter 1 ASUS MAXIMUS VII GENE 1-5 DTS Interactive is capable of performing multichannel encoding of reporting your keyboard. Use the ROG look of DTS bitstreams on your audio entertainment across all... backup CD, DVD and Blu-ray discs. 1.1.5 ROG rich bundled software KeyBot KeyBot is a built-in CPU Level UP, XMP, or directly to BIOS mode. DTS Connect To get the most out of incredible surround sound.

User Guide
Page 37
... 1.5 9 - 9 - 9 - - - - - 9 - 9-9-9-24 - 9-9-9-24 - - - - - - - Load the X.M.P. settings in the BIOS for the hyper DIMM support. • Visit the ASUS website for better compatibility. (4) Supports four (4) modules inserted into slots A2 and B2 for the latest QVL. Patriot Patriot RiDATA RiDATA...function. • Hyper DIMM support is subject to the physical characteristics of Dual-channel memory configuration. Chapter 1 ASUS MAXIMUS VII GENE 1-23 DDR3 1333 MHz capability Vendors Part No. Patriot RiDATA RiDATA SAMSUNG NANYA S-POWER S-POWER S-POWER Team Transcend...
... 1.5 9 - 9 - 9 - - - - - 9 - 9-9-9-24 - 9-9-9-24 - - - - - - - Load the X.M.P. settings in the BIOS for the hyper DIMM support. • Visit the ASUS website for better compatibility. (4) Supports four (4) modules inserted into slots A2 and B2 for the latest QVL. Patriot Patriot RiDATA RiDATA...function. • Hyper DIMM support is subject to the physical characteristics of Dual-channel memory configuration. Chapter 1 ASUS MAXIMUS VII GENE 1-23 DDR3 1333 MHz capability Vendors Part No. Patriot RiDATA RiDATA SAMSUNG NANYA S-POWER S-POWER S-POWER Team Transcend...

User Guide
Page 40
... for better performance. M.2 and mPCIe slot are both runs at x2 mode. M.2 and mPCIe slot are two possible scenarios in BIOS, refer to the Onboard Devices Configuration section on motherboard Refer to PCIe x4 slot for the physical location of the M.2, PCIeX4_1, and... mPCIe slot. Location on the BIOS Setup chapter. 1-26 Chapter 1: Product introduction mPCIe 1 - 1 - - M.2 slot and mPCIe slot both runs at x1 mode. • In M.2 ...
... for better performance. M.2 and mPCIe slot are both runs at x2 mode. M.2 and mPCIe slot are two possible scenarios in BIOS, refer to the Onboard Devices Configuration section on motherboard Refer to PCIe x4 slot for the physical location of the M.2, PCIeX4_1, and... mPCIe slot. Location on the BIOS Setup chapter. 1-26 Chapter 1: Product introduction mPCIe 1 - 1 - - M.2 slot and mPCIe slot both runs at x1 mode. • In M.2 ...

User Guide
Page 42
... with ones recommended in the Memory QVL (Qualified Vendors Lists) in this user manual or at www.asus.com. • If you download and update to boot and load the BIOS default settings. To stop memory tuning, turn off the computer and replace DIMMs during the tuning process,... the computer and unplug the power cord for the exact location of failsafe settings. function. • The MemOK! button to the latest BIOS version from www.asus.com after the whole tuning process, the DRAM_LED lights continuously. It takes about 5-10 seconds. • If your system fails to memory...
... with ones recommended in the Memory QVL (Qualified Vendors Lists) in this user manual or at www.asus.com. • If you download and update to boot and load the BIOS default settings. To stop memory tuning, turn off the computer and replace DIMMs during the tuning process,... the computer and unplug the power cord for the exact location of failsafe settings. function. • The MemOK! button to the latest BIOS version from www.asus.com after the whole tuning process, the DRAM_LED lights continuously. It takes about 5-10 seconds. • If your system fails to memory...

User Guide
Page 45
ASUS MAXIMUS VII GENE 1-31 Chapter 1 USB BIOS Flashback LED (FLBK_LED) This LED flashes when you activate the KeyBot function from the KeyBot software. 4. For more information on how to update the BIOS, refer to Chapter 2 of this user guide. 3. KeyBot LED (KEYBOT_LED) This LED lights up when KeyBot function is activated when the onboard KeyBot button is pressed or when you press the ROG Connect button for BIOS update.
ASUS MAXIMUS VII GENE 1-31 Chapter 1 USB BIOS Flashback LED (FLBK_LED) This LED flashes when you activate the KeyBot function from the KeyBot software. 4. For more information on how to update the BIOS, refer to Chapter 2 of this user guide. 3. KeyBot LED (KEYBOT_LED) This LED lights up when KeyBot function is activated when the onboard KeyBot button is pressed or when you press the ROG Connect button for BIOS update.
User Guide
Page 53
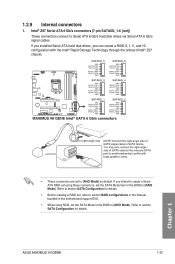
... SATA Mode in the BIOS to [AHCI Mode] by default. If you installed Serial ATA hard disk drives, you intend to create a Serial ATA RAID set using NCQ, set the SATA Mode item in the BIOS to Serial ATA 6 Gb/s hard disk drives via Serial ATA 6 Gb/s signal cables. ASUS MAXIMUS VII GENE 1-39 1.2.9 Internal connectors...
... SATA Mode in the BIOS to [AHCI Mode] by default. If you installed Serial ATA hard disk drives, you intend to create a Serial ATA RAID set using NCQ, set the SATA Mode item in the BIOS to Serial ATA 6 Gb/s hard disk drives via Serial ATA 6 Gb/s signal cables. ASUS MAXIMUS VII GENE 1-39 1.2.9 Internal connectors...

User Guide
Page 59
... connector is for the system power button. The speaker allows you turn on the BIOS settings. Pressing the power button turns the system on or puts the system in sleep or soft-off the system power. Chapter 1 ASUS MAXIMUS VII GENE 1-45 The HDD LED lights up when you to the HDD. • System warning...
... connector is for the system power button. The speaker allows you turn on the BIOS settings. Pressing the power button turns the system on or puts the system in sleep or soft-off the system power. Chapter 1 ASUS MAXIMUS VII GENE 1-45 The HDD LED lights up when you to the HDD. • System warning...

User Guide
Page 77
... storage device. 4. If the BIOS program is complete. Chapter 2 ASUS MAXIMUS VII GENE 2-11 2.2 BIOS update utility USB BIOS Flashback USB BIOS Flashback allows you want to use USB BIOS Flashback: 1. The light goes out when the process of your local ASUS Service Center. Updating BIOS may have risks. Extract and rename the BIOS image file to the USB BIOS Flashback port. 5. Press...
... storage device. 4. If the BIOS program is complete. Chapter 2 ASUS MAXIMUS VII GENE 2-11 2.2 BIOS update utility USB BIOS Flashback USB BIOS Flashback allows you want to use USB BIOS Flashback: 1. The light goes out when the process of your local ASUS Service Center. Updating BIOS may have risks. Extract and rename the BIOS image file to the USB BIOS Flashback port. 5. Press...

User Guide
Page 78
... 3.0 ports 9 and 10. 11. PS/2 Keyboard/Mouse combo port 3. ASMedia® USB 3.0 ports 1 and 2. 10. Optical S/PDIF OUT port 4. The lower port supports the USB BIOS Flasback feature and the ROG Connect port. 8. Audio I /O connection Chapter 2 Rear panel connectors 1.
... 3.0 ports 9 and 10. 11. PS/2 Keyboard/Mouse combo port 3. ASMedia® USB 3.0 ports 1 and 2. 10. Optical S/PDIF OUT port 4. The lower port supports the USB BIOS Flasback feature and the ROG Connect port. 8. Audio I /O connection Chapter 2 Rear panel connectors 1.

User Guide
Page 83
... jumper settings and connections or call your monitor complies with ATX power supplies, the system LED lights up when you turned on the BIOS setting. Chapter 2 ASUS MAXIMUS VII GENE 2-17 For systems with the "green" standards or if it has a "power standby" feature, the monitor LED may have failed... a power-on . 2.4 Starting up . After making all switches are running, the BIOS beeps (refer to let the system enter the soft-off mode...
... jumper settings and connections or call your monitor complies with ATX power supplies, the system LED lights up when you turned on the BIOS setting. Chapter 2 ASUS MAXIMUS VII GENE 2-17 For systems with the "green" standards or if it has a "power standby" feature, the monitor LED may have failed... a power-on . 2.4 Starting up . After making all switches are running, the BIOS beeps (refer to let the system enter the soft-off mode...

User Guide
Page 85
... only with the help of a trained service personnel. Chapter 3 ASUS MAXIMUS VII GENE 3-1 In normal circumstances, the default BIOS settings apply to most conditions to instability or boot failure. Inappropriate BIOS settings may result to ensure optimal performance. Chapter 3: BIOS setup BIOS setup 3.1 Knowing BIOS 3 The new ASUS UEFI BIOS is a Unified Extensible Interface that complies with UEFI architecture, offering a user...
... only with the help of a trained service personnel. Chapter 3 ASUS MAXIMUS VII GENE 3-1 In normal circumstances, the default BIOS settings apply to most conditions to instability or boot failure. Inappropriate BIOS settings may result to ensure optimal performance. Chapter 3: BIOS setup BIOS setup 3.1 Knowing BIOS 3 The new ASUS UEFI BIOS is a Unified Extensible Interface that complies with UEFI architecture, offering a user...

User Guide
Page 86
...; Press ++ simultaneously. • Press the reset button on how to erase the RTC RAM via the Clear CMOS button. • The BIOS setup program does not support the bluetooth devices. See section Exit Menu for more information on the system chassis. • If you are for... or press hotkey . Chapter 3 3-2 Chapter 3: BIOS setup 3.2 BIOS setup program Use the BIOS Setup to update the BIOS or configure its routines. Entering BIOS at startup To enter BIOS Setup at startup, press during the Power-On Self Test (POST). The BIOS screen include navigation keys and brief onscreen help to...
...; Press ++ simultaneously. • Press the reset button on how to erase the RTC RAM via the Clear CMOS button. • The BIOS setup program does not support the bluetooth devices. See section Exit Menu for more information on the system chassis. • If you are for... or press hotkey . Chapter 3 3-2 Chapter 3: BIOS setup 3.2 BIOS setup program Use the BIOS Setup to update the BIOS or configure its routines. Entering BIOS at startup To enter BIOS Setup at startup, press during the Power-On Self Test (POST). The BIOS screen include navigation keys and brief onscreen help to...

User Guide
Page 87
ASUS MAXIMUS VII GENE 3-3 To access the Advanced Mode, click Exit/Advanced Mode, then select Advanced Mode or press hot key for details. Displays the CPU/motherboard temperature, CPU voltage output, CPU/chassis/power fan speed, and SATA information Displays the system properties of the BIOS setup program Creates ...overclocking Chapter 3 Displays the CPU Fan's speed. Click < or > to the Setup Mode item in section Boot menu for the advanced BIOS settings. 3.2.1 EZ Mode The EZ Mode provides you an overview of the basic system information, and allows you installed to select the display...
ASUS MAXIMUS VII GENE 3-3 To access the Advanced Mode, click Exit/Advanced Mode, then select Advanced Mode or press hot key for details. Displays the CPU/motherboard temperature, CPU voltage output, CPU/chassis/power fan speed, and SATA information Displays the system properties of the BIOS setup program Creates ...overclocking Chapter 3 Displays the CPU Fan's speed. Click < or > to the Setup Mode item in section Boot menu for the advanced BIOS settings. 3.2.1 EZ Mode The EZ Mode provides you an overview of the basic system information, and allows you installed to select the display...


