MAXIMUS VI EXTREME User's Manual
Page 3
Contents Safety information...vii About this guide...viii MAXIMUS VI EXTREME specifications summary x OC Panel specifications summary xv Package contents...xvi Installation tools and components xvii Chapter 1: Product Introduction 1.1 Special features 1-1 1.1.1 Product highlights 1-1 1.1.2 ROG Intelligent Performance & Overclocking features 1-2 1.1.3 ASUS special features 1-4 1.1.4 ROG-rich bundled software 1-4 1.2 Motherboard overview 1-6 1.2.1 Before you proceed 1-6 1.2.2 Motherboard layout 1-7 1.2.3 Central Processing Unit (CPU 1-9 1.2.4 System...
Contents Safety information...vii About this guide...viii MAXIMUS VI EXTREME specifications summary x OC Panel specifications summary xv Package contents...xvi Installation tools and components xvii Chapter 1: Product Introduction 1.1 Special features 1-1 1.1.1 Product highlights 1-1 1.1.2 ROG Intelligent Performance & Overclocking features 1-2 1.1.3 ASUS special features 1-4 1.1.4 ROG-rich bundled software 1-4 1.2 Motherboard overview 1-6 1.2.1 Before you proceed 1-6 1.2.2 Motherboard layout 1-7 1.2.3 Central Processing Unit (CPU 1-9 1.2.4 System...
MAXIMUS VI EXTREME User's Manual
Page 4
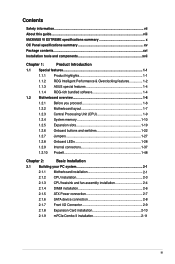
... BIOS update utility 2-15 2.3 Motherboard rear and audio connections 2-16 2.3.1 Rear I/O connection 2-16 2.3.2 Audio I/O connections 2-17 2.4 OC Panel...2-21 2.4.1 OC Panel Overview 2-21 2.4.2 Setting up your OC Panel in Normal Mode 2-23 2.4.3 Setting up your OC Panel in Extreme Mode 2-25 2.5 Starting up for...3-38 3.6.9 Network Stack 3-39 3.5.10 LED Control 3-39 3.7 Monitor menu 3-40 3.8 Boot menu 3-44 3.9 Tools menu 3-48 3.9.1 ASUS EZ Flash 2 Utility 3-48 3.9.2 ASUS O.C. Profile 3-48 3.9.3 ASUS SPD Information 3-49 3.9.4 BIOS Flashback 3-50 3.10 Exit menu 3-51 iv
... BIOS update utility 2-15 2.3 Motherboard rear and audio connections 2-16 2.3.1 Rear I/O connection 2-16 2.3.2 Audio I/O connections 2-17 2.4 OC Panel...2-21 2.4.1 OC Panel Overview 2-21 2.4.2 Setting up your OC Panel in Normal Mode 2-23 2.4.3 Setting up your OC Panel in Extreme Mode 2-25 2.5 Starting up for...3-38 3.6.9 Network Stack 3-39 3.5.10 LED Control 3-39 3.7 Monitor menu 3-40 3.8 Boot menu 3-44 3.9 Tools menu 3-48 3.9.1 ASUS EZ Flash 2 Utility 3-48 3.9.2 ASUS O.C. Profile 3-48 3.9.3 ASUS SPD Information 3-49 3.9.4 BIOS Flashback 3-50 3.10 Exit menu 3-51 iv

MAXIMUS VI EXTREME User's Manual
Page 7
... adding or removing devices to or from connectors, slots, sockets and circuitry. • Avoid dust, humidity, and temperature extremes. Operation safety • Before installing the motherboard and adding devices on a stable surface. • If you are using, contact your retailer. Do not place the ... Contact a qualified service technician or your area. If you add a device. • Before connecting or removing signal cables from the motherboard, ensure that your power supply is broken, do not try to the correct voltage in any damage, contact your dealer immediately. •...
... adding or removing devices to or from connectors, slots, sockets and circuitry. • Avoid dust, humidity, and temperature extremes. Operation safety • Before installing the motherboard and adding devices on a stable surface. • If you are using, contact your retailer. Do not place the ... Contact a qualified service technician or your area. If you add a device. • Before connecting or removing signal cables from the motherboard, ensure that your power supply is broken, do not try to the correct voltage in any damage, contact your dealer immediately. •...
MAXIMUS VI EXTREME User's Manual
Page 8
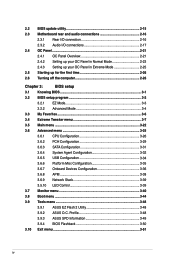
... for product and software updates. 1. ASUS websites The ASUS website provides updated information on the motherboard. • Chapter 2: Basic Installation This chapter lists the hardware setup procedures that you need when installing and configuring the motherboard. Refer to change system settings through ... perform when installing system components. • Chapter 3: BIOS setup This chapter tells how to the ASUS contact information. 2. It includes description of the motherboard and the new technology it supports. How this guide This user guide contains the information you have ...
... for product and software updates. 1. ASUS websites The ASUS website provides updated information on the motherboard. • Chapter 2: Basic Installation This chapter lists the hardware setup procedures that you need when installing and configuring the motherboard. Refer to change system settings through ... perform when installing system components. • Chapter 3: BIOS setup This chapter tells how to the ASUS contact information. 2. It includes description of the motherboard and the new technology it supports. How this guide This user guide contains the information you have ...
MAXIMUS VI EXTREME User's Manual
Page 15
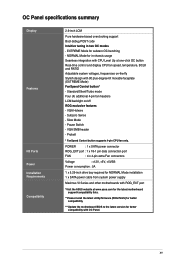
...x 5.25-inch drive bay required for NORMAL Mode installation 1 x SATA power cable from system power supply Maximus VI Series and other motherboards with ROG_EXT port *Visit the ASUS website at one-click OC button Real-time control and display CPU fan speed, temperature, BCLK and RATIO ...Up at www.asus.com for the latest motherboard support/compatibility lists. **Please install the latest utility/firmware (ROG PLUS) for better compatibility. ***Update the motherboard BIOS to the latest version for better compatibility with 90 plus-degree-tilt movable faceplate (EXTREME Mode) FanSpeed...
...x 5.25-inch drive bay required for NORMAL Mode installation 1 x SATA power cable from system power supply Maximus VI Series and other motherboards with ROG_EXT port *Visit the ASUS website at one-click OC button Real-time control and display CPU fan speed, temperature, BCLK and RATIO ...Up at www.asus.com for the latest motherboard support/compatibility lists. **Please install the latest utility/firmware (ROG PLUS) for better compatibility. ***Update the motherboard BIOS to the latest version for better compatibility with 90 plus-degree-tilt movable faceplate (EXTREME Mode) FanSpeed...
MAXIMUS VI EXTREME User's Manual
Page 16
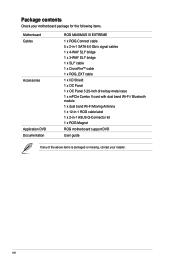
Package contents Check your motherboard package for the following items. Motherboard Cables Accessories Application DVD Documentation ROG MAXIMUS VI EXTREME 1 x ROG Connect cable 5 x 2-in-1 SATA 6.0 Gb/s signal cables 1 x 4-WAY SLI® bridge 1 x 3-WAY SLI® bridge 1 x SLI® cable 1 x CrossFireTM cable 1 x ROG_EXT ... with dual band Wi-Fi / Bluetooth module 1 x dual band Wi-Fi Moving Antenna 1 x 12-in-1 ROG cable label 1 x 2-in-1 ASUS Q-Connector kit 1 x ROG Magnet ROG motherboard support DVD User guide If any of the above items is damaged or missing, contact your retailer. xvi
Package contents Check your motherboard package for the following items. Motherboard Cables Accessories Application DVD Documentation ROG MAXIMUS VI EXTREME 1 x ROG Connect cable 5 x 2-in-1 SATA 6.0 Gb/s signal cables 1 x 4-WAY SLI® bridge 1 x 3-WAY SLI® bridge 1 x SLI® cable 1 x CrossFireTM cable 1 x ROG_EXT ... with dual band Wi-Fi / Bluetooth module 1 x dual band Wi-Fi Moving Antenna 1 x 12-in-1 ROG cable label 1 x 2-in-1 ASUS Q-Connector kit 1 x ROG Magnet ROG motherboard support DVD User guide If any of the above items is damaged or missing, contact your retailer. xvi

MAXIMUS VI EXTREME User's Manual
Page 17
xvii Installation tools and components 1 bag of screws Philips (cross) screwdriver PC chassis Power supply unit Intel LGA 1150 CPU Intel LGA 1150 compatible CPU Fan DDR3 DIMM SATA hard disk drive SATA optical disc drive (optional) Graphics card (optional) The tools and components in the table above are not included in the motherboard package.
xvii Installation tools and components 1 bag of screws Philips (cross) screwdriver PC chassis Power supply unit Intel LGA 1150 CPU Intel LGA 1150 compatible CPU Fan DDR3 DIMM SATA hard disk drive SATA optical disc drive (optional) Graphics card (optional) The tools and components in the table above are not included in the motherboard package.

MAXIMUS VI EXTREME User's Manual
Page 19
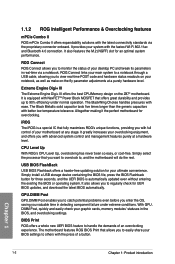
...8482; i5/ Intel® Core™ i3, Pentium® and Celeron® processors. SLI®/CrossFire™ On-Demand This motherboard features a unique PCIe 3.0 bridge chip to -point links, which increases bandwidth and enhances the system's performance. We offer the best..., Pentium® and Celeron® Processors This motherboard supports 4th generation Intel® Core™ i7/ Intel® Core™ i5/ Intel® Core™ i3, Pentium® and Celeron® processors in the LGA1150 package. Chapter 1 ASUS MAXIMUS VI EXTREME 1-1 PCI Express® 3.0 PCI Express®...
...8482; i5/ Intel® Core™ i3, Pentium® and Celeron® processors. SLI®/CrossFire™ On-Demand This motherboard features a unique PCIe 3.0 bridge chip to -point links, which increases bandwidth and enhances the system's performance. We offer the best..., Pentium® and Celeron® Processors This motherboard supports 4th generation Intel® Core™ i7/ Intel® Core™ i5/ Intel® Core™ i3, Pentium® and Celeron® processors in the LGA1150 package. Chapter 1 ASUS MAXIMUS VI EXTREME 1-1 PCI Express® 3.0 PCI Express®...
MAXIMUS VI EXTREME User's Manual
Page 20
...processor that fully maximizes ROG's unique functions, providing you to handle the demands of your notebook, as well as make on the Z87® motherboard. Simply install a USB storage device containing the BIOS file, press the BIOS Flashback button for overclocking. It also allows you want to overclock to... Digi+ III The Extreme Engine Digi+ III offers the best CPU/Memory design on -the-fly parameter adjustments at a purely hardware level. iROG The iROG is a special IC that you to , and the motherboard will do the rest. CPU Level Up With ROG's CPU Level Up, overclocking has never ...
...processor that fully maximizes ROG's unique functions, providing you to handle the demands of your notebook, as well as make on the Z87® motherboard. Simply install a USB storage device containing the BIOS file, press the BIOS Flashback button for overclocking. It also allows you want to overclock to... Digi+ III The Extreme Engine Digi+ III offers the best CPU/Memory design on -the-fly parameter adjustments at a purely hardware level. iROG The iROG is a special IC that you to , and the motherboard will do the rest. CPU Level Up With ROG's CPU Level Up, overclocking has never ...
MAXIMUS VI EXTREME User's Manual
Page 21
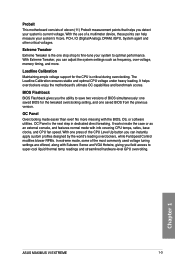
...of the most commonly used voltage tuning settings are offered, along with the BIOS, OS, or software utilities. Chapter 1 ASUS MAXIMUS VI EXTREME 1-3 With Extreme Tweaker, you the ability to save two versions of BIOS simultaneously: one press of the CPU Level Up button you can...voltage, memory timing, and more messing with Subzero Sense and VGA Hotwire, giving you detect your system to optimal performance. ProbeIt This motherboard consists of eleven (11) ProbeIt measurement points that helps you field access to super-cool liquid thermal temp readings and streamlined hardware-level...
...of the most commonly used voltage tuning settings are offered, along with the BIOS, OS, or software utilities. Chapter 1 ASUS MAXIMUS VI EXTREME 1-3 With Extreme Tweaker, you the ability to save two versions of BIOS simultaneously: one press of the CPU Level Up button you can...voltage, memory timing, and more messing with Subzero Sense and VGA Hotwire, giving you detect your system to optimal performance. ProbeIt This motherboard consists of eleven (11) ProbeIt measurement points that helps you field access to super-cool liquid thermal temp readings and streamlined hardware-level...
MAXIMUS VI EXTREME User's Manual
Page 22
...panel as a remote keyboard and mouse for your computer. • Smart Motion Control: Allows you to transfer files between your CPU, motherboard, memory, and other main components. ROG CPU-Z ROG CPU-Z, authorized by Intel's CPU Identification (CPUID), is renowned for individual users and...current information and status of reporting your computer and mobile device. • Capture and Send: Allows you to work with ROG CPU-Z. 1.1.3 ASUS special features Wi-Fi GO! Chapter 1 1-4 Chapter 1: Product introduction It gives you to a mobile device. 1.1.4 ROG-rich bundled software ...
...panel as a remote keyboard and mouse for your computer. • Smart Motion Control: Allows you to transfer files between your CPU, motherboard, memory, and other main components. ROG CPU-Z ROG CPU-Z, authorized by Intel's CPU Identification (CPUID), is renowned for individual users and...current information and status of reporting your computer and mobile device. • Capture and Send: Allows you to work with ROG CPU-Z. 1.1.3 ASUS special features Wi-Fi GO! Chapter 1 1-4 Chapter 1: Product introduction It gives you to a mobile device. 1.1.4 ROG-rich bundled software ...
MAXIMUS VI EXTREME User's Manual
Page 24
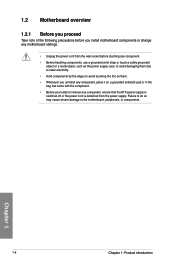
... you proceed Take note of the following precautions before you install motherboard components or change any motherboard settings. • Unplug the power cord from the wall socket before touching any component, ensure that the ATX power supply is switched off or the ... or a metal object, such as the power supply case, to avoid damaging them due to static electricity. • Hold components by the edges to the motherboard, peripherals, or components. Chapter 1 1-6 Chapter 1: Product introduction
... you proceed Take note of the following precautions before you install motherboard components or change any motherboard settings. • Unplug the power cord from the wall socket before touching any component, ensure that the ATX power supply is switched off or the ... or a metal object, such as the power supply case, to avoid damaging them due to static electricity. • Hold components by the edges to the motherboard, peripherals, or components. Chapter 1 1-6 Chapter 1: Product introduction
MAXIMUS VI EXTREME User's Manual
Page 25
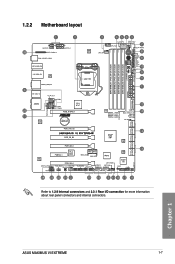
ASUS MAXIMUS VI EXTREME 1-7 1.2.2 Motherboard layout Chapter 1 Refer to 1.2.9 Internal connectors and 2.3.1 Rear I/O connection for more information about rear panel connectors and internal connectors.
ASUS MAXIMUS VI EXTREME 1-7 1.2.2 Motherboard layout Chapter 1 Refer to 1.2.9 Internal connectors and 2.3.1 Rear I/O connection for more information about rear panel connectors and internal connectors.
MAXIMUS VI EXTREME User's Manual
Page 27
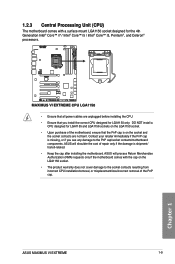
ASUS will shoulder the cost of the motherboard, ensure that the PnP cap is shipment/ transit-related. • Keep the cap after installing the motherboard. Contact your retailer immediately if the PnP cap is missing, or if you install the ... socket. • The product warranty does not cover damage to the PnP cap/socket contacts/motherboard components. Chapter 1 ASUS MAXIMUS VI EXTREME 1-9 ASUS will process Return Merchandise Authorization (RMA) requests only if the motherboard comes with a surface mount LGA1150 socket designed for the 4th Generation Intel® Core™...
ASUS will shoulder the cost of the motherboard, ensure that the PnP cap is shipment/ transit-related. • Keep the cap after installing the motherboard. Contact your retailer immediately if the PnP cap is missing, or if you install the ... socket. • The product warranty does not cover damage to the PnP cap/socket contacts/motherboard components. Chapter 1 ASUS MAXIMUS VI EXTREME 1-9 ASUS will process Return Merchandise Authorization (RMA) requests only if the motherboard comes with a surface mount LGA1150 socket designed for the 4th Generation Intel® Core™...

MAXIMUS VI EXTREME User's Manual
Page 28
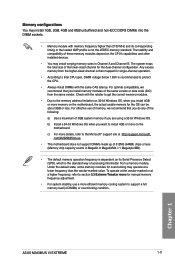
DO NOT install a DDR or DDR2 memory module to the DDR3 slot. 1.2.4 System memory The motherboard comes with four Double Data Rate 3 (DDR3) Dual Inline Memory Modules (DIMM) slots. A DDR3 module is notched differently from a DDR or DDR2 module. Recommended memory configurations Chapter 1 1-10 Chapter 1: Product introduction
DO NOT install a DDR or DDR2 memory module to the DDR3 slot. 1.2.4 System memory The motherboard comes with four Double Data Rate 3 (DDR3) Dual Inline Memory Modules (DIMM) slots. A DDR3 module is notched differently from a DDR or DDR2 module. Recommended memory configurations Chapter 1 1-10 Chapter 1: Product introduction
MAXIMUS VI EXTREME User's Manual
Page 29
...://support.microsoft. Check with the retailer to get the correct memory modules. • Due to install 4GB or more on the motherboard. b) Install a 64-bit Windows OS when you install memory modules of accessing information from a memory module. com/kb/929605/en-us. ...efficient memory cooling system to protect the CPU. • Always install DIMMs with memory frequency higher than the vendor-marked value. Chapter 1 ASUS MAXIMUS VI EXTREME 1-11 Memory configurations You may operate at a lower frequency than 2133 MHz and its Serial Presence Detect (SPD), which is the standard ...
...://support.microsoft. Check with the retailer to get the correct memory modules. • Due to install 4GB or more on the motherboard. b) Install a 64-bit Windows OS when you install memory modules of accessing information from a memory module. com/kb/929605/en-us. ...efficient memory cooling system to protect the CPU. • Always install DIMMs with memory frequency higher than the vendor-marked value. Chapter 1 ASUS MAXIMUS VI EXTREME 1-11 Memory configurations You may operate at a lower frequency than 2133 MHz and its Serial Presence Detect (SPD), which is the standard ...
MAXIMUS VI EXTREME User's Manual
Page 37
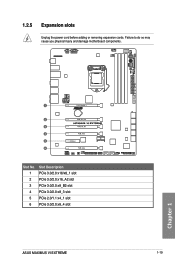
Chapter 1 Slot No. 1 2 3 4 5 6 Slot Description PCIe 3.0/2.0 x16/x8_1 slot PCIe 3.0/2.0 x16_A2 slot PCIe 3.0/2.0 x8_B2 slot PCIe 3.0/2.0 x8_3 slot PCIe 2.0/1.1 x4_1 slot PCIe 3.0/2.0 x8_4 slot ASUS MAXIMUS VI EXTREME 1-19 1.2.5 Expansion slots Unplug the power cord before adding or removing expansion cards. Failure to do so may cause you physical injury and damage motherboard components.
Chapter 1 Slot No. 1 2 3 4 5 6 Slot Description PCIe 3.0/2.0 x16/x8_1 slot PCIe 3.0/2.0 x16_A2 slot PCIe 3.0/2.0 x8_B2 slot PCIe 3.0/2.0 x8_3 slot PCIe 2.0/1.1 x4_1 slot PCIe 3.0/2.0 x8_4 slot ASUS MAXIMUS VI EXTREME 1-19 1.2.5 Expansion slots Unplug the power cord before adding or removing expansion cards. Failure to do so may cause you physical injury and damage motherboard components.

MAXIMUS VI EXTREME User's Manual
Page 38
... PCIe 3.0/2.0_x8_B2 - x8 • We recommend that you provide sufficient power when running CrossFireX™ or SLI® mode. • Connect a chassis fan to the motherboard connector labeled CHA_FAN1-3 when using multiple graphics cards for better thermal environment. • 4th generation Intel® Core™ processors support PCIe 3.0 speed rate. •...
... PCIe 3.0/2.0_x8_B2 - x8 • We recommend that you provide sufficient power when running CrossFireX™ or SLI® mode. • Connect a chassis fan to the motherboard connector labeled CHA_FAN1-3 when using multiple graphics cards for better thermal environment. • 4th generation Intel® Core™ processors support PCIe 3.0 speed rate. •...

MAXIMUS VI EXTREME User's Manual
Page 39
...Intel LAN Controller - - - - shared - - - - - - SATA #0 - - - shared - - - XHCI (USB 3.0) - - - - - shared - - - - High Definition Audio - - - - - - shared - - - - - - - shared EHCI# 1 (USB 2.0) - - - - Chapter 1 ASUS MAXIMUS VI EXTREME 1-21 PCIE_x4_1 shared - - - - - - - I.G.F.X. SATA #1 - - shared - - shared - - - EHCI# 0 (USB 2.0) - - - - - - shared - - - - shared - IRQ assignments for this motherboard A B C D E F G H PCIE_x16/x8_1 shared - - - - - - - PCIE_x8_B2 -
...Intel LAN Controller - - - - shared - - - - - - SATA #0 - - - shared - - - XHCI (USB 3.0) - - - - - shared - - - - High Definition Audio - - - - - - shared - - - - - - - shared EHCI# 1 (USB 2.0) - - - - Chapter 1 ASUS MAXIMUS VI EXTREME 1-21 PCIE_x4_1 shared - - - - - - - I.G.F.X. SATA #1 - - shared - - shared - - - EHCI# 0 (USB 2.0) - - - - - - shared - - - - shared - IRQ assignments for this motherboard A B C D E F G H PCIE_x16/x8_1 shared - - - - - - - PCIE_x8_B2 -

MAXIMUS VI EXTREME User's Manual
Page 40
... button also lights up when the system is ideal for overclockers and gamers who continually change settings to reboot the system. Power-on button The motherboard comes with a power-on button that allows you to a power source indicating that you to fine-tune performance when working on a bare or open-case... 1.2.6 Onboard buttons and switches Onboard switches and buttons allow you should shut down the system and unplug the power cable before removing or installing any motherboard component. 2.
... button also lights up when the system is ideal for overclockers and gamers who continually change settings to reboot the system. Power-on button The motherboard comes with a power-on button that allows you to a power source indicating that you to fine-tune performance when working on a bare or open-case... 1.2.6 Onboard buttons and switches Onboard switches and buttons allow you should shut down the system and unplug the power cable before removing or installing any motherboard component. 2.


