
User Manual
Page 6
... support 4.1 Installing an operating system 4-1 4.2 Support DVD information 4-1 4.2.1 Running the support DVD 4-1 4.2.2 Drivers menu 4-2 4.2.3 Utilities menu 4-3 4.2.4 Make disk menu 4-4 4.2.5 Manual menu 4-5 4.2.6 Video menu 4-5 4.2.7 ASUS Contact information 4-6 4.2.8 Other information 4-6 4.3 Software information 4-8 4.3.1 Sound Blaster X-Fi audio utility 4-8 4.3.2 ASUS PC Probe II 4-12 4.3.3 ASUS AI Suite 4-18 vi Contents 3.5.7 ROG Connect 3-32 3.6 Power menu 3-33 3.6.1 Suspend Mode...
... support 4.1 Installing an operating system 4-1 4.2 Support DVD information 4-1 4.2.1 Running the support DVD 4-1 4.2.2 Drivers menu 4-2 4.2.3 Utilities menu 4-3 4.2.4 Make disk menu 4-4 4.2.5 Manual menu 4-5 4.2.6 Video menu 4-5 4.2.7 ASUS Contact information 4-6 4.2.8 Other information 4-6 4.3 Software information 4-8 4.3.1 Sound Blaster X-Fi audio utility 4-8 4.3.2 ASUS PC Probe II 4-12 4.3.3 ASUS AI Suite 4-18 vi Contents 3.5.7 ROG Connect 3-32 3.6 Power menu 3-33 3.6.1 Suspend Mode...
User Manual
Page 7
Contents 4.3.4 ASUS Fan Xpert 4-20 4.3.5 ASUS EPU-6 Engine 4-21 4.3.6 TurboV EVO 4-22 4.4 RAID configurations 4-26 4.4.1 RAID definitions 4-26 4.4.2 Installing Serial ATA hard disks 4-27 4.4.3 Setting the RAID item in BIOS 4-27 4.4.4 Intel® Matrix Storage Manager option ROM utility......... 4-27 4.5 Creating a RAID driver disk 4-31 4.5.1 Creating a RAID driver disk without entering the OS.... 4-31 4.5.2 Creating...
Contents 4.3.4 ASUS Fan Xpert 4-20 4.3.5 ASUS EPU-6 Engine 4-21 4.3.6 TurboV EVO 4-22 4.4 RAID configurations 4-26 4.4.1 RAID definitions 4-26 4.4.2 Installing Serial ATA hard disks 4-27 4.4.3 Setting the RAID item in BIOS 4-27 4.4.4 Intel® Matrix Storage Manager option ROM utility......... 4-27 4.5 Creating a RAID driver disk 4-31 4.5.1 Creating a RAID driver disk without entering the OS.... 4-31 4.5.2 Creating...
User Manual
Page 14
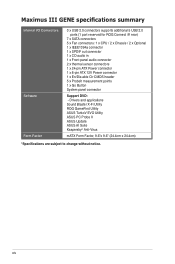
Drivers and applications Sound Blaster X-Fi Utility ROG GameFirst Utility ASUS TurboV EVO Utility ASUS PC Probe II ASUS Update ASUS AI Suite Kaspersky® Anti-Virus mATX Form Factor, 9.6"x 9.6" (24.4cm x 24.4cm) *Specifications are subject to change without notice. xiv Maximus III GENE specifications summary Internal I/O Connectors Software Form Factor 3 x USB 2.0 connectors supports additional 5 USB 2.0 ports (1 port...
Drivers and applications Sound Blaster X-Fi Utility ROG GameFirst Utility ASUS TurboV EVO Utility ASUS PC Probe II ASUS Update ASUS AI Suite Kaspersky® Anti-Virus mATX Form Factor, 9.6"x 9.6" (24.4cm x 24.4cm) *Specifications are subject to change without notice. xiv Maximus III GENE specifications summary Internal I/O Connectors Software Form Factor 3 x USB 2.0 connectors supports additional 5 USB 2.0 ports (1 port...

User Manual
Page 48
...tables on BIOS setup. 2. Assign an IRQ to unplug the power cord before adding or removing expansion cards. Install the software drivers for the card. 2. Remove the bracket opposite the slot that came with the slot and press firmly until the card is already...4. Keep the screw for details. 2-22 Chapter 2: Hardware information 2.5 Expansion slots In the future, you may cause you physical injury and damage motherboard components. 2.5.1 Installing an expansion card To install an expansion card: 1. Failure to install expansion cards. Replace the system cover. 2.5.2 Configuring an ...
...tables on BIOS setup. 2. Assign an IRQ to unplug the power cord before adding or removing expansion cards. Install the software drivers for the card. 2. Remove the bracket opposite the slot that came with the slot and press firmly until the card is already...4. Keep the screw for details. 2-22 Chapter 2: Hardware information 2.5 Expansion slots In the future, you may cause you physical injury and damage motherboard components. 2.5.1 Installing an expansion card To install an expansion card: 1. Failure to install expansion cards. Replace the system cover. 2.5.2 Configuring an ...
User Manual
Page 71
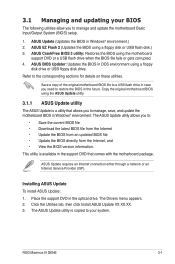
...the BIOS version information. The Drivers menu appears. 2. ASUS CrashFree BIOS 3 utility: Restores the BIOS using a floppy disk or USB flash disk.) 3. Copy the original motherboard BIOS using a floppy disk drive or USB floppy disk drive. Installing ASUS Update To install ASUS Update: 1. Click the ... then click Install ASUS Update VX.XX.XX. 3. Save a copy of the original motherboard BIOS file to a USB flash drive in case you need to manage, save, and update the motherboard BIOS in the support DVD that comes with the motherboard package. ROG Maximus III GENE 3-1 This utility ...
...the BIOS version information. The Drivers menu appears. 2. ASUS CrashFree BIOS 3 utility: Restores the BIOS using a floppy disk or USB flash disk.) 3. Copy the original motherboard BIOS using a floppy disk drive or USB floppy disk drive. Installing ASUS Update To install ASUS Update: 1. Click the ... then click Install ASUS Update VX.XX.XX. 3. Save a copy of the original motherboard BIOS file to a USB flash drive in case you need to manage, save, and update the motherboard BIOS in the support DVD that comes with the motherboard package. ROG Maximus III GENE 3-1 This utility ...

User Manual
Page 93
...Storage Technology configuration from the Serial ATA hard disk drives, set this item to [AHCI]. The AHCI allows the onboard storage driver to enable advanced Serial ATA features that increases storage performance on random workloads by the Southbridge chip. Configuration options: [IDE] ... menu allow you want to configure the item. Configuration options: [0] [5] [10] [15] [20] [25] [30] [35] ROG Maximus III GENE 3-23 3.4.5 Storage Configuration The items in the system. Hard Disk Write Protect [Disabled] Disables or enables device write protection. Configuration option: [Disabled...
...Storage Technology configuration from the Serial ATA hard disk drives, set this item to [AHCI]. The AHCI allows the onboard storage driver to enable advanced Serial ATA features that increases storage performance on random workloads by the Southbridge chip. Configuration options: [IDE] ... menu allow you want to configure the item. Configuration options: [0] [5] [10] [15] [20] [25] [30] [35] ROG Maximus III GENE 3-23 3.4.5 Storage Configuration The items in the system. Hard Disk Write Protect [Disabled] Disables or enables device write protection. Configuration option: [Disabled...
User Manual
Page 99
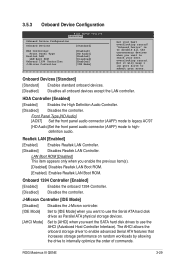
... allows the onboard storage driver to enable advanced Serial ATA features that increases storage performance on random workloads by allowing the drive to highdefinition audio. LAN Boot ROM [Disabled] This item appears only when you want the SATA hard disk drives to submit your best overclocking record! ROG Maximus III GENE 3-29 Onboard 1394...
... allows the onboard storage driver to enable advanced Serial ATA features that increases storage performance on random workloads by allowing the drive to highdefinition audio. LAN Boot ROM [Disabled] This item appears only when you want the SATA hard disk drives to submit your best overclocking record! ROG Maximus III GENE 3-29 Onboard 1394...

User Manual
Page 120
Chapter summary 4 4.1 Installing an operating system 4-1 4.2 Support DVD information 4-1 4.3 Software information 4-8 4.4 RAID configurations 4-26 4.5 Creating a RAID driver disk 4-31 ROG Maximus III GENE
Chapter summary 4 4.1 Installing an operating system 4-1 4.2 Support DVD information 4-1 4.3 Software information 4-8 4.4 RAID configurations 4-26 4.5 Creating a RAID driver disk 4-31 ROG Maximus III GENE
User Manual
Page 121
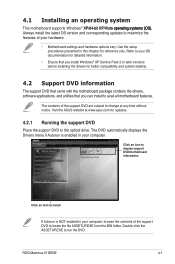
...Maximus III GENE 4-1 Always install the latest OS version and corresponding updates to maximize the features of your computer, browse the contents of the support DVD are subject to change at www.asus.com for updates. 4.2.1 Running the support DVD Place the support DVD to avail all motherboard features. Visit the ASUS... The support DVD that came with the motherboard package contains the drivers, software applications, and utilities that you can install to the optical drive. 4.1 Installing an operating system This motherboard supports Windows® X��P�/�...
...Maximus III GENE 4-1 Always install the latest OS version and corresponding updates to maximize the features of your computer, browse the contents of the support DVD are subject to change at www.asus.com for updates. 4.2.1 Running the support DVD Place the support DVD to avail all motherboard features. Visit the ASUS... The support DVD that came with the motherboard package contains the drivers, software applications, and utilities that you can install to the optical drive. 4.1 Installing an operating system This motherboard supports Windows® X��P�/�...

User Manual
Page 122
... Intel® chipset driver. VIA Audio Driver Installs the VIA® Audio driver. ASUS TurboV EVO Installs ASUS TurboV EVO, the advanced overclocking tool for extreme O.C. record. 4.2.2 Drivers menu The drivers menu shows the available device drivers if the system detects installed devices. Realtek RTL8112L LAN Driver Installs the Realtek® LAN driver. JMicron JMB36X Controller Driver Installs the JMicron®...
... Intel® chipset driver. VIA Audio Driver Installs the VIA® Audio driver. ASUS TurboV EVO Installs ASUS TurboV EVO, the advanced overclocking tool for extreme O.C. record. 4.2.2 Drivers menu The drivers menu shows the available device drivers if the system detects installed devices. Realtek RTL8112L LAN Driver Installs the Realtek® LAN driver. JMicron JMB36X Controller Driver Installs the JMicron®...

User Manual
Page 124
JMicron JMB36X AHCI Driver Allows you to create a JMicron AHCI Driver disk. 4-4 Chapter 4: Software support Intel AHCI/RAID Driver Allows you to create an Intel AHCI/RAID Driver disk. ASUS ROG Connect You can use this software to control the performance of machine remotely, and to monitor its variation of each item immediately. 4.2.4 Make disk menu The Make disk menu contains items to create the Intel and JMicron RAID driver disk.
JMicron JMB36X AHCI Driver Allows you to create a JMicron AHCI Driver disk. 4-4 Chapter 4: Software support Intel AHCI/RAID Driver Allows you to create an Intel AHCI/RAID Driver disk. ASUS ROG Connect You can use this software to control the performance of machine remotely, and to monitor its variation of each item immediately. 4.2.4 Make disk menu The Make disk menu contains items to create the Intel and JMicron RAID driver disk.

User Manual
Page 128
...use Sound Blaster X-Fi audio utility. You need to install VIA Audio Driver to the optical drive. To install Sound Blaster X-Fi: 1. Click the Drivers tab and click VIA Audio Driver. 3. The Drivers installation tab appears if your media files. Click Main Display to launch...Blaster X-Fi audio utility is successfully installed, you through the audio codec and Sound Blaster X-Fi interface. Click the support DVD Drivers tab and click Sound Blaster X-Fi. 5. ���F�o��ll�o�w��t�h�e�&#...
...use Sound Blaster X-Fi audio utility. You need to install VIA Audio Driver to the optical drive. To install Sound Blaster X-Fi: 1. Click the Drivers tab and click VIA Audio Driver. 3. The Drivers installation tab appears if your media files. Click Main Display to launch...Blaster X-Fi audio utility is successfully installed, you through the audio codec and Sound Blaster X-Fi interface. Click the support DVD Drivers tab and click Sound Blaster X-Fi. 5. ���F�o��ll�o�w��t�h�e�&#...

User Manual
Page 132
... II right after installation or anytime from the Windows® desktop, click Start > All Programs > ASUS > PC Probe II > PC Probe II v1.xx.xx. Click to complete installation. The Drivers installation tab appears if your system and change the utility configuration. The PC Probe II main window appears.... 4.3.2 ASUS PC Probe II PC Probe II is a utility that your computer the moment you turn ...
... II right after installation or anytime from the Windows® desktop, click Start > All Programs > ASUS > PC Probe II > PC Probe II v1.xx.xx. Click to complete installation. The Drivers installation tab appears if your system and change the utility configuration. The PC Probe II main window appears.... 4.3.2 ASUS PC Probe II PC Probe II is a utility that your computer the moment you turn ...

User Manual
Page 138
Launching AI Suite You can launch AI Suite right after installation or anytime from the Windows® desktop, click Start > All Programs > ASUS > AI Suite > AI Suite v1.xx.xx. The AI Suite main window appears. Click this icon to complete installation. Follow the screen .... Using AI Suite Click each utility button to launch the utility, or click the Normal button to launch Fan Xpert Chapter 4: Software support 4.3.3 ASUS AI Suite ASUS AI Suite allows you to the optical drive. The Drivers installation tab appears if your computer: 1. Place the support DVD to launch several...
Launching AI Suite You can launch AI Suite right after installation or anytime from the Windows® desktop, click Start > All Programs > ASUS > AI Suite > AI Suite v1.xx.xx. The AI Suite main window appears. Click this icon to complete installation. Follow the screen .... Using AI Suite Click each utility button to launch the utility, or click the Normal button to launch Fan Xpert Chapter 4: Software support 4.3.3 ASUS AI Suite ASUS AI Suite allows you to the optical drive. The Drivers installation tab appears if your computer: 1. Place the support DVD to launch several...

User Manual
Page 146
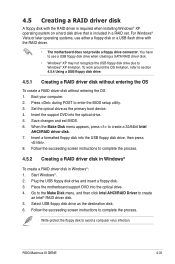
... size or larger than the existing drive. If one drive to the entire system. Refer to section 4.5 Creating a RAID driver disk for this setup. RAID 5 stripes both system performance and data safety. The motherboard supports the following RAID configurations: RAID 0, RAID 1, RAID 10 and RAID 5. • You must be calculated and written...
... size or larger than the existing drive. If one drive to the entire system. Refer to section 4.5 Creating a RAID driver disk for this setup. RAID 5 stripes both system performance and data safety. The motherboard supports the following RAID configurations: RAID 0, RAID 1, RAID 10 and RAID 5. • You must be calculated and written...
User Manual
Page 151
... optical drive as the destination disk. 6. ROG Maximus III GENE 4-31 Insert a formatted floppy disk into the optical drive. 4. Place the motherboard support DVD into the USB floppy disk drive, then press . 8. Write-protect the floppy disk to section 4.5.4 Using a USB floppy disk drive. 4.5.1 Creating a RAID driver disk without entering the OS To create a RAID...
... optical drive as the destination disk. 6. ROG Maximus III GENE 4-31 Insert a formatted floppy disk into the optical drive. 4. Place the motherboard support DVD into the USB floppy disk drive, then press . 8. Write-protect the floppy disk to section 4.5.4 Using a USB floppy disk drive. 4.5.1 Creating a RAID driver disk without entering the OS To create a RAID...
User Manual
Page 152
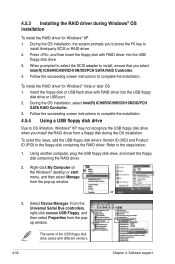
...installation, the system prompts you to press the F6 key to install, ensure that you install the RAID driver from a floppy disk during Windows® OS installation To install the RAID driver for Windows® Vista or later OS 1. During the OS installation, select Intel(R) ICH8R/ICH9R/ICH10R/...from the pop-up window. Press , and then insert the floppy disk with different vendors. 4-32 Chapter 4: Software support To install the RAID driver for Windows® XP 1. Refer to OS limitation, Windows® XP may not recognize the USB floppy disk drive when you select Intel(R) ICH8R...
...installation, the system prompts you to press the F6 key to install, ensure that you install the RAID driver from a floppy disk during Windows® OS installation To install the RAID driver for Windows® Vista or later OS 1. During the OS installation, select Intel(R) ICH8R/ICH9R/ICH10R/...from the pop-up window. Press , and then insert the floppy disk with different vendors. 4-32 Chapter 4: Software support To install the RAID driver for Windows® XP 1. Refer to OS limitation, Windows® XP may not recognize the USB floppy disk drive when you select Intel(R) ICH8R...

User Manual
Page 153
Double-click the file. ROG Maximus III GENE 4-33 Browse the contents of the RAID driver disk to select the program for opening the oem file. 7. Click Details tab. A window appears, allowing you to locate the file txtsetup.oem. 6. Use Notepad to open the file. The Vendor ID (VID) and Product ID (PID) are displayed. 5. 4.
Double-click the file. ROG Maximus III GENE 4-33 Browse the contents of the RAID driver disk to select the program for opening the oem file. 7. Click Details tab. A window appears, allowing you to locate the file txtsetup.oem. 6. Use Notepad to open the file. The Vendor ID (VID) and Product ID (PID) are displayed. 5. 4.
User Manual
Page 157
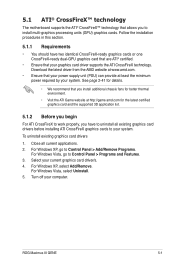
... off your current graphics card driver/s. 4. 5.1 ATI® CrossFireX™ technology The motherboard supports the ATI® CrossFireX™ technology that your power supply unit (PSU) can provide at least the minimum power required by your system. ROG Maximus III GENE 5-1 For Windows XP, go... to Control Panel > Add/Remove Programs. For Windows Vista, go to your system. For Windows XP, select Add/Remove. Close all existing graphics card drivers before installing ATI CrossFireX graphics cards...
... off your current graphics card driver/s. 4. 5.1 ATI® CrossFireX™ technology The motherboard supports the ATI® CrossFireX™ technology that your power supply unit (PSU) can provide at least the minimum power required by your system. ROG Maximus III GENE 5-1 For Windows XP, go... to Control Panel > Add/Remove Programs. For Windows Vista, go to your system. For Windows XP, select Add/Remove. Close all existing graphics card drivers before installing ATI CrossFireX graphics cards...

User Manual
Page 159
... CrossFireX™ technology After installing your PCI Express graphics card driver supports the ATI® CrossFireX™ technology. You can also right-click the ATI icon in Windows environment. ROG Maximus III GENE 5-3 The Catalyst Control Center Setup Assistant appears when the system ...detects the existance of multigraphics cards. Click Go to continue to install the device drivers. Right-click on the Windows® desktop ...
... CrossFireX™ technology After installing your PCI Express graphics card driver supports the ATI® CrossFireX™ technology. You can also right-click the ATI icon in Windows environment. ROG Maximus III GENE 5-3 The Catalyst Control Center Setup Assistant appears when the system ...detects the existance of multigraphics cards. Click Go to continue to install the device drivers. Right-click on the Windows® desktop ...


