User Manual
Page 4
Profile 3-27 3.9 Exit menu 3-28 3.10 Updating BIOS 3-29 3.10.1 ASUS Update utility 3-29 3.10.2 ASUS EZ Flash 2 utility 3-32 3.10.3 ASUS BIOS Updater 3-34 Chapter 4: Software support 4.1 Installing an operating system 4-1 4.2 Support DVD information 4-1 4.2.1 Running the support DVD 4-1 4.2.2 Obtaining the software ...3-16 3.5.4 USB Configuration 3-18 3.5.5 CPU Core On/Off Function 3-19 3.5.6 Onboard Devices Configuration 3-19 3.5.7 APM 3-21 3.6 Monitor menu 3-22 3.7 Boot menu 3-24 3.8 Tools menu 3-25 3.8.1 ASUS EZ Flash 2 3-25 3.8.2 ASUS SPD Information 3-26...
Profile 3-27 3.9 Exit menu 3-28 3.10 Updating BIOS 3-29 3.10.1 ASUS Update utility 3-29 3.10.2 ASUS EZ Flash 2 utility 3-32 3.10.3 ASUS BIOS Updater 3-34 Chapter 4: Software support 4.1 Installing an operating system 4-1 4.2 Support DVD information 4-1 4.2.1 Running the support DVD 4-1 4.2.2 Obtaining the software ...3-16 3.5.4 USB Configuration 3-18 3.5.5 CPU Core On/Off Function 3-19 3.5.6 Onboard Devices Configuration 3-19 3.5.7 APM 3-21 3.6 Monitor menu 3-22 3.7 Boot menu 3-24 3.8 Tools menu 3-25 3.8.1 ASUS EZ Flash 2 3-25 3.8.2 ASUS SPD Information 3-26...

User Manual
Page 11
... Design: Heat sink solution - ASUS Fan Xpert ASUS Q-Design: - ASUS Q-LED (CPU, DRAM, VGA, Boot Device LED) - ASUS EZ Flash 2 - vDRAM Bus: Adjustable DRAM voltage at 0.00625V increment - ASUS UEFI BIOS EZ Mode featuring friendly graphics user interface - Profile...+ ASUS Quiet Thermal Solution: - ASUS Q-DIMM - ASUS MyLogo 2 - vDDNB: Adjustable CPU/NB voltage at 0.00625V increment - M5A97 PRO specifications summary ASUS unique features ASUS exclusive overclocking features ASUS Dual Intelligent Processors 2 with DIGI+ VRM: ASUS DIGI+ VRM - ASUS DIGI+ VRM Utility ASUS EPU...
... Design: Heat sink solution - ASUS Fan Xpert ASUS Q-Design: - ASUS Q-LED (CPU, DRAM, VGA, Boot Device LED) - ASUS EZ Flash 2 - vDRAM Bus: Adjustable DRAM voltage at 0.00625V increment - ASUS UEFI BIOS EZ Mode featuring friendly graphics user interface - Profile...+ ASUS Quiet Thermal Solution: - ASUS Q-DIMM - ASUS MyLogo 2 - vDDNB: Adjustable CPU/NB voltage at 0.00625V increment - M5A97 PRO specifications summary ASUS unique features ASUS exclusive overclocking features ASUS Dual Intelligent Processors 2 with DIGI+ VRM: ASUS DIGI+ VRM - ASUS DIGI+ VRM Utility ASUS EPU...

User Manual
Page 15
... into the world's first real-time PC power saving chip through AI Suite II utility. ASUS M5A97 PRO 1-3 It also adjusts frequencies dynamically, cutting radiation interference by automatically detecting current PC loadings and intelligently moderating power consumption. EPU ... with no need to use software package. AI Suite II With its user-friendly interface, ASUS AI Suite II consolidates all -in diverse situations. TPU Unleash your system boot success. quickly ensures memory boot compatibility. MemOK! Auto tuning offers a user friendly way to automatically optimize the system for ...
... into the world's first real-time PC power saving chip through AI Suite II utility. ASUS M5A97 PRO 1-3 It also adjusts frequencies dynamically, cutting radiation interference by automatically detecting current PC loadings and intelligently moderating power consumption. EPU ... with no need to use software package. AI Suite II With its user-friendly interface, ASUS AI Suite II consolidates all -in diverse situations. TPU Unleash your system boot success. quickly ensures memory boot compatibility. MemOK! Auto tuning offers a user friendly way to automatically optimize the system for ...
User Manual
Page 34
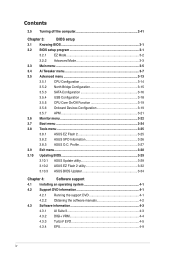
... erasing the CMOS RTC RAM data. The onboard button cell battery powers the RAM data in CMOS. enter data. Removing the cap will cause system boot failure! • If the steps above do not need to clear the RTC when the system hangs due to re- function. Move the jumper... on the power supply or unplug and plug the power cord before rebooting the system. 2-16 Chapter 2: Hardware information Shut down the key during the boot process and enter BIOS setup to overclocking. Chapter 2 To erase the RTC RAM 1. You can automatically reset parameter settings to default values. • Due ...
... erasing the CMOS RTC RAM data. The onboard button cell battery powers the RAM data in CMOS. enter data. Removing the cap will cause system boot failure! • If the steps above do not need to clear the RTC when the system hangs due to re- function. Move the jumper... on the power supply or unplug and plug the power cord before rebooting the system. 2-16 Chapter 2: Hardware information Shut down the key during the boot process and enter BIOS setup to overclocking. Chapter 2 To erase the RTC RAM 1. You can automatically reset parameter settings to default values. • Due ...
User Manual
Page 35
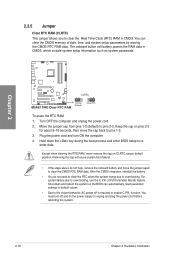
...performance. Press and hold the MemOK! This is ideal for overclockers and gamers who continually change settings to section 2.2.7 Onboard LEDs for successful boot. 2.2.6 Onboard switches Onboard switches allow you that the BIOS has been restored to its default settings. • We recommend that are ... ones recommended in the Memory QVL (Qualified Vendors Lists) in this user manual or on the ASUS website at www.asus.com after using the MemOK! MemOK! function. • The MemOK! ASUS M5A97 PRO 2-17 If the test fails, the system reboots and test the next set is not properly ...
...performance. Press and hold the MemOK! This is ideal for overclockers and gamers who continually change settings to section 2.2.7 Onboard LEDs for successful boot. 2.2.6 Onboard switches Onboard switches allow you that the BIOS has been restored to its default settings. • We recommend that are ... ones recommended in the Memory QVL (Qualified Vendors Lists) in this user manual or on the ASUS website at www.asus.com after using the MemOK! MemOK! function. • The MemOK! ASUS M5A97 PRO 2-17 If the test fails, the system reboots and test the next set is not properly ...
User Manual
Page 41
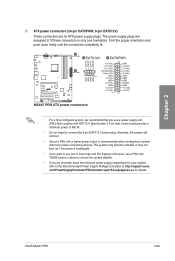
...plug; The power supply plugs are for ATX power supply plugs. ASUS M5A97 PRO 2-23 ATX power connectors (24-pin EATXPWR; 8-pin EATX12V) These connectors are designed to use two or more power-consuming devices. The system may become unstable or may not boot up if the power is recommended when configuring a system with... or above to ensure the system stability. • If you want to fit these connectors in only one orientation. otherwise, the system will not boot. • Use of 450 W. • Do not forget to the Recommended Power Supply Wattage Calculator at http://support...
...plug; The power supply plugs are for ATX power supply plugs. ASUS M5A97 PRO 2-23 ATX power connectors (24-pin EATXPWR; 8-pin EATX12V) These connectors are designed to use two or more power-consuming devices. The system may become unstable or may not boot up if the power is recommended when configuring a system with... or above to ensure the system stability. • If you want to fit these connectors in only one orientation. otherwise, the system will not boot. • Use of 450 W. • Do not forget to the Recommended Power Supply Wattage Calculator at http://support...

User Manual
Page 59
...failed a power-on test. The system then runs the power-on the system front panel case lights up. At power on the BIOS setting. ASUS M5A97 PRO 2-41 Be sure that is ON, pressing the power switch for more than four seconds puts the system on sleep mode or soft-off mode...short beeps then a pause (repeated) One continuous beep followed by three short beeps One continuous beep followed by four short beeps Description VGA detected Quick boot set to enter the BIOS Setup. Chapter 2 2.4 Starting up for assistance. Connect the power cord to green after the system LED turns on ...
...failed a power-on test. The system then runs the power-on the system front panel case lights up. At power on the BIOS setting. ASUS M5A97 PRO 2-41 Be sure that is ON, pressing the power switch for more than four seconds puts the system on sleep mode or soft-off mode...short beeps then a pause (repeated) One continuous beep followed by three short beeps One continuous beep followed by four short beeps Description VGA detected Quick boot set to enter the BIOS Setup. Chapter 2 2.4 Starting up for assistance. Connect the power cord to green after the system LED turns on ...

User Manual
Page 61
...65533;n� 2.2.5 Jumper for reference purposes only, and may result to instability or failure to "UEFI BIOS" unless otherwise specified. Chapter 3 ASUS M5A97 PRO 3-1 If you change modes from the Exit menu or from the available options using a keyboard or a USB mouse. BIOS (Basic Input and...You can also turn the system off and then turn it as storage device configuration, overclocking settings, advanced power management, and boot device configuration that are for information on how to run this section are needed for BIOS item modification. Users can be used...
...65533;n� 2.2.5 Jumper for reference purposes only, and may result to instability or failure to "UEFI BIOS" unless otherwise specified. Chapter 3 ASUS M5A97 PRO 3-1 If you change modes from the Exit menu or from the available options using a keyboard or a USB mouse. BIOS (Basic Input and...You can also turn the system off and then turn it as storage device configuration, overclocking settings, advanced power management, and boot device configuration that are for information on how to run this section are needed for BIOS item modification. Users can be used...

User Manual
Page 62
.... • The Boot Menu(F8) button is available only when the boot device is installed to decide the boot priority. To access the Advanced Mode, click Exit/Advanced Mode, then select Advanced Mode. The default screen for details. EZ Mode Monday [4/11/2011] M5A97 PRO BIOS Version : 0119... priority. Boot Menu(F8) Default(F5) Selects the boot device priority Power Saving mode Loads optimized default Displays the system properties of the selected mode on the right hand side Normal mode ASUS Optimal mode Selects the boot device priority • The boot device options vary ...
.... • The Boot Menu(F8) button is available only when the boot device is installed to decide the boot priority. To access the Advanced Mode, click Exit/Advanced Mode, then select Advanced Mode. The default screen for details. EZ Mode Monday [4/11/2011] M5A97 PRO BIOS Version : 0119... priority. Boot Menu(F8) Default(F5) Selects the boot device priority Power Saving mode Loads optimized default Displays the system properties of the selected mode on the right hand side Normal mode ASUS Optimal mode Selects the boot device priority • The boot device options vary ...

User Manual
Page 63
... bar on top of the Advanced Mode. For changing the system boot configuration For configuring options for special functions For selecting the exit options and loading default settings Chapter 3 ASUS M5A97 PRO 3-3 Advanced Mode General help Exit Main Back Ai Tweaker Advanced Advanced... Charging Support Enabled Disabled Enabled Realtek LAN Controller Enabled Realtek PXE OPROM Disabled > Serial Port Configuration > SB HD Azalia Configuration Boot Tool Enabled/Disabled JMB Storage OPROM. →←: Select Screen ↑↓: Select Item Enter: Select +/-: Change Opt....
... bar on top of the Advanced Mode. For changing the system boot configuration For configuring options for special functions For selecting the exit options and loading default settings Chapter 3 ASUS M5A97 PRO 3-3 Advanced Mode General help Exit Main Back Ai Tweaker Advanced Advanced... Charging Support Enabled Disabled Enabled Realtek LAN Controller Enabled Realtek PXE OPROM Disabled > Serial Port Configuration > SB HD Azalia Configuration Boot Tool Enabled/Disabled JMB Storage OPROM. →←: Select Screen ↑↓: Select Item Enter: Select +/-: Change Opt....
User Manual
Page 64
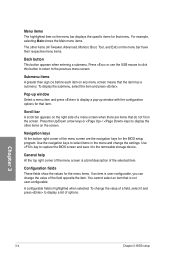
... navigation keys to select items in the menu and change the value of a field, select it to display the other items (Ai Tweaker, Advanced, Monitor, Boot, Tool, and Exit) on the menu bar displays the specific items for the menu items. If an item is a brief description of options. Use key...
... navigation keys to select items in the menu and change the value of a field, select it to display the other items (Ai Tweaker, Advanced, Monitor, Boot, Tool, and Exit) on the menu bar displays the specific items for the menu items. If an item is a brief description of options. Use key...

User Manual
Page 65
...menu screen appears when you have Administrator rights Administrator Password User Password Administrator Password User Password Monitor Not Installed Not Installed Boot Tool To clear the administrator password, key in the current password in the Enter Current Password box, and then press...2011] [16:46:15] Access Level Administrator > Security Boot Tool Choose the system default language Security The Security menu items allow you set the system date, time, language, and security settings. Chapter 3 ASUS M5A97 PRO 3-5 The Main menu provides you an overview of the screen...
...menu screen appears when you have Administrator rights Administrator Password User Password Administrator Password User Password Monitor Not Installed Not Installed Boot Tool To clear the administrator password, key in the current password in the Enter Current Password box, and then press...2011] [16:46:15] Access Level Administrator > Security Boot Tool Choose the system default language Security The Security menu items allow you set the system date, time, language, and security settings. Chapter 3 ASUS M5A97 PRO 3-5 The Main menu provides you an overview of the screen...

User Manual
Page 67
The configuration options for this section vary depending on the motherboard. Advanced Mode Exit Chapter 3 Main Ai Tweaker Advanced Monitor Boot Tool Current CPU Speed : 3439MHz Target CPU Speed : 3400MHz Current Memory Frequency: 1333MHz Current NB Frequency : 2000MHz Current HT Link Speed : 2000MHz Ai Overclock Tuner ...-Line Calibration Auto Auto Disabled Auto Auto Auto →←: Select Screen ↑↓: Select Item Enter: Select +/-: Change Opt. Copyright (C) 2010 American Megatrends, Inc. ASUS M5A97 PRO 3-7
The configuration options for this section vary depending on the motherboard. Advanced Mode Exit Chapter 3 Main Ai Tweaker Advanced Monitor Boot Tool Current CPU Speed : 3439MHz Target CPU Speed : 3400MHz Current Memory Frequency: 1333MHz Current NB Frequency : 2000MHz Current HT Link Speed : 2000MHz Ai Overclock Tuner ...-Line Calibration Auto Auto Disabled Auto Auto Auto →←: Select Screen ↑↓: Select Item Enter: Select +/-: Change Opt. Copyright (C) 2010 American Megatrends, Inc. ASUS M5A97 PRO 3-7

User Manual
Page 73
... > Onboard Devices Configuration > APM Monitor Exit Boot Tool CPU Configuration Parameters →←: Select Screen ↑↓: Select Item Enter: Select +/-: Change Opt. F1: General Help F2: Previous Values F5: Optimized Defaults F10: Save ESC: Exit F12: Print Screen Version 2.00.1201. UEFI BIOS Utility - Chapter 3 ASUS M5A97 PRO 3-13 Copyright (C) 2010 American Megatrends...
... > Onboard Devices Configuration > APM Monitor Exit Boot Tool CPU Configuration Parameters →←: Select Screen ↑↓: Select Item Enter: Select +/-: Change Opt. F1: General Help F2: Previous Values F5: Optimized Defaults F10: Save ESC: Exit F12: Print Screen Version 2.00.1201. UEFI BIOS Utility - Chapter 3 ASUS M5A97 PRO 3-13 Copyright (C) 2010 American Megatrends...

User Manual
Page 74
... Cache: 64 KB/2-way L2 Cache: 1024 KB/16-way Total L3 Cache per Socket: 0 MB/~way Cool'n' Quiet Enable C1E Enabled SVM Enabled Exit Boot Tool Enable/disable the generation of ACPI_PPC, _PSS, and _PCT objects. →←: Select Screen ↑↓: Select Item Enter: Select +/-: Change Opt. Configuration options...
... Cache: 64 KB/2-way L2 Cache: 1024 KB/16-way Total L3 Cache per Socket: 0 MB/~way Cool'n' Quiet Enable C1E Enabled SVM Enabled Exit Boot Tool Enable/disable the generation of ACPI_PPC, _PSS, and _PCT objects. →←: Select Screen ↑↓: Select Item Enter: Select +/-: Change Opt. Configuration options...

User Manual
Page 75
... errors. [Disabled] Disables the DRAM ECC mode. [Enable] Set to [Enable] to use as the primary boot device. Configuration options: [PCI/PEG] [PEG/PCI] Chapter 3 ASUS M5A97 PRO 3-15 Configuration options: [Disabled] [Enabled] Memory Hole Remapping [Enabled] Configuration options: [Disabled] [Enabled] DCT...Bridge Configuration IOMMU Mode > Memory Configuration Disabled Initate Graphic Adapter PEG/PCI Memory Information Total Memory: 4096MB (DDR3) Exit Boot Tool IOMMU is supported on LINUX based systems to convert 32bit I /O to 64bit MMIO. IOMMU Mode [Disabled] IOMMU...
... errors. [Disabled] Disables the DRAM ECC mode. [Enable] Set to [Enable] to use as the primary boot device. Configuration options: [PCI/PEG] [PEG/PCI] Chapter 3 ASUS M5A97 PRO 3-15 Configuration options: [Disabled] [Enabled] Memory Hole Remapping [Enabled] Configuration options: [Disabled] [Enabled] DCT...Bridge Configuration IOMMU Mode > Memory Configuration Disabled Initate Graphic Adapter PEG/PCI Memory Information Total Memory: 4096MB (DDR3) Exit Boot Tool IOMMU is supported on LINUX based systems to convert 32bit I /O to 64bit MMIO. IOMMU Mode [Disabled] IOMMU...

User Manual
Page 76
... Port2 SATA Port3 SATA Port4 SATA Port5 SATA Port6 > SB SATA Configuration Monitor Not Present Not Present Not Present Not Present Not Present Not Present Boot Tool Options for SATA Configuration. The following two items appear only when you could use the AHCI (Advanced Host Controller Interface). The SATA Port items...
... Port2 SATA Port3 SATA Port4 SATA Port5 SATA Port6 > SB SATA Configuration Monitor Not Present Not Present Not Present Not Present Not Present Not Present Boot Tool Options for SATA Configuration. The following two items appear only when you could use the AHCI (Advanced Host Controller Interface). The SATA Port items...

User Manual
Page 78
... the auto-detected values. Legacy USB3.0 Support [Enabled] [Enabled] Enables the support for operating systems without an EHCI hand‑off > SB USB Configuration Disabled Boot Tool Enables Legacy USB support. Legacy USB Support [Enabled] [Enabled] Enables the support for USB devices on legacy operating systems (OS). [Disabled] Disables the function...
... the auto-detected values. Legacy USB3.0 Support [Enabled] [Enabled] Enables the support for operating systems without an EHCI hand‑off > SB USB Configuration Disabled Boot Tool Enables Legacy USB support. Legacy USB Support [Enabled] [Enabled] Enables the support for USB devices on legacy operating systems (OS). [Disabled] Disables the function...

User Manual
Page 79
...off 2nd, 3rd, 4th, 5th, etc core manually. Copyright (C) 2010 American Megatrends, Inc. Chapter 3 ASUS M5A97 PRO 3-19 ASUS Core Unlocker [Disabled] [Enabled] Enables the ASUS Core Unlocker to different CPU margins. F1: General Help F2: Previous Values F5: Optimized Defaults F10: Save...USB 3.0 Battery Charging Support Disabled Realtek LAN Controller Enabled Realtek PXE OPROM Disabled > Serial Port Configuration > SB HD Azalia Configuration Boot Tool Enabled/Disabled JMB Storage OPROM. →←: Select Screen ↑↓: Select Item Enter: Select +/-: Change Opt....
...off 2nd, 3rd, 4th, 5th, etc core manually. Copyright (C) 2010 American Megatrends, Inc. Chapter 3 ASUS M5A97 PRO 3-19 ASUS Core Unlocker [Disabled] [Enabled] Enables the ASUS Core Unlocker to different CPU margins. F1: General Help F2: Previous Values F5: Optimized Defaults F10: Save...USB 3.0 Battery Charging Support Disabled Realtek LAN Controller Enabled Realtek PXE OPROM Disabled > Serial Port Configuration > SB HD Azalia Configuration Boot Tool Enabled/Disabled JMB Storage OPROM. →←: Select Screen ↑↓: Select Item Enter: Select +/-: Change Opt....
User Manual
Page 81
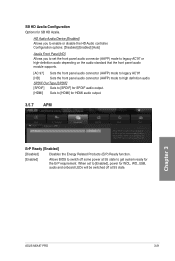
... > ErP Ready Advanced Monitor Enabled Boot Tool Allow BIOS to get system ready for WOL, WO_USB, audio and onboard LEDs will be switched off some power at S5 state. Configuration options: [Disabled] [Enabled] [Auto] Azalia Front Panel [HD] Allows you to [HDMI] for SB HD Azalia. Chapter 3 ASUS M5A97 PRO 3-21 SPDIF Out Type...
... > ErP Ready Advanced Monitor Enabled Boot Tool Allow BIOS to get system ready for WOL, WO_USB, audio and onboard LEDs will be switched off some power at S5 state. Configuration options: [Disabled] [Enabled] [Auto] Azalia Front Panel [HD] Allows you to [HDMI] for SB HD Azalia. Chapter 3 ASUS M5A97 PRO 3-21 SPDIF Out Type...


