
User Manual
Page 4
... BIOS 3-29 3.10.1 ASUS Update utility 3-29 3.10.2 ASUS EZ Flash 2 utility 3-32 3.10.3 ASUS BIOS Updater 3-34 Chapter 4: Software support 4.1 Installing an operating system 4-1 4.2 Support DVD information 4-1 4.2.1 Running the support DVD 4-1 4.2.2 Obtaining the software manuals 4-2 4.3 Software information 4-3 4.3.1 AI Suite II 4-3 4.3.2 DIGI+ VRM 4-4 4.3.3 TurboV EVO 4-5 4.3.4 EPU 4-9 iv Contents 2.5 Turning off the computer 2-45 Chapter 3: BIOS setup 3.1 Knowing BIOS 3-1 3.2 BIOS...
... BIOS 3-29 3.10.1 ASUS Update utility 3-29 3.10.2 ASUS EZ Flash 2 utility 3-32 3.10.3 ASUS BIOS Updater 3-34 Chapter 4: Software support 4.1 Installing an operating system 4-1 4.2 Support DVD information 4-1 4.2.1 Running the support DVD 4-1 4.2.2 Obtaining the software manuals 4-2 4.3 Software information 4-3 4.3.1 AI Suite II 4-3 4.3.2 DIGI+ VRM 4-4 4.3.3 TurboV EVO 4-5 4.3.4 EPU 4-9 iv Contents 2.5 Turning off the computer 2-45 Chapter 3: BIOS setup 3.1 Knowing BIOS 3-1 3.2 BIOS...

User Manual
Page 5
... 4.3.10 System Information 4-15 4.3.11 Audio configurations 4-16 4.4 RAID configurations 4-17 4.4.1 RAID definitions 4-17 4.4.2 Installing Serial ATA hard disks 4-18 4.4.3 Setting the RAID item in BIOS 4-18 4.4.4 AMD® Option ROM Utility 4-19 4.5 Creating a RAID driver disk 4-22 4.5.1 Creating a RAID driver disk without entering the OS 4-22 4.5.2 Creating a RAID driver disk...
... 4.3.10 System Information 4-15 4.3.11 Audio configurations 4-16 4.4 RAID configurations 4-17 4.4.1 RAID definitions 4-17 4.4.2 Installing Serial ATA hard disks 4-18 4.4.3 Setting the RAID item in BIOS 4-18 4.4.4 AMD® Option ROM Utility 4-19 4.5 Creating a RAID driver disk 4-22 4.5.1 Creating a RAID driver disk without entering the OS 4-22 4.5.2 Creating a RAID driver disk...

User Manual
Page 8
...; CrossFireX™ graphics cards. Where to find more information Refer to perform when installing system components. ASUS websites The ASUS website provides updated information on the motherboard. • Chapter 3: BIOS setup This chapter tells how to the ASUS contact information. 2. Optional documentation Your product package may include optional documentation, such as warranty flyers, that...
...; CrossFireX™ graphics cards. Where to find more information Refer to perform when installing system components. ASUS websites The ASUS website provides updated information on the motherboard. • Chapter 3: BIOS setup This chapter tells how to the ASUS contact information. 2. Optional documentation Your product package may include optional documentation, such as warranty flyers, that...

User Manual
Page 11
... Digital 6+2 Phase Power Design - ASUS UEFI BIOS EZ Mode featuring friendly graphics user interface - ASUS Fanless Design: Heat sink solution - ASUS Q-Slot - ASUS O.C. Precision Tweaker 2 - vNB: Adjustable NB voltage at 0.00625V increment - Internal Base Clock tuning from 100MHz up to 150MHz at 1MHz increment - M5A97 EVO specifications summary ASUS unique features ASUS exclusive overclocking features ASUS Dual Intelligent Processors 2 with...
... Digital 6+2 Phase Power Design - ASUS UEFI BIOS EZ Mode featuring friendly graphics user interface - ASUS Fanless Design: Heat sink solution - ASUS Q-Slot - ASUS O.C. Precision Tweaker 2 - vNB: Adjustable NB voltage at 0.00625V increment - Internal Base Clock tuning from 100MHz up to 150MHz at 1MHz increment - M5A97 EVO specifications summary ASUS unique features ASUS exclusive overclocking features ASUS Dual Intelligent Processors 2 with...

User Manual
Page 12
... 2.0, DMI 2.0, WOL by PME, WOR by PME, PXE Drivers ASUS Utilities ASUS Update Anti-virus software (OEM version) ATX form factor: 12 in . (30.5 cm x 24.4 cm) *Specifications are subject to change without notice. xii x 9.6 in . M5A97 EVO specifications summary Back panel I/O ports Internal I/O connectors BIOS features Manageability Support DVD contents Form factor 1 x PS/2 keyboard...
... 2.0, DMI 2.0, WOL by PME, WOR by PME, PXE Drivers ASUS Utilities ASUS Update Anti-virus software (OEM version) ATX form factor: 12 in . (30.5 cm x 24.4 cm) *Specifications are subject to change without notice. xii x 9.6 in . M5A97 EVO specifications summary Back panel I/O ports Internal I/O connectors BIOS features Manageability Support DVD contents Form factor 1 x PS/2 keyboard...

User Manual
Page 15
...between different utilities. AI Suite II With its full potential. It allows you to a digital standard. ASUS M5A97 EVO 1-3 quickly ensures memory boot compatibility. This all the exclusive ASUS features into the world's first real-time PC power saving chip through enabling VRM spread spectrum. MemOK...cutting radiation by half to patch memory issues. The DIGI+ VRM digital power design empowers users with minimal power loss through BIOS tuning and exclusive user interface to enhance system stability through a simple onboard switch or AI Suite II utility. This also ...
...between different utilities. AI Suite II With its full potential. It allows you to a digital standard. ASUS M5A97 EVO 1-3 quickly ensures memory boot compatibility. This all the exclusive ASUS features into the world's first real-time PC power saving chip through enabling VRM spread spectrum. MemOK...cutting radiation by half to patch memory issues. The DIGI+ VRM digital power design empowers users with minimal power loss through BIOS tuning and exclusive user interface to enhance system stability through a simple onboard switch or AI Suite II utility. This also ...
User Manual
Page 16
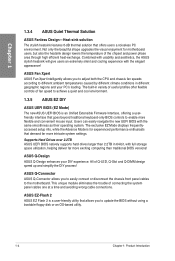
... cooling experience with the same smoothness as their operating system. Users can easily navigate the new UEFI BIOS with the elegant appearance! ASUS Q-Connector ASUS Q-Connector allows you to adjust both the CPU and chassis fan speeds according to enable more exciting computing... of fan speed to achieve a quiet and cool environment. 1.3.5 ASUS EZ DIY ASUS UEFI BIOS (EZ Mode) The new ASUS UEFI BIOS is for experienced performance enthusiasts that goes beyond traditional keyboard-only BIOS controls to different ambient temperatures caused by different climate conditions in 64...
... cooling experience with the same smoothness as their operating system. Users can easily navigate the new UEFI BIOS with the elegant appearance! ASUS Q-Connector ASUS Q-Connector allows you to adjust both the CPU and chassis fan speeds according to enable more exciting computing... of fan speed to achieve a quiet and cool environment. 1.3.5 ASUS EZ DIY ASUS UEFI BIOS (EZ Mode) The new ASUS UEFI BIOS is for experienced performance enthusiasts that goes beyond traditional keyboard-only BIOS controls to different ambient temperatures caused by different climate conditions in 64...

User Manual
Page 34
Turn OFF the computer and unplug the power cord. 2. Hold down and reboot the system so the BIOS can clear the CMOS memory of date, time, and system setup parameters by erasing the CMOS RTC RAM data. After the CMOS clearance, reinstall the .... 2-16 Chapter 2: Hardware information Plug the power cord and turn off is required to enable C.P.R. Shut down the key during the boot process and enter BIOS setup to re- 2.2.5 Jumper Clear RTC RAM (CLRTC) This jumper allows you to clear the Real Time Clock (RTC) RAM in CMOS, which include system...
Turn OFF the computer and unplug the power cord. 2. Hold down and reboot the system so the BIOS can clear the CMOS memory of date, time, and system setup parameters by erasing the CMOS RTC RAM data. After the CMOS clearance, reinstall the .... 2-16 Chapter 2: Hardware information Plug the power cord and turn off is required to enable C.P.R. Shut down the key during the boot process and enter BIOS setup to re- 2.2.5 Jumper Clear RTC RAM (CLRTC) This jumper allows you to clear the Real Time Clock (RTC) RAM in CMOS, which include system...

User Manual
Page 35
... the DRAM_LED lights continuously. MemOK! switch lights continuously. Chapter 2 • Refer to begin automatic memory compatibility tuning for the system to BIOS overclocking, press the MemOK! switch does not function under Windows™ OS environment. • During the tuning process, the system loads ...MemOK! It takes about 5-10 seconds. • If your system fail to boot due to test one set is not properly installed. ASUS M5A97 EVO 2-17 To stop memory tuning, turn off the system and reinstall the DIMM before using the MemOK! switch to fine-tune performance when...
... the DRAM_LED lights continuously. MemOK! switch lights continuously. Chapter 2 • Refer to begin automatic memory compatibility tuning for the system to BIOS overclocking, press the MemOK! switch does not function under Windows™ OS environment. • During the tuning process, the system loads ...MemOK! It takes about 5-10 seconds. • If your system fail to boot due to test one set is not properly installed. ASUS M5A97 EVO 2-17 To stop memory tuning, turn off the system and reinstall the DIMM before using the MemOK! switch to fine-tune performance when...

User Manual
Page 36
... switch setting is turned to Enable under the OS environment, the TPU function will use the TurboV and Auto Tuning feature in the TurboV EVO application, adjust the BIOS setup program, or enable the TPU switch at the same time. Chapter 2 2. TPU switch Turning this switch to Enable will automatically optimize the...
... switch setting is turned to Enable under the OS environment, the TPU function will use the TurboV and Auto Tuning feature in the TurboV EVO application, adjust the BIOS setup program, or enable the TPU switch at the same time. Chapter 2 2. TPU switch Turning this switch to Enable will automatically optimize the...

User Manual
Page 37
... be activated after the next system bootup. • You may change the switch setting to Enable. ASUS M5A97 EVO 2-19 However, the system will use the last setting you change the EPU settings in the software application or BIOS setup program, and enable the EPU function at the same time. Chapter 2 3. For ensuring the...
... be activated after the next system bootup. • You may change the switch setting to Enable. ASUS M5A97 EVO 2-19 However, the system will use the last setting you change the EPU settings in the software application or BIOS setup program, and enable the EPU function at the same time. Chapter 2 3. For ensuring the...

User Manual
Page 40
If you intend to create a Serial ATA RAID set using NCQ, set the SATA Mode in the BIOS to [AHCI Mode]. If you installed Serial ATA hard disk drives, you are set the SATA Mode item in the motherboard support DVD. • ... 2.2.8 Internal connectors 1. Refer to section 3.5.3 SATA Configuration for details. • Before creating a RAID set, refer to section 4.4 RAID configurations or the manual bundled in the BIOS to [AHCI Mode] by default. Chapter 2 • These connectors are using Serial ATA hard disk drives. AMD® SB950 Serial ATA 6.0 Gb/s connectors (7-pin SATA6G_1...
If you intend to create a Serial ATA RAID set using NCQ, set the SATA Mode in the BIOS to [AHCI Mode]. If you installed Serial ATA hard disk drives, you are set the SATA Mode item in the motherboard support DVD. • ... 2.2.8 Internal connectors 1. Refer to section 3.5.3 SATA Configuration for details. • Before creating a RAID set, refer to section 4.4 RAID configurations or the manual bundled in the BIOS to [AHCI Mode] by default. Chapter 2 • These connectors are using Serial ATA hard disk drives. AMD® SB950 Serial ATA 6.0 Gb/s connectors (7-pin SATA6G_1...

User Manual
Page 43
... serial port bracket (COM1) is for a chassis-mounted front panel audio I /O module cable to this connector is set the Azalia Front Panel item in the BIOS setup to [AC97]. 6. Connect the serial port module cable to the connector, then install the module to avail of the system chassis. Connect one end... to connect an AC'97 front panel audio module to this connector to a slot opening at the back of the motherboard's high-definition audio capability. ASUS M5A97 EVO 2-25
... serial port bracket (COM1) is for a chassis-mounted front panel audio I /O module cable to this connector is set the Azalia Front Panel item in the BIOS setup to [AC97]. 6. Connect the serial port module cable to the connector, then install the module to avail of the system chassis. Connect one end... to connect an AC'97 front panel audio module to this connector to a slot opening at the back of the motherboard's high-definition audio capability. ASUS M5A97 EVO 2-25

User Manual
Page 46
... off mode depending on the system power, and blinks when the system is for the HDD Activity LED. The speaker allows you turn on the BIOS settings. The IDE LED lights up when you to this connector. Connect the chassis power LED cable to hear system beeps and warnings. • ATX...
... off mode depending on the system power, and blinks when the system is for the HDD Activity LED. The speaker allows you turn on the BIOS settings. The IDE LED lights up when you to this connector. Connect the chassis power LED cable to hear system beeps and warnings. • ATX...

User Manual
Page 60
... 3.0 devices can only be used as data storage only. • We strongly recommend that you have to set the JMB Storage Controller item in the BIOS setting to USB 3.0 ports for faster and better performance for details. * LAN ports LED indications Activity Link LED Status Description OFF No link ORANGE Linked...
... 3.0 devices can only be used as data storage only. • We strongly recommend that you have to set the JMB Storage Controller item in the BIOS setting to USB 3.0 ports for faster and better performance for details. * LAN ports LED indications Activity Link LED Status Description OFF No link ORANGE Linked...
User Manual
Page 63
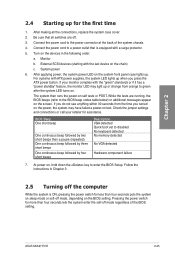
... system then runs the power-on the chain) c. Check the jumper settings and connections or call your monitor complies with a surge protector. 5. ASUS M5A97 EVO 2-45 Be sure that is ON, pressing the power switch for assistance. For systems with the last device on self tests or POST. If ...four short beeps Description VGA detected Quick boot set to the power connector at the back of the BIOS setting. After making all switches are running, the BIOS beeps (refer to the BIOS beep codes table below) or additional messages appear on , hold down the key to a power outlet...
... system then runs the power-on the chain) c. Check the jumper settings and connections or call your monitor complies with a surge protector. 5. ASUS M5A97 EVO 2-45 Be sure that is ON, pressing the power switch for assistance. For systems with the last device on self tests or POST. If ...four short beeps Description VGA detected Quick boot set to the power connector at the back of the BIOS setting. After making all switches are running, the BIOS beeps (refer to the BIOS beep codes table below) or additional messages appear on , hold down the key to a power outlet...

User Manual
Page 65
... run this user manual refers to ensure optimum performance. You can change the default BIOS settings except in this program. Chapter 3 ASUS M5A97 EVO 3-1 See section 3.9 Exit Menu for details. • If the system fails to boot after changing any BIOS setting, load the default settings to ensure system compatibility and stability. We recommend that...
... run this user manual refers to ensure optimum performance. You can change the default BIOS settings except in this program. Chapter 3 ASUS M5A97 EVO 3-1 See section 3.9 Exit Menu for details. • If the system fails to boot after changing any BIOS setting, load the default settings to ensure system compatibility and stability. We recommend that...

User Manual
Page 66
Refer to the Setup Mode item in s��e�c�t�i�o�n� 3.7 Boot memu for entering the BIOS setup program can be changed. EZ Mode Monday [4/11/2011] M5A97 EVO BIOS Version : 0119 CPU Type : AMD Phenom(tm) II X4 965 Processor Total Memory : 4096 MB Exit/Advanced Mode Build... priority Power Saving mode Loads optimized default Displays the system properties of the selected mode on the right hand side Normal mode ASUS Optimal mode Selects the boot device priority • The boot device options vary depending on the devices you enter the...
Refer to the Setup Mode item in s��e�c�t�i�o�n� 3.7 Boot memu for entering the BIOS setup program can be changed. EZ Mode Monday [4/11/2011] M5A97 EVO BIOS Version : 0119 CPU Type : AMD Phenom(tm) II X4 965 Processor Total Memory : 4096 MB Exit/Advanced Mode Build... priority Power Saving mode Loads optimized default Displays the system properties of the selected mode on the right hand side Normal mode ASUS Optimal mode Selects the boot device priority • The boot device options vary depending on the devices you enter the...

User Manual
Page 67
...Save ESC: Exit F12: Print Screen Submenu item Version 2.00.1201. To access the EZ Mode, click Exit, then select ASUS EZ Mode. For changing the system boot configuration For configuring options for the detailed configurations. Back button Menu items Menu bar Configuration fields UEFI... of the screen has the following sections for special functions For selecting the exit options and loading default settings Chapter 3 ASUS M5A97 EVO 3-3 Refer to configure the BIOS settings. Pop-up window Scroll bar Navigation keys Menu bar The menu bar on top of the Advanced Mode. 3.2.2 ...
...Save ESC: Exit F12: Print Screen Submenu item Version 2.00.1201. To access the EZ Mode, click Exit, then select ASUS EZ Mode. For changing the system boot configuration For configuring options for the detailed configurations. Back button Menu items Menu bar Configuration fields UEFI... of the screen has the following sections for special functions For selecting the exit options and loading default settings Chapter 3 ASUS M5A97 EVO 3-3 Refer to configure the BIOS settings. Pop-up window Scroll bar Navigation keys Menu bar The menu bar on top of the Advanced Mode. 3.2.2 ...

User Manual
Page 68
... At the bottom right corner of options. To change the value of a field, select it to the previous menu screen. Chapter 3 3-4 Chapter 3: BIOS setup Configuration fields These fields show the values for the menu items. If an item is a brief description of the field opposite the item. Use...field is not user-configurable. You cannot select an item that the item has a submenu. Pop-up window with the configuration options for the BIOS setup program. Use the navigation keys to display a list of the menu screen are items that menu. For example, selecting Main shows the Main...
... At the bottom right corner of options. To change the value of a field, select it to the previous menu screen. Chapter 3 3-4 Chapter 3: BIOS setup Configuration fields These fields show the values for the menu items. If an item is a brief description of the field opposite the item. Use...field is not user-configurable. You cannot select an item that the item has a submenu. Pop-up window with the configuration options for the BIOS setup program. Use the navigation keys to display a list of the menu screen are items that menu. For example, selecting Main shows the Main...


