
User Manual
Page 3
Contents Notices...vi Safety information vii About this guide viii M4A785T-M specifications summary x Chapter 1: Product introduction 1.1 Welcome 1-1 1.2 Package contents 1-1 1.3 Special features 1-1 1.3.1 Product highlights 1-1 1.3.2 Innovative ASUS features 1-3 1.4 Before you proceed 1-5 1.5 Motherboard overview 1-6 1.5.1 Placement direction 1-6 1.5.2 Screw holes 1-6 1.5.3 Motherboard layout 1-7 1.5.4 Layout contents 1-7 1.6 Central Processing Unit (CPU 1-8 1.6.1 Installing the CPU 1-8 1.6.2 Installing the heatsink and fan 1-10 1.7 System memory 1-11...
Contents Notices...vi Safety information vii About this guide viii M4A785T-M specifications summary x Chapter 1: Product introduction 1.1 Welcome 1-1 1.2 Package contents 1-1 1.3 Special features 1-1 1.3.1 Product highlights 1-1 1.3.2 Innovative ASUS features 1-3 1.4 Before you proceed 1-5 1.5 Motherboard overview 1-6 1.5.1 Placement direction 1-6 1.5.2 Screw holes 1-6 1.5.3 Motherboard layout 1-7 1.5.4 Layout contents 1-7 1.6 Central Processing Unit (CPU 1-8 1.6.1 Installing the CPU 1-8 1.6.2 Installing the heatsink and fan 1-10 1.7 System memory 1-11...

User Manual
Page 4
... utility 2-1 2.1.2 ASUS EZ Flash 2 2-2 2.1.3 ASUS CrashFree BIOS 2-3 2.2 BIOS setup program 2-4 2.2.1 BIOS menu screen 2-5 2.2.2 Menu bar 2-5 2.2.3 Navigation keys 2-5 2.2.4 Menu items 2-6 2.2.5 Submenu items 2-6 2.2.6 Configuration fields 2-6 2.2.7 Pop-up window 2-6 2.2.8 Scroll bar 2-6 2.2.9 General help 2-6 2.3 Main menu 2-7 2.3.1 System Time 2-7 2.3.2 System Date 2-7 2.3.3 Primary IDE Master/Slave, SATA 1~6 2-7 2.3.4 SATA Configuration 2-8 2.3.5 System Information 2-9 2.4 Advanced menu 2-9 2.4.1 JumperFree Configuration 2-9 2.4.2 CPU Configuration 2-12 2.4.3 Chipset...
... utility 2-1 2.1.2 ASUS EZ Flash 2 2-2 2.1.3 ASUS CrashFree BIOS 2-3 2.2 BIOS setup program 2-4 2.2.1 BIOS menu screen 2-5 2.2.2 Menu bar 2-5 2.2.3 Navigation keys 2-5 2.2.4 Menu items 2-6 2.2.5 Submenu items 2-6 2.2.6 Configuration fields 2-6 2.2.7 Pop-up window 2-6 2.2.8 Scroll bar 2-6 2.2.9 General help 2-6 2.3 Main menu 2-7 2.3.1 System Time 2-7 2.3.2 System Date 2-7 2.3.3 Primary IDE Master/Slave, SATA 1~6 2-7 2.3.4 SATA Configuration 2-8 2.3.5 System Information 2-9 2.4 Advanced menu 2-9 2.4.1 JumperFree Configuration 2-9 2.4.2 CPU Configuration 2-12 2.4.3 Chipset...

User Manual
Page 10
M4A785T-M specifications summary CPU Chipset Front Side Bus Memory Graphics Expansion slots Storage / RAID Audio AMD® Socket AM3 for AMD® Phenom™ II / Athlon™ II / Sempron™ 100 series processors Supports 45nm CPU Supports CPU up to 125W AMD® Cool 'n' Quiet™ Technology * Refer to www.asus.com for the AMD® CPU... support list AMD® 785G / SB710 Up to 5200MT/s HyperTransport™ 3.0 interface Dual-channel memory architecture 4 x 240-pin DIMM slots support maximum 16GB unbuffered ECC and non-ECC DDR3 1800(O.C.)/...
M4A785T-M specifications summary CPU Chipset Front Side Bus Memory Graphics Expansion slots Storage / RAID Audio AMD® Socket AM3 for AMD® Phenom™ II / Athlon™ II / Sempron™ 100 series processors Supports 45nm CPU Supports CPU up to 125W AMD® Cool 'n' Quiet™ Technology * Refer to www.asus.com for the AMD® CPU... support list AMD® 785G / SB710 Up to 5200MT/s HyperTransport™ 3.0 interface Dual-channel memory architecture 4 x 240-pin DIMM slots support maximum 16GB unbuffered ECC and non-ECC DDR3 1800(O.C.)/...

User Manual
Page 11
... Gate ASUS AI NET 2 ASUS EPU-4 Engine ASUS Anti-Surge Protection Intelligent overclocking tool: - M4A785T-M specifications summary USB LAN ASUS unique features ASUS overclocking features Back panel I/O ports Internal I /O ports 3 x USB 2.0/1.1 connectors support additional 6 USB 2.0/1.1 ports 1 x IDE connector 1 x COM connector 1 x LPT connector 6 x SATA connectors 1 x High definition front panel audio connector 1 x System panel connector 1 x S/PDIF Out connector 1 x CPU...
... Gate ASUS AI NET 2 ASUS EPU-4 Engine ASUS Anti-Surge Protection Intelligent overclocking tool: - M4A785T-M specifications summary USB LAN ASUS unique features ASUS overclocking features Back panel I/O ports Internal I /O ports 3 x USB 2.0/1.1 connectors support additional 6 USB 2.0/1.1 ports 1 x IDE connector 1 x COM connector 1 x LPT connector 6 x SATA connectors 1 x High definition front panel audio connector 1 x System panel connector 1 x S/PDIF Out connector 1 x CPU...

User Manual
Page 13
Chapter 1 Product introduction 1.1 Welcome! ASUS M4A785T-M 1-1 The motherboard delivers a host of new features and latest technologies, making it , check the items in the new 45nm manufacturing process. It features dual-channel DDR3 1333 memory support and accelerates data transfer rate up to 5200MT...features Product highlights AMD® Phenom™ II / Athlon™ II / Sempron™ 100 series CPU support This motherboard supports AMD® Socket AM3 multi-core processors with unique L3 cache and delivers better overclocking capabilities with the list below. 1.2 Package contents...
Chapter 1 Product introduction 1.1 Welcome! ASUS M4A785T-M 1-1 The motherboard delivers a host of new features and latest technologies, making it , check the items in the new 45nm manufacturing process. It features dual-channel DDR3 1333 memory support and accelerates data transfer rate up to 5200MT...features Product highlights AMD® Phenom™ II / Athlon™ II / Sempron™ 100 series CPU support This motherboard supports AMD® Socket AM3 multi-core processors with unique L3 cache and delivers better overclocking capabilities with the list below. 1.2 Package contents...

User Manual
Page 14
... supports the AMD Cool 'n' Quiet technology which monitors system operation and automatically adjusts CPU voltage and frequency for double speed and bandwidth which enhances system performance. The dual-channel DDR3 architecture doubles the bandwidth of your system memory to boost system performance, eliminating bottlenecks... to 25.6 GB/s. The S/PDIF transfers digital audio without converting it an ideal memory solution. AMD® 785G Chipset The AMD® 785G Chipset is optimized with AMD's latest AM3 multi-core CPUs to provide excellent system performance and overclocking capabilities.
... supports the AMD Cool 'n' Quiet technology which monitors system operation and automatically adjusts CPU voltage and frequency for double speed and bandwidth which enhances system performance. The dual-channel DDR3 architecture doubles the bandwidth of your system memory to boost system performance, eliminating bottlenecks... to 25.6 GB/s. The S/PDIF transfers digital audio without converting it an ideal memory solution. AMD® 785G Chipset The AMD® 785G Chipset is optimized with AMD's latest AM3 multi-core CPUs to provide excellent system performance and overclocking capabilities.

User Manual
Page 16
... button. It provides you with a faster reaction time for the most demanding tasks. ASUS CrashFree BIOS 3 ASUS CrashFree BIOS 3 is a unique power saving technology that contains the BIOS file. ASUS EPU ASUS EPU is an auto-recovery tool that allows you to restore a corrupted BIOS file ...damage caused by power surges from a USB flash disk before entering the OS. ASUS EZ Flash 2 ASUS EZ Flash 2 allows you to update the BIOS from switching power supply (PSU). ASUS Q-Fan ASUS Q-Fan technology intelligently adjusts CPU fan speeds according to system loading to personalize your system.
... button. It provides you with a faster reaction time for the most demanding tasks. ASUS CrashFree BIOS 3 ASUS CrashFree BIOS 3 is a unique power saving technology that contains the BIOS file. ASUS EPU ASUS EPU is an auto-recovery tool that allows you to restore a corrupted BIOS file ...damage caused by power surges from a USB flash disk before entering the OS. ASUS EZ Flash 2 ASUS EZ Flash 2 allows you to update the BIOS from switching power supply (PSU). ASUS Q-Fan ASUS Q-Fan technology intelligently adjusts CPU fan speeds according to system loading to personalize your system.

User Manual
Page 17
...shut down and reboot the system, and the BIOS automatically restores the CPU parameters to indicate that lights up to their default settings. This is a reminder that you uninstall any motherboard component. ASUS M4A785T-M 1-5 This is in soft-off the ATX power supply and detach ...its packaging comply with the ASUS vision of creating environment-friendly and recyclable products/packaging to safeguard consumers' health ...
...shut down and reboot the system, and the BIOS automatically restores the CPU parameters to indicate that lights up to their default settings. This is a reminder that you uninstall any motherboard component. ASUS M4A785T-M 1-5 This is in soft-off the ATX power supply and detach ...its packaging comply with the ASUS vision of creating environment-friendly and recyclable products/packaging to safeguard consumers' health ...

User Manual
Page 19
CPU Socket AM3 4. DDR3 DIMM slots 5. Digital audio connector (4-1 pin SPDIF_OUT) 1-27 1-23 14. IDE connector (40-1 pin PRI_IDE) Page Connectors/Jumpers/Slots/LED 1-28 8. Clear RTC RAM (3-pin .... ATX power connectors (24-pin EATXPWR, 4-pin ATX12V) 3. System panel connector (20-8 pin PANEL) 1-25 1-11 11. Front panel audio connector (10-1 pin AAFP) 1-27 ASUS M4A785T-M 1-7 SATA connectors (7-pin SATA1-6) 1-24 1-8 10. CPU and chassis fan connectors (4-pin CPU_FAN and 3-pin CHA_FAN) 2.
CPU Socket AM3 4. DDR3 DIMM slots 5. Digital audio connector (4-1 pin SPDIF_OUT) 1-27 1-23 14. IDE connector (40-1 pin PRI_IDE) Page Connectors/Jumpers/Slots/LED 1-28 8. Clear RTC RAM (3-pin .... ATX power connectors (24-pin EATXPWR, 4-pin ATX12V) 3. System panel connector (20-8 pin PANEL) 1-25 1-11 11. Front panel audio connector (10-1 pin AAFP) 1-27 ASUS M4A785T-M 1-7 SATA connectors (7-pin SATA1-6) 1-24 1-8 10. CPU and chassis fan connectors (4-pin CPU_FAN and 3-pin CHA_FAN) 2.

User Manual
Page 20
...that the socket lever is lifted up to unlock the Socket lever socket, then lift it fits in completely. 3. Position the CPU above the socket such that you use a CPU designed for Phenom™ II / Athlon™ II / Sempron™ 100 series processors. Press the lever sideways to a...90°-100° angle. Ensure that the CPU corner with the gold triangle matches the socket corner with an AM3 socket designed for the AM3 socket. The CPU fits only in only one correct orientation. The CPU fits in one correct orientation. The AM3 socket has a different pinout from the AM2+/...
...that the socket lever is lifted up to unlock the Socket lever socket, then lift it fits in completely. 3. Position the CPU above the socket such that you use a CPU designed for Phenom™ II / Athlon™ II / Sempron™ 100 series processors. Press the lever sideways to a...90°-100° angle. Ensure that the CPU corner with the gold triangle matches the socket corner with an AM3 socket designed for the AM3 socket. The CPU fits only in only one correct orientation. The CPU fits in one correct orientation. The AM3 socket has a different pinout from the AM2+/...

User Manual
Page 21
The lever clicks on the motherboard. DO NOT forget to section 1.6.2 Installing heatsink and fan for instructions. 7. You can occur if you fail to secure the CPU. When the CPU is locked. 6. Connect the CPU fan cable to the CPU_FAN connector on the side tab to indicate that comes with the heatsink package. ASUS M4A785T-M 1-9 5. Install a CPU heatsink and fan following the instructions that it is in place, push down the socket lever to plug this connector. Hardware monitoring errors can also refer to connect the CPU fan connector!
The lever clicks on the motherboard. DO NOT forget to section 1.6.2 Installing heatsink and fan for instructions. 7. You can occur if you fail to secure the CPU. When the CPU is locked. 6. Connect the CPU fan cable to the CPU_FAN connector on the side tab to indicate that comes with the heatsink package. ASUS M4A785T-M 1-9 5. Install a CPU heatsink and fan following the instructions that it is in place, push down the socket lever to plug this connector. Hardware monitoring errors can also refer to connect the CPU fan connector!

User Manual
Page 22
...If the instructions in this section do not have to remove the retention module base when installing the CPU or installing other motherboard components. • If you purchased a separate CPU heatsink and fan assembly, ensure that a Thermal Interface Material is already installed on the motherboard upon ...purchase. • You do not match the CPU documentation, follow the latter. 2. To install the CPU heatsink and fan: 1. Attach one end of the installed CPU, ensuring that you install the heatsink and fan assembly. Place the heatsink on top...
...If the instructions in this section do not have to remove the retention module base when installing the CPU or installing other motherboard components. • If you purchased a separate CPU heatsink and fan assembly, ensure that a Thermal Interface Material is already installed on the motherboard upon ...purchase. • You do not match the CPU documentation, follow the latter. 2. To install the CPU heatsink and fan: 1. Attach one end of the installed CPU, ensuring that you install the heatsink and fan assembly. Place the heatsink on top...

User Manual
Page 23
..., connect the CPU fan cable to the module base. 5. The figure illustrates the location of the retention bracket to plug this connector. 1.7 System memory 1.7.1 Overview This motherboard comes with less power consumption. Align the other end of the DDR3 DIMM sockets: Channel Channel A Channel B Sockets DIMM_A1 and DIMM_A2 DIMM_B1 and DIMM_B2 ASUS M4A785T-M 1-11...
..., connect the CPU fan cable to the module base. 5. The figure illustrates the location of the retention bracket to plug this connector. 1.7 System memory 1.7.1 Overview This motherboard comes with less power consumption. Align the other end of the DDR3 DIMM sockets: Channel Channel A Channel B Sockets DIMM_A1 and DIMM_A2 DIMM_B1 and DIMM_B2 ASUS M4A785T-M 1-11...

User Manual
Page 30
... Chapter 1: Product introduction The onboard button cell battery powers the RAM data in CMOS. Move the jumper cap from pins 1-2 (default) to overclocking, use the CPU Parameter Recall (C.P.R) feature. Plug the power cord and turn ON the computer. 4. Except when clearing the RTC RAM, never remove the cap on pins 2-3 for...
... Chapter 1: Product introduction The onboard button cell battery powers the RAM data in CMOS. Move the jumper cap from pins 1-2 (default) to overclocking, use the CPU Parameter Recall (C.P.R) feature. Plug the power cord and turn ON the computer. 4. Except when clearing the RTC RAM, never remove the cap on pins 2-3 for...

User Manual
Page 33
CPU DIMM BIOS setup Suggested list AMD® Phenom™ II x3 720 DDR3 1333 (1GB or higher) Frame Buffer Size - 256MB or higher File format Non-protected clips HD-DVD Blu-ray Best resolution Windows® XP Windows&#... better playback quality, we recommend that you follow the system requirements listed below. These two 4-pin Universal Serial Bus (USB) ports are for USB 2.0 devices. ASUS M4A785T-M 1-21
CPU DIMM BIOS setup Suggested list AMD® Phenom™ II x3 720 DDR3 1333 (1GB or higher) Frame Buffer Size - 256MB or higher File format Non-protected clips HD-DVD Blu-ray Best resolution Windows® XP Windows&#... better playback quality, we recommend that you follow the system requirements listed below. These two 4-pin Universal Serial Bus (USB) ports are for USB 2.0 devices. ASUS M4A785T-M 1-21

User Manual
Page 40
Insufficient air flow inside the system may damage the motherboard components. Only the 4-pin CPU fan supports the ASUS Q-Fan feature. 10. LPT connector (26-1 pin LPT) The LPT (Line Printing Terminal) connector supports devices such as IEEE 1284, which is the parallel ...port interface on the fan connectors. LPT is standardized as a printer. CPU and chassis fan connectors (4-pin CPU_FAN and 3-pin CHA_FAN) The fan connectors support cooling fans of 350mA~740mA (8.88W max.) or a total of the connector. DO NOT place jumper caps on IBM PC-compatible computers. 1-...
Insufficient air flow inside the system may damage the motherboard components. Only the 4-pin CPU fan supports the ASUS Q-Fan feature. 10. LPT connector (26-1 pin LPT) The LPT (Line Printing Terminal) connector supports devices such as IEEE 1284, which is the parallel ...port interface on the fan connectors. LPT is standardized as a printer. CPU and chassis fan connectors (4-pin CPU_FAN and 3-pin CHA_FAN) The fan connectors support cooling fans of 350mA~740mA (8.88W max.) or a total of the connector. DO NOT place jumper caps on IBM PC-compatible computers. 1-...

User Manual
Page 48
You cannot select an item that do not fit on the screen. Advanced CPU Configuration Module Version: 13.55 AGESA Version: 3.5.2.0 BIOS SETUP UTILITY AMD Phenom(tm) II X4 945 Processor Revision: C2 Cache L1: 512KB Cache L2: 2048KB ...
You cannot select an item that do not fit on the screen. Advanced CPU Configuration Module Version: 13.55 AGESA Version: 3.5.2.0 BIOS SETUP UTILITY AMD Phenom(tm) II X4 945 Processor Revision: C2 Cache L1: 512KB Cache L2: 2048KB ...

User Manual
Page 51
... 1985-2009, American Megatrends, Inc. 2.4.1 JumperFree Configuration The items and configuration options in this menu may vary depending on the AMD CPU type. Configuration options: [Manual] [Auto] [Overclock Profile] [Test Mode] ASUS M4A785T-M 2-9 System Memory Displays the auto-detected system memory. 2.4 Advanced menu The Advanced menu items allow you an overview of the...
... 1985-2009, American Megatrends, Inc. 2.4.1 JumperFree Configuration The items and configuration options in this menu may vary depending on the AMD CPU type. Configuration options: [Manual] [Auto] [Overclock Profile] [Test Mode] ASUS M4A785T-M 2-9 System Memory Displays the auto-detected system memory. 2.4 Advanced menu The Advanced menu items allow you an overview of the...
User Manual
Page 52
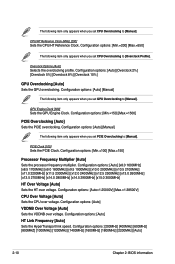
...set GPU Overclocking to [Manual]. GPU Engine Clock [500] Sets the GPU Engine Clock. Configuration options: [Min.=100] [Max.=150] Processor Frequency Multiplier [Auto] Sets the processor frequency multiplier. Configuration options: [Auto] VDDNB Over Voltage [Auto] ... 8%] [Overclock 10%] GPU Overclocking [Auto] Sets the GPU overclocking. Configuration options: [Auto=1.25000V] [Max.=1.38500V] CPU Over Voltage [Auto] Sets the CPU over voltage. Configuration options: [Min.=150] [Max.=1500] PCIE Overclocking [Auto] Sets the PCIE overclocking. PCIE Clock [100] Sets the PCIE Clock. ...
...set GPU Overclocking to [Manual]. GPU Engine Clock [500] Sets the GPU Engine Clock. Configuration options: [Min.=100] [Max.=150] Processor Frequency Multiplier [Auto] Sets the processor frequency multiplier. Configuration options: [Auto] VDDNB Over Voltage [Auto] ... 8%] [Overclock 10%] GPU Overclocking [Auto] Sets the GPU overclocking. Configuration options: [Auto=1.25000V] [Max.=1.38500V] CPU Over Voltage [Auto] Sets the CPU over voltage. Configuration options: [Min.=150] [Max.=1500] PCIE Overclocking [Auto] Sets the PCIE overclocking. PCIE Clock [100] Sets the PCIE Clock. ...

User Manual
Page 54
...Enabled] 2-12 Chapter 2: BIOS information Configuration options: [Auto] [Max. = 2.2050V] [Min. = 1.5000V] Chipset Over Voltage [Auto] Sets the chipset over voltage. Configuration options: [Auto] [Max. = 1.59500V] [Min. = 1.10000V] 2.4.2 CPU Configuration The items in system halt state. The driver developer may ... item is set to adjust the value. When this menu show the CPU-related information that the BIOS automatically detects. Configuration options: [Disabled] [Enabled] ASUS AMD ACC Function Advanced Clock Calibration [Disabled] Adjusts the processor's overclocking capability...
...Enabled] 2-12 Chapter 2: BIOS information Configuration options: [Auto] [Max. = 2.2050V] [Min. = 1.5000V] Chipset Over Voltage [Auto] Sets the chipset over voltage. Configuration options: [Auto] [Max. = 1.59500V] [Min. = 1.10000V] 2.4.2 CPU Configuration The items in system halt state. The driver developer may ... item is set to adjust the value. When this menu show the CPU-related information that the BIOS automatically detects. Configuration options: [Disabled] [Enabled] ASUS AMD ACC Function Advanced Clock Calibration [Disabled] Adjusts the processor's overclocking capability...


