
User Manual
Page 6
... 4-8 4.3.7 ASUS AI Nap 4-9 4.3.8 ASUS TurboV 4-10 4.3.9 ASUS Turbo Key 4-11 4.4 RAID configurations 4-12 4.4.1 RAID definitions 4-12 4.4.2 Installing Serial ATA hard disks 4-12 4.4.3 Setting the RAID item in BIOS 4-13 4.4.4 NVIDIA® MediaShield BIOS RAID configurations 4-13 4.5 Creating a RAID driver disk 4-17 4.5.1 Creating a RAID driver disk without entering the OS 4-17 4.5.2 Creating a RAID driver disk in Windows 4-17...
... 4-8 4.3.7 ASUS AI Nap 4-9 4.3.8 ASUS TurboV 4-10 4.3.9 ASUS Turbo Key 4-11 4.4 RAID configurations 4-12 4.4.1 RAID definitions 4-12 4.4.2 Installing Serial ATA hard disks 4-12 4.4.3 Setting the RAID item in BIOS 4-13 4.4.4 NVIDIA® MediaShield BIOS RAID configurations 4-13 4.5 Creating a RAID driver disk 4-17 4.5.1 Creating a RAID driver disk without entering the OS 4-17 4.5.2 Creating a RAID driver disk in Windows 4-17...
User Manual
Page 45
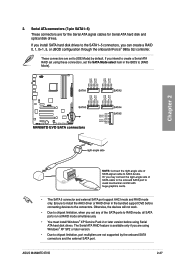
... and external SATA port support AHCI mode and RAID mode only. ASUS M4N98TD EVO 2-27 If you install SATA hard disk drives to the SATA1-5 connectors, you are using Serial ATA hard disk drives. Ensure to install the AHCI driver or RAID driver in the BIOS to the connectors. If you set any of the... for Serial ATA hard disk and optical disk drives. These connectors are set the SATA Mode select item in the bundled support DVD before using Windows® XP SP2 or later version. • Due to [IDE Mode] by the onboard SATA connectors and the external SATA port.
... and external SATA port support AHCI mode and RAID mode only. ASUS M4N98TD EVO 2-27 If you install SATA hard disk drives to the SATA1-5 connectors, you are using Serial ATA hard disk drives. Ensure to install the AHCI driver or RAID driver in the BIOS to the connectors. If you set any of the... for Serial ATA hard disk and optical disk drives. These connectors are set the SATA Mode select item in the bundled support DVD before using Windows® XP SP2 or later version. • Due to [IDE Mode] by the onboard SATA connectors and the external SATA port.

User Manual
Page 66
... PCI IDE Controller [Enabled] [Enabled] Enables the onboard IDE controller. [Disabled] Disables the onboard IDE controller. The AHCI allows the onboard storage driver to use the SATA connectors in this item is set to create a RAID configuration from the SATA hard disk drives. Set to [AHCI Mode..., CPU specification, and system memory in AHCI mode under the OS environment or during POST. • For Windows® XP OS, you have to install the AHCI driver, so that increases storage performance on random workloads by allowing the drive to internally optimize the order of commands....
... PCI IDE Controller [Enabled] [Enabled] Enables the onboard IDE controller. [Disabled] Disables the onboard IDE controller. The AHCI allows the onboard storage driver to use the SATA connectors in this item is set to create a RAID configuration from the SATA hard disk drives. Set to [AHCI Mode..., CPU specification, and system memory in AHCI mode under the OS environment or during POST. • For Windows® XP OS, you have to install the AHCI driver, so that increases storage performance on random workloads by allowing the drive to internally optimize the order of commands....

User Manual
Page 91
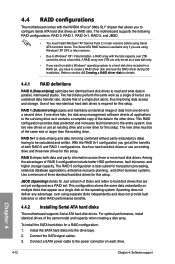
.... The Utilities menu shows the applications and other software that you can install to install. ASUS M4N98TD EVO 4-1 Click each menu tab and select the items you install the Windows® XP Service Pack 2 or later versions before installing the drivers for updates. 4.2.1 Running the support DVD Place the support DVD into the optical drive...
.... The Utilities menu shows the applications and other software that you can install to install. ASUS M4N98TD EVO 4-1 Click each menu tab and select the items you install the Windows® XP Service Pack 2 or later versions before installing the drivers for updates. 4.2.1 Running the support DVD Place the support DVD into the optical drive...

User Manual
Page 98
...the VIA HD Audio Deck. Double-click on the icon to the software manual in the support DVD or visit the ASUS website at www.asus.com for Windows® Vista™ / Windows® 7™ Jacks default setting button Device volume control Minimize button Exit button Analog and digital connector status Default Device...software configuration. 4-8 Chapter 4: Software support 4.3.6 Audio configurations The VIA® High Definition Audio CODEC provides 8-channel audio capability to install the VIA® Audio Driver from the support CD/DVD that came with the motherboard package.
...the VIA HD Audio Deck. Double-click on the icon to the software manual in the support DVD or visit the ASUS website at www.asus.com for Windows® Vista™ / Windows® 7™ Jacks default setting button Device volume control Minimize button Exit button Analog and digital connector status Default Device...software configuration. 4-8 Chapter 4: Software support 4.3.6 Audio configurations The VIA® High Definition Audio CODEC provides 8-channel audio capability to install the VIA® Audio Driver from the support CD/DVD that came with the motherboard package.
User Manual
Page 102
..., fault tolerance, and higher storage capacity. Install the SATA hard disks into the drive bays. 2. Refer to section 4.5 Creating a RAID driver disk for this setup. With the RAID 0+1 configuration you get all applications to the entire system. To install the SATA hard disks for ...SATA power cable to create a RAID driver disk and load the RAID driver during OS installation. Use of a single disk alone, thus improving data access and storage. The new drive must install Windows® XP Service Pack 2 or later versions before using Windows® XP SP2 or later versions. ...
..., fault tolerance, and higher storage capacity. Install the SATA hard disks into the drive bays. 2. Refer to section 4.5 Creating a RAID driver disk for this setup. With the RAID 0+1 configuration you get all applications to the entire system. To install the SATA hard disks for ...SATA power cable to create a RAID driver disk and load the RAID driver during OS installation. Use of a single disk alone, thus improving data access and storage. The new drive must install Windows® XP Service Pack 2 or later versions before using Windows® XP SP2 or later versions. ...

User Manual
Page 107
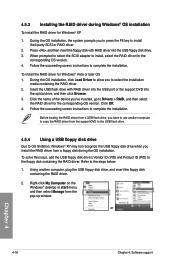
... menu appears, press to enter the BIOS setup utility. 3. Chapter 4 ASUS M4N98TD EVO 4-17 Plug the USB floppy disk drive and insert a floppy disk. 3. For Windows® Vista or later operating systems, use a USB floppy disk drive when creating a SATA RAID driver disk. • Windows® XP may not recognize the USB floppy disk drive due...
... menu appears, press to enter the BIOS setup utility. 3. Chapter 4 ASUS M4N98TD EVO 4-17 Plug the USB floppy disk drive and insert a floppy disk. 3. For Windows® Vista or later operating systems, use a USB floppy disk drive when creating a SATA RAID driver disk. • Windows® XP may not recognize the USB floppy disk drive due...
User Manual
Page 108
..., and then select Manage from a floppy disk during Windows® OS installation To install the RAID driver for the corresponding OS version. During the OS installation, click Load Driver to allow you have to install, select the RAID driver for Windows® Vista or later OS 1. Refer to the ...floppy disk containing the RAID driver. Press , and then insert the floppy disk with RAID driver into the USB port or the support...
..., and then select Manage from a floppy disk during Windows® OS installation To install the RAID driver for the corresponding OS version. During the OS installation, click Load Driver to allow you have to install, select the RAID driver for Windows® Vista or later OS 1. Refer to the ...floppy disk containing the RAID driver. Press , and then insert the floppy disk with RAID driver into the USB port or the support...
User Manual
Page 109
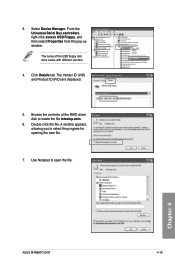
3. The Vendor ID (VID) and Product ID (PID) are displayed. 5. Click Details tab. A window appears, allowing you to open the file. Select Device Manager. The name of the RAID driver disk to locate the file txtsetup.oem. 6. From the Universal Serial Bus controllers, right-click xxxxxx USB Floppy, and then select Properties from the pop-up window. Use Notepad to select the program for opening the oem file. 7. Chapter 4 ASUS M4N98TD EVO 4-19 Browse the contents of the USB floppy disk drive varies with different vendors. 4. Double-click the file.
3. The Vendor ID (VID) and Product ID (PID) are displayed. 5. Click Details tab. A window appears, allowing you to open the file. Select Device Manager. The name of the RAID driver disk to locate the file txtsetup.oem. 6. From the Universal Serial Bus controllers, right-click xxxxxx USB Floppy, and then select Properties from the pop-up window. Use Notepad to select the program for opening the oem file. 7. Chapter 4 ASUS M4N98TD EVO 4-19 Browse the contents of the USB floppy disk drive varies with different vendors. 4. Double-click the file.
User Manual
Page 112
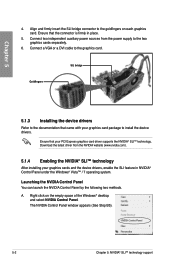
... graphics cards separately. 6. SLI bridge Goldfingers 5.1.3 Installing the device drivers Refer to the documentation that came with your PCI Express graphics card driver supports the NVIDIA® SLI™ technology. A. The NVIDIA Control Panel window appears (See Step B5). 5-2 Chapter 5: NVIDIA® SLI&#...card. Chapter 5 4. Align and firmly insert the SLI bridge connector to install the device drivers. Ensure that the connector is firmly in NVIDIA® Control Panel under the Windows® Vista™ / 7 operating system. Launching the NVIDIA Control Panel You can ...
... graphics cards separately. 6. SLI bridge Goldfingers 5.1.3 Installing the device drivers Refer to the documentation that came with your PCI Express graphics card driver supports the NVIDIA® SLI™ technology. A. The NVIDIA Control Panel window appears (See Step B5). 5-2 Chapter 5: NVIDIA® SLI&#...card. Chapter 5 4. Align and firmly insert the SLI bridge connector to install the device drivers. Ensure that the connector is firmly in NVIDIA® Control Panel under the Windows® Vista™ / 7 operating system. Launching the NVIDIA Control Panel You can ...
User Manual
Page 116
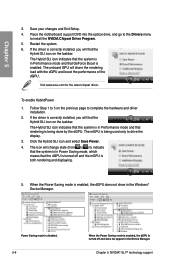
.... 5-6 When the Power Saving mode is enabled, the dGPU is turned off and the mGPU is turned off and does not appear in the Windows® Device Manager. Follow Step 1 to 5 on the taskbar. The mGPU is correctly installed, you will find the Hybrid SLI icon on ...which means that the dGPU is both rendering and displaying. 5. Visit www.asus.com for the latest chipset driver. Place the motherboard support DVD into the optical drive, and go to the Drivers menu to drive the display. 3. If the driver is being done by the dGPU. Save your changes and Exit Setup....
.... 5-6 When the Power Saving mode is enabled, the dGPU is turned off and the mGPU is turned off and does not appear in the Windows® Device Manager. Follow Step 1 to 5 on the taskbar. The mGPU is correctly installed, you will find the Hybrid SLI icon on ...which means that the dGPU is both rendering and displaying. 5. Visit www.asus.com for the latest chipset driver. Place the motherboard support DVD into the optical drive, and go to the Drivers menu to drive the display. 3. If the driver is being done by the dGPU. Save your changes and Exit Setup....


