
User Manual
Page 4
... 2-34 2.9 Onboard LEDs 2-35 2.10 Starting up for the first time 2-37 2.11 Turning off the computer 2-37 Chapter 3: BIOS setup 3.1 Knowing BIOS 3-1 3.2 Updating BIOS 3-1 3.2.1 ASUS Update utility 3-2 3.2.2 ASUS EZ Flash 2 utility 3-4 3.2.3 ASUS CrashFree BIOS 3 utility 3-5 3.3 BIOS setup program 3-6 3.3.1 BIOS menu screen 3-6 3.3.2 Menu bar 3-6 3.3.3 Navigation keys 3-7 3.3.4 Menu items 3-7 3.3.5 Submenu items 3-7 3.3.6 Configuration fields 3-7 3.3.7 Pop-up window 3-7 3.3.8 Scroll bar 3-7 3.3.9 General help...
... 2-34 2.9 Onboard LEDs 2-35 2.10 Starting up for the first time 2-37 2.11 Turning off the computer 2-37 Chapter 3: BIOS setup 3.1 Knowing BIOS 3-1 3.2 Updating BIOS 3-1 3.2.1 ASUS Update utility 3-2 3.2.2 ASUS EZ Flash 2 utility 3-4 3.2.3 ASUS CrashFree BIOS 3 utility 3-5 3.3 BIOS setup program 3-6 3.3.1 BIOS menu screen 3-6 3.3.2 Menu bar 3-6 3.3.3 Navigation keys 3-7 3.3.4 Menu items 3-7 3.3.5 Submenu items 3-7 3.3.6 Configuration fields 3-7 3.3.7 Pop-up window 3-7 3.3.8 Scroll bar 3-7 3.3.9 General help...
User Manual
Page 6
Contents 4.3.4 ASUS EPU 4-6 4.3.5 ASUS Express Gate 4-7 4.3.6 Audio configurations 4-8 4.3.7 ASUS AI Nap 4-9 4.3.8 ASUS TurboV 4-10 4.3.9 ASUS Turbo Key 4-11 4.4 RAID configurations 4-12 4.4.1 RAID definitions 4-12 4.4.2 Installing Serial ATA hard disks 4-12 4.4.3 Setting the RAID item in BIOS 4-13 4.4.4 NVIDIA® MediaShield BIOS RAID configurations 4-13 4.5 Creating a RAID driver disk 4-17 4.5.1 Creating a RAID driver disk without entering the OS 4-17...
Contents 4.3.4 ASUS EPU 4-6 4.3.5 ASUS Express Gate 4-7 4.3.6 Audio configurations 4-8 4.3.7 ASUS AI Nap 4-9 4.3.8 ASUS TurboV 4-10 4.3.9 ASUS Turbo Key 4-11 4.4 RAID configurations 4-12 4.4.1 RAID definitions 4-12 4.4.2 Installing Serial ATA hard disks 4-12 4.4.3 Setting the RAID item in BIOS 4-13 4.4.4 NVIDIA® MediaShield BIOS RAID configurations 4-13 4.5 Creating a RAID driver disk 4-17 4.5.1 Creating a RAID driver disk without entering the OS 4-17...
User Manual
Page 9
.... How this guide This user guide contains the information you have been added by your dealer. ASUS websites The ASUS website provides updated information on the motherboard. • Chapter 3: BIOS setup This chapter tells how to the ASUS contact information. 2. Optional documentation Your product package may include optional documentation, such as warranty flyers, that...
.... How this guide This user guide contains the information you have been added by your dealer. ASUS websites The ASUS website provides updated information on the motherboard. • Chapter 3: BIOS setup This chapter tells how to the ASUS contact information. 2. Optional documentation Your product package may include optional documentation, such as warranty flyers, that...
User Manual
Page 12
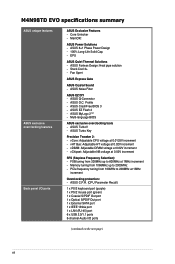
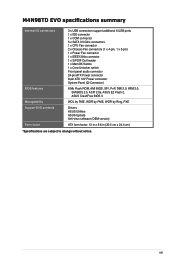
...ASUS Noise Filter ASUS EZ DIY - ASUS CrashFree BIOS 3 - Multi-language BIOS ASUS exclusive overclocking tools - ASUS TurboV - vHT Bus: Adjustable HT voltage at 0.02V increment SFS (Stepless Frequency Selection): - ASUS Power Solutions - ASUS Fanless Design: Heat pipe solution - ASUS Q-Connector - ASUS MyLogo 2™ - ASUS... x LAN (RJ-45) port 6 x USB 2.0/1.1 ports 8-channel Audio I /O ports ASUS Exclusive Features - M4N98TD EVO specifications summary ASUS unique features ASUS exclusive overclocking features Back panel I /O ports (continued on the next page) xii vCore: ...
...ASUS Noise Filter ASUS EZ DIY - ASUS CrashFree BIOS 3 - Multi-language BIOS ASUS exclusive overclocking tools - ASUS TurboV - vHT Bus: Adjustable HT voltage at 0.02V increment SFS (Stepless Frequency Selection): - ASUS Power Solutions - ASUS Fanless Design: Heat pipe solution - ASUS Q-Connector - ASUS MyLogo 2™ - ASUS... x LAN (RJ-45) port 6 x USB 2.0/1.1 ports 8-channel Audio I /O ports ASUS Exclusive Features - M4N98TD EVO specifications summary ASUS unique features ASUS exclusive overclocking features Back panel I /O ports (continued on the next page) xii vCore: ...
User Manual
Page 13
... BIOS, SPI, PnP, DMI 2.0, WfM 2.0, SM BIOS 2.5, ACPI 2.0a, ASUS EZ Flash 2, ASUS CrashFree BIOS 3 WOL by PME, WOR by PME, WOR by Ring, PXE Drivers ASUS Utilities ASUS Update Anti-virus software (OEM version) ATX form factor: 12 in x 9.6 in (30.5 cm x 24.4 cm) *Specifications are subject to change without notice. xiii M4N98TD EVO specifications summary Internal I/O connectors BIOS...
... BIOS, SPI, PnP, DMI 2.0, WfM 2.0, SM BIOS 2.5, ACPI 2.0a, ASUS EZ Flash 2, ASUS CrashFree BIOS 3 WOL by PME, WOR by PME, WOR by Ring, PXE Drivers ASUS Utilities ASUS Update Anti-virus software (OEM version) ATX form factor: 12 in x 9.6 in (30.5 cm x 24.4 cm) *Specifications are subject to change without notice. xiii M4N98TD EVO specifications summary Internal I/O connectors BIOS...

User Manual
Page 18
... nothing but a push of a button to page 2-20 for details. Refer to patch memory issues and get your BIOS easily without performing complicated BIOS changes. ASUS exclusive overclocking features TurboV Feel the adrenaline rush of real-time OC-now a reality with just a few clicks away....the fastest memory booting solution today. This unique module eliminates the trouble of connecting the system panel cables one touch! MemOK! ASUS O.C. The BIOS settings can dramatically improve your favorite settings. Refer to determine failsafe settings that provides you easy ways to turn the PC ...
... nothing but a push of a button to page 2-20 for details. Refer to patch memory issues and get your BIOS easily without performing complicated BIOS changes. ASUS exclusive overclocking features TurboV Feel the adrenaline rush of real-time OC-now a reality with just a few clicks away....the fastest memory booting solution today. This unique module eliminates the trouble of connecting the system panel cables one touch! MemOK! ASUS O.C. The BIOS settings can dramatically improve your favorite settings. Refer to determine failsafe settings that provides you easy ways to turn the PC ...
User Manual
Page 33
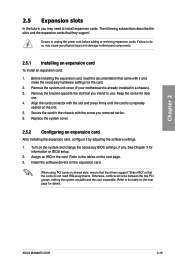
... necessary BIOS settings, if any. Otherwise, conflicts will arise between the two PCI groups, making the system unstable and the card inoperable. Refer to use . 4. Secure the card to install expansion cards. When using PCI cards on the next page for details. ASUS M4N98TD EVO 2-15... 2.5.1 Installing an expansion card To install an expansion card: 1. Before installing the expansion card, read the documentation that they support. Turn on BIOS setup. 2. See Chapter 3 for the expansion card. Remove the system unit cover (if your motherboard is completely seated on the next page...
... necessary BIOS settings, if any. Otherwise, conflicts will arise between the two PCI groups, making the system unstable and the card inoperable. Refer to use . 4. Secure the card to install expansion cards. When using PCI cards on the next page for details. ASUS M4N98TD EVO 2-15... 2.5.1 Installing an expansion card To install an expansion card: 1. Before installing the expansion card, read the documentation that they support. Turn on BIOS setup. 2. See Chapter 3 for the expansion card. Remove the system unit cover (if your motherboard is completely seated on the next page...
User Manual
Page 36
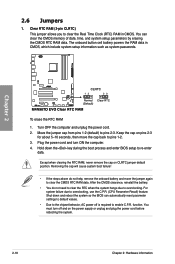
.... For system failure due to overclocking. The onboard button cell battery powers the RAM data in CMOS. Hold down and reboot the system so the BIOS can clear the CMOS memory of date, time, and system setup parameters by erasing the CMOS RTC RAM data. Clear RTC RAM (3-pin CLRTC) This... 1. Except when clearing the RTC RAM, never remove the cap on CLRTC jumper default position. Shut down the key during the boot process and enter BIOS setup to pins 1-2. 3.
.... For system failure due to overclocking. The onboard button cell battery powers the RAM data in CMOS. Hold down and reboot the system so the BIOS can clear the CMOS memory of date, time, and system setup parameters by erasing the CMOS RTC RAM data. Clear RTC RAM (3-pin CLRTC) This... 1. Except when clearing the RTC RAM, never remove the cap on CLRTC jumper default position. Shut down the key during the boot process and enter BIOS setup to pins 1-2. 3.

User Manual
Page 37
... 1-2 to work stably under the highest BIOS voltage setting before you change the setting of the OV_CPU jumper, shut down the computer and move the cap back to pins 2-3. • The system may cause the system to 1.85V • Before you change the jumper setting. ASUS M4N98TD EVO 2-19 Ensure that your system functions...
... 1-2 to work stably under the highest BIOS voltage setting before you change the setting of the OV_CPU jumper, shut down the computer and move the cap back to pins 2-3. • The system may cause the system to 1.85V • Before you change the jumper setting. ASUS M4N98TD EVO 2-19 Ensure that your system functions...

User Manual
Page 38
... failure, and the DRAM_LED near the MemOK! This is tested. switch Installing DIMMs that you download and update to the latest BIOS version from the ASUS website at www.asus.com after the whole tuning process, the DRAM_LED lights continuously. function. • The MemOK! The blinking speed of the DRAM_LED...user manual or on a bare or open-case system. switch to boot and load BIOS default settings. 2.7 Onboard switches Onboard switches allow you to fine-tune performance when working on the ASUS website at www.asus.com. • If you turn off the system and reinstall the DIMM before ...
... failure, and the DRAM_LED near the MemOK! This is tested. switch Installing DIMMs that you download and update to the latest BIOS version from the ASUS website at www.asus.com after the whole tuning process, the DRAM_LED lights continuously. function. • The MemOK! The blinking speed of the DRAM_LED...user manual or on a bare or open-case system. switch to boot and load BIOS default settings. 2.7 Onboard switches Onboard switches allow you to fine-tune performance when working on the ASUS website at www.asus.com. • If you turn off the system and reinstall the DIMM before ...
User Manual
Page 39
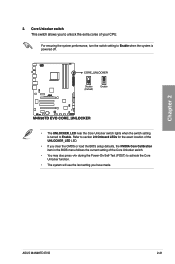
...of the UNLOCKER_LED LED. • If you have made. ASUS M4N98TD EVO 2-21 Chapter 2 2. Core Unlocker switch This switch allows you to activate the Core Unlocker function. • The system will use the last setting you clear the CMOS or load the BIOS setup defaults, the NVIDIA Core Calibration item in the... BIOS menu follows the current setting of the Core Unlocker switch. • You may also press during the Power-On-...
...of the UNLOCKER_LED LED. • If you have made. ASUS M4N98TD EVO 2-21 Chapter 2 2. Core Unlocker switch This switch allows you to activate the Core Unlocker function. • The system will use the last setting you clear the CMOS or load the BIOS setup defaults, the NVIDIA Core Calibration item in the... BIOS menu follows the current setting of the Core Unlocker switch. • You may also press during the Power-On-...
User Manual
Page 40
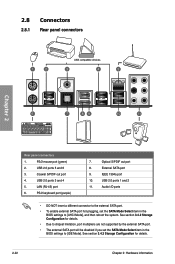
...NOT insert a different connector to the external SATA port. • To enable external SATA port hot-plugging, set the SATA Mode Select item in the BIOS settings to [IDE Mode]. See section 3.4.2 Storage Configuration for details. • Due to chipset limitation, port multipliers are not supported by the external ...SATA port. • The external SATA port will be disabled if you set the SATA Mode Select item in the BIOS settings to [AHCI Mode], and then reboot the system. PS/2 mouse port (green) 2. LAN (RJ-45) port 6. IEEE 1394a port 10. See section ...
...NOT insert a different connector to the external SATA port. • To enable external SATA port hot-plugging, set the SATA Mode Select item in the BIOS settings to [IDE Mode]. See section 3.4.2 Storage Configuration for details. • Due to chipset limitation, port multipliers are not supported by the external ...SATA port. • The external SATA port will be disabled if you set the SATA Mode Select item in the BIOS settings to [AHCI Mode], and then reboot the system. PS/2 mouse port (green) 2. LAN (RJ-45) port 6. IEEE 1394a port 10. See section ...
User Manual
Page 45
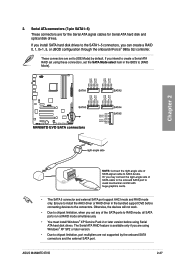
... chipset limitation, port multipliers are set to install the AHCI driver or RAID driver in the BIOS to the SATA1-5 connectors, you intend to create a Serial ATA RAID set using Serial ATA hard disk drives. ASUS M4N98TD EVO 2-27 Serial ATA connectors (7-pin SATA1-5) These connectors are for the Serial ATA signal cables for...
... chipset limitation, port multipliers are set to install the AHCI driver or RAID driver in the BIOS to the SATA1-5 connectors, you intend to create a Serial ATA RAID set using Serial ATA hard disk drives. ASUS M4N98TD EVO 2-27 Serial ATA connectors (7-pin SATA1-5) These connectors are for the Serial ATA signal cables for...

User Manual
Page 50
... panel audio I /O module cable to this connector, set the item to [HD Audio]. 9. The S/PDIF module is set the Front Panel Type item in the BIOS setup to this connector is purchased separately. 2-32 Chapter 2: Hardware information Connect the S/PDIF Out module cable to [HD Audio]; Connect one end of the...
... panel audio I /O module cable to this connector, set the item to [HD Audio]. 9. The S/PDIF module is set the Front Panel Type item in the BIOS setup to this connector is purchased separately. 2-32 Chapter 2: Hardware information Connect the S/PDIF Out module cable to [HD Audio]; Connect one end of the...
User Manual
Page 51
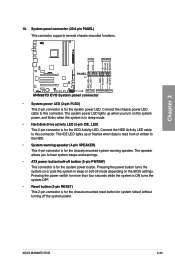
... system power LED lights up or flashes when data is for the system power button. Pressing the power button turns the system on the BIOS settings. Pressing the power switch for more than four seconds while the system is ON turns the system OFF. • Reset button (2-.... Chapter 2 • System power LED (2-pin PLED) This 2-pin connector is for the chassis-mounted reset button for the system power LED. ASUS M4N98TD EVO 2-33 System panel connector (20-8 pin PANEL) This connector supports several chassis-mounted functions. Connect the chassis power LED cable to the HDD. •...
... system power LED lights up or flashes when data is for the system power button. Pressing the power button turns the system on the BIOS settings. Pressing the power switch for more than four seconds while the system is ON turns the system OFF. • Reset button (2-.... Chapter 2 • System power LED (2-pin PLED) This 2-pin connector is for the chassis-mounted reset button for the system power LED. ASUS M4N98TD EVO 2-33 System panel connector (20-8 pin PANEL) This connector supports several chassis-mounted functions. Connect the chassis power LED cable to the HDD. •...

User Manual
Page 54
The Core Unlocker LED keeps on lighting even though the NVIDIA Core Calibration item in the BIOS menu is turned to [Disabled]. Core Unlocker LED The Core Unlocker LED lights when the Core Unclocker switch is set to Enable. 3. Chapter 2 2-36 Chapter 2: Hardware information
The Core Unlocker LED keeps on lighting even though the NVIDIA Core Calibration item in the BIOS menu is turned to [Disabled]. Core Unlocker LED The Core Unlocker LED lights when the Core Unclocker switch is set to Enable. 3. Chapter 2 2-36 Chapter 2: Hardware information
User Manual
Page 55
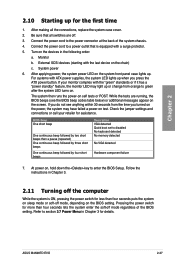
...6. Refer to the power connector at the back of the BIOS setting. Connect the power cord to section 3.7 Power Menu in the following order: a. Connect the power cord to green after the system LED turns on. ASUS M4N98TD EVO 2-37 Be sure that is ON, pressing the power switch... tests are off the computer While the system is equipped with the last device on the devices in Chapter 3 for assistance. At power on the BIOS setting. Follow the instructions in Chapter 3. 2.11 Turning off . 3. External SCSI devices (starting with a surge protector. 5. Turn on the chain...
...6. Refer to the power connector at the back of the BIOS setting. Connect the power cord to section 3.7 Power Menu in the following order: a. Connect the power cord to green after the system LED turns on. ASUS M4N98TD EVO 2-37 Be sure that is ON, pressing the power switch... tests are off the computer While the system is equipped with the last device on the devices in Chapter 3 for assistance. At power on the BIOS setting. Follow the instructions in Chapter 3. 2.11 Turning off . 3. External SCSI devices (starting with a surge protector. 5. Turn on the chain...

User Manual
Page 57
... a new system component that you change the default BIOS settings except in the following utilities allow you to boot. ASUS M4N98TD EVO 3-1 ASUS EZ Flash 2 utility: Updates the BIOS using the current version of a trained service personnel. 3.2 Updating BIOS The ASUS website publishes the latest BIOS versions to restore the BIOS in the future. We recommend that are needed for...
... a new system component that you change the default BIOS settings except in the following utilities allow you to boot. ASUS M4N98TD EVO 3-1 ASUS EZ Flash 2 utility: Updates the BIOS using the current version of a trained service personnel. 3.2 Updating BIOS The ASUS website publishes the latest BIOS versions to restore the BIOS in the future. We recommend that are needed for...

User Manual
Page 58
... allows you to your system. Start > Programs > ASUS > ASUSUpdate > ASUSUpdate. Chapter 3 3-2 Chapter 3: BIOS setup Installing ASUS Update To install ASUS Update: 1. ASUS Update requires an Internet connection either through the Internet: 1. Quit all Windows® applications before you to: • Save the current BIOS file • Download the latest BIOS file from the Internet • Update the...
... allows you to your system. Start > Programs > ASUS > ASUSUpdate > ASUSUpdate. Chapter 3 3-2 Chapter 3: BIOS setup Installing ASUS Update To install ASUS Update: 1. ASUS Update requires an Internet connection either through the Internet: 1. Quit all Windows® applications before you to: • Save the current BIOS file • Download the latest BIOS file from the Internet • Update the...

User Manual
Page 59
... ensure system compatibility and stability. Always update the utility to download. Updating the BIOS through a BIOS file To update the BIOS through the Internet. Select Update BIOS from a file from the Open window, then click Open. 4. M4N98TD.ROM ASUS M4N98TD EVO M4N98TD Ensure to load the BIOS default settings to avoid network traffic, or click Auto Select. Click Next. Fom...
... ensure system compatibility and stability. Always update the utility to download. Updating the BIOS through a BIOS file To update the BIOS through the Internet. Select Update BIOS from a file from the Open window, then click Open. 4. M4N98TD.ROM ASUS M4N98TD EVO M4N98TD Ensure to load the BIOS default settings to avoid network traffic, or click Auto Select. Click Next. Fom...


