User Manual
Page 13
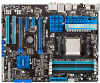
...PME, WOR by PME, PXE Drivers ASUS Utilities ASUS Update Anti-virus software (OEM version) ATX form factor: 12 in . (30.5 cm x 24.4 cm) *Specifications are subject to change without notice. M4A89TD PRO Series specifications summary Back panel I/O ports...(green) 1 x Optical S/PDIF Out port 1 x Power eSATA port 1 x IEEE 1394a port 1 x LAN (RJ-45) port 1 x Clear CMOS button For M4A89TD PRO/USB3 model: - 2 x USB 3.0/2.0 ports (blue), 6 x USB 2.0/1.1 ports For M4A89TD PRO model: - 8 x USB 2.0/1.1 ports 8-channel Audio I/O ports 3 x USB connectors support additional 6 USB ports 1 x IDE connector 6 x ...
...PME, WOR by PME, PXE Drivers ASUS Utilities ASUS Update Anti-virus software (OEM version) ATX form factor: 12 in . (30.5 cm x 24.4 cm) *Specifications are subject to change without notice. M4A89TD PRO Series specifications summary Back panel I/O ports...(green) 1 x Optical S/PDIF Out port 1 x Power eSATA port 1 x IEEE 1394a port 1 x LAN (RJ-45) port 1 x Clear CMOS button For M4A89TD PRO/USB3 model: - 2 x USB 3.0/2.0 ports (blue), 6 x USB 2.0/1.1 ports For M4A89TD PRO model: - 8 x USB 2.0/1.1 ports 8-channel Audio I/O ports 3 x USB connectors support additional 6 USB ports 1 x IDE connector 6 x ...
User Manual
Page 39
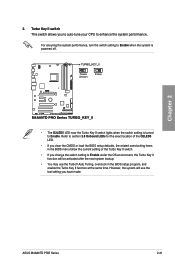
... bootup. • You may use the last setting you change the switch setting to Enable when the system is turned to enhance the system performance. ASUS M4A89TD PRO Series 2-21 Turbo Key II switch This switch allows you to auto-tune your CPU to Enable. Chapter 2 • The O2LED5 LED near the ... when the switch setting is powered off. Refer to section 2.8 Onboard LEDs for the exact location of the O2LED5 LED. • If you clear the CMOS or load the BIOS setup defaults, the related overclocking items in the BIOS setup program, and enable the Turbo Key II function at the same...
... bootup. • You may use the last setting you change the switch setting to Enable when the system is turned to enhance the system performance. ASUS M4A89TD PRO Series 2-21 Turbo Key II switch This switch allows you to auto-tune your CPU to Enable. Chapter 2 • The O2LED5 LED near the ... when the switch setting is powered off. Refer to section 2.8 Onboard LEDs for the exact location of the O2LED5 LED. • If you clear the CMOS or load the BIOS setup defaults, the related overclocking items in the BIOS setup program, and enable the Turbo Key II function at the same...
User Manual
Page 40
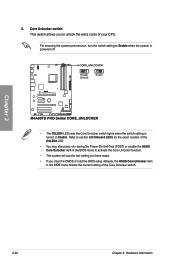
... 2.8 Onboard LEDs for the exact location of the O2LED4 LED. • You may also press during the Power-On-Self-Test (POST) or enable the ASUS Core Unlocker item in the BIOS menu follows the current setting of your CPU. For ensuring the system performance, turn the switch setting to Enable... made. • If you to unlock the extra cores of the Core Unlocker switch. 2-22 Chapter 2: Hardware information Core Unlocker switch This switch allows you clear the CMOS or load the BIOS setup defaults, the ASUS Core Unlocker item in the BIOS menu to Enable.
... 2.8 Onboard LEDs for the exact location of the O2LED4 LED. • You may also press during the Power-On-Self-Test (POST) or enable the ASUS Core Unlocker item in the BIOS menu follows the current setting of your CPU. For ensuring the system performance, turn the switch setting to Enable... made. • If you to unlock the extra cores of the Core Unlocker switch. 2-22 Chapter 2: Hardware information Core Unlocker switch This switch allows you clear the CMOS or load the BIOS setup defaults, the ASUS Core Unlocker item in the BIOS menu to Enable.
User Manual
Page 41
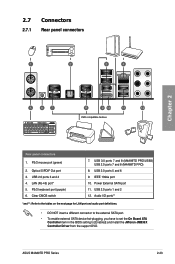
PS/2 keyboard port (purple) 6. USB 3.0 ports 7 and 8 (M4A89TD PRO/USB3) USB 2.0 ports 7 and 8 (M4A89TD PRO) 8. USB 2.0 ports 1 and 2 12. Clear CMOS switch 7. IEEE 1394a port 10. LAN (RJ-45) port* 5. Audio I/O ports** *and **: Refer to the tables on the next page for LAN port and... JMB36X Controller Driver from the support DVD. USB 2.0 ports 3 and 4 4. Power External SATA port 11. PS/2 mouse port (green) 2. Optical S/PDIF Out port 3. ASUS M4A89TD PRO Series 2-23 2.7 Connectors 2.7.1 Rear panel connectors Chapter 2 Rear panel connectors 1. USB 2.0 ports 5 and 6 9.
PS/2 keyboard port (purple) 6. USB 3.0 ports 7 and 8 (M4A89TD PRO/USB3) USB 2.0 ports 7 and 8 (M4A89TD PRO) 8. USB 2.0 ports 1 and 2 12. Clear CMOS switch 7. IEEE 1394a port 10. LAN (RJ-45) port* 5. Audio I/O ports** *and **: Refer to the tables on the next page for LAN port and... JMB36X Controller Driver from the support DVD. USB 2.0 ports 3 and 4 4. Power External SATA port 11. PS/2 mouse port (green) 2. Optical S/PDIF Out port 3. ASUS M4A89TD PRO Series 2-23 2.7 Connectors 2.7.1 Rear panel connectors Chapter 2 Rear panel connectors 1. USB 2.0 ports 5 and 6 9.

User Manual
Page 65
...not exactly match what you see on your screen. • If the system becomes unstable after changing any BIOS setting, try to clear the CMOS and reset the motherboard to select a field. If you with its test routines. Press during the Power-On Self-Test (POST) ... configuration For changing the system boot configuration For configuring options for special functions For selecting the exit options and loading default settings Chapter 3 ASUS M4A89TD PRO Series 3-9 Submenu items Navigation keys 3.3.2 Menu bar The menu bar on the system chassis. When you start up the computer, the ...
...not exactly match what you see on your screen. • If the system becomes unstable after changing any BIOS setting, try to clear the CMOS and reset the motherboard to select a field. If you with its test routines. Press during the Power-On Self-Test (POST) ... configuration For changing the system boot configuration For configuring options for special functions For selecting the exit options and loading default settings Chapter 3 ASUS M4A89TD PRO Series 3-9 Submenu items Navigation keys 3.3.2 Menu bar The menu bar on the system chassis. When you start up the computer, the ...

User Manual
Page 89
... Setup utility. The Supervisor Password item on how to change other items appear to allow change password. After you can clear clear it by erasing the CMOS Real Time Clock (RTC) RAM. The message Password Installed appears after you successfully set your BIOS password, you set ...and press to disabled password. again to display the configuration options. Allows viewing and changing all the fields in setting a user password. ASUS M4A89TD PRO Series 3-33 Confirm the password when prompted. See section 2.6 Jumper for information on top of at least six letters and/or numbers, ...
... Setup utility. The Supervisor Password item on how to change other items appear to allow change password. After you can clear clear it by erasing the CMOS Real Time Clock (RTC) RAM. The message Password Installed appears after you successfully set your BIOS password, you set ...and press to disabled password. again to display the configuration options. Allows viewing and changing all the fields in setting a user password. ASUS M4A89TD PRO Series 3-33 Confirm the password when prompted. See section 2.6 Jumper for information on top of at least six letters and/or numbers, ...

User Manual
Page 92
...Not Installed : Not Installed : Not Installed : Not Installed Tools Typing your CMOS settings in the BIOS Flash. Profile v02.61 (C)Copyright 1985-2010, American Megatrends, Inc. Load CMOS Profiles. BIOS SETUP UTILITY O.C. Profile 2 Status O.C. Profile 1 Status O.C. Add Your CMOS Profile Allows you to load the previous BIOS settings saved in the Save...This item allows you to save your profile name, [0-9][a-z][A-Z] are acceptable. Chapter 3 3-36 Chapter 3: BIOS setup Allows you enter the Express Gate environment after clearing its settings. 3.9.3 ASUS O.C.
...Not Installed : Not Installed : Not Installed : Not Installed Tools Typing your CMOS settings in the BIOS Flash. Profile v02.61 (C)Copyright 1985-2010, American Megatrends, Inc. Load CMOS Profiles. BIOS SETUP UTILITY O.C. Profile 2 Status O.C. Profile 1 Status O.C. Add Your CMOS Profile Allows you to load the previous BIOS settings saved in the Save...This item allows you to save your profile name, [0-9][a-z][A-Z] are acceptable. Chapter 3 3-36 Chapter 3: BIOS setup Allows you enter the Express Gate environment after clearing its settings. 3.9.3 ASUS O.C.


