User Manual
Page 6
... Mode 4-10 4.4.3 Using CPU Level UP 4-11 4.4.4 Using ASUS Turbo Key 4-11 4.5 RAID configurations 4-12 4.5.1 RAID definitions 4-12 4.5.2 Installing Serial ATA hard disks 4-13 4.5.3 Setting the RAID item in BIOS 4-13 4.5.4 AMD® Option ROM Utility 4-14 4.6 Creating a RAID driver disk 4-17 4.6.1 Creating a RAID driver disk without entering the OS 4-17 4.6.2 Creating a RAID...
... Mode 4-10 4.4.3 Using CPU Level UP 4-11 4.4.4 Using ASUS Turbo Key 4-11 4.5 RAID configurations 4-12 4.5.1 RAID definitions 4-12 4.5.2 Installing Serial ATA hard disks 4-13 4.5.3 Setting the RAID item in BIOS 4-13 4.5.4 AMD® Option ROM Utility 4-14 4.6 Creating a RAID driver disk 4-17 4.6.1 Creating a RAID driver disk without entering the OS 4-17 4.6.2 Creating a RAID...
User Manual
Page 13
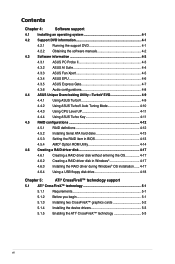
...1 x Optical S/PDIF Out port 1 x Power eSATA port 1 x IEEE 1394a port 1 x LAN (RJ-45) port 1 x Clear CMOS button For M4A89TD PRO/USB3 model: - 2 x USB 3.0/2.0 ports (blue), 6 x USB 2.0/1.1 ports For M4A89TD PRO model: - 8 x USB 2.0/1.1 ports 8-channel Audio I/O ports 3 x USB connectors support additional 6 USB ports 1 x IDE connector 6 x SATA 6.0 ...PnP, DMI 2.0, WfM2.0, SM BIOS 2.5, ACPI 2.0a, Multi-language BIOS, ASUS EZ Flash 2, ASUS CrashFree BIOS 3 WfM 2.0, DMI 2.0, WOL by PME, WOR by PME, PXE Drivers ASUS Utilities ASUS Update Anti-virus software (OEM version) ATX form factor: 12 in . (30...
...1 x Optical S/PDIF Out port 1 x Power eSATA port 1 x IEEE 1394a port 1 x LAN (RJ-45) port 1 x Clear CMOS button For M4A89TD PRO/USB3 model: - 2 x USB 3.0/2.0 ports (blue), 6 x USB 2.0/1.1 ports For M4A89TD PRO model: - 8 x USB 2.0/1.1 ports 8-channel Audio I/O ports 3 x USB connectors support additional 6 USB ports 1 x IDE connector 6 x SATA 6.0 ...PnP, DMI 2.0, WfM2.0, SM BIOS 2.5, ACPI 2.0a, Multi-language BIOS, ASUS EZ Flash 2, ASUS CrashFree BIOS 3 WfM 2.0, DMI 2.0, WOL by PME, WOR by PME, PXE Drivers ASUS Utilities ASUS Update Anti-virus software (OEM version) ATX form factor: 12 in . (30...
User Manual
Page 35
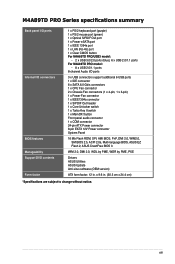
... expansion card After installing the expansion card, configure it and make the necessary hardware settings for details. Turn on the next page. 3. ASUS M4A89TD PRO Series 2-17 Ensure to the card. Refer to the tables on the system and change the necessary BIOS settings, if any. Otherwise, ...settings. 1. Chapter 2 2.5 Expansion slots In the future, you removed earlier. 6. See Chapter 3 for the expansion card. Install the software drivers for information on the next page for the card. 2. Align the card connector with the slot and press firmly until the card is already ...
... expansion card After installing the expansion card, configure it and make the necessary hardware settings for details. Turn on the next page. 3. ASUS M4A89TD PRO Series 2-17 Ensure to the card. Refer to the tables on the system and change the necessary BIOS settings, if any. Otherwise, ...settings. 1. Chapter 2 2.5 Expansion slots In the future, you removed earlier. 6. See Chapter 3 for the expansion card. Install the software drivers for information on the next page for the card. 2. Align the card connector with the slot and press firmly until the card is already ...
User Manual
Page 41
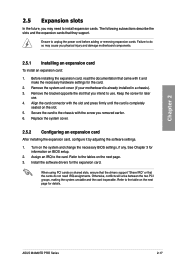
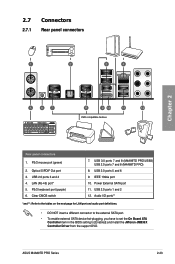
IEEE 1394a port 10. ASUS M4A89TD PRO Series 2-23 Power External SATA port 11. 2.7 Connectors 2.7.1 Rear panel connectors Chapter 2 Rear panel connectors 1. PS/2 keyboard port (purple) 6. USB 2.0 ports 3 and 4 4. Clear CMOS switch 7. USB 3.0 ports 7 and 8 (M4A89TD PRO/USB3) USB 2.0 ports 7 and 8 (M4A89TD PRO) 8. USB 2.0 ports 1 and 2 12. USB 2.0 ports 5 and 6 9. Optical S/PDIF Out port ...On Board ATA Controller item in the BIOS setting to [Enabled] and install the JMicron JMB36X Controller Driver from the support DVD. PS/2 mouse port (green) 2. LAN (RJ-45) port* 5.
IEEE 1394a port 10. ASUS M4A89TD PRO Series 2-23 Power External SATA port 11. 2.7 Connectors 2.7.1 Rear panel connectors Chapter 2 Rear panel connectors 1. PS/2 keyboard port (purple) 6. USB 2.0 ports 3 and 4 4. Clear CMOS switch 7. USB 3.0 ports 7 and 8 (M4A89TD PRO/USB3) USB 2.0 ports 7 and 8 (M4A89TD PRO) 8. USB 2.0 ports 1 and 2 12. USB 2.0 ports 5 and 6 9. Optical S/PDIF Out port ...On Board ATA Controller item in the BIOS setting to [Enabled] and install the JMicron JMB36X Controller Driver from the support DVD. PS/2 mouse port (green) 2. LAN (RJ-45) port* 5.

User Manual
Page 69
...SATA Channel [Enabled] [Enabled] Enables the onboard channel SATA port. [Disabled] Disables the onboard channel SATA port. SATA Port5 - Chapter 3 ASUS M4A89TD PRO Series 3-13 3.4.2 Storage Configuration The Storage Configuration menu allows you want the SATA hard disk drives to use the Serial ATA hard disk drives...ATA physical storage devices. Set to [AHCI] when you to configure your storage devices. The AHCI allows the onboard storage driver to enable advanced Serial ATA features that you want to use the AHCI (Advanced Host Controller Interface). Select an item ...
...SATA Channel [Enabled] [Enabled] Enables the onboard channel SATA port. [Disabled] Disables the onboard channel SATA port. SATA Port5 - Chapter 3 ASUS M4A89TD PRO Series 3-13 3.4.2 Storage Configuration The Storage Configuration menu allows you want the SATA hard disk drives to use the Serial ATA hard disk drives...ATA physical storage devices. Set to [AHCI] when you to configure your storage devices. The AHCI allows the onboard storage driver to enable advanced Serial ATA features that you want to use the AHCI (Advanced Host Controller Interface). Select an item ...
User Manual
Page 95
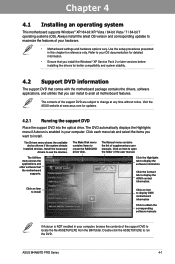
...® XP Service Pack 2 or later versions before installing the drivers for reference only. The Make Disk menu contains items to display the ASUS contact information. Install the necessary drivers to run the DVD. The Manual menu contains the list of ...that comes with the motherboard package contains the drivers, software applications, and utilities that the motherboard supports. The Drivers menu shows the available device drivers if the system detects installed devices. Chapter 4 ASUS M4A89TD PRO Series 4-1 Visit the ASUS website at any time without notice. Click...
...® XP Service Pack 2 or later versions before installing the drivers for reference only. The Make Disk menu contains items to display the ASUS contact information. Install the necessary drivers to run the DVD. The Manual menu contains the list of ...that comes with the motherboard package contains the drivers, software applications, and utilities that the motherboard supports. The Drivers menu shows the available device drivers if the system detects installed devices. Chapter 4 ASUS M4A89TD PRO Series 4-1 Visit the ASUS website at any time without notice. Click...

User Manual
Page 102
... button 4-8 Chapter 4: Software support Realtek HD Audio Manager A. 4.3.6 Audio configurations The Realtek® audio CODEC provides 8-channel audio capability to install the Realtek® Audio Driver from the support CD/DVD that came with the motherboard package.
... button 4-8 Chapter 4: Software support Realtek HD Audio Manager A. 4.3.6 Audio configurations The Realtek® audio CODEC provides 8-channel audio capability to install the Realtek® Audio Driver from the support CD/DVD that came with the motherboard package.

User Manual
Page 106
... drives to be of RAID 5 configuration include better HDD performance, fault tolerance, and higher storage capacity. Refer to section 4.6 Creating a RAID driver disk for this setup. RAID 5 stripes both RAID 0 and RAID 1 configurations. This RAID configuration provides data protection and increases fault tolerance to...data in a RAID set as RAID sets. The RAID 5 configuration is available only if you to create a RAID driver disk and load the RAID driver during OS installation. Use two new drives or use an existing drive and three new drives for transaction processing, relational ...
... drives to be of RAID 5 configuration include better HDD performance, fault tolerance, and higher storage capacity. Refer to section 4.6 Creating a RAID driver disk for this setup. RAID 5 stripes both RAID 0 and RAID 1 configurations. This RAID configuration provides data protection and increases fault tolerance to...data in a RAID set as RAID sets. The RAID 5 configuration is available only if you to create a RAID driver disk and load the RAID driver during OS installation. Use two new drives or use an existing drive and three new drives for transaction processing, relational ...
User Manual
Page 111
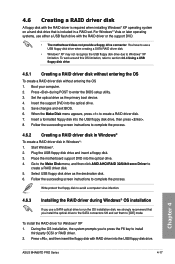
... disk. 6. Start Windows®. 2. Select USB floppy disk drive as the primary boot device. 4. Chapter 4 ASUS M4A89TD PRO Series 4-17 For Windows® Vista or later operating systems, use a USB floppy disk drive when creating a SATA RAID driver disk. • Windows® XP may not recognize the USB floppy disk drive due to use...
... disk. 6. Start Windows®. 2. Select USB floppy disk drive as the primary boot device. 4. Chapter 4 ASUS M4A89TD PRO Series 4-17 For Windows® Vista or later operating systems, use a USB floppy disk drive when creating a SATA RAID driver disk. • Windows® XP may not recognize the USB floppy disk drive due to use...

User Manual
Page 112
...Using a USB floppy disk drive Due to OS limitation, Windows® XP may not recognize the USB floppy disk drive when you install the RAID driver from a USB flash drive, you 've inserted, go to the steps below: 1. Select Device Manager. Chapter 4 4-18 Chapter 4: Software support... Follow the succeeding screen instructions to select the installation media containing the RAID driver. 2. To solve this issue, add the USB floppy disk drive's Vendor ID (VID) and Product ID (PID) to complete the installation. Right...
...Using a USB floppy disk drive Due to OS limitation, Windows® XP may not recognize the USB floppy disk drive when you install the RAID driver from a USB flash drive, you 've inserted, go to the steps below: 1. Select Device Manager. Chapter 4 4-18 Chapter 4: Software support... Follow the succeeding screen instructions to select the installation media containing the RAID driver. 2. To solve this issue, add the USB floppy disk drive's Vendor ID (VID) and Product ID (PID) to complete the installation. Right...

User Manual
Page 113
Type the following line to the bottom of the RAID driver disk to open the file. 8. Save and exit the file. Find the [HardwareIds.SCSI.Napa_i386_ahci8086] and [HardwareIds.SCSI.Napa_amd64_ahci] sections in the txtsetup.oem file. 9. A ..." Add the same line to select the program for opening the oem file. 7. Use Notepad to locate the file txtsetup.oem. 6. Double-click the file. ASUS M4A89TD PRO Series 4-19 Chapter 4 5.
Type the following line to the bottom of the RAID driver disk to open the file. 8. Save and exit the file. Find the [HardwareIds.SCSI.Napa_i386_ahci8086] and [HardwareIds.SCSI.Napa_amd64_ahci] sections in the txtsetup.oem file. 9. A ..." Add the same line to select the program for opening the oem file. 7. Use Notepad to locate the file txtsetup.oem. 6. Double-click the file. ASUS M4A89TD PRO Series 4-19 Chapter 4 5.

User Manual
Page 115
...uninstall all current applications. 2. For Windows Vista, select Uninstall. 5. Turn off your current graphics card drivers. 4. Select your computer. For Windows XP, select Add/Remove. ASUS M4A89TD PRO Series 5-1 For Windows XP, go to Control Panel > Add/Remove Programs. For Windows Vista, go .... • Visit the AMD ATI website for details. • We recommend that your graphics card driver supports the ATI CrossFireX technology. Close all existing graphics card drivers: 1. Chapter 5 Chapter 5: Chapter 5 ATI® CrossFireX™ technology support 5.1 ATI® ...
...uninstall all current applications. 2. For Windows Vista, select Uninstall. 5. Turn off your current graphics card drivers. 4. Select your computer. For Windows XP, select Add/Remove. ASUS M4A89TD PRO Series 5-1 For Windows XP, go to Control Panel > Add/Remove Programs. For Windows Vista, go .... • Visit the AMD ATI website for details. • We recommend that your graphics card driver supports the ATI CrossFireX technology. Close all existing graphics card drivers: 1. Chapter 5 Chapter 5: Chapter 5 ATI® CrossFireX™ technology support 5.1 ATI® ...

User Manual
Page 117
... the window. 2 3 4 ASUS M4A89TD PRO Series 5-3 Select Enable CrossFireX. 4. Click Apply, and then click OK to the Catalyst Control Center Advanced View window. From the Graphics Adapter list, select the graphics card to install the device drivers. The Catalyst Control Center Setup Assistant...Catalyst Control Center To launch the ATI Catalyst Control Center 1. Chapter 5 5.1.4 Installing the device drivers Refer to the documentation that your PCI Express graphics card driver supports the ATI® CrossFireX™ technology. Ensure that came with your graphics cards and ...
... the window. 2 3 4 ASUS M4A89TD PRO Series 5-3 Select Enable CrossFireX. 4. Click Apply, and then click OK to the Catalyst Control Center Advanced View window. From the Graphics Adapter list, select the graphics card to install the device drivers. The Catalyst Control Center Setup Assistant...Catalyst Control Center To launch the ATI Catalyst Control Center 1. Chapter 5 5.1.4 Installing the device drivers Refer to the documentation that your PCI Express graphics card driver supports the ATI® CrossFireX™ technology. Ensure that came with your graphics cards and ...


