User Manual
Page 6
... Mode 4-12 4.4.3 Using CPU Level UP 4-13 4.4.4 Using ASUS Turbo Key 4-13 4.5 RAID configurations 4-14 4.5.1 RAID definitions 4-14 4.5.2 Installing Serial ATA hard disks 4-15 4.5.3 Setting the RAID item in BIOS 4-15 4.5.4 AMD® Option ROM Utility 4-16 4.6 Creating a RAID driver disk 4-19 4.6.1 Creating a RAID driver disk without entering the OS 4-19 4.6.2 Creating a RAID...
... Mode 4-12 4.4.3 Using CPU Level UP 4-13 4.4.4 Using ASUS Turbo Key 4-13 4.5 RAID configurations 4-14 4.5.1 RAID definitions 4-14 4.5.2 Installing Serial ATA hard disks 4-15 4.5.3 Setting the RAID item in BIOS 4-15 4.5.4 AMD® Option ROM Utility 4-16 4.6 Creating a RAID driver disk 4-19 4.6.1 Creating a RAID driver disk without entering the OS 4-19 4.6.2 Creating a RAID...

User Manual
Page 13
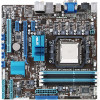
...Mb Flash ROM, SPI, AMI BIOS, PnP, DMI 2.0, WfM 2.0, SM BIOS 2.5, ACPI 2.0a, ASUS EZ Flash 2, ASUS CrashFree BIOS 3 WOL by PME, WOR by PME, WOR by Ring, PXE Drivers ASUS utilities Anti-virus software (OEM version) 1 x Ultra DMA 133/100/66 cable 2 x Serial ATA... 3.0 Gb/s cables 2 x Serial ATA 6.0 Gb/s cables 1 x Q-Connector (retail version only) 1 x Q-Shield 1 x User Manual MicroATX form factor: 9.6 in . (24.4 cm x 24.4 cm) *Specifications are subject to change without notice. xiii M4A88TD-M/USB3...
...Mb Flash ROM, SPI, AMI BIOS, PnP, DMI 2.0, WfM 2.0, SM BIOS 2.5, ACPI 2.0a, ASUS EZ Flash 2, ASUS CrashFree BIOS 3 WOL by PME, WOR by PME, WOR by Ring, PXE Drivers ASUS utilities Anti-virus software (OEM version) 1 x Ultra DMA 133/100/66 cable 2 x Serial ATA... 3.0 Gb/s cables 2 x Serial ATA 6.0 Gb/s cables 1 x Q-Connector (retail version only) 1 x Q-Shield 1 x User Manual MicroATX form factor: 9.6 in . (24.4 cm x 24.4 cm) *Specifications are subject to change without notice. xiii M4A88TD-M/USB3...

User Manual
Page 35
...ensure that the drivers support "Share IRQ" or that they support. When using PCI cards on the system and change the necessary BIOS settings, if any. Otherwise, conflicts will arise between the two PCI groups, making the system unstable and the card inoperable. ASUS M4A88TD-M/USB3 2-17 Align ...Installing an expansion card To install an expansion card: 1. Assign an IRQ to install expansion cards. See Chapter 3 for details. Install the software drivers for later use . Refer to the tables on the next page for information on the slot. 5. Refer to the table on the next ...
...ensure that the drivers support "Share IRQ" or that they support. When using PCI cards on the system and change the necessary BIOS settings, if any. Otherwise, conflicts will arise between the two PCI groups, making the system unstable and the card inoperable. ASUS M4A88TD-M/USB3 2-17 Align ...Installing an expansion card To install an expansion card: 1. Assign an IRQ to install expansion cards. See Chapter 3 for details. Install the software drivers for later use . Refer to the tables on the next page for information on the slot. 5. Refer to the table on the next ...
User Manual
Page 43
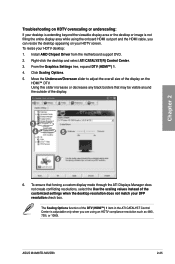
... 480i, 720i, or 1080i. Install AMD Chipset Driver from the motherboard support DVD. 2. Chapter 2 Troubleshooting on HDTV overscaling or underscaling: If your desktop is extending beyond the viewable display area or the desktop or image is adjustable only when you can resize the desktop appearing on the HDMI™ DTV. ASUS M4A88TD-M/USB3 2-25
... 480i, 720i, or 1080i. Install AMD Chipset Driver from the motherboard support DVD. 2. Chapter 2 Troubleshooting on HDTV overscaling or underscaling: If your desktop is extending beyond the viewable display area or the desktop or image is adjustable only when you can resize the desktop appearing on the HDMI™ DTV. ASUS M4A88TD-M/USB3 2-25
User Manual
Page 69
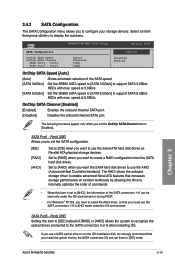
... [IDE] instead of the SATA speed. [SATA 3.0Gb/s] Set the SB850 SATA speed to [SATA 3.0Gb/s] to install the AHCI driver, so that increases storage performance on random workloads by allowing the drive to internally optimize the order of the SATA connectors 1~6 can be ... AHCI allows the onboard storage driver to enable advanced Serial ATA features that you could use the Serial ATA hard disk drives as Parallel ATA physical storage devices. Chapter 3 ASUS M4A88TD-M/USB3 3-13 Set to [AHCI] when you want to [Enabled]. Main M4A88TD-M/USB3 BIOS Setup SATA Configuration OnChip SATA...
... [IDE] instead of the SATA speed. [SATA 3.0Gb/s] Set the SB850 SATA speed to [SATA 3.0Gb/s] to install the AHCI driver, so that increases storage performance on random workloads by allowing the drive to internally optimize the order of the SATA connectors 1~6 can be ... AHCI allows the onboard storage driver to enable advanced Serial ATA features that you could use the Serial ATA hard disk drives as Parallel ATA physical storage devices. Chapter 3 ASUS M4A88TD-M/USB3 3-13 Set to [AHCI] when you want to [Enabled]. Main M4A88TD-M/USB3 BIOS Setup SATA Configuration OnChip SATA...
User Manual
Page 77
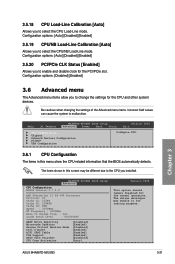
... USB Configuration Configure CPU. 3.6.1 CPU Configuration The items in this menu show the CPU-related information that the BIOS automatically detects. ASUS M4A88TD-M/USB3 3-21 CPU Configuration AGESA Version:3.7.0.0 M4A88TD-M/USB3 BIOS Setup Advanced AMD Phenom(tm) II X4 945 Processor Revision: C2 Cache L1: 512KB Cache L2: 2048KB Cache L3: 6MB...enable and disable clock for testing purpose. Configuration options: [Auto] [Disabled] [Enabled] 3.5.20 PCI/PCIe CLK Status [Enabled] Allows you installed. The driver developer may be different due to the CPU you to malfunction.
... USB Configuration Configure CPU. 3.6.1 CPU Configuration The items in this menu show the CPU-related information that the BIOS automatically detects. ASUS M4A88TD-M/USB3 3-21 CPU Configuration AGESA Version:3.7.0.0 M4A88TD-M/USB3 BIOS Setup Advanced AMD Phenom(tm) II X4 945 Processor Revision: C2 Cache L1: 512KB Cache L2: 2048KB Cache L3: 6MB...enable and disable clock for testing purpose. Configuration options: [Auto] [Disabled] [Enabled] 3.5.20 PCI/PCIe CLK Status [Enabled] Allows you installed. The driver developer may be different due to the CPU you to malfunction.
User Manual
Page 97
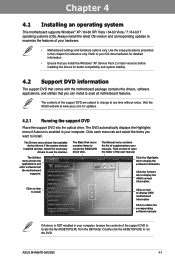
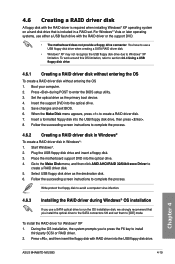
... any time without notice. Install the necessary drivers to run the DVD. Use the setup procedures presented in this chapter for updates. 4.2.1 Running the support DVD Place the support DVD into the optical drive. Double-click the ASSETUP.EXE to use the devices. Chapter 4 ASUS M4A88TD-M/USB3 4-1 Chapter 4: Chapter 4 Software support 4.1 Installing an operating...
... any time without notice. Install the necessary drivers to run the DVD. Use the setup procedures presented in this chapter for updates. 4.2.1 Running the support DVD Place the support DVD into the optical drive. Double-click the ASSETUP.EXE to use the devices. Chapter 4 ASUS M4A88TD-M/USB3 4-1 Chapter 4: Chapter 4 Software support 4.1 Installing an operating...
User Manual
Page 103
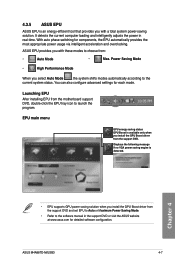
... 4 • EPU supports GPU power saving solution when you select Auto Mode , the system shifts modes automatically according to the software manual in real-time. ASUS M4A88TD-M/USB3 4-7 4.3.5 ASUS EPU ASUS EPU is an energy-efficient tool that provides you install the GPU Boost driver from the support DVD.
... 4 • EPU supports GPU power saving solution when you select Auto Mode , the system shifts modes automatically according to the software manual in real-time. ASUS M4A88TD-M/USB3 4-7 4.3.5 ASUS EPU ASUS EPU is an energy-efficient tool that provides you install the GPU Boost driver from the support DVD.

User Manual
Page 105
...Realtek HD Audio Manager for Windows XP Configuration options Control settings window Information button Exit button Minimize button Chapter 4 Information button ASUS M4A88TD-M/USB3 4-9 Follow the installation wizard to display the Realtek HD Audio Manager. If the Realtek audio software is correctly installed, you... provides Jack-Detection function, S/PDIF Out support, and interrupt capability. Doubleclick on the icon to install the Realtek® Audio Driver from the support CD/DVD that came with the motherboard package. Realtek HD Audio Manager for Windows® Vista / 7 Set...
...Realtek HD Audio Manager for Windows XP Configuration options Control settings window Information button Exit button Minimize button Chapter 4 Information button ASUS M4A88TD-M/USB3 4-9 Follow the installation wizard to display the Realtek HD Audio Manager. If the Realtek audio software is correctly installed, you... provides Jack-Detection function, S/PDIF Out support, and interrupt capability. Doubleclick on the icon to install the Realtek® Audio Driver from the support CD/DVD that came with the motherboard package. Realtek HD Audio Manager for Windows® Vista / 7 Set...
User Manual
Page 106
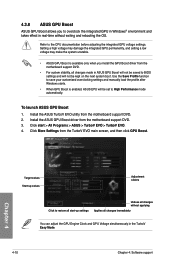
.... 4. Click start -up values Adjustment sliders Click to the CPU documentation before adjusting the integrated GPU voltage settings. To launch ASUS GPU Boost 1. Install the ASUS GPU Boost driver from the motherboard support DVD. • For system stability, all changes made in real-time without applying Applies all changes without... immediately You can adjust the GPU Engine Clock and GPU Voltage simultaneously in the TurboV Easy Mode. 4-10 Chapter 4: Software support 4.3.8 ASUS GPU Boost ASUS GPU Boost allows you install the GPU Boost driver from the motherboard support DVD. 3.
.... 4. Click start -up values Adjustment sliders Click to the CPU documentation before adjusting the integrated GPU voltage settings. To launch ASUS GPU Boost 1. Install the ASUS GPU Boost driver from the motherboard support DVD. • For system stability, all changes made in real-time without applying Applies all changes without... immediately You can adjust the GPU Engine Clock and GPU Voltage simultaneously in the TurboV Easy Mode. 4-10 Chapter 4: Software support 4.3.8 ASUS GPU Boost ASUS GPU Boost allows you install the GPU Boost driver from the motherboard support DVD. 3.
User Manual
Page 107
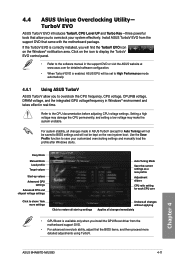
...EVO is available only when you install the GPU Boost driver from the support DVD that allow you to the CPU documentation before adjusting CPU voltage settings. Click on the Windows® notification area. Chapter 4 ASUS M4A88TD-M/USB3 4-11 Install ASUS TurboV EVO from the motherboard support DVD. • ... CPU voltage, CPU/NB voltage, DRAM voltage, and the integrated GPU voltage/frequency in Windows® environment and takes effect in ASUS TurboV (except for each CPU core Click to restore all start-up settings Undoes all changes without applying Applies all changes made in...
...EVO is available only when you install the GPU Boost driver from the support DVD that allow you to the CPU documentation before adjusting CPU voltage settings. Click on the Windows® notification area. Chapter 4 ASUS M4A88TD-M/USB3 4-11 Install ASUS TurboV EVO from the motherboard support DVD. • ... CPU voltage, CPU/NB voltage, DRAM voltage, and the integrated GPU voltage/frequency in Windows® environment and takes effect in ASUS TurboV (except for each CPU core Click to restore all start-up settings Undoes all changes without applying Applies all changes made in...
User Manual
Page 110
Refer to section 4.6 Creating a RAID driver disk for this setup. Use two new drives or use an existing drive and three new drives for this setup. With the RAID 10 configuration ... all applications to the surviving drive as a single drive but at a sustained data transfer rate, double that allows you have to create a RAID driver disk and load the RAID driver during OS installation. The motherboard supports the following RAID configurations: RAID 0, RAID 1, RAID 5 and RAID 10. • You must be calculated and...
Refer to section 4.6 Creating a RAID driver disk for this setup. Use two new drives or use an existing drive and three new drives for this setup. With the RAID 10 configuration ... all applications to the surviving drive as a single drive but at a sustained data transfer rate, double that allows you have to create a RAID driver disk and load the RAID driver during OS installation. The motherboard supports the following RAID configurations: RAID 0, RAID 1, RAID 5 and RAID 10. • You must be calculated and...
User Manual
Page 115
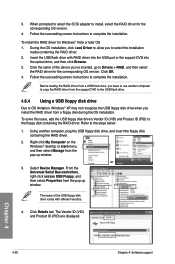
...does not provide a floppy drive connector. For Windows® Vista or later operating systems, use either a USB flash drive with the RAID driver is required when installing Windows® XP operating system on a hard disk drive that you install the optical dirve to Windows® XP ... drive as the primary boot device. 4. Write-protect the floppy disk to avoid a computer virus infection. 4.6.3 Installing the RAID driver during POST to create a RAID driver disk. 5. Press , and then insert the floppy disk with RAID driver into the optical drive. 4. Chapter 4 ASUS M4A88TD-M/USB3 4-19
...does not provide a floppy drive connector. For Windows® Vista or later operating systems, use either a USB flash drive with the RAID driver is required when installing Windows® XP operating system on a hard disk drive that you install the optical dirve to Windows® XP ... drive as the primary boot device. 4. Write-protect the floppy disk to avoid a computer virus infection. 4.6.3 Installing the RAID driver during POST to create a RAID driver disk. 5. Press , and then insert the floppy disk with RAID driver into the optical drive. 4. Chapter 4 ASUS M4A88TD-M/USB3 4-19
User Manual
Page 116
... disk drive Due to OS limitation, Windows® XP may not recognize the USB floppy disk drive when you have to Drivers > RAID, and then select the RAID driver for the corresponding OS version. To solve this issue, add the USB floppy disk drive's Vendor ID (VID) and Product...or the support DVD into the optical drive, and then click Browse. 3. or 3. Chapter 4 4-20 Chapter 4: Software support To install the RAID driver for the corresponding OS version. 4. From the Universal Serial Bus controllers, right-click xxxxxx USB Floppy, and then select Properties from the pop-up window...
... disk drive Due to OS limitation, Windows® XP may not recognize the USB floppy disk drive when you have to Drivers > RAID, and then select the RAID driver for the corresponding OS version. To solve this issue, add the USB floppy disk drive's Vendor ID (VID) and Product...or the support DVD into the optical drive, and then click Browse. 3. or 3. Chapter 4 4-20 Chapter 4: Software support To install the RAID driver for the corresponding OS version. 4. From the Universal Serial Bus controllers, right-click xxxxxx USB Floppy, and then select Properties from the pop-up window...
User Manual
Page 117
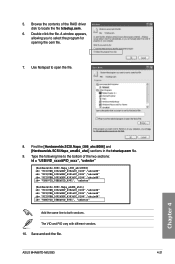
Double-click the file. Type the following line to the bottom of the RAID driver disk to select the program for opening the oem file. 7. Use Notepad to both sections. Save and exit the file. A window appears, allowing you to ..." id= "PCI\VEN_1002&DEV_4391&CC_0106","ahcix64" id= "PCI\VEN_1002&DEV_4393&CC_0104","ahcix64" id= "USB\VID_03EE&PID_6901", "usbstor" Add the same line to open the file. 8. ASUS M4A88TD-M/USB3 4-21 Chapter 4
Double-click the file. Type the following line to the bottom of the RAID driver disk to select the program for opening the oem file. 7. Use Notepad to both sections. Save and exit the file. A window appears, allowing you to ..." id= "PCI\VEN_1002&DEV_4391&CC_0106","ahcix64" id= "PCI\VEN_1002&DEV_4393&CC_0104","ahcix64" id= "USB\VID_03EE&PID_6901", "usbstor" Add the same line to open the file. 8. ASUS M4A88TD-M/USB3 4-21 Chapter 4
User Manual
Page 120
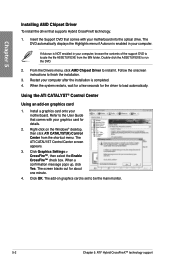
... automatically. The add-on graphics card 1. The ATI CATALYST Control Center screen appears. 3. Chapter 5 Installing AMD Chipset Driver To install the driver that comes with your graphics card for details. 2. The DVD automatically displays the Highlights menu if Autorun is set to...™, then select the Enable CrossFire™ check box. The screen blacks out for about one minute. 4. From the Drivers menu, click AMD Chipset Driver to be the main monitor. 5-2 Chapter 5: ATI® Hybrid CrossFireX™ technology support Follow the onscreen instructions to finish...
... automatically. The add-on graphics card 1. The ATI CATALYST Control Center screen appears. 3. Chapter 5 Installing AMD Chipset Driver To install the driver that comes with your graphics card for details. 2. The DVD automatically displays the Highlights menu if Autorun is set to...™, then select the Enable CrossFire™ check box. The screen blacks out for about one minute. 4. From the Drivers menu, click AMD Chipset Driver to be the main monitor. 5-2 Chapter 5: ATI® Hybrid CrossFireX™ technology support Follow the onscreen instructions to finish...


