User Manual
Page 15
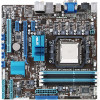
... 1 x 2-in your package with the list below. 1.2 Package contents Check your retailer. • The illustrated items above are for buying an ASUS® M4A88TD-M/USB3 motherboard! ASUS M4A88TD-M/USB3 1-1 The motherboard delivers a host of ASUS quality motherboards! Chapter 1 Chapter 1: Chapter 1 Product introduction 1.1 Welcome! Thank you start installing the motherboard, and hardware devices on it another standout in...
... 1 x 2-in your package with the list below. 1.2 Package contents Check your retailer. • The illustrated items above are for buying an ASUS® M4A88TD-M/USB3 motherboard! ASUS M4A88TD-M/USB3 1-1 The motherboard delivers a host of ASUS quality motherboards! Chapter 1 Chapter 1: Chapter 1 Product introduction 1.1 Welcome! Thank you start installing the motherboard, and hardware devices on it another standout in...
User Manual
Page 17
... moderating power usage for critical PC components in real time for the CPU under heavy loading or overclocking modes. ASUS M4A88TD-M/USB3 1-3 beginners can achieve extreme yet stable overclocking results with just a simple switch. User-friendly UI facilitates flexible frequency...you with quick access to the Internet and key applications before entering the Windows® OS. 1.3.5 ASUS unique features ASUS Power Solutions ASUS Power solutions intelligently and automatically provide balanced computing power and energy consumption. 4+1 Phase Power Design Unleashes ultimate...
... moderating power usage for critical PC components in real time for the CPU under heavy loading or overclocking modes. ASUS M4A88TD-M/USB3 1-3 beginners can achieve extreme yet stable overclocking results with just a simple switch. User-friendly UI facilitates flexible frequency...you with quick access to the Internet and key applications before entering the Windows® OS. 1.3.5 ASUS unique features ASUS Power Solutions ASUS Power solutions intelligently and automatically provide balanced computing power and energy consumption. 4+1 Phase Power Design Unleashes ultimate...
User Manual
Page 19
... install or remove any component, ensure that the ATX power supply is switched off or the power cord is detached from the power supply. Chapter 2 ASUS M4A88TD-M/USB3 2-1
... install or remove any component, ensure that the ATX power supply is switched off or the power cord is detached from the power supply. Chapter 2 ASUS M4A88TD-M/USB3 2-1
User Manual
Page 21
... panel audio connector (10-1 pin AAFP) Page 2-32 2-33 2-5 2-10 2-31 2-29 2-36 2-21 2-28 2-20 2-29 2-34 2-36 2-30 2-37 2-22 2-32 2-31 Chapter 2 ASUS M4A88TD-M/USB3 2-3 LPT connector (26-1 pin LPT) 7. Clear RTC RAM (3-pin CLRTC) 11. Standby power LED (SB_PWR) 14. DRAM LED (DRAM_LED) 8. Core Unlocker LED (O2LED1) 16. switch...
... panel audio connector (10-1 pin AAFP) Page 2-32 2-33 2-5 2-10 2-31 2-29 2-36 2-21 2-28 2-20 2-29 2-34 2-36 2-30 2-37 2-22 2-32 2-31 Chapter 2 ASUS M4A88TD-M/USB3 2-3 LPT connector (26-1 pin LPT) 7. Clear RTC RAM (3-pin CLRTC) 11. Standby power LED (SB_PWR) 14. DRAM LED (DRAM_LED) 8. Core Unlocker LED (O2LED1) 16. switch...
User Manual
Page 23
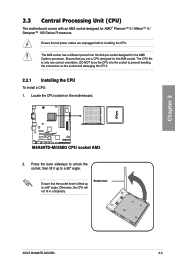
...® Phenom™ II / Athlon™ II / Sempron™ 100 Series Processors. Ensure that all power cables are unplugged before installing the CPU. Socket lever ASUS M4A88TD-M/USB3 2-5
...® Phenom™ II / Athlon™ II / Sempron™ 100 Series Processors. Ensure that all power cables are unplugged before installing the CPU. Socket lever ASUS M4A88TD-M/USB3 2-5
User Manual
Page 25
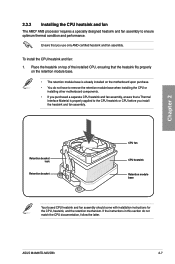
... the latter. Place the heatsink on the retention module base. • The retention module base is properly applied to ensure optimum thermal condition and performance. ASUS M4A88TD-M/USB3 2-7 Ensure that the heatsink fits properly on top of the installed CPU, ensuring that you install the heatsink and fan assembly. 2.3.2 Installing the CPU heatsink...
... the latter. Place the heatsink on the retention module base. • The retention module base is properly applied to ensure optimum thermal condition and performance. ASUS M4A88TD-M/USB3 2-7 Ensure that the heatsink fits properly on top of the installed CPU, ensuring that you install the heatsink and fan assembly. 2.3.2 Installing the CPU heatsink...
User Manual
Page 27
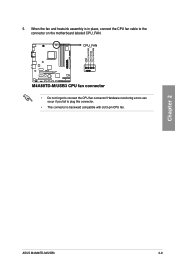
5. When the fan and heatsink assembly is backward compatible with old 3-pin CPU fan. Hardware monitoring errors can occur if you fail to plug this connector. • This connector is in place, connect the CPU fan cable to the connector on the motherboard labeled CPU_FAN. • Do not forget to connect the CPU fan connector! Chapter 2 ASUS M4A88TD-M/USB3 2-9
5. When the fan and heatsink assembly is backward compatible with old 3-pin CPU fan. Hardware monitoring errors can occur if you fail to plug this connector. • This connector is in place, connect the CPU fan cable to the connector on the motherboard labeled CPU_FAN. • Do not forget to connect the CPU fan connector! Chapter 2 ASUS M4A88TD-M/USB3 2-9

User Manual
Page 29
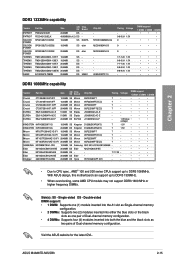
... may operate at http://support.microsoft.com/kb/929605/en-us. • This motherboard does not support DIMMs made up to DDR3 1066MHz. ASUS M4A88TD-M/USB3 2-11 Under the default state, some AMD CPUs may not support DDR3 1600MHz or higher frequency DIMMs. • Due to the memory address... system to support a full memory load (4 DIMMs) or overclocking condition. Use a maximum of the following: - For more on the motherboard. With ASUS design, this motherboard can be about 3GB or less. The system maps the total size of accessing information from the same vendor. • Due to...
... may operate at http://support.microsoft.com/kb/929605/en-us. • This motherboard does not support DIMMs made up to DDR3 1066MHz. ASUS M4A88TD-M/USB3 2-11 Under the default state, some AMD CPUs may not support DDR3 1600MHz or higher frequency DIMMs. • Due to the memory address... system to support a full memory load (4 DIMMs) or overclocking condition. Use a maximum of the following: - For more on the motherboard. With ASUS design, this motherboard can be about 3GB or less. The system maps the total size of accessing information from the same vendor. • Due to...
User Manual
Page 33
...2048MB TMS2GB364D081-138EY 2048MB TMS2GB364D082-138EW 2048MB E41302GP0-73BDB 2048MB SS SS DS DS DS DS UMAX Chip NO. With ASUS design, this motherboard can support up to DDR3 1333MHz. • When overclocking, some AMD CPU models may ... PATRIOT SILICON POWER SILICON POWER SILICON POWER TAKEMS TAKEMS TAKEMS TAKEMS TAKEMS UMAX Part No. Visit the ASUS website for the latest QVL. NT5CB128M8AN-CG N2CB1680AN-C6 N2CB1680AN-C6 U2S24D30TP-13 Timing Voltage - - 9-9-9-24 1.5V 9 - ASUS M4A88TD-M/USB3 2-15 DIMM support 1 DIMM 2 DIMM 4 DIMM • • • • &#...
...2048MB TMS2GB364D081-138EY 2048MB TMS2GB364D082-138EW 2048MB E41302GP0-73BDB 2048MB SS SS DS DS DS DS UMAX Chip NO. With ASUS design, this motherboard can support up to DDR3 1333MHz. • When overclocking, some AMD CPU models may ... PATRIOT SILICON POWER SILICON POWER SILICON POWER TAKEMS TAKEMS TAKEMS TAKEMS TAKEMS UMAX Part No. Visit the ASUS website for the latest QVL. NT5CB128M8AN-CG N2CB1680AN-C6 N2CB1680AN-C6 U2S24D30TP-13 Timing Voltage - - 9-9-9-24 1.5V 9 - ASUS M4A88TD-M/USB3 2-15 DIMM support 1 DIMM 2 DIMM 4 DIMM • • • • &#...

User Manual
Page 35
... expansion card After installing the expansion card, configure it and make the necessary hardware settings for later use . When using PCI cards on BIOS setup. 2. ASUS M4A88TD-M/USB3 2-17 Remove the bracket opposite the slot that the cards do so may need IRQ assignments. Refer to the table on the system and change...
... expansion card After installing the expansion card, configure it and make the necessary hardware settings for later use . When using PCI cards on BIOS setup. 2. ASUS M4A88TD-M/USB3 2-17 Remove the bracket opposite the slot that the cards do so may need IRQ assignments. Refer to the table on the system and change...
User Manual
Page 37
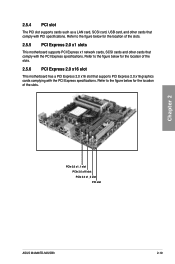
... slot This motherboard has a PCI Express 2.0 x16 slot that comply with PCI specifications. Chapter 2 PCIe 2.0 x1_1 slot PCIe 2.0 x16 slot PCIe 2.0 x1_2 slot PCI slot ASUS M4A88TD-M/USB3 2-19 2.5.4 PCI slot The PCI slot supports cards such as a LAN card, SCSI card, USB card, and other cards that comply with the PCI Express...
... slot This motherboard has a PCI Express 2.0 x16 slot that comply with PCI specifications. Chapter 2 PCIe 2.0 x1_1 slot PCIe 2.0 x16 slot PCIe 2.0 x1_2 slot PCI slot ASUS M4A88TD-M/USB3 2-19 2.5.4 PCI slot The PCI slot supports cards such as a LAN card, SCSI card, USB card, and other cards that comply with the PCI Express...
User Manual
Page 39
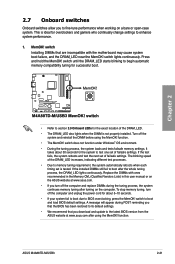
MemOK! switch Installing DIMMs that you download and update to the latest BIOS version from the ASUS website at www.asus.com. • If you turn off the computer and unplug the power cord for about 30 seconds for the exact location of failsafe settings. ... after using the MemOK! To stop memory tuning, turn off the system and reinstall the DIMM before using the MemOK! function. • The MemOK! ASUS M4A88TD-M/USB3 2-21 switch until the DRAM_LED starts blinking to section 2.9 Onboard LEDs for the system to test one set of the DRAM_LED. • The DRAM_LED also...
MemOK! switch Installing DIMMs that you download and update to the latest BIOS version from the ASUS website at www.asus.com. • If you turn off the computer and unplug the power cord for about 30 seconds for the exact location of failsafe settings. ... after using the MemOK! To stop memory tuning, turn off the system and reinstall the DIMM before using the MemOK! function. • The MemOK! ASUS M4A88TD-M/USB3 2-21 switch until the DRAM_LED starts blinking to section 2.9 Onboard LEDs for the system to test one set of the DRAM_LED. • The DRAM_LED also...
User Manual
Page 41
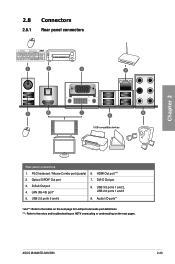
2.8 Connectors 2.8.1 Rear panel connectors Chapter 2 Rear panel connectors 1. USB 2.0 ports 5 and 6 9. Audio I/O ports** *and **: Refer to the tables on the next page for LAN port and audio port definitions. ***: Refer to the notes and troubleshooting on HDTV overscaling or underscaling on the next pages. ASUS M4A88TD-M/USB3 2-23 USB 3.0 ports 1 and 2, USB 2.0 ports 1 and 2 5. Optical S/PDIF Out port 7. HDMI Out port*** 2. PS/2 keyboard / Mouse Combo port (purple) 6. LAN (RJ-45) port* 8. DVI-D Out pot 3. D-Sub Out port 4.
2.8 Connectors 2.8.1 Rear panel connectors Chapter 2 Rear panel connectors 1. USB 2.0 ports 5 and 6 9. Audio I/O ports** *and **: Refer to the tables on the next page for LAN port and audio port definitions. ***: Refer to the notes and troubleshooting on HDTV overscaling or underscaling on the next pages. ASUS M4A88TD-M/USB3 2-23 USB 3.0 ports 1 and 2, USB 2.0 ports 1 and 2 5. Optical S/PDIF Out port 7. HDMI Out port*** 2. PS/2 keyboard / Mouse Combo port (purple) 6. LAN (RJ-45) port* 8. DVI-D Out pot 3. D-Sub Out port 4.
User Manual
Page 43
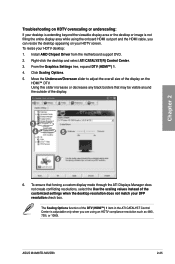
... not create conflicting resolutions, select the Use the scaling values instead of the display on your DFP resolution check box. To resize your HDTV desktop: 1. ASUS M4A88TD-M/USB3 2-25 Move the Underscan/Overscan slider to adjust the overall size of the customized settings when the desktop resolution does not match your HDTV screen...
... not create conflicting resolutions, select the Use the scaling values instead of the display on your DFP resolution check box. To resize your HDTV desktop: 1. ASUS M4A88TD-M/USB3 2-25 Move the Underscan/Overscan slider to adjust the overall size of the customized settings when the desktop resolution does not match your HDTV screen...

User Manual
Page 45
Connect to 4.1 channel Speakers Connect to 5.1 channel Speakers Chapter 2 Connect to 7.1 channel Speakers ASUS M4A88TD-M/USB3 2-27
Connect to 4.1 channel Speakers Connect to 5.1 channel Speakers Chapter 2 Connect to 7.1 channel Speakers ASUS M4A88TD-M/USB3 2-27
User Manual
Page 47
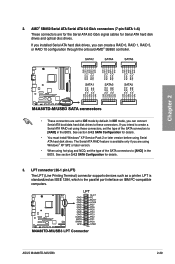
... IDE mode, you can connect Serial ATA boot/data hard disk drives to these connectors, set to create a Serial ATA RAID set using these connectors. ASUS M4A88TD-M/USB3 2-29 If you installed Serial ATA hard disk drives, you can create a RAID 0, RAID 1, RAID 5, or RAID 10 configuration through the onboard AMD® SB850...
... IDE mode, you can connect Serial ATA boot/data hard disk drives to these connectors, set to create a Serial ATA RAID set using these connectors. ASUS M4A88TD-M/USB3 2-29 If you installed Serial ATA hard disk drives, you can create a RAID 0, RAID 1, RAID 5, or RAID 10 configuration through the onboard AMD® SB850...
User Manual
Page 49
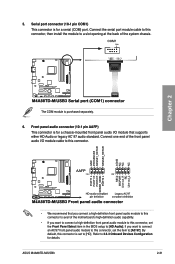
... connect an AC'97 front panel audio module to avail of the system chassis. 5. Serial port connector (10-1 pin COM1) This connector is purchased separately. 6. ASUS M4A88TD-M/USB3 2-31
... connect an AC'97 front panel audio module to avail of the system chassis. 5. Serial port connector (10-1 pin COM1) This connector is purchased separately. 6. ASUS M4A88TD-M/USB3 2-31
User Manual
Page 51
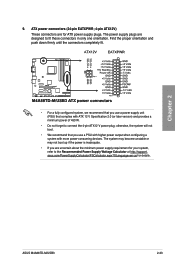
...boot. • We recommend that you use a power supply unit (PSU) that you are for ATX power supply plugs. Chapter 2 ASUS M4A88TD-M/USB3 2-33 Find the proper orientation and push down firmly until the connectors completely fit. • For a fully configured system, we recommend ...that complies with more power-consuming devices. 9. asus.com/PowerSupplyCalculator/PSCalculator.aspx?SLanguage=en-us for your system, refer to the Recommended Power Supply Wattage Calculator at http://support. ATX...
...boot. • We recommend that you use a power supply unit (PSU) that you are for ATX power supply plugs. Chapter 2 ASUS M4A88TD-M/USB3 2-33 Find the proper orientation and push down firmly until the connectors completely fit. • For a fully configured system, we recommend ...that complies with more power-consuming devices. 9. asus.com/PowerSupplyCalculator/PSCalculator.aspx?SLanguage=en-us for your system, refer to the Recommended Power Supply Wattage Calculator at http://support. ATX...
User Manual
Page 53
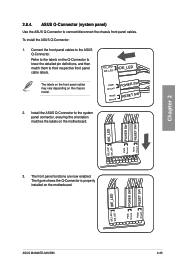
.... 3. PWR Ground Reset Ground POWER SW RESET SW 2. The front panel functions are now enabled. ASUS M4A88TD-M/USB3 2-35 IDE_LED+ IDE_LED- ASUS Q-Connector (system panel) Use the ASUS Q-Connector to their respective front panel cable labels. To install the ASUS Q-Connector: 1. Connect the front panel cables to the system panel connector, ensuring the orientation matches the... the front panel cables may vary depending on the motherboard. The figure shows the Q-Connector is properly installed on the chassis model. Chapter 2 2.8.4. Install the ASUS Q-Connector to the...
.... 3. PWR Ground Reset Ground POWER SW RESET SW 2. The front panel functions are now enabled. ASUS M4A88TD-M/USB3 2-35 IDE_LED+ IDE_LED- ASUS Q-Connector (system panel) Use the ASUS Q-Connector to their respective front panel cable labels. To install the ASUS Q-Connector: 1. Connect the front panel cables to the system panel connector, ensuring the orientation matches the... the front panel cables may vary depending on the motherboard. The figure shows the Q-Connector is properly installed on the chassis model. Chapter 2 2.8.4. Install the ASUS Q-Connector to the...
User Manual
Page 55
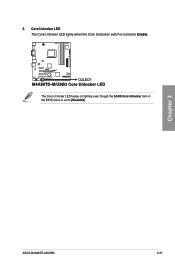
3. Core Unlocker LED The Core Unlocker LED lights when the Core Unclocker switch is set to Enable. Chapter 2 ASUS M4A88TD-M/USB3 2-37 The Core Unlocker LED keeps on lighting even though the ASUS Core Unlocker item in the BIOS menu is turned to [Disabled].
3. Core Unlocker LED The Core Unlocker LED lights when the Core Unclocker switch is set to Enable. Chapter 2 ASUS M4A88TD-M/USB3 2-37 The Core Unlocker LED keeps on lighting even though the ASUS Core Unlocker item in the BIOS menu is turned to [Disabled].


