
User Manual
Page 31
All rights reserved. ok A:\> 當 BIOS DOS 31 exe 2 DOS afudos /o[filename filename A:\>afudos /oOLDBIOS1.rom 3. 按下 afudos /oOLDBIOS1.rom AMI Firmware Update Utility - Version 1.19(ASUS V2.07(03.11.24BB)) Copyright (C) 2002 American Megatrends, Inc. Reading flash ..... BIOS 2.1 使用 AFUDOS BIOS AFUDOS DOS BIOS BIOS 程式。AFUDOS BIOS BIOS BIOS 程式 BIOS 程式。 1.2MB BIOS 1 AFUDOS 程式(afudos. done Write to file......
All rights reserved. ok A:\> 當 BIOS DOS 31 exe 2 DOS afudos /o[filename filename A:\>afudos /oOLDBIOS1.rom 3. 按下 afudos /oOLDBIOS1.rom AMI Firmware Update Utility - Version 1.19(ASUS V2.07(03.11.24BB)) Copyright (C) 2002 American Megatrends, Inc. Reading flash ..... BIOS 2.1 使用 AFUDOS BIOS AFUDOS DOS BIOS BIOS 程式。AFUDOS BIOS BIOS BIOS 程式 BIOS 程式。 1.2MB BIOS 1 AFUDOS 程式(afudos. done Write to file......

User Manual
Page 32
... Firmware Update Utility - Do not turn off power during flash BIOS Reading file ....... done Please restart your computer A:\> 32 BIOS done Verifying flash .... 更新 BIOS 程式 AFUDOS BIOS 程式。 1 tw.asus.com BIOS 片中。 BIOS BIOS 2. 將 AFUDOS.EXE BIOS 3 DOS afudos /i[filename filename BIOS 程式。 A:\>afudos /iP5B-VM DO.ROM 4. Version...
... Firmware Update Utility - Do not turn off power during flash BIOS Reading file ....... done Please restart your computer A:\> 32 BIOS done Verifying flash .... 更新 BIOS 程式 AFUDOS BIOS 程式。 1 tw.asus.com BIOS 片中。 BIOS BIOS 2. 將 AFUDOS.EXE BIOS 3 DOS afudos /i[filename filename BIOS 程式。 A:\>afudos /iP5B-VM DO.ROM 4. Version...

User Manual
Page 33
.../13/2006 Flash Type - 2.2 使用 AwardBIOS Flash BIOS AwardBIOS Flash AwardBIOS Flash 程式(AWDFLASH.EXE BIOS AwardBIOS Flash BIOS 程式。 1 http://tw.asus.com BIOS M2N-VM HDMI.bin FAT 32/16 格式的 USB BIOS 2 CD/DVD AwardBIOS Flash BIOS 3 DOS 4. 當 A BIOS 檔案與 AwardBIOS Flash 5 A awdflash 並按...
.../13/2006 Flash Type - 2.2 使用 AwardBIOS Flash BIOS AwardBIOS Flash AwardBIOS Flash 程式(AWDFLASH.EXE BIOS AwardBIOS Flash BIOS 程式。 1 http://tw.asus.com BIOS M2N-VM HDMI.bin FAT 32/16 格式的 USB BIOS 2 CD/DVD AwardBIOS Flash BIOS 3 DOS 4. 當 A BIOS 檔案與 AwardBIOS Flash 5 A awdflash 並按...

User Manual
Page 34
... OFE00 OK Write OK No Update Write Fail Warning: Don't Turn Off Power Or Reset System! 在更新 BIOS 9 Flash Complete BIOS F1 AwardBIOS Flash Utility for ASUS V1.14 (C) Phoenix Technologies Ltd. PMC Pm49FL004T LPC/FWH File Name to Continue Write OK F1 Reset No Update Write Fail... 34 BIOS All Rights Reserved For C51PV-MCP51-M2A-VM HDMI-00 DATE:04/13/2006 Flash Type - All Rights Reserved For...
... OFE00 OK Write OK No Update Write Fail Warning: Don't Turn Off Power Or Reset System! 在更新 BIOS 9 Flash Complete BIOS F1 AwardBIOS Flash Utility for ASUS V1.14 (C) Phoenix Technologies Ltd. PMC Pm49FL004T LPC/FWH File Name to Continue Write OK F1 Reset No Update Write Fail... 34 BIOS All Rights Reserved For C51PV-MCP51-M2A-VM HDMI-00 DATE:04/13/2006 Flash Type - All Rights Reserved For...
User Manual
Page 4
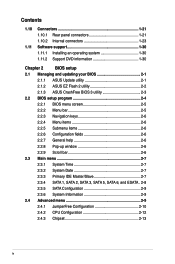
... connectors 1-23 1.11 Software support 1-30 1.11.1 Installing an operating system 1-30 1.11.2 Support DVD information 1-30 Chapter 2 BIOS setup 2.1 Managing and updating your BIOS 2-1 2.1.1 ASUS Update utility 2-1 2.1.2 ASUS EZ Flash 2 utility 2-2 2.1.3 ASUS CrashFree BIOS 3 utility 2-3 2.2 BIOS setup program 2-4 2.2.1 BIOS menu screen 2-5 2.2.2 Menu bar 2-5 2.2.3 Navigation keys 2-6 2.2.4 Menu items 2-6 2.2.5 Submenu items 2-6 2.2.6 Configuration fields 2-6 2.2.7 General help 2-6 2.2.8 Pop-up window 2-6 2.2.9 Scroll...
... connectors 1-23 1.11 Software support 1-30 1.11.1 Installing an operating system 1-30 1.11.2 Support DVD information 1-30 Chapter 2 BIOS setup 2.1 Managing and updating your BIOS 2-1 2.1.1 ASUS Update utility 2-1 2.1.2 ASUS EZ Flash 2 utility 2-2 2.1.3 ASUS CrashFree BIOS 3 utility 2-3 2.2 BIOS setup program 2-4 2.2.1 BIOS menu screen 2-5 2.2.2 Menu bar 2-5 2.2.3 Navigation keys 2-6 2.2.4 Menu items 2-6 2.2.5 Submenu items 2-6 2.2.6 Configuration fields 2-6 2.2.7 General help 2-6 2.2.8 Pop-up window 2-6 2.2.9 Scroll...
User Manual
Page 7
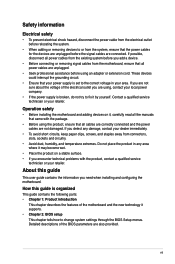
... and staples away from the existing system before using , contact your area. If you are not sure about the voltage of the BIOS parameters are unplugged. • Seek professional assistance before you need when installing and configuring the motherboard. How this guide This user guide ...or removing signal cables from the motherboard, ensure that your retailer. vii About this guide is set to change system settings through the BIOS Setup menus. If possible, disconnect all power cables are also provided. These devices could interrupt the grounding circuit. • Ensure that ...
... and staples away from the existing system before using , contact your area. If you are not sure about the voltage of the BIOS parameters are unplugged. • Seek professional assistance before you need when installing and configuring the motherboard. How this guide This user guide ...or removing signal cables from the motherboard, ensure that your retailer. vii About this guide is set to change system settings through the BIOS Setup menus. If possible, disconnect all power cables are also provided. These devices could interrupt the grounding circuit. • Ensure that ...
User Manual
Page 9
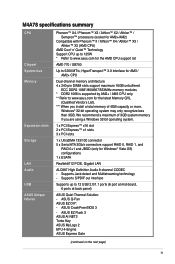
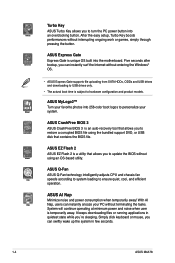
... Windows® Vista OS) configurations 1 x ESATA Realtek8112 PCIE, Gigabit LAN ALC887 High Definition Audio 8-channel CODEC - ASUS Q-Fan ASUS EZ DIY: - ASUS CrashFree BIOS 3 - ASUS EZ Flash 2 ASUS AI NET2 Turbo Key ASUS MyLogo 2 EPU 4-Engine ASUS Express Gate (continued on the next page) ix M4A78 specifications summary CPU Chipset System bus Memory Expansion slots Storage LAN Audio USB...
... Windows® Vista OS) configurations 1 x ESATA Realtek8112 PCIE, Gigabit LAN ALC887 High Definition Audio 8-channel CODEC - ASUS Q-Fan ASUS EZ DIY: - ASUS CrashFree BIOS 3 - ASUS EZ Flash 2 ASUS AI NET2 Turbo Key ASUS MyLogo 2 EPU 4-Engine ASUS Express Gate (continued on the next page) ix M4A78 specifications summary CPU Chipset System bus Memory Expansion slots Storage LAN Audio USB...
User Manual
Page 10
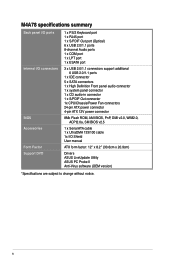
M4A78 specifications summary Back panel I/O ports Internal I/O connectors BIOS Accessories Form Factor Support DVD 1 x PS/2 Keyboard port 1 x RJ45 port 1 x S/PDIF Out port (Optical) 6 x USB 2.0/1.1 ports 8-channel Audio ports 1 x COM port 1 x LPT port 1 x ESATA port 3 x ... Out connector 1x CPU/Chassis/Power Fan connectors 24-pin ATX power connector 4-pin ATX 12V power connector 8Mb Flash ROM, AMI BIOS, PnP, DMI v2.0, WfM2.0, ACPI2.0a, SM BIOS v2.5 1 x Serial ATA cable 1 x UltraDMA 133/100 cable 1x I/O Shield User manual ATX form factor: 12'' x 8.2'' (30.6cm x 20.9cm) Drivers...
M4A78 specifications summary Back panel I/O ports Internal I/O connectors BIOS Accessories Form Factor Support DVD 1 x PS/2 Keyboard port 1 x RJ45 port 1 x S/PDIF Out port (Optical) 6 x USB 2.0/1.1 ports 8-channel Audio ports 1 x COM port 1 x LPT port 1 x ESATA port 3 x ... Out connector 1x CPU/Chassis/Power Fan connectors 24-pin ATX power connector 4-pin ATX 12V power connector 8Mb Flash ROM, AMI BIOS, PnP, DMI v2.0, WfM2.0, ACPI2.0a, SM BIOS v2.5 1 x Serial ATA cable 1 x UltraDMA 133/100 cable 1x I/O Shield User manual ATX form factor: 12'' x 8.2'' (30.6cm x 20.9cm) Drivers...
User Manual
Page 14
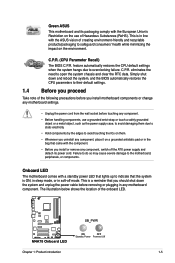
...models. It keeps downloading files or running applications in few seconds. 1-4 ASUS M4A78 System will continue operating at minimum power and noise when user is an auto-recovery tool that contains the BIOS file. Simply click keyboard or mouse, you to turn the PC ... utility. After the easy setup, Turbo Key boosts performances without terminating the tasks. ASUS MyLogo2™ Turn your favorite photos into the motherboard. ASUS CrashFree BIOS 3 ASUS CrashFree BIOS 3 is temporarily away. ASUS Express Gate Express Gate is unique OS built into 256-color boot logos to ensure...
...models. It keeps downloading files or running applications in few seconds. 1-4 ASUS M4A78 System will continue operating at minimum power and noise when user is an auto-recovery tool that contains the BIOS file. Simply click keyboard or mouse, you to turn the PC ... utility. After the easy setup, Turbo Key boosts performances without terminating the tasks. ASUS MyLogo2™ Turn your favorite photos into the motherboard. ASUS CrashFree BIOS 3 ASUS CrashFree BIOS 3 is temporarily away. ASUS Express Gate Express Gate is unique OS built into 256-color boot logos to ensure...
User Manual
Page 15
...do so may cause severe damage to open the system chassis and clear the RTC data. Onboard LED The motherboard comes with the ASUS vision of the following precautions before you install motherboard components or change any motherboard settings. • Unplug the power cord from ...avoid touching the ICs on them. • Whenever you uninstall any component, place it on the environment. C.P.R. (CPU Parameter Recall) The BIOS C.P.R. feature automatically restores the CPU default settings when the system hangs due to safeguard consumers' health while minimizing the impact on a grounded ...
...do so may cause severe damage to open the system chassis and clear the RTC data. Onboard LED The motherboard comes with the ASUS vision of the following precautions before you install motherboard components or change any motherboard settings. • Unplug the power cord from ...avoid touching the ICs on them. • Whenever you uninstall any component, place it on the environment. C.P.R. (CPU Parameter Recall) The BIOS C.P.R. feature automatically restores the CPU default settings when the system hangs due to safeguard consumers' health while minimizing the impact on a grounded ...
User Manual
Page 28
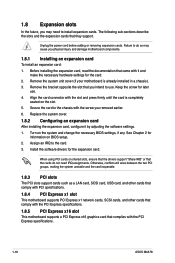
... power cord before adding or removing expansion cards. Remove the bracket opposite the slot that came with the PCI Express specifications. 1-18 ASUS M4A78 Before installing the expansion card, read the documentation that you may cause you removed earlier. 6. Remove the system unit cover (if ... expansion card After installing the expansion card, configure it and make the necessary hardware settings for information on the system and change the necessary BIOS settings, if any. Failure to install expansion cards. Secure the card to the card. 3. See Chapter 2 for the card. 2....
... power cord before adding or removing expansion cards. Remove the bracket opposite the slot that came with the PCI Express specifications. 1-18 ASUS M4A78 Before installing the expansion card, read the documentation that you may cause you removed earlier. 6. Remove the system unit cover (if ... expansion card After installing the expansion card, configure it and make the necessary hardware settings for information on the system and change the necessary BIOS settings, if any. Failure to install expansion cards. Secure the card to the card. 3. See Chapter 2 for the card. 2....

User Manual
Page 29
... above do not need to clear the RTC when the system hangs due to pins 2-3. Shut down the key during the boot process and enter BIOS setup to clear the Real Time Clock (RTC) RAM in CMOS, which include system setup information such as system passwords. The onboard button cell battery... system failure due to default values. Clear RTC RAM (CLRTC) This jumper allows you to reenter data. Hold down and reboot the system so the BIOS can clear the CMOS memory of date, time, and system setup parameters by erasing the CMOS RTC RAM data.
... above do not need to clear the RTC when the system hangs due to pins 2-3. Shut down the key during the boot process and enter BIOS setup to clear the Real Time Clock (RTC) RAM in CMOS, which include system setup information such as system passwords. The onboard button cell battery... system failure due to default values. Clear RTC RAM (CLRTC) This jumper allows you to reenter data. Hold down and reboot the system so the BIOS can clear the CMOS memory of date, time, and system setup parameters by erasing the CMOS RTC RAM data.

User Manual
Page 30
... default is for the rear USB ports. 3. Set to +5VSB to wake up from S1 sleep mode (CPU stopped, DRAM refreshed, system running in the BIOS. When you set this jumper to +5V to pins 2-3 (+5VSB), you can wake up feature. USB device wake-up (3-pin USBPW1-6 and USBPW7-12) Set... a corresponding setting in low power mode) using a USB device. This feature requires an ATX power supply that you can connect to additional USB ports. 1-20 ASUS M4A78 This jumper is the Space Bar), clicking the mouse, or using the connected USB devices.
... default is for the rear USB ports. 3. Set to +5VSB to wake up from S1 sleep mode (CPU stopped, DRAM refreshed, system running in the BIOS. When you set this jumper to +5V to pins 2-3 (+5VSB), you can wake up feature. USB device wake-up (3-pin USBPW1-6 and USBPW7-12) Set... a corresponding setting in low power mode) using a USB device. This feature requires an ATX power supply that you can connect to additional USB ports. 1-20 ASUS M4A78 This jumper is the Space Bar), clicking the mouse, or using the connected USB devices.
User Manual
Page 35
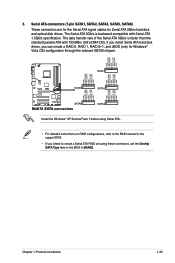
..., you intend to create a Serial ATA RAID set using Serial ATA. • For detailed instructions on RAID configurations, refer to the RAID manual in the BIOS to [RAID].
..., you intend to create a Serial ATA RAID set using Serial ATA. • For detailed instructions on RAID configurations, refer to the RAID manual in the BIOS to [RAID].

User Manual
Page 36
... lights up or flashes when data is for the chassis-mounted reset button for the system power LED. The speaker allows you turn on the BIOS settings. Pressing the power switch for more than four seconds while the system is ON turns the system OFF. • Reset button (2-pin RESET) This... LED cable to the HDD. • System warning speaker (4-pin SPEAKER) This 4-pin connector is for system reboot without turning off the system power. 1-26 ASUS M4A78 The IDE LED lights up when you to this connector. Pressing the power button turns the system on or puts the system in sleep or...
... lights up or flashes when data is for the chassis-mounted reset button for the system power LED. The speaker allows you turn on the BIOS settings. Pressing the power switch for more than four seconds while the system is ON turns the system OFF. • Reset button (2-pin RESET) This... LED cable to the HDD. • System warning speaker (4-pin SPEAKER) This 4-pin connector is for system reboot without turning off the system power. 1-26 ASUS M4A78 The IDE LED lights up when you to this connector. Pressing the power button turns the system on or puts the system in sleep or...

User Manual
Page 39
...details. 9. Connect one end of the motherboard high-definition audio capability. • By default, this connector is set the item in the BIOS to the fan connectors on the fan connectors! If you connect a high-definition front panel audio module to this connector to avail of ...audio module to this connector. • We recommend that supports either High Definition Audio or AC`97 audio standard. Only the CPU fan supports the ASUS Q-FAN feature. CPU, Chassis, and PowerFan connectors (4 pin CPU_FAN, 3-pin CHA_FAN, and 3-pin PWR_FAN) The fan connectors support cooling fans of ...
...details. 9. Connect one end of the motherboard high-definition audio capability. • By default, this connector is set the item in the BIOS to the fan connectors on the fan connectors! If you connect a high-definition front panel audio module to this connector to avail of ...audio module to this connector. • We recommend that supports either High Definition Audio or AC`97 audio standard. Only the CPU fan supports the ASUS Q-FAN feature. CPU, Chassis, and PowerFan connectors (4 pin CPU_FAN, 3-pin CHA_FAN, and 3-pin PWR_FAN) The fan connectors support cooling fans of ...
User Manual
Page 41
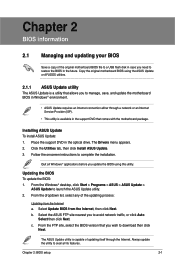
...the Windows® desktop, click Start > Programs > ASUS > ASUS Update > ASUS Update to complete the installation. Select the ASUS FTP site nearest you update the BIOS using the ASUS Update or AFUDOS utilities. 2.1.1 ASUS Update utility The ASUS Update is a utility that allows you to manage, ...Click the Utilities tab, then click Install ASUS Update. 3. Updating the BIOS To update the BIOS: 1. Installing ASUS Update To install ASUS Update: 1. From the FTP site, select the BIOS version that comes with the motherboard package. The ASUS Update utility is available in the support...
...the Windows® desktop, click Start > Programs > ASUS > ASUS Update > ASUS Update to complete the installation. Select the ASUS FTP site nearest you update the BIOS using the ASUS Update or AFUDOS utilities. 2.1.1 ASUS Update utility The ASUS Update is a utility that allows you to manage, ...Click the Utilities tab, then click Install ASUS Update. 3. Updating the BIOS To update the BIOS: 1. Installing ASUS Update To install ASUS Update: 1. From the FTP site, select the BIOS version that comes with the motherboard package. The ASUS Update utility is available in the support...

User Manual
Page 42
... PATH: A:\ A: Note [Enter] Select or Load [Tab] Switch [Up/Down/Home/End] Move [B] Backup [V] Drive Info [ESC] Exit • Enter the BIOS setup program. Press to prevent system boot failure! 2-2 ASUS M4A78 b. Before using EZ Flash 2: 1. You can support devices such as USB flash disk with FAT 32/16 format and single partition...
... PATH: A:\ A: Note [Enter] Select or Load [Tab] Switch [Up/Down/Home/End] Move [B] Backup [V] Drive Info [ESC] Exit • Enter the BIOS setup program. Press to prevent system boot failure! 2-2 ASUS M4A78 b. Before using EZ Flash 2: 1. You can support devices such as USB flash disk with FAT 32/16 format and single partition...

User Manual
Page 43
... this utility. • Always connect the SATA cable to the SATA1, 2, 3, 5, 6 connectors. Bad BIOS checksum. Checking for USB Device... Reading file "M4A78.ROM". Doing so can support ASUS CrashFree BIOS 3. Checking for CD-ROM... Completed. Chapter 2: BIOS setup 2-3 You can update a corrupted BIOS file using this motherboard. The utility displays the following message and automatically checks...
... this utility. • Always connect the SATA cable to the SATA1, 2, 3, 5, 6 connectors. Bad BIOS checksum. Checking for USB Device... Reading file "M4A78.ROM". Doing so can support ASUS CrashFree BIOS 3. Checking for CD-ROM... Completed. Chapter 2: BIOS setup 2-3 You can update a corrupted BIOS file using this motherboard. The utility displays the following message and automatically checks...
User Manual
Page 44
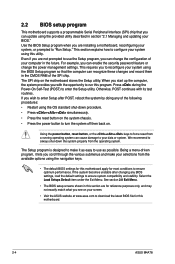
...wish to enter Setup after changing any of the following procedures: • Restart using this motherboard. 2-4 ASUS M4A78 The SPI chip on . If you are installing a motherboard, reconfiguring your BIOS." We recommend to always shut-down procedure. • Press ++ simultaneously. • Press the reset button... reset from the operating system. This section explains how to configure your screen. • Visit the ASUS website at www.asus.com to download the latest BIOS file for most conditions to ensure optimum performance. The Setup program is designed to make your data or...
...wish to enter Setup after changing any of the following procedures: • Restart using this motherboard. 2-4 ASUS M4A78 The SPI chip on . If you are installing a motherboard, reconfiguring your BIOS." We recommend to always shut-down procedure. • Press ++ simultaneously. • Press the reset button... reset from the operating system. This section explains how to configure your screen. • Visit the ASUS website at www.asus.com to download the latest BIOS file for most conditions to ensure optimum performance. The Setup program is designed to make your data or...


