
User Manual
Page 4
...Software support...1-29 1.11.1 1.11.2 Installing an operating system...1-29 Support DVD information...1-29 Chapter 2: 2.1 Managing and updating your BIOS...2-1 2.1.1 2.1.2 2.1.3 2.2.1 2.2.2 2.2.3 2.2.4 2.2.5 2.2.6 2.2.7 2.2.8 2.2.9 2.3.1 2.3.2 2.3.3 2.3.4 2.3.5 2.4.1 2.4.2 2.4.3 2.4.4 2.4.5 2.4.6 2.5.1 2.5.2 ASUS Update utility...2-1 ASUS EZ Flash 2 utility...2-2 ASUS CrashFree BIOS 3 utility...2-3 BIOS menu screen...2-5 Menu bar...2-5 Navigation keys...2-5 Menu items...2-6 Submenu items...2-6 Configuration fields...2-6 Pop-up window...2-6 Scroll bar...2-6 General...
...Software support...1-29 1.11.1 1.11.2 Installing an operating system...1-29 Support DVD information...1-29 Chapter 2: 2.1 Managing and updating your BIOS...2-1 2.1.1 2.1.2 2.1.3 2.2.1 2.2.2 2.2.3 2.2.4 2.2.5 2.2.6 2.2.7 2.2.8 2.2.9 2.3.1 2.3.2 2.3.3 2.3.4 2.3.5 2.4.1 2.4.2 2.4.3 2.4.4 2.4.5 2.4.6 2.5.1 2.5.2 ASUS Update utility...2-1 ASUS EZ Flash 2 utility...2-2 ASUS CrashFree BIOS 3 utility...2-3 BIOS menu screen...2-5 Menu bar...2-5 Navigation keys...2-5 Menu items...2-6 Submenu items...2-6 Configuration fields...2-6 Pop-up window...2-6 Scroll bar...2-6 General...

User Manual
Page 7
...to the correct voltage in any damage, contact your dealer immediately. vii If you are not sure about the voltage of the BIOS parameters are unplugged. Place the product on it by yourself. Safety information Electrical safety To prevent electric shock hazard, disconnect the... Chapter 1: Product introduction • This chapter describes the features of the motherboard and the new technology it may become wet. Chapter 2: BIOS information This chapter tells how to or from the system, ensure that came with the product, contact a qualified service technician or your retailer...
...to the correct voltage in any damage, contact your dealer immediately. vii If you are not sure about the voltage of the BIOS parameters are unplugged. Place the product on it by yourself. Safety information Electrical safety To prevent electric shock hazard, disconnect the... Chapter 1: Product introduction • This chapter describes the features of the motherboard and the new technology it may become wet. Chapter 2: BIOS information This chapter tells how to or from the system, ensure that came with the product, contact a qualified service technician or your retailer...

User Manual
Page 11
xi M4A78-EM/1394 specifications summary Internal I/O connectors 3 x USB 2.0 connectors support additional 6 USB 2.0 ports 1 x IDE connector 1 x COM connector 1 x LPT connector 1 x IEEE 1394a connector 5 x SATA connectors 1 x High definition front ... x 24-pin EATX power connector 1 x 4-pin ATX 12V power connector 8Mb Flash ROM, AMI BIOS, PnP, DMI v2.0, WfM2.0, ACPI v2.0a, SM BIOS 2.5 1 x Serial ATA cable 1 x UltraDMA 133/100/66 cable 1 x I/O shield 1 x User Manual Drivers ASUS PC Probe II ASUS LiveUpdate Utility Anti-Virus software (OEM version) MicroATX form factor: 9.6 in x 9.6 in (24...
xi M4A78-EM/1394 specifications summary Internal I/O connectors 3 x USB 2.0 connectors support additional 6 USB 2.0 ports 1 x IDE connector 1 x COM connector 1 x LPT connector 1 x IEEE 1394a connector 5 x SATA connectors 1 x High definition front ... x 24-pin EATX power connector 1 x 4-pin ATX 12V power connector 8Mb Flash ROM, AMI BIOS, PnP, DMI v2.0, WfM2.0, ACPI v2.0a, SM BIOS 2.5 1 x Serial ATA cable 1 x UltraDMA 133/100/66 cable 1 x I/O shield 1 x User Manual Drivers ASUS PC Probe II ASUS LiveUpdate Utility Anti-Virus software (OEM version) MicroATX form factor: 9.6 in x 9.6 in (24...

User Manual
Page 14
...(socket AM2+/AM2) This motherboard supports AMD® Socket AM2+ multi-core processors. Dual channel DDR2 1200(O.C.) support To attain top performance, ASUS engineers have successfully unleashed DDR2 1200(O.C.) MHz to meet the higher bandwidth requirements of the latest operating system, 3D graphics, multimedia, and Internet ... 1200/1066 DIMM is supported by default for system stability. • We recommend that you download the latest BIOS version at 800MHz frequency by Windows® Vista OS only. • Refer to 5200MT/s via HyperTransport™ 3.0-based system bus.
...(socket AM2+/AM2) This motherboard supports AMD® Socket AM2+ multi-core processors. Dual channel DDR2 1200(O.C.) support To attain top performance, ASUS engineers have successfully unleashed DDR2 1200(O.C.) MHz to meet the higher bandwidth requirements of the latest operating system, 3D graphics, multimedia, and Internet ... 1200/1066 DIMM is supported by default for system stability. • We recommend that you download the latest BIOS version at 800MHz frequency by Windows® Vista OS only. • Refer to 5200MT/s via HyperTransport™ 3.0-based system bus.

User Manual
Page 16
... line with the European Union's Restriction on the environment. eliminates the need to convert your screen. ASUS MyLogo2™ This feature allows you to open the system chassis and clear the RTC data. ASUS CrashFree BIOS 3 ASUS CrashFree BIOS 3 is a unique power saving technology that allows you to safeguard consumers' health while minimizing the impact...
... line with the European Union's Restriction on the environment. eliminates the need to convert your screen. ASUS MyLogo2™ This feature allows you to open the system chassis and clear the RTC data. ASUS CrashFree BIOS 3 ASUS CrashFree BIOS 3 is a unique power saving technology that allows you to safeguard consumers' health while minimizing the impact...

User Manual
Page 29
... supports PCI Express x1 network cards, SCSI cards, and other cards that complies with PCI specifications. PCI Express x16 slot ASUS M4A78-EM/1394 1-17 The following sub‑sections describe the slots and the expansion cards that comply with the slot and press firmly until...install expansion cards. Replace the system cover. 1.8.2 1. 2. 3. Install the software drivers for information on the system and change the necessary BIOS settings, if any. Unplug the power cord before adding or removing expansion cards. Keep the screw for the card. Otherwise, conflicts will ...
... supports PCI Express x1 network cards, SCSI cards, and other cards that complies with PCI specifications. PCI Express x16 slot ASUS M4A78-EM/1394 1-17 The following sub‑sections describe the slots and the expansion cards that comply with the slot and press firmly until...install expansion cards. Replace the system cover. 1.8.2 1. 2. 3. Install the software drivers for information on the system and change the necessary BIOS settings, if any. Unplug the power cord before adding or removing expansion cards. Keep the screw for the card. Otherwise, conflicts will ...

User Manual
Page 30
Hold down and reboot the system so the BIOS can clear the CMOS memory of date, time, and system setup parameters by erasing the CMOS RTC RAM data. 1.9 1. Keep the cap on CLRTC jumper ... do not need to clear the RTC when the system hangs due to reenter data. Shut down the key during the boot process and enter BIOS setup to overclocking.
Hold down and reboot the system so the BIOS can clear the CMOS memory of date, time, and system setup parameters by erasing the CMOS RTC RAM data. 1.9 1. Keep the cap on CLRTC jumper ... do not need to clear the RTC when the system hangs due to reenter data. Shut down the key during the boot process and enter BIOS setup to overclocking.

User Manual
Page 32
... Line In Front Speaker Out Mic In Center/Subwoofer Rear Speaker Out Side Speaker Out Ensure the audio device of the audio ports in the BIOS to configure the settings. 12. HDMI port.
... Line In Front Speaker Out Mic In Center/Subwoofer Rear Speaker Out Side Speaker Out Ensure the audio device of the audio ports in the BIOS to configure the settings. 12. HDMI port.

User Manual
Page 33
...and Blu-Ray discs • For better playback quality, we recommend that whether the following dual display outputs are for USB 2.0 devices. ASUS M4A78-EM/1394 1-21 The dual display function works only under Windows. These two 4-pin Universal Serial Bus (USB) ports are supported on your motherboard...8226; During POST, only the monitor connected to use HDCP compliant devices and software. 17. USB 2.0 ports 5 and 6. Suggested list CPU DIMM BIOS setup AMD® Athlon 4400+ DDR2 800 (1GB or higher) Frame Buffer Size--256MB or higher Best resolution Windows® XP 1920 x 1080p...
...and Blu-Ray discs • For better playback quality, we recommend that whether the following dual display outputs are for USB 2.0 devices. ASUS M4A78-EM/1394 1-21 The dual display function works only under Windows. These two 4-pin Universal Serial Bus (USB) ports are supported on your motherboard...8226; During POST, only the monitor connected to use HDCP compliant devices and software. 17. USB 2.0 ports 5 and 6. Suggested list CPU DIMM BIOS setup AMD® Athlon 4400+ DDR2 800 (1GB or higher) Frame Buffer Size--256MB or higher Best resolution Windows® XP 1920 x 1080p...

User Manual
Page 37
... 2.3.4 SATA Configuration for an IEEE 1394a port. ASUS M4A78-EM/1394 1-25 6. The data transfer rate of the system chassis. If you install Serial ATA hard disk drives, you intend to create a Serial ATA RAID set using these connectors, set the OnChip SATA Type item in the BIOS to [RAID]. Connect the IEEE 1394a module...
... 2.3.4 SATA Configuration for an IEEE 1394a port. ASUS M4A78-EM/1394 1-25 6. The data transfer rate of the system chassis. If you install Serial ATA hard disk drives, you intend to create a Serial ATA RAID set using these connectors, set the OnChip SATA Type item in the BIOS to [RAID]. Connect the IEEE 1394a module...
User Manual
Page 39
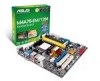
...HD Audio]. If you want to connect an AC'97 front panel audio module to this connector, set the Front Panel Select item in the BIOS setup to [HD Audio]. Go to Start > Control Panel > Sounds and Audio Devices > Sound Playback to [AC97]. This connector is for ... avail of Sound playback is purchased separately. 11. By default, this connector is for an additional Sony/Philips Digital Interface (S/PDIF) port. ASUS M4A78-EM/1394 1-27 Digital audio connector (4-1 pin SPDIF_OUT) This connector is set to this connector, set the item to configure the setting. Front panel audio...
...HD Audio]. If you want to connect an AC'97 front panel audio module to this connector, set the Front Panel Select item in the BIOS setup to [HD Audio]. Go to Start > Control Panel > Sounds and Audio Devices > Sound Playback to [AC97]. This connector is for ... avail of Sound playback is purchased separately. 11. By default, this connector is for an additional Sony/Philips Digital Interface (S/PDIF) port. ASUS M4A78-EM/1394 1-27 Digital audio connector (4-1 pin SPDIF_OUT) This connector is set to this connector, set the item to configure the setting. Front panel audio...

User Manual
Page 40
... hear system beeps and warnings. The system power LED lights up or flashes when data is in SLEEP or SOFT-OFF mode depending on the BIOS settings. System warning speaker (4-pin SPEAKER) This 4-pin connector is for more than four seconds while the system is for the system power button. Pressing...
... hear system beeps and warnings. The system power LED lights up or flashes when data is in SLEEP or SOFT-OFF mode depending on the BIOS settings. System warning speaker (4-pin SPEAKER) This 4-pin connector is for more than four seconds while the system is for the system power button. Pressing...

User Manual
Page 43
... Select then click Next. a. ASUS M4A78-EM/1394 2-1 The Drivers menu appears. Follow the onscreen instructions to launch the ASUS Update utility. From the dropdown list, select either through a network or an Internet Service Provider (ISP). • This utility is available in the support DVD that you need to restore the BIOS in case you want...
... Select then click Next. a. ASUS M4A78-EM/1394 2-1 The Drivers menu appears. Follow the onscreen instructions to launch the ASUS Update utility. From the dropdown list, select either through a network or an Internet Service Provider (ISP). • This utility is available in the support DVD that you need to restore the BIOS in case you want...

User Manual
Page 44
...in either of these two ways: • Press + during POST to display the following: ASUSTek EZ Flash 2 BIOS ROM Utility V3.36 FLASH TYPE: MXIC 25L8005 Current ROM BOARD: M4A78-EM-1394 VER: 0303 (H:00 B:02) DATE: 03/24/2009 C: Update ROM BOARD: Unknown VER: Unknown DATE: ...Unknown PATH: C:\ Note [Enter] Select or Load [Tab] Switch [Up/Down/Home/End] Move [B] Backup [V] Drive Info [ESC] Exit 2. • Press to prevent system boot failure! 2-2 Chapter 2: BIOS information The ASUS...
...in either of these two ways: • Press + during POST to display the following: ASUSTek EZ Flash 2 BIOS ROM Utility V3.36 FLASH TYPE: MXIC 25L8005 Current ROM BOARD: M4A78-EM-1394 VER: 0303 (H:00 B:02) DATE: 03/24/2009 C: Update ROM BOARD: Unknown VER: Unknown DATE: ...Unknown PATH: C:\ Note [Enter] Select or Load [Tab] Switch [Up/Down/Home/End] Move [B] Backup [V] Drive Info [ESC] Exit 2. • Press to prevent system boot failure! 2-2 Chapter 2: BIOS information The ASUS...
User Manual
Page 45
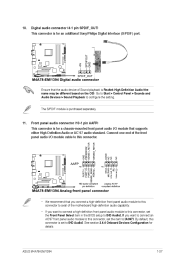
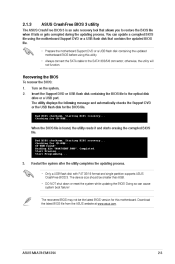
... disk containing the BIOS file to the optical disk drive or a USB port. Starting BIOS recovery...Checking for this utility. • Always connect the SATA cable to restore the BIOS file when it and starts erasing the corrupted BIOS file. Start Erasing...Start Programming... 3. Download the latest BIOS file from the ASUS website at www.asus.com. ASUS M4A78-EM/1394 2-3
... disk containing the BIOS file to the optical disk drive or a USB port. Starting BIOS recovery...Checking for this utility. • Always connect the SATA cable to restore the BIOS file when it and starts erasing the corrupted BIOS file. Start Erasing...Start Programming... 3. Download the latest BIOS file from the ASUS website at www.asus.com. ASUS M4A78-EM/1394 2-3

User Manual
Page 46
...not prompted to ensure optimum performance. otherwise, POST continues with the opportunity to configure your selections from the available options using the BIOS Setup program so that the computer can change the power management settings. The Setup program is designed to make your system using...shut-down the system properly from a running operating system can cause damage to your screen. • Visit the ASUS website at www.asus.com to download the latest BIOS file for this motherboard apply to most conditions to use as possible. Being a menu-driven program, it lets...
...not prompted to ensure optimum performance. otherwise, POST continues with the opportunity to configure your selections from the available options using the BIOS Setup program so that the computer can change the power management settings. The Setup program is designed to make your system using...shut-down the system properly from a running operating system can cause damage to your screen. • Visit the ASUS website at www.asus.com to download the latest BIOS file for this motherboard apply to most conditions to use as possible. Being a menu-driven program, it lets...

User Manual
Page 47
...changing the advanced power management (APM) configuration For configuring options for that particular menu. 2.2.1 BIOS menu screen Menu bar Power Menu items Main Configuration fields BIOS SETUP UTILITY Boot Tools Exit General help Advanced Main Settings System Time System Date Primary IDE ... functions Menu bar For selecting the exit options and loading default settings. Use [+] or [-] to select a field. Navigation keys ASUS M4A78-EM/1394 2-5 Tab F1 F10 ESC Select Screen Select Item Change Field Select Field General Help Save and Exit Exit v02.61 (C)Copyright 1985...
...changing the advanced power management (APM) configuration For configuring options for that particular menu. 2.2.1 BIOS menu screen Menu bar Power Menu items Main Configuration fields BIOS SETUP UTILITY Boot Tools Exit General help Advanced Main Settings System Time System Date Primary IDE ... functions Menu bar For selecting the exit options and loading default settings. Use [+] or [-] to select a field. Navigation keys ASUS M4A78-EM/1394 2-5 Tab F1 F10 ESC Select Screen Select Item Change Field Select Field General Help Save and Exit Exit v02.61 (C)Copyright 1985...

User Manual
Page 48
... with the configuration options for that the item has a submenu. Pop-up window CPU Configuration Module Version: 13.40 AGESA Version: 3.3.1.0 BIOS SETUP UTILITY Advanced Sets the ratio between CPU Core Clock and the FSB Frequency. configurable, you can change the value of a field,...Mode [Enabled] Cool 'n' Quiet [Enalbed] CPU Prefetching [Enabled] v02.61 (C)Copyright 1985-2008, American Megatrends, Inc. General help 2-6 Chapter 2: BIOS information To display the submenu, select the item and press . To change the value of the selected item. You cannot select an item that is...
... with the configuration options for that the item has a submenu. Pop-up window CPU Configuration Module Version: 13.40 AGESA Version: 3.3.1.0 BIOS SETUP UTILITY Advanced Sets the ratio between CPU Core Clock and the FSB Frequency. configurable, you can change the value of a field,...Mode [Enabled] Cool 'n' Quiet [Enalbed] CPU Prefetching [Enabled] v02.61 (C)Copyright 1985-2008, American Megatrends, Inc. General help 2-6 Chapter 2: BIOS information To display the submenu, select the item and press . To change the value of the selected item. You cannot select an item that is...

User Manual
Page 49
...in the Primary IDE Master/Slave menus. Configuration options: [Not Installed] [Auto] [CDROM] [ARMD] This item only appears in the system. ASUS M4A78-EM/1394 2-7 BIOS SETUP UTILITY Boot Tools Main Advanced Power Exit Use [ENTER], [TAB] or [SHIFT-TAB] to [Auto] allows automatic selection of the basic ...Type [Auto] Selects the type of IDE/SATA devices. Select [CDROM] if you are not user-configurable. Refer to section 2.2.1 BIOS menu screen for each IDE/SATA device. Main Settings System Time System Date Primary IDE Master Primary IDE Slave SATA1 SATA2 SATA3 SATA5 ...
...in the Primary IDE Master/Slave menus. Configuration options: [Not Installed] [Auto] [CDROM] [ARMD] This item only appears in the system. ASUS M4A78-EM/1394 2-7 BIOS SETUP UTILITY Boot Tools Main Advanced Power Exit Use [ENTER], [TAB] or [SHIFT-TAB] to [Auto] allows automatic selection of the basic ...Type [Auto] Selects the type of IDE/SATA devices. Select [CDROM] if you are not user-configurable. Refer to section 2.2.1 BIOS menu screen for each IDE/SATA device. Main Settings System Time System Date Primary IDE Master Primary IDE Slave SATA1 SATA2 SATA3 SATA5 ...

User Manual
Page 50
...Auto] enables the LBA mode if the device supports this menu. System Information System Memory Displays the auto-detected system memory. 2-8 Chapter 2: BIOS information Configuration options: [Auto] [0] [1] [2] [3] [4] DMA Mode [Auto] Selects the DMA mode. Configuration options: [Auto] [Disabled] ...and if the device was not previously formatted with LBA mode disabled. Displays the auto-detected CPU specification. BIOS Information Processor Displays the auto-detected BIOS information. Configuration options: [Disabled] [Auto] Block (Multi-Sector Transfer) M [Auto] Enables or ...
...Auto] enables the LBA mode if the device supports this menu. System Information System Memory Displays the auto-detected system memory. 2-8 Chapter 2: BIOS information Configuration options: [Auto] [0] [1] [2] [3] [4] DMA Mode [Auto] Selects the DMA mode. Configuration options: [Auto] [Disabled] ...and if the device was not previously formatted with LBA mode disabled. Displays the auto-detected CPU specification. BIOS Information Processor Displays the auto-detected BIOS information. Configuration options: [Disabled] [Auto] Block (Multi-Sector Transfer) M [Auto] Enables or ...


