User Manual
Page 11
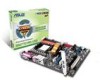
... connector 1 x System panel connector 1 x CD audio-in (30.5 cm x 22.4 cm) *Specifications are subject to 550MHz at 1MHz increment - xi M4A77TD PRO specifications summary Back panel I/O ports Internal I /O shield 1 x User Manual Drivers ASUS Update ASUS PC Probe II Anti-Virus software (OEM version) ATX form factor: 12 in x 8.8 in connector 1 x S/PDIF_OUT connector 1 x CPU / 1 x Power / 1 x Chassis...
... connector 1 x System panel connector 1 x CD audio-in (30.5 cm x 22.4 cm) *Specifications are subject to 550MHz at 1MHz increment - xi M4A77TD PRO specifications summary Back panel I/O ports Internal I /O shield 1 x User Manual Drivers ASUS Update ASUS PC Probe II Anti-Virus software (OEM version) ATX form factor: 12 in x 8.8 in connector 1 x S/PDIF_OUT connector 1 x CPU / 1 x Power / 1 x Chassis...
User Manual
Page 29
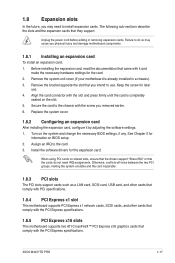
... the expansion card, configure it and make the necessary hardware settings for later use . Install the software drivers for information on shared slots, ensure that the drivers support "Share IRQ" or that comply with the screw you may cause you intend to the chassis with... chassis). 3. Remove the system unit cover (if your motherboard is completely seated on the system and change the necessary BIOS settings, if any. ASUS M4A77TD PRO 1-17 Align the card connector with it by adjusting the software settings. 1. See Chapter 2 for the expansion card. 1.8 Expansion slots In the...
... the expansion card, configure it and make the necessary hardware settings for later use . Install the software drivers for information on shared slots, ensure that the drivers support "Share IRQ" or that comply with the screw you may cause you intend to the chassis with... chassis). 3. Remove the system unit cover (if your motherboard is completely seated on the system and change the necessary BIOS settings, if any. ASUS M4A77TD PRO 1-17 Align the card connector with it by adjusting the software settings. 1. See Chapter 2 for the expansion card. 1.8 Expansion slots In the...
User Manual
Page 41
Place the support DVD into the optical drive. The Drivers menu appears. 2. ASUS M4A77TD PRO 2-1 Installing ASUS Update To install ASUS Update: 1. Quit all Windows® applications before you need to restore the BIOS in the support DVD that comes with the motherboard package. Chapter...and updating your BIOS Save a copy of the original motherboard BIOS file to a USB flash disk in case you update the BIOS using the ASUS Update utility. 2.1.1 ASUS Update utility The ASUS Update is a utility that allows you to manage, save, and update the motherboard BIOS in Windows® environment. •...
Place the support DVD into the optical drive. The Drivers menu appears. 2. ASUS M4A77TD PRO 2-1 Installing ASUS Update To install ASUS Update: 1. Quit all Windows® applications before you need to restore the BIOS in the support DVD that comes with the motherboard package. Chapter...and updating your BIOS Save a copy of the original motherboard BIOS file to a USB flash disk in case you update the BIOS using the ASUS Update utility. 2.1.1 ASUS Update utility The ASUS Update is a utility that allows you to manage, save, and update the motherboard BIOS in Windows® environment. •...
User Manual
Page 49
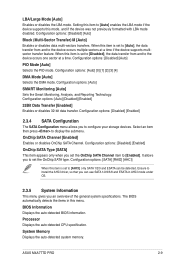
..., and if the device was not previously formatted with LBA mode disabled. BIOS Information Displays the auto-detected BIOS information. ASUS M4A77TD PRO 2-9 Configuration options: [Auto] SMART Monitoring [Auto] Sets the Smart Monitoring, Analysis, and Reporting Technology. Configuration options: ...[Disabled] [Enabled] 2.3.4 SATA Configuration The SATA Configuration menu allows you to install the AHCI driver, so that you set the OnChip SATA type. It allows you an overview of the general system specifications. Configuration options...
..., and if the device was not previously formatted with LBA mode disabled. BIOS Information Displays the auto-detected BIOS information. ASUS M4A77TD PRO 2-9 Configuration options: [Auto] SMART Monitoring [Auto] Sets the Smart Monitoring, Analysis, and Reporting Technology. Configuration options: ...[Disabled] [Enabled] 2.3.4 SATA Configuration The SATA Configuration menu allows you to install the AHCI driver, so that you set the OnChip SATA type. It allows you an overview of the general system specifications. Configuration options...

