User Manual
Page 9
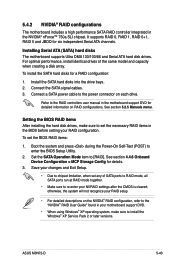
...8226; Chapter 1: Product introduction This chapter describes the features of shutting down the system. • Chapter 4: BIOS setup This chapter tells how to the ASUS contact information. 2. ix These documents are also provided. • Chapter 5: Software support This chapter describes the ...chapter lists the hardware setup procedures that you need when installing and configuring the motherboard. Refer to change system settings through the BIOS Setup menus. Detailed descriptions of the BIOS parameters are not part of the support DVD that may include optional documentation, ...
...8226; Chapter 1: Product introduction This chapter describes the features of shutting down the system. • Chapter 4: BIOS setup This chapter tells how to the ASUS contact information. 2. ix These documents are also provided. • Chapter 5: Software support This chapter describes the ...chapter lists the hardware setup procedures that you need when installing and configuring the motherboard. Refer to change system settings through the BIOS Setup menus. Detailed descriptions of the BIOS parameters are not part of the support DVD that may include optional documentation, ...
User Manual
Page 21
... page 5-17 for details. making it convenient and easy to install computer components, update the BIOS or back up your favorite settings. See page 2-41 for details. ASUS M3N72-D 1-5 Noise Filter This feature detects repetitive and stationary noises (non-voice signals) like Skype,... cables to launch the utility and update the BIOS without entering the OS. ASUS Q-Connector ASUS Q-Connector allows you easy ways to install. Simply press the predefined hotkey to the motherboard. ASUS Q-Shield The specially designed ASUS Q-Shield does without preparing a bootable diskette or...
... page 5-17 for details. making it convenient and easy to install computer components, update the BIOS or back up your favorite settings. See page 2-41 for details. ASUS M3N72-D 1-5 Noise Filter This feature detects repetitive and stationary noises (non-voice signals) like Skype,... cables to launch the utility and update the BIOS without entering the OS. ASUS Q-Connector ASUS Q-Connector allows you easy ways to install. Simply press the predefined hotkey to the motherboard. ASUS Q-Shield The specially designed ASUS Q-Shield does without preparing a bootable diskette or...

User Manual
Page 22
... Parameter Recall) The C.P.R. Simply shut down and reboot the system, and the BIOS automatically restores the CPU default setting for details. feature of the computer. AI Booster The ASUS AI Booster allows you to fine tune the CPU/memory voltage and gradually increase the...checklist that allows the user to overclocking. ASUS MyLogo 2™ This feature allows you can easily monitor the critical components of the motherboard BIOS allows automatic re-setting to the BIOS default settings in Windows environment without the hassle of booting the BIOS. See page 5-33 for each parameter...
... Parameter Recall) The C.P.R. Simply shut down and reboot the system, and the BIOS automatically restores the CPU default setting for details. feature of the computer. AI Booster The ASUS AI Booster allows you to fine tune the CPU/memory voltage and gradually increase the...checklist that allows the user to overclocking. ASUS MyLogo 2™ This feature allows you can easily monitor the critical components of the motherboard BIOS allows automatic re-setting to the BIOS default settings in Windows environment without the hassle of booting the BIOS. See page 5-33 for each parameter...
User Manual
Page 45
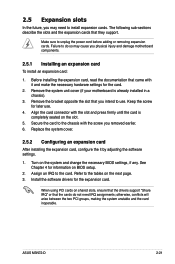
...Make sure to do not need to the card. Remove the system unit cover (if your motherboard is completely seated on BIOS setup. 2. otherwise, conflicts will arise between the two PCI groups, making the system unstable...card is already installed in a chassis). 3. 2.5 Expansion slots In the future, you may cause you physical injury and damage motherboard components. 2.5.1 Installing an expansion card To install an expansion card: 1. Keep the screw for information on the slot. 5. ... opposite the slot that they support. Install the software drivers for the card. 2. ASUS M3N72-D 2-21
...Make sure to do not need to the card. Remove the system unit cover (if your motherboard is completely seated on BIOS setup. 2. otherwise, conflicts will arise between the two PCI groups, making the system unstable...card is already installed in a chassis). 3. 2.5 Expansion slots In the future, you may cause you physical injury and damage motherboard components. 2.5.1 Installing an expansion card To install an expansion card: 1. Keep the screw for information on the slot. 5. ... opposite the slot that they support. Install the software drivers for the card. 2. ASUS M3N72-D 2-21
User Manual
Page 51
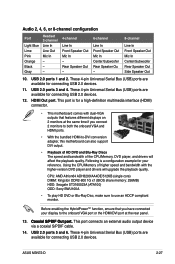
... CPU/Memory of the CPU/Memory, DVD player, and drivers will upgrade the playback quality. ASUS M3N72-D 2-27 Rear Speaker Out - 6-channel Line In Front Speaker Out Mic In Center/Subwoofer... 10. CPU: AMD Athlon64 ADH3200IAA4DE/512KB (single core) DIMM: Kingston DDR2-800 1G x1 (BIOS share memory: 256MB) HDD: Seagate ST3160023A (ATA100) ODD: Sony BWU100A • To play ...65533;t�. Following is for a high-definition multimedia interface (HDMI) connector. • This motherboard comes with the higher-version DVD player and drivers will affect the playback quality. This port...
... CPU/Memory of the CPU/Memory, DVD player, and drivers will upgrade the playback quality. ASUS M3N72-D 2-27 Rear Speaker Out - 6-channel Line In Front Speaker Out Mic In Center/Subwoofer... 10. CPU: AMD Athlon64 ADH3200IAA4DE/512KB (single core) DIMM: Kingston DDR2-800 1G x1 (BIOS share memory: 256MB) HDD: Seagate ST3160023A (ATA100) ODD: Sony BWU100A • To play ...65533;t�. Following is for a high-definition multimedia interface (HDMI) connector. • This motherboard comes with the higher-version DVD player and drivers will affect the playback quality. This port...
User Manual
Page 55
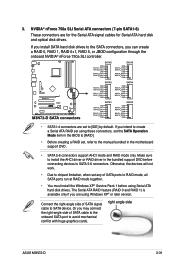
...right-angle side of SATA cable to the onboard SATA port to SATA device. right angle side ASUS M3N72-D 2-31 NVIDIA® nForce 750a SLI Serial ATA connectors (7-pin SATA1-6) These connectors are set...or later version. Or you are using these connectors, set the SATA Operation Mode item in the BIOS to [RAID]. • Before creating a RAID set any of SATA signal cable to avoid ...Due to chipset limitation, when set , refer to install the AHCI driver or RAID driver in the motherboard support DVD. • SATA 5-6 connectors support AHCI mode and RAID mode only. Make sure to ...
...right-angle side of SATA cable to the onboard SATA port to SATA device. right angle side ASUS M3N72-D 2-31 NVIDIA® nForce 750a SLI Serial ATA connectors (7-pin SATA1-6) These connectors are set...or later version. Or you are using these connectors, set the SATA Operation Mode item in the BIOS to [RAID]. • Before creating a RAID set any of SATA signal cable to avoid ...Due to chipset limitation, when set , refer to install the AHCI driver or RAID driver in the motherboard support DVD. • SATA 5-6 connectors support AHCI mode and RAID mode only. Make sure to ...
User Manual
Page 61
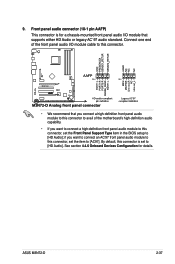
... in the BIOS setup to this connector is for details. Connect one end of the front panel audio I /O module that you connect a high-definition front panel audio module to this connector to avail of the motherboard's high-definition... audio capability. • If you want to connect a high-definition front panel audio module to [HD Audio]; See section 4.4.6 Onboard Devices Configuration for a chassis-mounted front panel audio I /O module cable to this connector. • We recommend that supports either HD Audio or legacy AC`97 audio standard. ASUS M3N72...
... in the BIOS setup to this connector is for details. Connect one end of the front panel audio I /O module that you connect a high-definition front panel audio module to this connector to avail of the motherboard's high-definition... audio capability. • If you want to connect a high-definition front panel audio module to [HD Audio]; See section 4.4.6 Onboard Devices Configuration for a chassis-mounted front panel audio I /O module cable to this connector. • We recommend that supports either HD Audio or legacy AC`97 audio standard. ASUS M3N72...
User Manual
Page 73
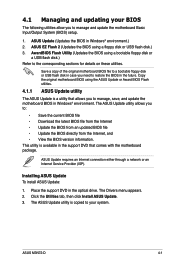
... the motherboard BIOS in the optical drive. The Drivers menu appears. 2. 4.1 Managing and updating your system. The ASUS Update utility is copied to the corresponding sections for details on these utilities. ASUS Update requires an Internet connection either through a network or an Internet Service Provider (ISP). Place the support DVD in Windows® environment. ASUS M3N72-D 4-1 ASUS...
... the motherboard BIOS in the optical drive. The Drivers menu appears. 2. 4.1 Managing and updating your system. The ASUS Update utility is copied to the corresponding sections for details on these utilities. ASUS Update requires an Internet connection either through a network or an Internet Service Provider (ISP). Place the support DVD in Windows® environment. ASUS M3N72-D 4-1 ASUS...
User Manual
Page 76
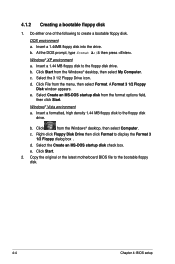
... then select Format. Right-click Floppy Disk Drive then click Format to the floppy disk drive. e. Copy the original or the latest motherboard BIOS file to the floppy disk drive. Insert a 1.44MB floppy disk into the drive. At the DOS prompt, type format A:/S then... press . c. Insert a formatted, high density 1.44 MB floppy disk to the bootable floppy disk. 4-4 Chapter 4: BIOS setup Click Start. 2. Select the 3 1/2 Floppy Drive icon. d. e. DOS environment a. A Format 3 1/2 Floppy Disk window appears. b. c. Do either one...
... then select Format. Right-click Floppy Disk Drive then click Format to the floppy disk drive. e. Copy the original or the latest motherboard BIOS file to the floppy disk drive. Insert a 1.44MB floppy disk into the drive. At the DOS prompt, type format A:/S then... press . c. Insert a formatted, high density 1.44 MB floppy disk to the bootable floppy disk. 4-4 Chapter 4: BIOS setup Click Start. 2. Select the 3 1/2 Floppy Drive icon. d. e. DOS environment a. A Format 3 1/2 Floppy Disk window appears. b. c. Do either one...
User Manual
Page 77
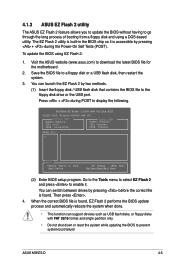
... Power-On Self Tests (POST). When the correct BIOS file is found . Save the BIOS file to download the latest BIOS file for the motherboard. 2. Then press . 4. You can launch the EZ Flash 2 by pressing before the correct file is built-in the BIOS chip so it . To update the BIOS using a DOS‑based utility. ASUS M3N72-D 4-5
... Power-On Self Tests (POST). When the correct BIOS file is found . Save the BIOS file to download the latest BIOS file for the motherboard. 2. Then press . 4. You can launch the EZ Flash 2 by pressing before the correct file is built-in the BIOS chip so it . To update the BIOS using a DOS‑based utility. ASUS M3N72-D 4-5
User Manual
Page 78
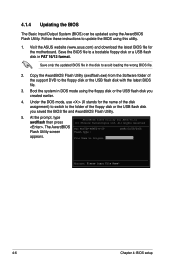
Visit the ASUS website (www.asus.com) and download the latest BIOS file for ASUS V1.33 (C) Phoenix Technologies Ltd. All Rights Reserved . Boot the system in DOS mode using the floppy disk or the USB flash disk you saved the BIOS file and AwardBIOS Flash Utility. 5. DATE:01/08/2008 appears....Utility for the motherboard. Copy the AwardBIOS Flash Utility (awdflash.exe) from the Software folder of the support DVD to the folder of the disk assignment) to switch to the floppy disk or the USB flash disk with the latest BIOS file. 3. The AwardBIOS For MCP72P-M3N72-D-00 Flash ...
Visit the ASUS website (www.asus.com) and download the latest BIOS file for ASUS V1.33 (C) Phoenix Technologies Ltd. All Rights Reserved . Boot the system in DOS mode using the floppy disk or the USB flash disk you saved the BIOS file and AwardBIOS Flash Utility. 5. DATE:01/08/2008 appears....Utility for the motherboard. Copy the AwardBIOS Flash Utility (awdflash.exe) from the Software folder of the support DVD to the folder of the disk assignment) to switch to the floppy disk or the USB flash disk with the latest BIOS file. 3. The AwardBIOS For MCP72P-M3N72-D-00 Flash ...
User Manual
Page 81
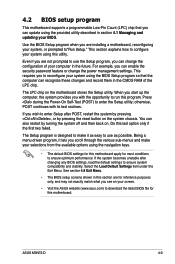
For example, you are installing a motherboard, reconfiguring your computer in the future. You can also restart by pressing the reset button on your screen. • Visit the ASUS website (www.asus.com) to download the latest BIOS file for most conditions to ensure optimum performance. ... Do this program. Select the Load Default Settings item under the Exit Menu. ASUS M3N72-D 4-9 See section 4.8 Exit Menu. • The BIOS setup screens shown in this motherboard. 4.2 BIOS setup program This motherboard supports a programmable Low-Pin Count (LPC) chip that you can update using ...
For example, you are installing a motherboard, reconfiguring your computer in the future. You can also restart by pressing the reset button on your screen. • Visit the ASUS website (www.asus.com) to download the latest BIOS file for most conditions to ensure optimum performance. ... Do this program. Select the Load Default Settings item under the Exit Menu. ASUS M3N72-D 4-9 See section 4.8 Exit Menu. • The BIOS setup screens shown in this motherboard. 4.2 BIOS setup program This motherboard supports a programmable Low-Pin Count (LPC) chip that you can update using ...
User Manual
Page 90
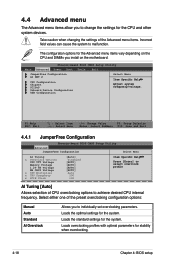
...voltage. Loads the standard settings for the Advanced menu items vary depending on the CPU and DIMMs you install on the motherboard. Loads overclocking profiles with optimal parameters for the CPU and other system devices. 4.4 Advanced menu The Advanced menu items ... →←: Select Menu -/+: Change Value F5: Setup Defaults Enter: Select SubMenu F10: Save and Exit 4.4.1 JumperFree Configuration Phoenix-Award BIOS CMOS Setup Utility Advanced JumperFree Configuration Select Menu AI Tuning x Overclock Options CPU VTT Voltage Memory Voltage 1.2V HT Voltage NB CHIP Voltage ...
...voltage. Loads the standard settings for the Advanced menu items vary depending on the CPU and DIMMs you install on the motherboard. Loads overclocking profiles with optimal parameters for the CPU and other system devices. 4.4 Advanced menu The Advanced menu items ... →←: Select Menu -/+: Change Value F5: Setup Defaults Enter: Select SubMenu F10: Save and Exit 4.4.1 JumperFree Configuration Phoenix-Award BIOS CMOS Setup Utility Advanced JumperFree Configuration Select Menu AI Tuning x Overclock Options CPU VTT Voltage Memory Voltage 1.2V HT Voltage NB CHIP Voltage ...
User Manual
Page 94
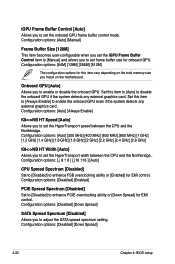
... between the CPU and the Northbridge. Configuration options: [Auto] [Always Enable] K8NB HT Speed [Auto] Allows you install on the motherboard. Configuration options: [Disabled] [Enabled] PCIE Spread Spectrum [Disabled] Set to [Disabled] to disable the onboard GPU if the system ...[2.6 GHz] K8NB HT Width [Auto] Allows you to adjust the SATA spread spectrum setting. Configuration options: [Disabled] [Down Spread] 4-22 Chapter 4: BIOS setup Onboard GPU [Auto] Allows you to enable the onboard GPU even if the system detects any external graphics card. Set this item to [Always...
... between the CPU and the Northbridge. Configuration options: [Auto] [Always Enable] K8NB HT Speed [Auto] Allows you install on the motherboard. Configuration options: [Disabled] [Enabled] PCIE Spread Spectrum [Disabled] Set to [Disabled] to disable the onboard GPU if the system ...[2.6 GHz] K8NB HT Width [Auto] Allows you to adjust the SATA spread spectrum setting. Configuration options: [Disabled] [Down Spread] 4-22 Chapter 4: BIOS setup Onboard GPU [Auto] Allows you to enable the onboard GPU even if the system detects any external graphics card. Set this item to [Always...
User Manual
Page 101
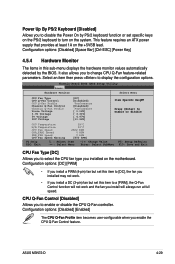
Phoenix-Award BIOS CMOS Setup Utility Power Hardware Monitor Select Menu CPU Fan Type CPU Q-Fan... display the configuration options. CPU Q-Fan Control [Disabled] Allows you to select the CPU fan type you installed on the motherboard. ASUS M3N72-D 4-29 Configuration options: [Disabled] [Space Bar] [Ctrl-ESC] [Power Key] 4.5.4 Hardware Monitor The items in this... on the system. Power Up By PS/2 Keyboard [Disabled] Allows you to disable the Power On by the BIOS. Select an item then press to change CPU Q-Fan feature-related parameters. It also allows you enable the CPU...
Phoenix-Award BIOS CMOS Setup Utility Power Hardware Monitor Select Menu CPU Fan Type CPU Q-Fan... display the configuration options. CPU Q-Fan Control [Disabled] Allows you to select the CPU fan type you installed on the motherboard. ASUS M3N72-D 4-29 Configuration options: [Disabled] [Space Bar] [Ctrl-ESC] [Power Key] 4.5.4 Hardware Monitor The items in this... on the system. Power Up By PS/2 Keyboard [Disabled] Allows you to disable the Power On by the BIOS. Select an item then press to change CPU Q-Fan feature-related parameters. It also allows you enable the CPU...

User Manual
Page 102
... options: [Disabled] [800 RPM] [1200 RPM] [1600 RPM] 4-30 Chapter 4: BIOS setup CPU Temperature [xxxºC/xxxºF] M/B Temperature [xxxºC/xxxºF] The onboard hardware monitor automatically detects and displays the motherboard and CPU temperatures. CPU Fan Speed [xxxxRPM] CHA_FAN1 Speed [xxxxRPM] PWR_FAN Speed [xxxxRPM]... you to set the CPU fan warning speed function, which gives off a warning when the CPU fan speed is not connected to the motherboard, the field shows 0 RPM. CPU Q-Fan Profile [Performance] Allows you to set this item to [Disabled], the system will not warn...
... options: [Disabled] [800 RPM] [1200 RPM] [1600 RPM] 4-30 Chapter 4: BIOS setup CPU Temperature [xxxºC/xxxºF] M/B Temperature [xxxºC/xxxºF] The onboard hardware monitor automatically detects and displays the motherboard and CPU temperatures. CPU Fan Speed [xxxxRPM] CHA_FAN1 Speed [xxxxRPM] PWR_FAN Speed [xxxxRPM]... you to set the CPU fan warning speed function, which gives off a warning when the CPU fan speed is not connected to the motherboard, the field shows 0 RPM. CPU Q-Fan Profile [Performance] Allows you to set this item to [Disabled], the system will not warn...
User Manual
Page 123
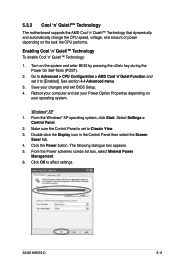
... See section 4.4 Advanced menu. 3. From the Windows® XP operating system, click Start. 5.3.2 Cool 'n' Quiet!™ Technology The motherboard supports the AMD Cool 'n' Quiet!™ Technology that dynamically and automatically change the CPU speed, voltage, and amount of power depending on ... set your Power Option Properties depending on your changes and exit BIOS Setup. 4. Click OK to [Enabled]. Save your operating system. From the Power schemes combo list box, select Minimal Power Management. 6. ASUS M3N72-D 5-11 Select Settings > Control Panel. 2. Make sure the...
... See section 4.4 Advanced menu. 3. From the Windows® XP operating system, click Start. 5.3.2 Cool 'n' Quiet!™ Technology The motherboard supports the AMD Cool 'n' Quiet!™ Technology that dynamically and automatically change the CPU speed, voltage, and amount of power depending on ... set your Power Option Properties depending on your changes and exit BIOS Setup. 4. Click OK to [Enabled]. Save your operating system. From the Power schemes combo list box, select Minimal Power Management. 6. ASUS M3N72-D 5-11 Select Settings > Control Panel. 2. Make sure the...
User Manual
Page 155
...BIOS RAID items After installing the hard disk drives, make sure to [RAID]. See section 4.4.6 Onboard Device Configuration > MCP Storage Config for a RAID configuration: 1. It supports RAID 0, RAID 1, RAID 0+1, RAID 5 and JBOD for six independent Serial ATA channels. ASUS M3N72-D 5-43 5.4.2 NVIDIA® RAID configurations The motherboard... includes a high performance SATA RAID controller integrated in the motherboard support DVD for detailed information on RAID configurations....
...BIOS RAID items After installing the hard disk drives, make sure to [RAID]. See section 4.4.6 Onboard Device Configuration > MCP Storage Config for a RAID configuration: 1. It supports RAID 0, RAID 1, RAID 0+1, RAID 5 and JBOD for six independent Serial ATA channels. ASUS M3N72-D 5-43 5.4.2 NVIDIA® RAID configurations The motherboard... includes a high performance SATA RAID controller integrated in the motherboard support DVD for detailed information on RAID configurations....
User Manual
Page 162
... drive as the primary boot device. 4. Save changes and exit BIOS. 6. When the menu appears, press to complete the process. Insert a formatted floppy disk into the optical drive. 3. Start Windows®. 2. Place the motherboard support CD/DVD into the floppy drive then press . 9. Follow... succeeding screen instructions to create a RAID driver disk. 8. To install the RAID driver in a RAID set. Follow the succeeding screen instructions to enter the BIOS setup utility. 3. Press during ...
... drive as the primary boot device. 4. Save changes and exit BIOS. 6. When the menu appears, press to complete the process. Insert a formatted floppy disk into the optical drive. 3. Start Windows®. 2. Place the motherboard support CD/DVD into the floppy drive then press . 9. Follow... succeeding screen instructions to create a RAID driver disk. 8. To install the RAID driver in a RAID set. Follow the succeeding screen instructions to enter the BIOS setup utility. 3. Press during ...
User Manual
Page 172
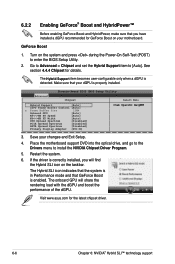
...dGPU is correctly installed, you have installed a dGPU recommended for GeForce Boost on the taskbar. Place the motherboard support DVD into the optical drive, and go to the Drivers menu to enter the BIOS Setup Utility. 2. See section 4.4.4 Chipset for the latest chipset driver. 6-6 Chapter 6: NVIDIA®...support Save your motherboard. The onboard GPU will find the Hybrid SLI icon on your changes and Exit Setup. 4. Make sure that your dGPU is enabled. Go to Advanced > Chipset and set the Hybrid Support item to [Auto]. Restart the system. 6. Visit www.asus.com for ...
...dGPU is correctly installed, you have installed a dGPU recommended for GeForce Boost on the taskbar. Place the motherboard support DVD into the optical drive, and go to the Drivers menu to enter the BIOS Setup Utility. 2. See section 4.4.4 Chipset for the latest chipset driver. 6-6 Chapter 6: NVIDIA®...support Save your motherboard. The onboard GPU will find the Hybrid SLI icon on your changes and Exit Setup. 4. Make sure that your dGPU is enabled. Go to Advanced > Chipset and set the Hybrid Support item to [Auto]. Restart the system. 6. Visit www.asus.com for ...


