User Manual
Page 59
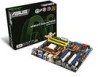
... + HDMI HDMI + D-Sub Supported • • Not supported • • During POST, only the monitor connected to the HDMI/DVI port at the rear panel. This port connects an external audio output device via an optical S/PDIF cable. 15. ASUS M3N-HT Deluxe Series 2-33 CPU DIMM BIOS setup Playback software Suggested list AMD®...
... + HDMI HDMI + D-Sub Supported • • Not supported • • During POST, only the monitor connected to the HDMI/DVI port at the rear panel. This port connects an external audio output device via an optical S/PDIF cable. 15. ASUS M3N-HT Deluxe Series 2-33 CPU DIMM BIOS setup Playback software Suggested list AMD®...

User Manual
Page 73
This chapter describes the power up Powerin3g up sequence, the vocal POST messages, and ways of shutting down the system.
This chapter describes the power up Powerin3g up sequence, the vocal POST messages, and ways of shutting down the system.

User Manual
Page 75
... connections or call your monitor complies with ATX power supplies, the system LED lights up for assistance. At power on self tests or POST. Be sure that is equipped with the last device on the chain) c. Turn on the devices in the following order: a. If... beeps Description No keyboard detected No memory detected No VGA detected Hardware component failure 7. External SCSI devices (starting with a surge protector. 5. ASUS M3N-HT Deluxe Series 3-1 After making all switches are running, the BIOS beeps (see anything within 30 seconds from the time you press the ATX power ...
... connections or call your monitor complies with ATX power supplies, the system LED lights up for assistance. At power on self tests or POST. Be sure that is equipped with the last device on the chain) c. Turn on the devices in the following order: a. If... beeps Description No keyboard detected No memory detected No VGA detected Hardware component failure 7. External SCSI devices (starting with a surge protector. 5. ASUS M3N-HT Deluxe Series 3-1 After making all switches are running, the BIOS beeps (see anything within 30 seconds from the time you press the ATX power ...

User Manual
Page 83
... the floppy disk / USB flash disk that contains the BIOS file to the floppy disk drive or the USB port. ASUS M3N-HT Deluxe Series 4-5 You can switch between drives by pressing + during POST to enable it is accessible by pressing before the correct file is built-in the BIOS chip so it . ASUSTek EZ...
... the floppy disk / USB flash disk that contains the BIOS file to the floppy disk drive or the USB port. ASUS M3N-HT Deluxe Series 4-5 You can switch between drives by pressing + during POST to enable it is accessible by pressing before the correct file is built-in the BIOS chip so it . ASUSTek EZ...

User Manual
Page 87
... ensure system compatibility and stability. If the system becomes unstable after POST, restart the system by pressing , or by turning the system off and then back on your screen. • Visit the ASUS website (www.asus.com) to use as possible. The LPC chip on the system... Setup utility. ASUS M3N-HT Deluxe Series 4-9 This requires you can update using the navigation keys. • The default BIOS settings for most conditions to enter Setup after changing any BIOS settings, load the default settings to use the Setup program, you see on . otherwise, POST continues with the...
... ensure system compatibility and stability. If the system becomes unstable after POST, restart the system by pressing , or by turning the system off and then back on your screen. • Visit the ASUS website (www.asus.com) to use as possible. The LPC chip on the system... Setup utility. ASUS M3N-HT Deluxe Series 4-9 This requires you can update using the navigation keys. • The default BIOS settings for most conditions to enter Setup after changing any BIOS settings, load the default settings to use the Setup program, you see on . otherwise, POST continues with the...
User Manual
Page 98
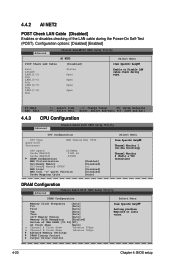
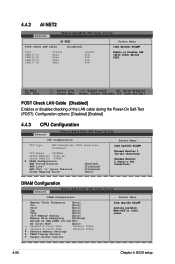
...Memory SLI-Ready Memory CPUOC AMD Live! Configuration options: [Disabled] [Enabled] Advanced Phoenix-AwardBIOS CMOS Setup Utility AI NET2 Select Menu POST Check LAN Cable [Disabled] Item Specific Help Pair Length LAN1(1-2) N/A LAN1(3-6) N/A LAN1(4-5) N/A LAN1(7-8) N/A Status Open Open Open... [Auto] Trp [Auto] Tras [Auto] 1T/T Memory Timing [Auto] Memory Hole Remapping [Enabled] Bottom of the LAN cable during POST. 4.4.2 AI NET2 POST Check LAN Cable [Disabled] Enables or disables checking of UMA DRAM [31:24][FC] AI Clock Skew [Auto] x Channel A Clock...
...Memory SLI-Ready Memory CPUOC AMD Live! Configuration options: [Disabled] [Enabled] Advanced Phoenix-AwardBIOS CMOS Setup Utility AI NET2 Select Menu POST Check LAN Cable [Disabled] Item Specific Help Pair Length LAN1(1-2) N/A LAN1(3-6) N/A LAN1(4-5) N/A LAN1(7-8) N/A Status Open Open Open... [Auto] Trp [Auto] Tras [Auto] 1T/T Memory Timing [Auto] Memory Hole Remapping [Enabled] Bottom of the LAN cable during POST. 4.4.2 AI NET2 POST Check LAN Cable [Disabled] Enables or disables checking of UMA DRAM [31:24][FC] AI Clock Skew [Auto] x Channel A Clock...
User Manual
Page 133
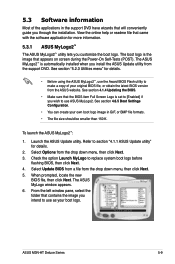
... window appears. 6. From the left window pane, select the folder that appears on screen during the Power‑On Self-Tests (POST). Refer to use ASUS MyLogo 2. Select Options from the support DVD. Check the option Launch MyLogo to make a copy of the applications in GIF file format. • The ... that will conveniently guide you intend to use the Award BIOS Flash utility to replace system boot logo before flashing BIOS, then click Next. 4. ASUS M3N-HT Deluxe Series 5-9 The ASUS MyLogo 2™ is automatically installed when you customize the boot logo. To launch the...
... window appears. 6. From the left window pane, select the folder that appears on screen during the Power‑On Self-Tests (POST). Refer to use ASUS MyLogo 2. Select Options from the support DVD. Check the option Launch MyLogo to make a copy of the applications in GIF file format. • The ... that will conveniently guide you intend to use the Award BIOS Flash utility to replace system boot logo before flashing BIOS, then click Next. 4. ASUS M3N-HT Deluxe Series 5-9 The ASUS MyLogo 2™ is automatically installed when you customize the boot logo. To launch the...
User Manual
Page 134
When the screen returns to the ASUS Update utility, flash the original BIOS to display the new boot logo during POST. 5-10 Chapter 5: Software support 7. Adjust the boot image to enlarge by selecting a value on it. 8. When the logo images appear on the right window pane, select an image to your desired size by clicking on the Ratio box. 9. After flashing the BIOS, restart the computer to load the new boot logo. 10.
When the screen returns to the ASUS Update utility, flash the original BIOS to display the new boot logo during POST. 5-10 Chapter 5: Software support 7. Adjust the boot image to enlarge by selecting a value on it. 8. When the logo images appear on the right window pane, select an image to your desired size by clicking on the Ratio box. 9. After flashing the BIOS, restart the computer to load the new boot logo. 10.
User Manual
Page 135
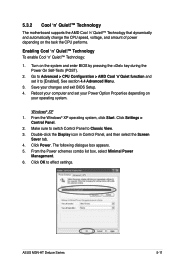
... box appears. 5. From the Power schemes combo list box, select Minimal Power Management. 6. See section 4.4 Advanced Menu. 3. Save your operating system. ASUS M3N-HT Deluxe Series 5-11 Make sure to switch Control Panel to effect settings. Click OK to Classic View. 3. Reboot your computer and set it to Advanced > CPU..., and amount of power depending on the system and enter BIOS by pressing the key during the Power On Self-Tests (POST). 2. Turn on the task the CPU performs. Enabling Cool 'n' Quiet!™ Technology To enable Cool 'n' Quiet!™ Technology: 1.
... box appears. 5. From the Power schemes combo list box, select Minimal Power Management. 6. See section 4.4 Advanced Menu. 3. Save your operating system. ASUS M3N-HT Deluxe Series 5-11 Make sure to switch Control Panel to effect settings. Click OK to Classic View. 3. Reboot your computer and set it to Advanced > CPU..., and amount of power depending on the system and enter BIOS by pressing the key during the Power On Self-Tests (POST). 2. Turn on the task the CPU performs. Enabling Cool 'n' Quiet!™ Technology To enable Cool 'n' Quiet!™ Technology: 1.
User Manual
Page 169
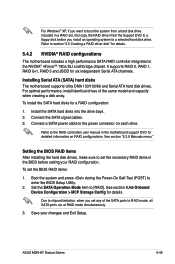
...and Serial ATA hard disk drives. Connect the SATA signal cables. 3. Boot the system and press during the Power-On Self-Test (POST) to [RAID]. Due to chipset limitation, when you install an operating system to set , first copy the RAID driver from a hard...8482; 780a SLI southbridge chipset. Setting the BIOS RAID items After installing the hard disk drives, make sure to a selected hard disk drive. ASUS M3N-HT Deluxe Series 5-45 See section 4.4.6 Onboard Device Configuration > MCP Storage Config for six independent Serial ATA channels. Save your RAID configuration. See section ...
...and Serial ATA hard disk drives. Connect the SATA signal cables. 3. Boot the system and press during the Power-On Self-Test (POST) to [RAID]. Due to chipset limitation, when you install an operating system to set , first copy the RAID driver from a hard...8482; 780a SLI southbridge chipset. Setting the BIOS RAID items After installing the hard disk drives, make sure to a selected hard disk drive. ASUS M3N-HT Deluxe Series 5-45 See section 4.4.6 Onboard Device Configuration > MCP Storage Config for six independent Serial ATA channels. Save your RAID configuration. See section ...
User Manual
Page 170
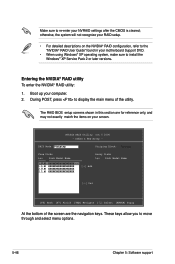
... Disk Model Name [→] Add [←] Del [F6] Back [F7] Finish [TAB] Navigate [↑↓] Select [ENTER] Popup At the bottom of the utility. During POST, press to re-enter your screen. Make sure to display the main menu of the screen are for reference only, and may not exactly match...
... Disk Model Name [→] Add [←] Del [F6] Back [F7] Finish [TAB] Navigate [↑↓] Select [ENTER] Popup At the bottom of the utility. During POST, press to re-enter your screen. Make sure to display the main menu of the screen are for reference only, and may not exactly match...
User Manual
Page 176
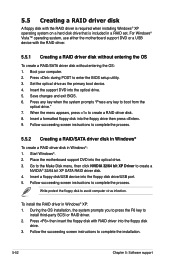
... Windows®. 2. Follow succeeding screen instructions to boot from the optical drive." 7. Follow the succeeding screen instructions to enter the BIOS setup utility. 3. Press during POST to complete the installation. 5-52 Chapter 5: Software support Follow succeeding screen instructions to complete the process. 5.5.2 Creating a RAID/SATA driver disk in Windows® To...
... Windows®. 2. Follow succeeding screen instructions to boot from the optical drive." 7. Follow the succeeding screen instructions to enter the BIOS setup utility. 3. Press during POST to complete the installation. 5-52 Chapter 5: Software support Follow succeeding screen instructions to complete the process. 5.5.2 Creating a RAID/SATA driver disk in Windows® To...

User Manual
Page 190
...Support [Auto] iGPU Frame Buffer Control [Auto] x Frame Buffer Size 128M Onboard GPU [Auto] K8NB HT Speed [Auto] K8NB HT Width [Auto] CPU Spread Spectrum [Disabled] PCIE Spread Spectrum [Disabled] SATA Spread Spectrum [Down Spread...] Primary Display Adapter [PCI-E] Item Specific Help 3. The onboard GPU will find the Hybrid SLI icon on the system and press during the Power-On Self-Test (POST...the Drivers menu to [Auto]. Visit www.asus.com for details.
...Support [Auto] iGPU Frame Buffer Control [Auto] x Frame Buffer Size 128M Onboard GPU [Auto] K8NB HT Speed [Auto] K8NB HT Width [Auto] CPU Spread Spectrum [Disabled] PCIE Spread Spectrum [Disabled] SATA Spread Spectrum [Down Spread...] Primary Display Adapter [PCI-E] Item Specific Help 3. The onboard GPU will find the Hybrid SLI icon on the system and press during the Power-On Self-Test (POST...the Drivers menu to [Auto]. Visit www.asus.com for details.

User Manual
Page 67
This chapter describes the power up Powerin3g up sequence, the vocal POST messages, and ways of shutting down the system.
This chapter describes the power up Powerin3g up sequence, the vocal POST messages, and ways of shutting down the system.
User Manual
Page 69
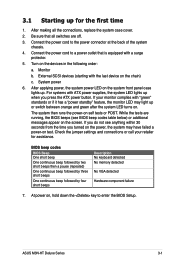
... a surge protector. 5. ASUS M3N-HT Deluxe Series 3-1 3.1 Starting up for assistance. Be sure that is equipped with ATX power supplies, the system LED lights up when you turned on the power, the system may light up or switch between orange and green after the system LED turns on self tests or POST. If your retailer...
... a surge protector. 5. ASUS M3N-HT Deluxe Series 3-1 3.1 Starting up for assistance. Be sure that is equipped with ATX power supplies, the system LED lights up when you turned on the power, the system may light up or switch between orange and green after the system LED turns on self tests or POST. If your retailer...
User Manual
Page 77
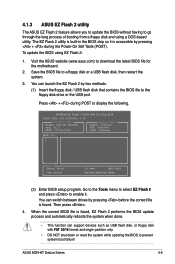
...from a floppy disk and using EZ Flash 2: 1. When the correct BIOS file is accessible by pressing + during POST to prevent system boot failure! ASUS M3N-HT Deluxe Series 4-5 To update the BIOS using a DOS‑based utility. ASUSTek EZ Flash 2 BIOS ROM Utility B325 ...FLASH TYPE: SST 25VF020B /3.3V Current ROM BOARD: M3N-HT DELUXE VER: 0110 DATE: 01/04/2008 Update ROM BOARD: Unknown VER: Unknown DATE: Unknown ...
...from a floppy disk and using EZ Flash 2: 1. When the correct BIOS file is accessible by pressing + during POST to prevent system boot failure! ASUS M3N-HT Deluxe Series 4-5 To update the BIOS using a DOS‑based utility. ASUSTek EZ Flash 2 BIOS ROM Utility B325 ...FLASH TYPE: SST 25VF020B /3.3V Current ROM BOARD: M3N-HT DELUXE VER: 0110 DATE: 01/04/2008 Update ROM BOARD: Unknown VER: Unknown DATE: Unknown ...
User Manual
Page 81
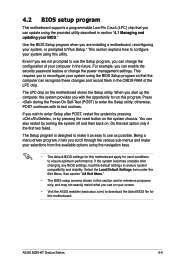
... system, or prompted to use the Setup program, you can change the power management settings. Press during the Power-On Self-Test (POST) to ensure optimum performance. Select the Load Default Settings item under the Exit Menu. 4.2 BIOS setup program This motherboard supports a programmable...-driven program, it as possible. The Setup program is designed to make it lets you with its test routines. Do this program. ASUS M3N-HT Deluxe Series 4-9 For example, you wish to enter Setup after changing any BIOS settings, load the default settings to run this last option ...
... system, or prompted to use the Setup program, you can change the power management settings. Press during the Power-On Self-Test (POST) to ensure optimum performance. Select the Load Default Settings item under the Exit Menu. 4.2 BIOS setup program This motherboard supports a programmable...-driven program, it as possible. The Setup program is designed to make it lets you with its test routines. Do this program. ASUS M3N-HT Deluxe Series 4-9 For example, you wish to enter Setup after changing any BIOS settings, load the default settings to run this last option ...
User Manual
Page 92
...(3-6) LAN1(4-5) LAN1(7-8) Status Open Open Open Open Length N/A N/A N/A N/A Enable or Disable LAN cable check during the Power-On Self‑Test (POST). F1:Help ESC: Exit ↑↓ : Select Item -/+: Change Value F5: Setup Defaults →←: Select Menu Enter: Select Sub-menu ...F10: Save and Exit POST Check LAN Cable [Disabled] Enables or disables checking of UMA DRAM [31:24][FC] AI Clock Skew [Auto] x Channel A Clock Skew Advance...
...(3-6) LAN1(4-5) LAN1(7-8) Status Open Open Open Open Length N/A N/A N/A N/A Enable or Disable LAN cable check during the Power-On Self‑Test (POST). F1:Help ESC: Exit ↑↓ : Select Item -/+: Change Value F5: Setup Defaults →←: Select Menu Enter: Select Sub-menu ...F10: Save and Exit POST Check LAN Cable [Disabled] Enables or disables checking of UMA DRAM [31:24][FC] AI Clock Skew [Auto] x Channel A Clock Skew Advance...
User Manual
Page 127
.... • Make sure that appears on screen during the Power‑On Self-Tests (POST). See section 4.6.5 Boot Settings Configuration. • You can create your boot logo. ASUS M3N-HT Deluxe Series 5-9 The ASUS MyLogo2™ is the image that the BIOS item Full Screen Logo is set to [...Enabled] if you wish to use ASUS MyLogo2. Select Update BIOS from a file from the support DVD. The ASUS MyLogo window appears. 6. 5.3 Software...
.... • Make sure that appears on screen during the Power‑On Self-Tests (POST). See section 4.6.5 Boot Settings Configuration. • You can create your boot logo. ASUS M3N-HT Deluxe Series 5-9 The ASUS MyLogo2™ is the image that the BIOS item Full Screen Logo is set to [...Enabled] if you wish to use ASUS MyLogo2. Select Update BIOS from a file from the support DVD. The ASUS MyLogo window appears. 6. 5.3 Software...

User Manual
Page 128
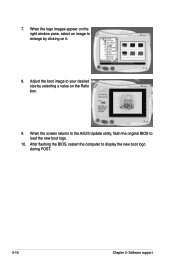
After flashing the BIOS, restart the computer to load the new boot logo. 10. When the logo images appear on the right window pane, select an image to your desired size by clicking on the Ratio box. 9. When the screen returns to the ASUS Update utility, flash the original BIOS to display the new boot logo during POST. 5-10 Chapter 5: Software support Adjust the boot image to enlarge by selecting a value on it. 8. 7.
After flashing the BIOS, restart the computer to load the new boot logo. 10. When the logo images appear on the right window pane, select an image to your desired size by clicking on the Ratio box. 9. When the screen returns to the ASUS Update utility, flash the original BIOS to display the new boot logo during POST. 5-10 Chapter 5: Software support Adjust the boot image to enlarge by selecting a value on it. 8. 7.


