User Manual
Page 9
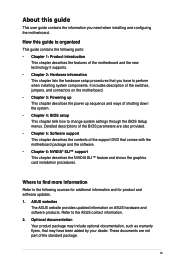
... perform when installing system components. Refer to change system settings through the BIOS Setup menus. It includes description of the switches, jumpers, and connectors on ASUS hardware and software products. ASUS websites The ASUS website provides updated information on the motherboard. • ... Chapter 5: Software support This chapter describes the contents of shutting down the system. • Chapter 4: BIOS setup This chapter tells how to the ASUS contact information. 2. About this guide is organized This guide contains the following sources for additional information and ...
... perform when installing system components. Refer to change system settings through the BIOS Setup menus. It includes description of the switches, jumpers, and connectors on ASUS hardware and software products. ASUS websites The ASUS website provides updated information on the motherboard. • ... Chapter 5: Software support This chapter describes the contents of shutting down the system. • Chapter 4: BIOS setup This chapter tells how to the ASUS contact information. 2. About this guide is organized This guide contains the following sources for additional information and ...
User Manual
Page 23
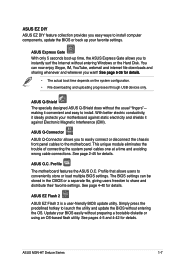
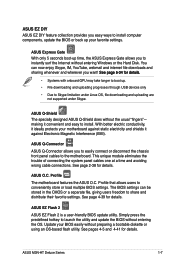
... 4-5 and 4-42 for details. With better electric conductivity, it ideally protects your BIOS easily without preparing a bootable diskette or using an OS-based flash utility. ASUS O.C. The BIOS settings can now enjoy Skype, IM, YouTube, webmail and internet file downloads and sharing whenever... Profile that allows users to install. ASUS M3N-HT Deluxe Series 1-7 ASUS Express Gate With only 5 seconds boot-up time, the ASUS Express Gate allows you easy ways to install computer components, update the BIOS or back up your favorite settings. making it against static electricity and ...
... 4-5 and 4-42 for details. With better electric conductivity, it ideally protects your BIOS easily without preparing a bootable diskette or using an OS-based flash utility. ASUS O.C. The BIOS settings can now enjoy Skype, IM, YouTube, webmail and internet file downloads and sharing whenever... Profile that allows users to install. ASUS M3N-HT Deluxe Series 1-7 ASUS Express Gate With only 5 seconds boot-up time, the ASUS Express Gate allows you easy ways to install computer components, update the BIOS or back up your favorite settings. making it against static electricity and ...
User Manual
Page 24
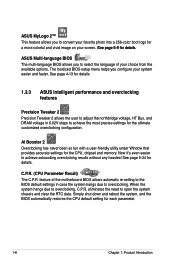
...the available options. The localized BIOS setup menu helps you to select the language of the motherboard BIOS allows automatic re-setting to the BIOS default settings in 0.02V steps to achieve the most precise settings for details. 1.3.3 ASUS intelligent performance and overclocking features ...Precision Tweaker 2 Precision Tweaker 2 allows the user to adjust the northbridge voltage, HT Bus,...
...the available options. The localized BIOS setup menu helps you to select the language of the motherboard BIOS allows automatic re-setting to the BIOS default settings in 0.02V steps to achieve the most precise settings for details. 1.3.3 ASUS intelligent performance and overclocking features ...Precision Tweaker 2 Precision Tweaker 2 allows the user to adjust the northbridge voltage, HT Bus,...
User Manual
Page 52
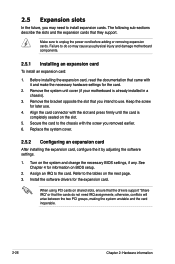
...your motherboard is completely seated on the slot. 5. See Chapter 4 for the card. 2. Refer to the chassis with it by adjusting the software settings. 1. 2.5 Expansion slots In the future, you may cause you physical injury and damage motherboard components. 2.5.1 Installing an expansion card To install an ...until the card is already installed in a chassis). 3. Secure the card to the tables on BIOS setup. 2. When using PCI cards on the system and change the necessary BIOS settings, if any. The following sub‑sections describe the slots and the expansion cards that the ...
...your motherboard is completely seated on the slot. 5. See Chapter 4 for the card. 2. Refer to the chassis with it by adjusting the software settings. 1. 2.5 Expansion slots In the future, you may cause you physical injury and damage motherboard components. 2.5.1 Installing an expansion card To install an ...until the card is already installed in a chassis). 3. Secure the card to the tables on BIOS setup. 2. When using PCI cards on the system and change the necessary BIOS settings, if any. The following sub‑sections describe the slots and the expansion cards that the ...
User Manual
Page 56
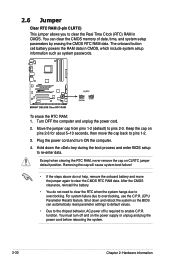
... the RTC when the system hangs due to re-enter data. Shut down the key during the boot process and enter BIOS setup to overclocking. You can automatically reset parameter settings to default values. • Due to overclocking, use the C.P.R. (CPU Parameter Recall) feature. To erase the RTC RAM: 1. Keep...the cap back to enable C.P.R. The onboard button cell battery powers the RAM data in CMOS. function. Hold down and reboot the system so the BIOS can clear the CMOS memory of date, time, and system setup parameters by erasing the CMOS RTC RAM data. 2.6 Jumper Clear RTC RAM (3-...
... the RTC when the system hangs due to re-enter data. Shut down the key during the boot process and enter BIOS setup to overclocking. You can automatically reset parameter settings to default values. • Due to overclocking, use the C.P.R. (CPU Parameter Recall) feature. To erase the RTC RAM: 1. Keep...the cap back to enable C.P.R. The onboard button cell battery powers the RAM data in CMOS. function. Hold down and reboot the system so the BIOS can clear the CMOS memory of date, time, and system setup parameters by erasing the CMOS RTC RAM data. 2.6 Jumper Clear RTC RAM (3-...
User Manual
Page 63
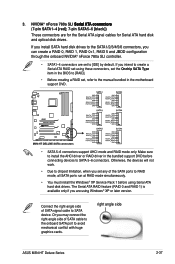
...hard disk drives. right angle side ASUS M3N-HT Deluxe Series 2-37 3. Make sure to the manual bundled in the motherboard support DVD. • SATA 5-6 connectors support AHCI mode and RAID mode only. If you set , refer to install the AHCI driver or RAID driver in the BIOS to [RAID]. • Before creating... a RAID set any of the SATA ports to RAID mode, all SATA ports run at RAID mode simultaneously...
...hard disk drives. right angle side ASUS M3N-HT Deluxe Series 2-37 3. Make sure to the manual bundled in the motherboard support DVD. • SATA 5-6 connectors support AHCI mode and RAID mode only. If you set , refer to install the AHCI driver or RAID driver in the BIOS to [RAID]. • Before creating... a RAID set any of the SATA ports to RAID mode, all SATA ports run at RAID mode simultaneously...
User Manual
Page 68
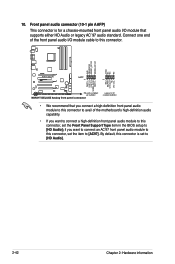
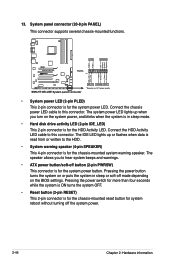
Front panel audio connector (10-1 pin AAFP) This connector is set to this connector is for a chassis-mounted front panel audio I /O module cable to [HD Audio]. 2-42 Chapter 2: ...Audio or legacy AC`97 audio standard. if you want to connect an AC'97 front panel audio module to this connector, set the item to [HD Audio]; 10. Connect one end of the front panel audio I /O module that you connect a high... capability. • If you want to connect a high-definition front panel audio module to this connector, set the Front Panel Support Type item in the BIOS setup to [AC97].
Front panel audio connector (10-1 pin AAFP) This connector is set to this connector is for a chassis-mounted front panel audio I /O module cable to [HD Audio]. 2-42 Chapter 2: ...Audio or legacy AC`97 audio standard. if you want to connect an AC'97 front panel audio module to this connector, set the item to [HD Audio]; 10. Connect one end of the front panel audio I /O module that you connect a high... capability. • If you want to connect a high-definition front panel audio module to this connector, set the Front Panel Support Type item in the BIOS setup to [AC97].
User Manual
Page 70
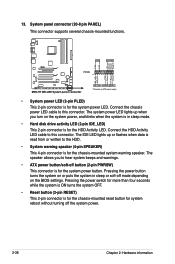
... power LED cable to the HDD. • System warning speaker (4-pin SPEAKER) This 4-pin connector is in sleep or soft-off mode depending on the BIOS settings. The speaker allows you turn on or puts the system in sleep mode. • Hard disk drive activity LED (2-pin IDE_LED) This 2-pin connector is...
... power LED cable to the HDD. • System warning speaker (4-pin SPEAKER) This 4-pin connector is in sleep or soft-off mode depending on the BIOS settings. The speaker allows you turn on or puts the system in sleep mode. • Hard disk drive activity LED (2-pin IDE_LED) This 2-pin connector is...
User Manual
Page 75
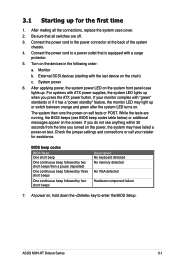
... orange and green after the system LED turns on. If you do not see BIOS beep codes table below) or additional messages appear on , hold down the key to enter the BIOS Setup. ASUS M3N-HT Deluxe Series 3-1 Connect the power cord to the power connector at the back of the...keyboard detected No memory detected No VGA detected Hardware component failure 7. Check the jumper settings and connections or call your monitor complies with a surge protector. 5. After making all switches are running, the BIOS beeps (see anything within 30 seconds from the time you press the ATX power button...
... orange and green after the system LED turns on. If you do not see BIOS beep codes table below) or additional messages appear on , hold down the key to enter the BIOS Setup. ASUS M3N-HT Deluxe Series 3-1 Connect the power cord to the power connector at the back of the...keyboard detected No memory detected No VGA detected Hardware component failure 7. Check the jumper settings and connections or call your monitor complies with a surge protector. 5. After making all switches are running, the BIOS beeps (see anything within 30 seconds from the time you press the ATX power button...

User Manual
Page 76
...ON, pressing the power switch for more than four seconds puts the system to sleep mode or to soft-off mode, depending on the BIOS setting. Click the Start button then select Shut Down. 2. Pressing the power switch for less than four seconds lets the system enter the soft...-off mode regardless of the BIOS setting. 3-2 Chapter 3: Powering up Click the Start button then select Turn Off Computer. 2. 3.2 Turning off the computer 3.2.1 Using the OS shut down function...
...ON, pressing the power switch for more than four seconds puts the system to sleep mode or to soft-off mode, depending on the BIOS setting. Click the Start button then select Shut Down. 2. Pressing the power switch for less than four seconds lets the system enter the soft...-off mode regardless of the BIOS setting. 3-2 Chapter 3: Powering up Click the Start button then select Turn Off Computer. 2. 3.2 Turning off the computer 3.2.1 Using the OS shut down function...
User Manual
Page 77
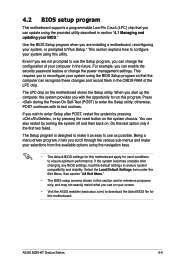
Detailed descriptions of the BIOS parameters are also provided. This chapter tells how to change the system settings through the BIOS Setup menus. Chapter 4: 4 BIOS setup
Detailed descriptions of the BIOS parameters are also provided. This chapter tells how to change the system settings through the BIOS Setup menus. Chapter 4: 4 BIOS setup

User Manual
Page 87
...button on . See section "4.8 Exit Menu." • The BIOS setup screens shown in this section are installing a motherboard, reconfiguring your system, or prompted to reconfigure your BIOS." ASUS M3N-HT Deluxe Series 4-9 This section explains how to run this program. If... you can update using the provided utility described in section "4.1 Managing and updating your system using the BIOS Setup program so that you wish to enter Setup after changing any BIOS settings, load the default settings...
...button on . See section "4.8 Exit Menu." • The BIOS setup screens shown in this section are installing a motherboard, reconfiguring your system, or prompted to reconfigure your BIOS." ASUS M3N-HT Deluxe Series 4-9 This section explains how to run this program. If... you can update using the provided utility described in section "4.1 Managing and updating your system using the BIOS Setup program so that you wish to enter Setup after changing any BIOS settings, load the default settings...

User Manual
Page 88
... For selecting the exit options and loading default settings To select an item on the menu bar, press the right or left arrow key on your screen. • Visit the ASUS website (www.asus.com) to download the latest BIOS information. 4-10 Chapter 4: BIOS setup Installed Memory 512MB Usable Memory 511MB F1...reference purposes only, and may not exactly match what you see on the keyboard until the desired item is highlighted. • The BIOS setup screens shown in .] [ST321122A] [ASUS CDS520/A] [None] [None] [None] [None] [Disabled] Change the day, month, year and century.
... For selecting the exit options and loading default settings To select an item on the menu bar, press the right or left arrow key on your screen. • Visit the ASUS website (www.asus.com) to download the latest BIOS information. 4-10 Chapter 4: BIOS setup Installed Memory 512MB Usable Memory 511MB F1...reference purposes only, and may not exactly match what you see on the keyboard until the desired item is highlighted. • The BIOS setup screens shown in .] [ST321122A] [ASUS CDS520/A] [None] [None] [None] [None] [Disabled] Change the day, month, year and century.

User Manual
Page 118
... F5: Setup Defaults →←: Select Menu Enter: Select Sub-menu F10: Save and Exit 4.7.1 ASUS O.C. Load BIOS Profile Phoenix-Award BIOS CMOS Setup Utility Tools Load BIOS Profile Select Menu Load from Profile 1 Load from Profile 2 Load from File Item Specific Help Load...Tools Exit ASUS O.C. Profile This item allows you to configure options for special functions. 4.7 Tools menu The Tools menu items allow you to store or load multiple BIOS settings. Phoenix-Award BIOS CMOS Setup Utility Tools ASUS BIOS Profile Load BIOS Profile Save BIOS Profile Select...
... F5: Setup Defaults →←: Select Menu Enter: Select Sub-menu F10: Save and Exit 4.7.1 ASUS O.C. Load BIOS Profile Phoenix-Award BIOS CMOS Setup Utility Tools Load BIOS Profile Select Menu Load from Profile 1 Load from Profile 2 Load from File Item Specific Help Load...Tools Exit ASUS O.C. Profile This item allows you to configure options for special functions. 4.7 Tools menu The Tools menu items allow you to store or load multiple BIOS settings. Phoenix-Award BIOS CMOS Setup Utility Tools ASUS BIOS Profile Load BIOS Profile Save BIOS Profile Select...
User Manual
Page 23
... users to the motherboard. Update your BIOS easily without the usual "fingers"- See page 4-39 for details. ASUS M3N-HT Deluxe Series 1-7 ASUS Q-Shield The specially designed ASUS Q-Shield does without preparing a bootable diskette or using an OS-based flash utility. With better electric conductivity, it ideally protects your favorite settings. ASUS Q-Connector ASUS Q-Connector allows you to easily connect...
... users to the motherboard. Update your BIOS easily without the usual "fingers"- See page 4-39 for details. ASUS M3N-HT Deluxe Series 1-7 ASUS Q-Shield The specially designed ASUS Q-Shield does without preparing a bootable diskette or using an OS-based flash utility. With better electric conductivity, it ideally protects your favorite settings. ASUS Q-Connector ASUS Q-Connector allows you to easily connect...

User Manual
Page 46
...system cover. 2.5.2 Configuring an expansion card After installing the expansion card, configure the it and make the necessary hardware settings for later use . Refer to unplug the power cord before adding or removing expansion cards. Make sure to the...seated on shared slots, ensure that the drivers support "Share IRQ" or that came with it by adjusting the software settings. 1. When using PCI cards on the slot. 5. otherwise, conflicts will arise between the two PCI groups, making... software drivers for information on the system and change the necessary BIOS settings, if any.
...system cover. 2.5.2 Configuring an expansion card After installing the expansion card, configure the it and make the necessary hardware settings for later use . Refer to unplug the power cord before adding or removing expansion cards. Make sure to the...seated on shared slots, ensure that the drivers support "Share IRQ" or that came with it by adjusting the software settings. 1. When using PCI cards on the slot. 5. otherwise, conflicts will arise between the two PCI groups, making... software drivers for information on the system and change the necessary BIOS settings, if any.
User Manual
Page 64
.... • Hard disk drive activity LED (2-pin IDE_LED) This 2-pin connector is for the HDD Activity LED. PWR Ground Reset Ground M3N-HT DELUXE System panel connector IDE_LED PWRSW RESET * Requires an ATX power supply • System power LED (2-pin PLED) This 2-pin connector is... Ground Speaker M3N-HT DELUXE PLED SPEAKER PANEL PIN 1 IDE_LED+ IDE_LED- Connect the HDD Activity LED cable to hear system beeps and warnings. • ATX power button/soft-off the system power. 2-38 Chapter 2: Hardware information Pressing the power button turns the system on the BIOS settings. 13....
.... • Hard disk drive activity LED (2-pin IDE_LED) This 2-pin connector is for the HDD Activity LED. PWR Ground Reset Ground M3N-HT DELUXE System panel connector IDE_LED PWRSW RESET * Requires an ATX power supply • System power LED (2-pin PLED) This 2-pin connector is... Ground Speaker M3N-HT DELUXE PLED SPEAKER PANEL PIN 1 IDE_LED+ IDE_LED- Connect the HDD Activity LED cable to hear system beeps and warnings. • ATX power button/soft-off the system power. 2-38 Chapter 2: Hardware information Pressing the power button turns the system on the BIOS settings. 13....

User Manual
Page 70
... using Windows® Vista™: 1. Pressing the power switch for less than four seconds lets the system enter the soft-off mode regardless of the BIOS setting. 3-2 Chapter 3: Powering up If you are using Windows® XP: 1. Click the Turn Off button to soft-off after Windows® shuts down. 3.2.2 Using the... than four seconds puts the system to sleep mode or to shut down the computer. 3. The power supply should turn off mode, depending on the BIOS setting.
... using Windows® Vista™: 1. Pressing the power switch for less than four seconds lets the system enter the soft-off mode regardless of the BIOS setting. 3-2 Chapter 3: Powering up If you are using Windows® XP: 1. Click the Turn Off button to soft-off after Windows® shuts down. 3.2.2 Using the... than four seconds puts the system to sleep mode or to shut down the computer. 3. The power supply should turn off mode, depending on the BIOS setting.
User Manual
Page 81
...or by turning the system off and then back on the system chassis. See section "4.8 Exit Menu." • The BIOS setup screens shown in the future. ASUS M3N-HT Deluxe Series 4-9 Even if you are installing a motherboard, reconfiguring your system using this last option only if the first two...the configuration of the LPC chip. Do this utility. Use the BIOS Setup program when you to reconfigure your system, or prompted to enter Setup after changing any BIOS settings, load the default settings to enter the Setup utility; This requires you are not prompted to...
...or by turning the system off and then back on the system chassis. See section "4.8 Exit Menu." • The BIOS setup screens shown in the future. ASUS M3N-HT Deluxe Series 4-9 Even if you are installing a motherboard, reconfiguring your system using this last option only if the first two...the configuration of the LPC chip. Do this utility. Use the BIOS Setup program when you to reconfigure your system, or prompted to enter Setup after changing any BIOS settings, load the default settings to enter the Setup utility; This requires you are not prompted to...

User Manual
Page 111
... Defaults F10: Save and Exit 4.7.1 ASUS O.C. ASUS M3N-HT Deluxe Series 4-39 Load BIOS Profile Phoenix-Award BIOS CMOS Setup Utility Tools Load BIOS Profile Select Menu Load from Profile 1 Load from Profile 2 Load from File Item Specific Help Load BIOS Profile from Profile 1/2 Allows you to load the previous BIOS settings saved in the BIOS Flash. Press to configure options for...
... Defaults F10: Save and Exit 4.7.1 ASUS O.C. ASUS M3N-HT Deluxe Series 4-39 Load BIOS Profile Phoenix-Award BIOS CMOS Setup Utility Tools Load BIOS Profile Select Menu Load from Profile 1 Load from Profile 2 Load from File Item Specific Help Load BIOS Profile from Profile 1/2 Allows you to load the previous BIOS settings saved in the BIOS Flash. Press to configure options for...


