User Manual
Page 59
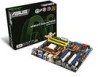
... device via an optical S/PDIF cable. 15. ASUS M3N-HT Deluxe Series 2-33 Optical S/PDIF Out port. Before enabling the HybridPower™ function, ensure that you have connected your motherboard: Dual display outputs DVI + D-Sub DVI + HDMI HDMI + D-Sub Supported • • Not supported • • During POST, only the monitor connected to the D-Sub...
... device via an optical S/PDIF cable. 15. ASUS M3N-HT Deluxe Series 2-33 Optical S/PDIF Out port. Before enabling the HybridPower™ function, ensure that you have connected your motherboard: Dual display outputs DVI + D-Sub DVI + HDMI HDMI + D-Sub Supported • • Not supported • • During POST, only the monitor connected to the D-Sub...

User Manual
Page 73
This chapter describes the power up Powerin3g up sequence, the vocal POST messages, and ways of shutting down the system.
This chapter describes the power up Powerin3g up sequence, the vocal POST messages, and ways of shutting down the system.

User Manual
Page 75
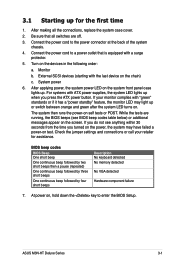
Be sure that is equipped with the last device on self tests or POST. Connect the power cord to a power outlet that all the connections, replace the system case cover. 2. External SCSI devices (starting with a surge protector. 5. For systems ... by three short beeps One continuous beep followed by four short beeps Description No keyboard detected No memory detected No VGA detected Hardware component failure 7. ASUS M3N-HT Deluxe Series 3-1 System power 6. Turn on , hold down the key to the power connector at the back of the system chassis. 4. If your retailer for the...
Be sure that is equipped with the last device on self tests or POST. Connect the power cord to a power outlet that all the connections, replace the system case cover. 2. External SCSI devices (starting with a surge protector. 5. For systems ... by three short beeps One continuous beep followed by four short beeps Description No keyboard detected No memory detected No VGA detected Hardware component failure 7. ASUS M3N-HT Deluxe Series 3-1 System power 6. Turn on , hold down the key to the power connector at the back of the system chassis. 4. If your retailer for the...

User Manual
Page 83
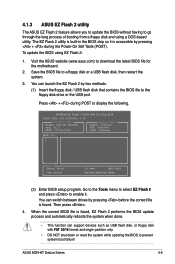
...BIOS file for the motherboard. 2. Visit the ASUS website (www.asus.com) to display the following. Press + during the Power-On Self Tests (POST). ASUSTek EZ Flash 2 BIOS ROM Utility B325 FLASH TYPE: SST 25VF020B /3.3V Current ROM BOARD: M3N-HT DELUXE VER: 0110 DATE: 01/04/2008 Update ...press to go through the long process of booting from a floppy disk and using EZ Flash 2: 1. Then press . 4. ASUS M3N-HT Deluxe Series 4-5 4.1.3 ASUS EZ Flash 2 utility The ASUS EZ Flash 2 feature allows you to update the BIOS without having to enable it is accessible by two methods. (1) Insert the...
...BIOS file for the motherboard. 2. Visit the ASUS website (www.asus.com) to display the following. Press + during the Power-On Self Tests (POST). ASUSTek EZ Flash 2 BIOS ROM Utility B325 FLASH TYPE: SST 25VF020B /3.3V Current ROM BOARD: M3N-HT DELUXE VER: 0110 DATE: 01/04/2008 Update ...press to go through the long process of booting from a floppy disk and using EZ Flash 2: 1. Then press . 4. ASUS M3N-HT Deluxe Series 4-5 4.1.3 ASUS EZ Flash 2 utility The ASUS EZ Flash 2 feature allows you to update the BIOS without having to enable it is accessible by two methods. (1) Insert the...

User Manual
Page 87
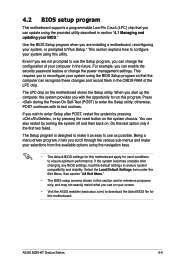
...settings to enter the Setup utility; ASUS M3N-HT Deluxe Series 4-9 4.2 BIOS setup program This motherboard supports a programmable Low-Pin Count (LPC) chip that the computer can change the power management settings. The LPC chip on the system chassis. otherwise, POST continues with the opportunity to use ...to ensure optimum performance. If the system becomes unstable after POST, restart the system by pressing , or by turning the system off and then back on your screen. • Visit the ASUS website (www.asus.com) to "Run Setup." The Setup program is designed...
...settings to enter the Setup utility; ASUS M3N-HT Deluxe Series 4-9 4.2 BIOS setup program This motherboard supports a programmable Low-Pin Count (LPC) chip that the computer can change the power management settings. The LPC chip on the system chassis. otherwise, POST continues with the opportunity to use ...to ensure optimum performance. If the system becomes unstable after POST, restart the system by pressing , or by turning the system off and then back on your screen. • Visit the ASUS website (www.asus.com) to "Run Setup." The Setup program is designed...
User Manual
Page 98
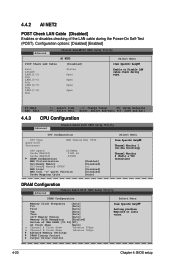
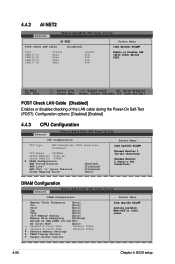
...[Auto] Trp [Auto] Tras [Auto] 1T/T Memory Timing [Auto] Memory Hole Remapping [Enabled] Bottom of the LAN cable during POST. 4.4.2 AI NET2 POST Check LAN Cable [Disabled] Enables or disables checking of UMA DRAM [31:24][FC] AI Clock Skew [Auto] x Channel A Clock...Memory SLI-Ready Memory CPUOC AMD Live! Configuration options: [Disabled] [Enabled] Advanced Phoenix-AwardBIOS CMOS Setup Utility AI NET2 Select Menu POST Check LAN Cable [Disabled] Item Specific Help Pair Length LAN1(1-2) N/A LAN1(3-6) N/A LAN1(4-5) N/A LAN1(7-8) N/A Status Open Open Open...
...[Auto] Trp [Auto] Tras [Auto] 1T/T Memory Timing [Auto] Memory Hole Remapping [Enabled] Bottom of the LAN cable during POST. 4.4.2 AI NET2 POST Check LAN Cable [Disabled] Enables or disables checking of UMA DRAM [31:24][FC] AI Clock Skew [Auto] x Channel A Clock...Memory SLI-Ready Memory CPUOC AMD Live! Configuration options: [Disabled] [Enabled] Advanced Phoenix-AwardBIOS CMOS Setup Utility AI NET2 Select Menu POST Check LAN Cable [Disabled] Item Specific Help Pair Length LAN1(1-2) N/A LAN1(3-6) N/A LAN1(4-5) N/A LAN1(7-8) N/A Status Open Open Open...
User Manual
Page 133
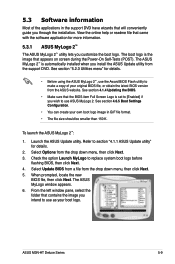
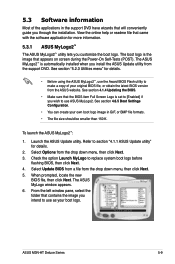
... select the folder that came with the software application for details. • Before using the ASUS MyLogo 2™, use ASUS MyLogo 2. View the online help or readme file that contains the image you customize the boot...POST). Launch the ASUS Update utility. The ASUS MyLogo window appears. 6. 5.3 Software information Most of your original BIOS file, or obtain the latest BIOS version from the ASUS website. See section "5.2.3 Utilities menu" for more information. 5.3.1 ASUS MyLogo 2™ The ASUS MyLogo 2™ utility lets you intend to use as your boot logo. ASUS M3N-HT Deluxe...
... select the folder that came with the software application for details. • Before using the ASUS MyLogo 2™, use ASUS MyLogo 2. View the online help or readme file that contains the image you customize the boot...POST). Launch the ASUS Update utility. The ASUS MyLogo window appears. 6. 5.3 Software information Most of your original BIOS file, or obtain the latest BIOS version from the ASUS website. See section "5.2.3 Utilities menu" for more information. 5.3.1 ASUS MyLogo 2™ The ASUS MyLogo 2™ utility lets you intend to use as your boot logo. ASUS M3N-HT Deluxe...
User Manual
Page 134
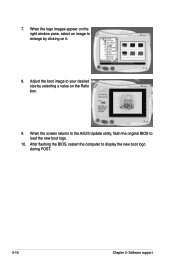
When the logo images appear on the right window pane, select an image to your desired size by clicking on the Ratio box. 9. Adjust the boot image to enlarge by selecting a value on it. 8. After flashing the BIOS, restart the computer to load the new boot logo. 10. When the screen returns to the ASUS Update utility, flash the original BIOS to display the new boot logo during POST. 5-10 Chapter 5: Software support 7.
When the logo images appear on the right window pane, select an image to your desired size by clicking on the Ratio box. 9. Adjust the boot image to enlarge by selecting a value on it. 8. After flashing the BIOS, restart the computer to load the new boot logo. 10. When the screen returns to the ASUS Update utility, flash the original BIOS to display the new boot logo during POST. 5-10 Chapter 5: Software support 7.
User Manual
Page 135
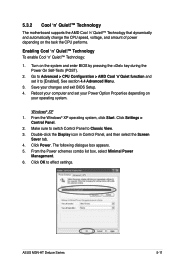
... the CPU speed, voltage, and amount of power depending on the system and enter BIOS by pressing the key during the Power On Self-Tests (POST). 2. Save your computer and set it to Advanced > CPU Configuration > AMD Cool 'n'Quiet function and set your Power Option Properties depending on your operating system... Panel. 2. Click Power. Turn on the task the CPU performs. Enabling Cool 'n' Quiet!™ Technology To enable Cool 'n' Quiet!™ Technology: 1. See section 4.4 Advanced Menu. 3. ASUS M3N-HT Deluxe Series 5-11
... the CPU speed, voltage, and amount of power depending on the system and enter BIOS by pressing the key during the Power On Self-Tests (POST). 2. Save your computer and set it to Advanced > CPU Configuration > AMD Cool 'n'Quiet function and set your Power Option Properties depending on your operating system... Panel. 2. Click Power. Turn on the task the CPU performs. Enabling Cool 'n' Quiet!™ Technology To enable Cool 'n' Quiet!™ Technology: 1. See section 4.4 Advanced Menu. 3. ASUS M3N-HT Deluxe Series 5-11
User Manual
Page 169
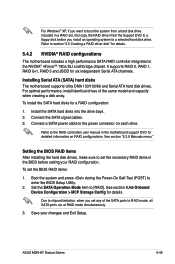
.../100/66 and Serial ATA hard disk drives. Connect the SATA signal cables. 3. Boot the system and press during the Power-On Self-Test (POST) to [RAID]. ASUS M3N-HT Deluxe Series 5-45 For optimal performance, install identical drives of the SATA ports to section "5.5 Creating a RAID driver disk" for details. 5.4.2 NVIDIA® RAID configurations...
.../100/66 and Serial ATA hard disk drives. Connect the SATA signal cables. 3. Boot the system and press during the Power-On Self-Test (POST) to [RAID]. ASUS M3N-HT Deluxe Series 5-45 For optimal performance, install identical drives of the SATA ports to section "5.5 Creating a RAID driver disk" for details. 5.4.2 NVIDIA® RAID configurations...
User Manual
Page 170
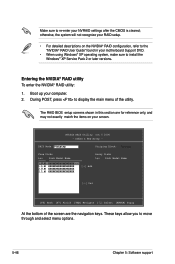
... Support DVD. • When using Windows® XP operating system, make sure to install the Windows® XP Service Pack 2 or later versions�. During POST, press to display the main menu of the screen are for reference only, and may not exactly match the items on the NVIDIA® RAID...
... Support DVD. • When using Windows® XP operating system, make sure to install the Windows® XP Service Pack 2 or later versions�. During POST, press to display the main menu of the screen are for reference only, and may not exactly match the items on the NVIDIA® RAID...
User Manual
Page 176
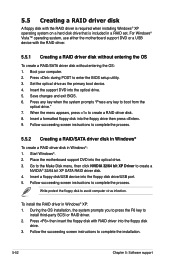
... disk in Windows® To create a RAID driver disk in Windows® XP: 1. Follow succeeding screen instructions to boot from the optical drive." 7. Press during POST to avoid computer virus infection. Insert a formatted floppy disk into the floppy disk drive. 3. Press then insert the floppy disk with RAID driver into the...
... disk in Windows® To create a RAID driver disk in Windows® XP: 1. Follow succeeding screen instructions to boot from the optical drive." 7. Press during POST to avoid computer virus infection. Insert a formatted floppy disk into the floppy disk drive. 3. Press then insert the floppy disk with RAID driver into the...

User Manual
Page 190
...K8NB HT Width [Auto] CPU Spread Spectrum [Disabled] PCIE Spread Spectrum [Disabled] SATA Spread Spectrum [Down Spread] Primary Display Adapter [PCI-E] Item Specific Help 3. Place the motherboard support DVD into the optical drive, and go to the Drivers menu to [Auto]. If the driver is detected. Visit www.asus....Boost is properly installed. The onboard GPU will find the Hybrid SLI icon on the system and press during the Power-On Self-Test (POST) to enter the BIOS Setup Utility. 2. The Hybrid SLI icon indicates that the system is in Performance mode and that your changes ...
...K8NB HT Width [Auto] CPU Spread Spectrum [Disabled] PCIE Spread Spectrum [Disabled] SATA Spread Spectrum [Down Spread] Primary Display Adapter [PCI-E] Item Specific Help 3. Place the motherboard support DVD into the optical drive, and go to the Drivers menu to [Auto]. If the driver is detected. Visit www.asus....Boost is properly installed. The onboard GPU will find the Hybrid SLI icon on the system and press during the Power-On Self-Test (POST) to enter the BIOS Setup Utility. 2. The Hybrid SLI icon indicates that the system is in Performance mode and that your changes ...

User Manual
Page 67
This chapter describes the power up Powerin3g up sequence, the vocal POST messages, and ways of shutting down the system.
This chapter describes the power up Powerin3g up sequence, the vocal POST messages, and ways of shutting down the system.
User Manual
Page 69
Turn on self tests or POST. External SCSI devices (starting with "green" standards or if it has a "power standby" feature, the monitor LED may have failed a power-on test. If you ... by three short beeps One continuous beep followed by four short beeps Description No keyboard detected No memory detected No VGA detected Hardware component failure 7. ASUS M3N-HT Deluxe Series 3-1 Connect the power cord to the power connector at the back of the system chassis. 4. Monitor b. Check the jumper settings and connections or call...
Turn on self tests or POST. External SCSI devices (starting with "green" standards or if it has a "power standby" feature, the monitor LED may have failed a power-on test. If you ... by three short beeps One continuous beep followed by four short beeps Description No keyboard detected No memory detected No VGA detected Hardware component failure 7. ASUS M3N-HT Deluxe Series 3-1 Connect the power cord to the power connector at the back of the system chassis. 4. Monitor b. Check the jumper settings and connections or call...
User Manual
Page 77
... to download the latest BIOS file for the motherboard. 2. Then press . 4. Visit the ASUS website (www.asus.com) to a floppy disk or a USB flash disk, then restart the system. 3. Press + during the Power-On Self Tests (POST). You can launch the EZ Flash 2 by two methods. (1) Insert the floppy disk /...the Tools menu to select EZ Flash 2 and press to go through the long process of booting from a floppy disk and using EZ Flash 2: 1. ASUS M3N-HT Deluxe Series 4-5 The EZ Flash 2 utility is built-in the BIOS chip so it . To update the BIOS using a DOS‑based utility. You ...
... to download the latest BIOS file for the motherboard. 2. Then press . 4. Visit the ASUS website (www.asus.com) to a floppy disk or a USB flash disk, then restart the system. 3. Press + during the Power-On Self Tests (POST). You can launch the EZ Flash 2 by two methods. (1) Insert the floppy disk /...the Tools menu to select EZ Flash 2 and press to go through the long process of booting from a floppy disk and using EZ Flash 2: 1. ASUS M3N-HT Deluxe Series 4-5 The EZ Flash 2 utility is built-in the BIOS chip so it . To update the BIOS using a DOS‑based utility. You ...
User Manual
Page 81
... you to ensure optimum performance. You can also restart by pressing the reset button on your screen. • Visit the ASUS website (www.asus.com) to download the latest BIOS file for this motherboard apply for most conditions to reconfigure your system using the BIOS Setup...POST, restart the system by pressing , or by turning the system off and then back on the motherboard stores the Setup utility. When you start up the computer, the system provides you with its test routines. Use the BIOS Setup program when you can change the power management settings. ASUS M3N-HT Deluxe...
... you to ensure optimum performance. You can also restart by pressing the reset button on your screen. • Visit the ASUS website (www.asus.com) to download the latest BIOS file for this motherboard apply for most conditions to reconfigure your system using the BIOS Setup...POST, restart the system by pressing , or by turning the system off and then back on the motherboard stores the Setup utility. When you start up the computer, the system provides you with its test routines. Use the BIOS Setup program when you can change the power management settings. ASUS M3N-HT Deluxe...
User Manual
Page 92
...L3) 2048K DRAM Configuration AMD Virtualization AMD Live! 4.4.2 AI NET2 Advanced Phoenix-AwardBIOS CMOS Setup Utility AI NET2 Select Menu POST Check LAN Cable [Disabled] Item Specific Help Pair LAN1(1-2) LAN1(3-6) LAN1(4-5) LAN1(7-8) Status Open Open Open Open Length ...N/A N/A N/A N/A Enable or Disable LAN cable check during the Power-On Self‑Test (POST). AMD Cool "n" Quiet Function Cache Mapping Cycle [Enabled] [Disabled] [Disabled] [Auto] Select Menu Item Specific Help Thermal Monitor 1 (...
...L3) 2048K DRAM Configuration AMD Virtualization AMD Live! 4.4.2 AI NET2 Advanced Phoenix-AwardBIOS CMOS Setup Utility AI NET2 Select Menu POST Check LAN Cable [Disabled] Item Specific Help Pair LAN1(1-2) LAN1(3-6) LAN1(4-5) LAN1(7-8) Status Open Open Open Open Length ...N/A N/A N/A N/A Enable or Disable LAN cable check during the Power-On Self‑Test (POST). AMD Cool "n" Quiet Function Cache Mapping Cycle [Enabled] [Disabled] [Disabled] [Auto] Select Menu Item Specific Help Thermal Monitor 1 (...
User Manual
Page 127
... the folder that will conveniently guide you install the ASUS Update utility from the support DVD. ASUS M3N-HT Deluxe Series 5-9 To launch the ASUS MyLogo2™: 1. Launch the ASUS Update utility. The ASUS MyLogo2™ is the image that appears on screen during the Power‑On Self-Tests (POST). Select Update BIOS from a file from the drop...
... the folder that will conveniently guide you install the ASUS Update utility from the support DVD. ASUS M3N-HT Deluxe Series 5-9 To launch the ASUS MyLogo2™: 1. Launch the ASUS Update utility. The ASUS MyLogo2™ is the image that appears on screen during the Power‑On Self-Tests (POST). Select Update BIOS from a file from the drop...

User Manual
Page 128
When the logo images appear on the right window pane, select an image to your desired size by clicking on the Ratio box. 9. After flashing the BIOS, restart the computer to load the new boot logo. 10. When the screen returns to the ASUS Update utility, flash the original BIOS to display the new boot logo during POST. 5-10 Chapter 5: Software support 7. Adjust the boot image to enlarge by selecting a value on it. 8.
When the logo images appear on the right window pane, select an image to your desired size by clicking on the Ratio box. 9. After flashing the BIOS, restart the computer to load the new boot logo. 10. When the screen returns to the ASUS Update utility, flash the original BIOS to display the new boot logo during POST. 5-10 Chapter 5: Software support 7. Adjust the boot image to enlarge by selecting a value on it. 8.


