User Manual
Page 5
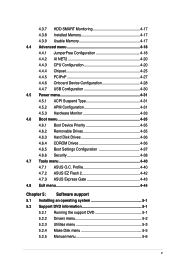
Profile 4-40 4.7.2 ASUS EZ Flash 2 4-42 4.7.3 ASUS Express Gate 4-43 4.8 Exit menu 4-44 Chapter 5: Software support 5.1 Installing an operating system 5-1 5.2 Support DVD information 5-1 5.2.1 Running the support DVD 5-1 5.2.2 Drivers menu 5-2 5.2.3 ...25 4.4.5 PCIPnP 4-27 4.4.6 Onboard Device Configuration 4-28 4.4.7 USB Configuration 4-30 4.5 Power menu 4-31 4.5.1 ACPI Suspend Type 4-31 4.5.2 APM Configuration 4-31 4.5.3 Hardware Monitor 4-33 4.6 Boot menu 4-35 4.6.1 Boot Device Priority 4-35 4.6.2 Removable Drives 4-35 4.6.3 Hard Disk Drives 4-36 4.6.4 CDROM Drives 4-36...
Profile 4-40 4.7.2 ASUS EZ Flash 2 4-42 4.7.3 ASUS Express Gate 4-43 4.8 Exit menu 4-44 Chapter 5: Software support 5.1 Installing an operating system 5-1 5.2 Support DVD information 5-1 5.2.1 Running the support DVD 5-1 5.2.2 Drivers menu 5-2 5.2.3 ...25 4.4.5 PCIPnP 4-27 4.4.6 Onboard Device Configuration 4-28 4.4.7 USB Configuration 4-30 4.5 Power menu 4-31 4.5.1 ACPI Suspend Type 4-31 4.5.2 APM Configuration 4-31 4.5.3 Hardware Monitor 4-33 4.6 Boot menu 4-35 4.6.1 Boot Device Priority 4-35 4.6.2 Removable Drives 4-35 4.6.3 Hard Disk Drives 4-36 4.6.4 CDROM Drives 4-36...
User Manual
Page 23
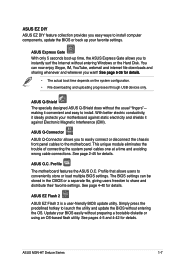
...;d��e�ta��il�s�. • The actual boot time depends on the system configuration. • File downloading and uploading progresses through USB devices only. ASUS M3N-HT Deluxe Series 1-7 See page 2-45 for details. ASUS Q-Shield The specially designed ASUS Q-Shield does without entering the OS. The BIOS settings can now enjoy...
...;d��e�ta��il�s�. • The actual boot time depends on the system configuration. • File downloading and uploading progresses through USB devices only. ASUS M3N-HT Deluxe Series 1-7 See page 2-45 for details. ASUS Q-Shield The specially designed ASUS Q-Shield does without entering the OS. The BIOS settings can now enjoy...
User Manual
Page 24
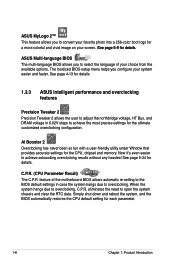
See page 4-13 for details. 1.3.3 ASUS intelligent performance and overclocking features Precision Tweaker 2 Precision Tweaker 2 allows the user to adjust the northbridge voltage, HT Bus, and DRAM voltage in case the system hangs due to overclocking. The localized BIOS setup menu ... C.P.R. When the system hangs due to open the system chassis and clear the RTC data. ASUS MyLogo 2™ This feature allows you to convert your favorite photo into a 256-color boot logo for the ultimate customized overclocking configuration. eliminates the need to overclocking, C.P.R. AI Booster 2...
See page 4-13 for details. 1.3.3 ASUS intelligent performance and overclocking features Precision Tweaker 2 Precision Tweaker 2 allows the user to adjust the northbridge voltage, HT Bus, and DRAM voltage in case the system hangs due to overclocking. The localized BIOS setup menu ... C.P.R. When the system hangs due to open the system chassis and clear the RTC data. ASUS MyLogo 2™ This feature allows you to convert your favorite photo into a 256-color boot logo for the ultimate customized overclocking configuration. eliminates the need to overclocking, C.P.R. AI Booster 2...
User Manual
Page 56
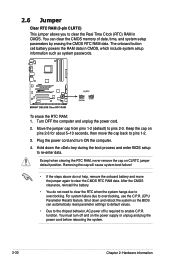
... can clear the CMOS memory of date, time, and system setup parameters by erasing the CMOS RTC RAM data. Shut down the key during the boot process and enter BIOS setup to overclocking. function. Except when clearing the RTC RAM, never remove the cap on the power supply or unplug and... plug the power cord before rebooting the system. 2-30 Chapter 2: Hardware information Removing the cap will cause system boot failure! • If the steps above do not need to clear the RTC when the system hangs due to re-enter data. Move the jumper...
... can clear the CMOS memory of date, time, and system setup parameters by erasing the CMOS RTC RAM data. Shut down the key during the boot process and enter BIOS setup to overclocking. function. Except when clearing the RTC RAM, never remove the cap on the power supply or unplug and... plug the power cord before rebooting the system. 2-30 Chapter 2: Hardware information Removing the cap will cause system boot failure! • If the steps above do not need to clear the RTC when the system hangs due to re-enter data. Move the jumper...
User Manual
Page 67
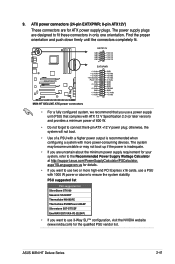
...of a PSU with 1000 W power or above to the Recommended Power Supply Wattage Calculator at http://support.asus.com/PowerSupplyCalculator/PSCalculator. The system may become unstable or may not boot up if the power is recommended when configuring a system with more high-end PCI Express x16 cards,...=en-us for the qualified PSU vendor list. otherwise, the system will not boot. • Use of 600 W. • Do not forget to fit these connectors in only one orientation. ASUS M3N-HT Deluxe Series 2-41 PSU suggested list PSU suggested list SilverStone ST1000 Seasonic SS-600HT Thermaltake...
...of a PSU with 1000 W power or above to the Recommended Power Supply Wattage Calculator at http://support.asus.com/PowerSupplyCalculator/PSCalculator. The system may become unstable or may not boot up if the power is recommended when configuring a system with more high-end PCI Express x16 cards,...=en-us for the qualified PSU vendor list. otherwise, the system will not boot. • Use of 600 W. • Do not forget to fit these connectors in only one orientation. ASUS M3N-HT Deluxe Series 2-41 PSU suggested list PSU suggested list SilverStone ST1000 Seasonic SS-600HT Thermaltake...
User Manual
Page 78
Chapter summary 4 4.1 Managing and updating your BIOS 4-1 4.2 BIOS setup program 4-9 4.3 Main menu 4-13 4.4 Advanced menu 4-18 4.5 Power menu 4-31 4.6 Boot menu 4-35 4.7 Tools menu 4-40 4.8 Exit menu 4-44 ASUS M3N-HT Deluxe Series
Chapter summary 4 4.1 Managing and updating your BIOS 4-1 4.2 BIOS setup program 4-9 4.3 Main menu 4-13 4.4 Advanced menu 4-18 4.5 Power menu 4-31 4.6 Boot menu 4-35 4.7 Tools menu 4-40 4.8 Exit menu 4-44 ASUS M3N-HT Deluxe Series
User Manual
Page 83
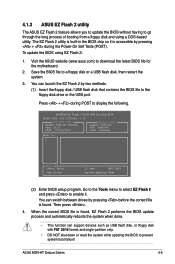
... system. 3. Save the BIOS file to go through the long process of booting from a floppy disk and using EZ Flash 2: 1. Go to the Tools menu to select EZ Flash 2 and press to display the following. ASUS M3N-HT Deluxe Series 4-5 The EZ Flash 2 utility is built-in the BIOS chip so... it . To update the BIOS using a DOS‑based utility. Press + during the Power-On Self Tests (POST). Then press . 4. Visit the ASUS website (www.asus.com) to the floppy disk...
... system. 3. Save the BIOS file to go through the long process of booting from a floppy disk and using EZ Flash 2: 1. Go to the Tools menu to select EZ Flash 2 and press to display the following. ASUS M3N-HT Deluxe Series 4-5 The EZ Flash 2 utility is built-in the BIOS chip so... it . To update the BIOS using a DOS‑based utility. Press + during the Power-On Self Tests (POST). Then press . 4. Visit the ASUS website (www.asus.com) to the floppy disk...
User Manual
Page 84
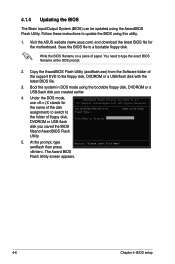
Write the BIOS filename on a piece of the disk For MCP72XE-M3N-HT-D-00 DATE:01/04/2008 assignment) to switch to the floppy disk... to Program: DVDROM or USB flash disk you created earlier. 4. Visit the ASUS website (www.asus.com) and download the latest BIOS file for ASUS V1.17 (C) Phoenix Technologies Ltd. Copy the AwardBIOS Flash Utility (awdflash.exe)... for AwardBIOS Flash Utility for the motherboard. The Award BIOS Flash Utility screen appears. 4-6 Chapter 4: BIOS setup Boot the system in DOS mode using the bootable floppy disk, DVDROM or a USB flash disk you saved the BIOS...
Write the BIOS filename on a piece of the disk For MCP72XE-M3N-HT-D-00 DATE:01/04/2008 assignment) to switch to the floppy disk... to Program: DVDROM or USB flash disk you created earlier. 4. Visit the ASUS website (www.asus.com) and download the latest BIOS file for ASUS V1.17 (C) Phoenix Technologies Ltd. Copy the AwardBIOS Flash Utility (awdflash.exe)... for AwardBIOS Flash Utility for the motherboard. The Award BIOS Flash Utility screen appears. 4-6 Chapter 4: BIOS setup Boot the system in DOS mode using the bootable floppy disk, DVDROM or a USB flash disk you saved the BIOS...

User Manual
Page 88
... highlighted. • The BIOS setup screens shown in .] [ST321122A] [ASUS CDS520/A] [None] [None] [None] [None] [Disabled] Change the day, month, year and century. 4.2.1 BIOS menu screen Menu items Menu bar Configuration fields General help Phoenix-AwardBIOS CMOS Setup Utility Main Advanced Power Boot Tools Exit System Time 15 : 30 : 36 System Date...
... highlighted. • The BIOS setup screens shown in .] [ST321122A] [ASUS CDS520/A] [None] [None] [None] [None] [Disabled] Change the day, month, year and century. 4.2.1 BIOS menu screen Menu items Menu bar Configuration fields General help Phoenix-AwardBIOS CMOS Setup Utility Main Advanced Power Boot Tools Exit System Time 15 : 30 : 36 System Date...
User Manual
Page 89
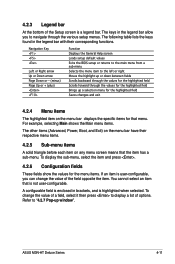
... shows the Main menu items. The other items (Advanced, Power, Boot, and Exit) on any menu screen means that the item has a sub-menu. A configurable field is enclosed in brackets, and is user‑configurable, you to display a list of options. ASUS M3N-HT Deluxe Series 4-11 4.2.3 Legend bar At the bottom of the Setup...
... shows the Main menu items. The other items (Advanced, Power, Boot, and Exit) on any menu screen means that the item has a sub-menu. A configurable field is enclosed in brackets, and is user‑configurable, you to display a list of options. ASUS M3N-HT Deluxe Series 4-11 4.2.3 Legend bar At the bottom of the Setup...
User Manual
Page 90
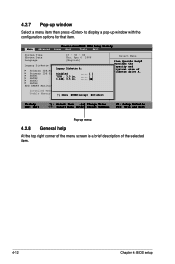
... F5: Setup Defaults F10: Save and Exit Pop-up window with the configuration options for that item. Main Phoenix-AwardBIOS CMOS Setup Utility Advanced Power Boot Tools Exit System Time System Date Language 15 : 30 : 36 Thu, Apr 6 2006 [English] Legacy Diskette A: [1.44M, 3.5 in.] Legacy Diskette A: Primary IDE Master [ST321122A] Primary...
... F5: Setup Defaults F10: Save and Exit Pop-up window with the configuration options for that item. Main Phoenix-AwardBIOS CMOS Setup Utility Advanced Power Boot Tools Exit System Time System Date Language 15 : 30 : 36 Thu, Apr 6 2006 [English] Legacy Diskette A: [1.44M, 3.5 in.] Legacy Diskette A: Primary IDE Master [ST321122A] Primary...
User Manual
Page 91
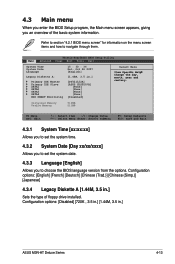
...drive installed. Main Phoenix-AwardBIOS CMOS Setup Utility Advanced Power Boot Tools Exit System Time System Date Language 15 : 30 : 36 Sat, Oct 26 2007 [English] Legacy Diskette A: [1.44M, 3.5 in .] ASUS M3N-HT Deluxe Series 4-13 Configuration options: [Disabled] [720K , 3.5... in.] [1.44M, 3.5 in .] Primary IDE Master [ST321122A] Primary IDE Slave [ASUS CDS520/A] SATA1 [None] SATA2 [None] SATA3 [None] SATA4 [None]...
...drive installed. Main Phoenix-AwardBIOS CMOS Setup Utility Advanced Power Boot Tools Exit System Time System Date Language 15 : 30 : 36 Sat, Oct 26 2007 [English] Legacy Diskette A: [1.44M, 3.5 in .] ASUS M3N-HT Deluxe Series 4-13 Configuration options: [Disabled] [720K , 3.5... in.] [1.44M, 3.5 in .] Primary IDE Master [ST321122A] Primary IDE Slave [ASUS CDS520/A] SATA1 [None] SATA2 [None] SATA3 [None] SATA4 [None]...
User Manual
Page 96
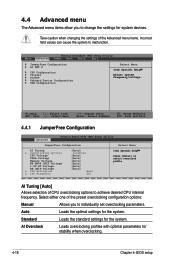
...the optimal settings for stability when overclocking. 4-18 Chapter 4: BIOS setup Phoenix-AwardBIOS CMOS Setup Utility Main Advanced Power Boot Tools Exit JumperFree Configuration AI NET 2 CPU Configuration Chipset PCIPnP Onboard Device Configuration USB Configuration Select Menu Item Specific ...Auto] x Overclocking Options Disabled CPU Voltage [Auto] VDDA Voltage [Auto] Memory Voltage [Auto] NB BR04 CHIP Voltage [Auto] 1.2V HT Voltage [Auto] NB CHIP Voltage [Auto] x CPU Multiplier Auto x CPU Frequency 200 Item Specific Help Press [Enter] to select overclock...
...the optimal settings for stability when overclocking. 4-18 Chapter 4: BIOS setup Phoenix-AwardBIOS CMOS Setup Utility Main Advanced Power Boot Tools Exit JumperFree Configuration AI NET 2 CPU Configuration Chipset PCIPnP Onboard Device Configuration USB Configuration Select Menu Item Specific ...Auto] x Overclocking Options Disabled CPU Voltage [Auto] VDDA Voltage [Auto] Memory Voltage [Auto] NB BR04 CHIP Voltage [Auto] 1.2V HT Voltage [Auto] NB CHIP Voltage [Auto] x CPU Multiplier Auto x CPU Frequency 200 Item Specific Help Press [Enter] to select overclock...

User Manual
Page 104
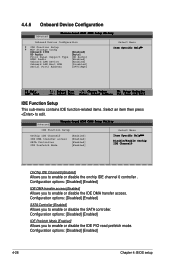
Configuration options: [PCI] [Onboard] [PCI-E] 4-26 Chapter 4: BIOS setup K8NB HT Width [Auto] Configuration options: [ ↓8↑8] [ ↓16↑16] [Auto] CPU Spread Spectrum [Disabled] Configuration options: [Disabled] [Enabled] PCIE Spread Spectrum [Disabled] Configuration options: [Disabled] [Enabled] SATA Spread Spectrum [Down Spread] Configuration options: [Disabled] [Down Spread] Primary Display Adapter [Disabled] Allows you to select which graphics controller to use as the primary boot device.
Configuration options: [PCI] [Onboard] [PCI-E] 4-26 Chapter 4: BIOS setup K8NB HT Width [Auto] Configuration options: [ ↓8↑8] [ ↓16↑16] [Auto] CPU Spread Spectrum [Disabled] Configuration options: [Disabled] [Enabled] PCIE Spread Spectrum [Disabled] Configuration options: [Disabled] [Enabled] SATA Spread Spectrum [Down Spread] Configuration options: [Disabled] [Down Spread] Primary Display Adapter [Disabled] Allows you to select which graphics controller to use as the primary boot device.
User Manual
Page 105
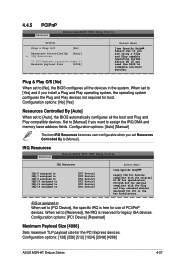
...PCI or ISA bus architecture. Configuration options: [No] [Yes] Resources Controlled By [Auto] When set Resources Controlled By to configure non-boot devices. IRQ Resources Advanced Phoenix-Award BIOS CMOS Setup Utility IRQ Resources IRQ-5 assigned to IRQ-7 assigned to IRQ-9 assigned to IRQ-10... base address fields. IRQ-xx assigned to When set to [No], the BIOS configures all the boot and Plug and Play compatible devices. Configuration options: [128] [256] [512] [1024] [2048] [4096] ASUS M3N-HT Deluxe Series 4-27 Plug & Play O/S [No] When set to [Reserved], the IRQ is free ...
...PCI or ISA bus architecture. Configuration options: [No] [Yes] Resources Controlled By [Auto] When set Resources Controlled By to configure non-boot devices. IRQ Resources Advanced Phoenix-Award BIOS CMOS Setup Utility IRQ Resources IRQ-5 assigned to IRQ-7 assigned to IRQ-9 assigned to IRQ-10... base address fields. IRQ-xx assigned to When set to [No], the BIOS configures all the boot and Plug and Play compatible devices. Configuration options: [128] [256] [512] [1024] [2048] [4096] ASUS M3N-HT Deluxe Series 4-27 Plug & Play O/S [No] When set to [Reserved], the IRQ is free ...
User Manual
Page 106
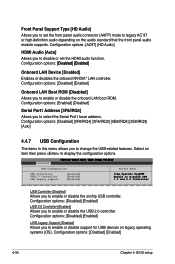
...;H� D �Au�di�o Au�to�] Front Panel Support Type [HD Audio] HDMI Audio [Enabled] Onboard LAN Device [Enabled] Onboard LAN Boot ROM [Disabled] Serial Port1 Address [3F8/IRQ4] Select Menu Item Specific Help F1:Help ESC: Exit ↑↓ : Select Item -/+: Change Value F5: Setup Defaults...
...;H� D �Au�di�o Au�to�] Front Panel Support Type [HD Audio] HDMI Audio [Enabled] Onboard LAN Device [Enabled] Onboard LAN Boot ROM [Disabled] Serial Port1 Address [3F8/IRQ4] Select Menu Item Specific Help F1:Help ESC: Exit ↑↓ : Select Item -/+: Change Value F5: Setup Defaults...
User Manual
Page 108
...] Enables or disables the onboard NVIDIA® LAN controller. Select an item then press to enable or disable the onboard LAN boot ROM. Configuration options: [Disabled] [Enabled] USB Legacy Support [Enabled] Allows you to enable or disable support for USB devices... on the audio standard that the front panel audio module supports. Configuration options: [Disabled] [Enabled] Onboard LAN Boot ROM [Disabled] Allows you to display the configuration options. Configuration options: [Disabled] [Enabled] 4-30 Chapter 4: BIOS setup Configuration options: ...
...] Enables or disables the onboard NVIDIA® LAN controller. Select an item then press to enable or disable the onboard LAN boot ROM. Configuration options: [Disabled] [Enabled] USB Legacy Support [Enabled] Allows you to enable or disable support for USB devices... on the audio standard that the front panel audio module supports. Configuration options: [Disabled] [Enabled] Onboard LAN Boot ROM [Disabled] Allows you to display the configuration options. Configuration options: [Disabled] [Enabled] 4-30 Chapter 4: BIOS setup Configuration options: ...

User Manual
Page 109
... (APM). Phoenix-AwardBIOS CMOS Setup Utility Main Advanced Power Boot Tools Exit ACPI Suspend Type [S1&S3] APM Configuration Hardware Monitor Select Menu Item Specific Help Select the ACPI state used for system suspend. Configuration options: [Power-Off] [Power-On] [Last State] ASUS M3N-HT Deluxe Series 4-31 F1:Help Select Item ESC: Exit →...
... (APM). Phoenix-AwardBIOS CMOS Setup Utility Main Advanced Power Boot Tools Exit ACPI Suspend Type [S1&S3] APM Configuration Hardware Monitor Select Menu Item Specific Help Select the ACPI state used for system suspend. Configuration options: [Power-Off] [Power-On] [Last State] ASUS M3N-HT Deluxe Series 4-31 F1:Help Select Item ESC: Exit →...
User Manual
Page 113
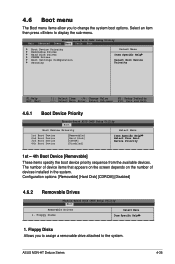
... the system. Configuration options: [Removable] [Hard Disk] [CDROM] [Disabled] 4.6.2 Removable Drives Phoenix-Award BIOS CMOS Setup Utility Boot Removable Drives 1. Floppy Disks Allows you to change the system boot options. ASUS M3N-HT Deluxe Series 4-35 4.6 Boot menu The Boot menu items allow you to assign a removable drive attached to the system. Phoenix-Award BIOS CMOS Setup Utility...
... the system. Configuration options: [Removable] [Hard Disk] [CDROM] [Disabled] 4.6.2 Removable Drives Phoenix-Award BIOS CMOS Setup Utility Boot Removable Drives 1. Floppy Disks Allows you to change the system boot options. ASUS M3N-HT Deluxe Series 4-35 4.6 Boot menu The Boot menu items allow you to assign a removable drive attached to the system. Phoenix-Award BIOS CMOS Setup Utility...

User Manual
Page 114
4.6.3 Hard Disk Drives Phoenix-Award BIOS CMOS Setup Utility Boot Hard Disk Drives 1. SATA X: XXXXXXXXX Select Menu Item Specific Help 1. SATA X: XXXXXXXXX Allows you to assign hard disk drives attached to the system. 4.6.4 CDROM Drives Phoenix-Award BIOS CMOS Setup Utility Boot CDROM Drives 1. 1st Slave: XXXXXXXXX Select Menu Item Specific Help 1. 1st Slave: XXXXXXXXX Allows you to assign optical drives attached to the system. 4-36 Chapter 4: BIOS setup
4.6.3 Hard Disk Drives Phoenix-Award BIOS CMOS Setup Utility Boot Hard Disk Drives 1. SATA X: XXXXXXXXX Select Menu Item Specific Help 1. SATA X: XXXXXXXXX Allows you to assign hard disk drives attached to the system. 4.6.4 CDROM Drives Phoenix-Award BIOS CMOS Setup Utility Boot CDROM Drives 1. 1st Slave: XXXXXXXXX Select Menu Item Specific Help 1. 1st Slave: XXXXXXXXX Allows you to assign optical drives attached to the system. 4-36 Chapter 4: BIOS setup


