User Manual
Page 2
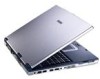
Notebook PC Hardware User's Manual Product Name: Notebook PC Hardware Manual Revision: 3 E1510 Release Date: December 2003 1
Notebook PC Hardware User's Manual Product Name: Notebook PC Hardware Manual Revision: 3 E1510 Release Date: December 2003 1

User Manual
Page 4
... controls or adjustments or performance of used batteries according to laser products manufactured from August 1, 1976. Explosionsfara vid felaktigt batteribyte. Safety Statements Nordic Cautions (for Notebook PC with the same or equivalent type recommended by the manufacturer. Eksplosionsfare ved fejlagtig håndtering. Il y a danger d'explosion s'il y a remplacement incorrect de la batterie...
... controls or adjustments or performance of used batteries according to laser products manufactured from August 1, 1976. Explosionsfara vid felaktigt batteribyte. Safety Statements Nordic Cautions (for Notebook PC with the same or equivalent type recommended by the manufacturer. Eksplosionsfare ved fejlagtig håndtering. Il y a danger d'explosion s'il y a remplacement incorrect de la batterie...
User Manual
Page 5
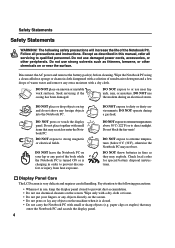
... careful handling. Do not use strong solvents such as thinners, benzene, or other peripherals. Except as they may scratch or enter the Notebook PC. DO NOT expose to extreme temperatures above 50˚C (122˚F) or to the following safety precautions will increase the life ...to direct sunlight. The following precautions: • When not in order to extreme temperatures (below 0˚C (32˚F), otherwise the Notebook PC may enter the Notebook PC and scratch the display panel. 4 Do not use damaged power cords, accessories, or other chemicals on the screen. Do not place...
... careful handling. Do not use strong solvents such as thinners, benzene, or other peripherals. Except as they may scratch or enter the Notebook PC. DO NOT expose to extreme temperatures above 50˚C (122˚F) or to the following safety precautions will increase the life ...to direct sunlight. The following precautions: • When not in order to extreme temperatures (below 0˚C (32˚F), otherwise the Notebook PC may enter the Notebook PC and scratch the display panel. 4 Do not use damaged power cords, accessories, or other chemicals on the screen. Do not place...
User Manual
Page 6
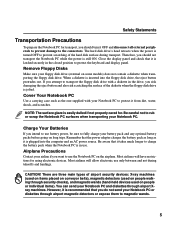
... position to magnetic wands. 5 Most airlines will allow electronic use battery power, be sure to charge the battery pack when the Notebook PC is inserted into the computer and an AC power source. Remove Floppy Disks Make sure your battery pack and any optional battery...detectors (used on people walking through security checks), and magnetic wands (hand-held devices used on the airplane. Airplane Precautions Contact your Notebook PC and diskettes through airport magnetic detectors or expose them to protect the keyboard and display panel. Be careful not to use . ...
... position to magnetic wands. 5 Most airlines will allow electronic use battery power, be sure to charge the battery pack when the Notebook PC is inserted into the computer and an AC power source. Remove Floppy Disks Make sure your battery pack and any optional battery...detectors (used on people walking through security checks), and magnetic wands (hand-held devices used on the airplane. Airplane Precautions Contact your Notebook PC and diskettes through airport magnetic detectors or expose them to protect the keyboard and display panel. Be careful not to use . ...
User Manual
Page 7
Safety Statements CTR 21 Approval (for Notebook PC with built-in Modem) Danish Dutch English Finnish French German Greek Italian Portuguese Spanish Swedish 6
Safety Statements CTR 21 Approval (for Notebook PC with built-in Modem) Danish Dutch English Finnish French German Greek Italian Portuguese Spanish Swedish 6
User Manual
Page 8
...injury to persons due to fire or explosion. • Do not use power adapters or batteries from lightning. • Do not use the Notebook PC in products. Required for UL 1642 covering primary (nonrechargeable) and secondary (rechargeable) lithium batteries for use as they may be a remote ...(NFPA 70). Use only UL certified power adapters or batteries supplied by an irreversible or reversible chemical reaction. • Do not dispose the Notebook PC battery pack in a fire, as power sources in the vicinity of a gas leak. Safety Statements UL Safety Notices Required for UL 1459...
...injury to persons due to fire or explosion. • Do not use power adapters or batteries from lightning. • Do not use the Notebook PC in products. Required for UL 1642 covering primary (nonrechargeable) and secondary (rechargeable) lithium batteries for use as they may be a remote ...(NFPA 70). Use only UL certified power adapters or batteries supplied by an irreversible or reversible chemical reaction. • Do not dispose the Notebook PC battery pack in a fire, as power sources in the vicinity of a gas leak. Safety Statements UL Safety Notices Required for UL 1459...
User Manual
Page 9
......26 Installing and Removing the Battery Pack 26 Battery Care ...27 Operating Systems ...27 Support Software ...27 Power Connection ...28 Powering ON The Notebook PC 29 The Power-On Self Test (POST 29 Power Management - Knowing the Parts 15 Top Side ...16 Bottom Side ...18 Left Side...This User's Manual ...12 Notes For This Manual ...12 Preparing your Notebook PC 13 2. "Stand By" & "Hibernate 30 Restarting or Rebooting ...31 Powering OFF the Notebook PC 31 Restarting or Rebooting 31 Powering OFF the Notebook PC 32 Status Indicators ...33 Instant Status Indicators and Launch Keys 33...
......26 Installing and Removing the Battery Pack 26 Battery Care ...27 Operating Systems ...27 Support Software ...27 Power Connection ...28 Powering ON The Notebook PC 29 The Power-On Self Test (POST 29 Power Management - Knowing the Parts 15 Top Side ...16 Bottom Side ...18 Left Side...This User's Manual ...12 Notes For This Manual ...12 Preparing your Notebook PC 13 2. "Stand By" & "Hibernate 30 Restarting or Rebooting ...31 Powering OFF the Notebook PC 31 Restarting or Rebooting 31 Powering OFF the Notebook PC 32 Status Indicators ...33 Instant Status Indicators and Launch Keys 33...
User Manual
Page 10
Using the Notebook PC 39 Using the Touchpad ...40 Touchpad Usage Illustrations 40 Pointing Device ...40 Caring for the Touchpad 42 Laser Safety ...43 PC Card (PCMCIA) Socket ... ...51 Battery Power System ...51 Charging the Battery Pack 51 Using Battery Power ...52 Thermal Power Control ...54 Power Savings ...54 Power State Summary ...54 Notebook PC Upgrades ...55 System Memory Expansion 55 Hard Disk Drive Upgrades 55 Processor Upgrades ...55 9 Contents 4.
Using the Notebook PC 39 Using the Touchpad ...40 Touchpad Usage Illustrations 40 Pointing Device ...40 Caring for the Touchpad 42 Laser Safety ...43 PC Card (PCMCIA) Socket ... ...51 Battery Power System ...51 Charging the Battery Pack 51 Using Battery Power ...52 Thermal Power Control ...54 Power Savings ...54 Power State Summary ...54 Notebook PC Upgrades ...55 System Memory Expansion 55 Hard Disk Drive Upgrades 55 Processor Upgrades ...55 9 Contents 4.
User Manual
Page 11
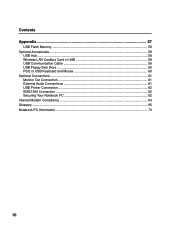
Contents Appendix ...57 USB Flash Memory ...58 Optional Accessories...58 USB Hub ...58 Wireless LAN Cardbus Card or USB 59 USB Communication Cable 59 USB Floppy Disk Drive ...60 PS/2 or USB Keyboard and Mouse 60 Optional Connections ...61 Monitor Out Connection 61 External Audio Connections 61 USB Printer Connection 62 IEEE1394 Connection ...62 Securing Your Notebook PC 62 Internal Modem Compliancy 63 Glossary ...65 Notebook PC Information ...70 10
Contents Appendix ...57 USB Flash Memory ...58 Optional Accessories...58 USB Hub ...58 Wireless LAN Cardbus Card or USB 59 USB Communication Cable 59 USB Floppy Disk Drive ...60 PS/2 or USB Keyboard and Mouse 60 Optional Connections ...61 Monitor Out Connection 61 External Audio Connections 61 USB Printer Connection 62 IEEE1394 Connection ...62 Securing Your Notebook PC 62 Internal Modem Compliancy 63 Glossary ...65 Notebook PC Information ...70 10

User Manual
Page 12
Introducing the Notebook PC About This User's Manual Notes For This Manual 11 1.
Introducing the Notebook PC About This User's Manual Notes For This Manual 11 1.
User Manual
Page 13
...Illustrator® 8.0, and Macromedia® Freehand™ 8.0.1. NOTE: Tips and information for safe operation. Introducing the Notebook PC Introduces you to the Notebook PC and this User's Manuals: 1. Appendix Introduces you to optional accessories and gives additional information. Notes For This ...Manual This User's Manual was created using the Notebook PC's components. 5. 1 Introducing the Notebook PC About This User's Manual You are major sections of in this guide that you information on...
...Illustrator® 8.0, and Macromedia® Freehand™ 8.0.1. NOTE: Tips and information for safe operation. Introducing the Notebook PC Introduces you to the Notebook PC and this User's Manuals: 1. Appendix Introduces you to optional accessories and gives additional information. Notes For This ...Manual This User's Manual was created using the Notebook PC's components. 5. 1 Introducing the Notebook PC About This User's Manual You are major sections of in this guide that you information on...
User Manual
Page 14
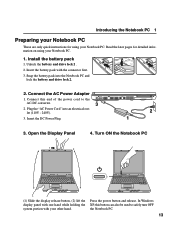
... and drive lock 2. 2. Insert the DC Power Plug. 2 1 3. In Windows XP, this end of the power cord to safely turn OFF the Notebook PC. 13 Connect the AC Power Adapter 1. Snap the battery pack into an electrical out- Open the Display Panel 4. let (110V - 240V). 3.... Press the power button and release. Turn ON the Notebook PC 1 2 (1) Slide the display release button, (2) lift the display panel with one hand while holding the system portion with the connector first. 3....
... and drive lock 2. 2. Insert the DC Power Plug. 2 1 3. In Windows XP, this end of the power cord to safely turn OFF the Notebook PC. 13 Connect the AC Power Adapter 1. Snap the battery pack into an electrical out- Open the Display Panel 4. let (110V - 240V). 3.... Press the power button and release. Turn ON the Notebook PC 1 2 (1) Slide the display release button, (2) lift the display panel with one hand while holding the system portion with the connector first. 3....

User Manual
Page 15
1 Introducing the Notebook PC 14
1 Introducing the Notebook PC 14

User Manual
Page 17
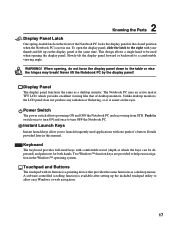
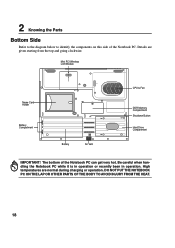
Details are given starting from the top and going clockwise. Microphone Display Panel Latch Display Panel Scroll Button Status Indicators (see front side) Power Switch / Instant Keys Keyboard Touchpad Touchpad Buttons 16 2 Knowing the Parts Top Side Refer to the diagram below to identify the components on the top side of the Notebook PC.
Details are given starting from the top and going clockwise. Microphone Display Panel Latch Display Panel Scroll Button Status Indicators (see front side) Power Switch / Instant Keys Keyboard Touchpad Touchpad Buttons 16 2 Knowing the Parts Top Side Refer to the diagram below to identify the components on the top side of the Notebook PC.
User Manual
Page 18
... and Buttons The touchpad with one push of a button. Two Windows™ function keys are provided to a comfortable viewing angle. Never lift the Notebook PC by the display panel! Instant Launch Keys Instant launch keys allow easy Windows or web navigation. 17 Slowly tilt the display panel forward or... not force the display panel down to the table or else the hinges may break! This design allows a single hand to turn OFF the Notebook PC. Unlike desktop monitors, the LCD panel does not produce any radiation or flickering, so it is easier on the display panel at which ...
... and Buttons The touchpad with one push of a button. Two Windows™ function keys are provided to a comfortable viewing angle. Never lift the Notebook PC by the display panel! Instant Launch Keys Instant launch keys allow easy Windows or web navigation. 17 Slowly tilt the display panel forward or... not force the display panel down to the table or else the hinges may break! This design allows a single hand to turn OFF the Notebook PC. Unlike desktop monitors, the LCD panel does not produce any radiation or flickering, so it is easier on the display panel at which ...
User Manual
Page 19
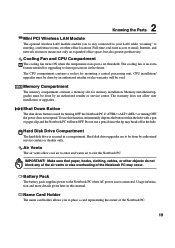
2 Knowing the Parts Bottom Side Refer to the diagram below to identify the components on this side of the Notebook PC can get very hot. DO NOT PUT THE NOTEBOOK PC ON THE LAP OR OTHER PARTS OF THE BODY TO AVOID INJURY FROM THE HEAT. 18 Mini PCI Wireless LAN...& Fan DDR Memory Compartment Shutdown Button Hard Drive Compartment IMPORTANT! Details are normal during charging or operation. The bottom of the Notebook PC. Be careful when handling the Notebook PC while it is in operation or recently been in operation. High temperatures are given starting from the top and going clockwise....
2 Knowing the Parts Bottom Side Refer to the diagram below to identify the components on this side of the Notebook PC can get very hot. DO NOT PUT THE NOTEBOOK PC ON THE LAP OR OTHER PARTS OF THE BODY TO AVOID INJURY FROM THE HEAT. 18 Mini PCI Wireless LAN...& Fan DDR Memory Compartment Shutdown Button Hard Drive Compartment IMPORTANT! Details are normal during charging or operation. The bottom of the Notebook PC. Be careful when handling the Notebook PC while it is in operation or recently been in operation. High temperatures are given starting from the top and going clockwise....
User Manual
Page 20
... will be done by an authorized retailer or else warranty will turn OFF. Full-time, real-time access to exit the Notebook PC. The CPU compartment contains a socket for memory installation. Usage information and more details given later in the hole. CPU installation/ upgrades must be done ... to your LAN while "roaming" to meeting, conference rooms, or other objects do not block any of the air vents or else overheating of the Notebook PC. 19 The warranty does not allow cool air to enter and warm air to email, Internet, and network resources means not only an expanded...
... will be done by an authorized retailer or else warranty will turn OFF. Full-time, real-time access to exit the Notebook PC. The CPU compartment contains a socket for memory installation. Usage information and more details given later in the hole. CPU installation/ upgrades must be done ... to your LAN while "roaming" to meeting, conference rooms, or other objects do not block any of the air vents or else overheating of the Notebook PC. 19 The warranty does not allow cool air to enter and warm air to email, Internet, and network resources means not only an expanded...
User Manual
Page 21
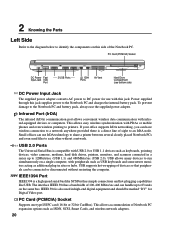
... can handle up to 12Mbits/sec (USB 1.1) and 480Mbits/sec (USB 2.0). USB 2.0 Ports The Universal Serial Bus is a direct line of Notebook PC expansion options such as additional plug-in high-end digital equipment and should be connected or disconnected without a network. To prevent damage to the... Notebook PC and battery pack, always use with peripherals such as USB keyboards and some newer monitors acting as ISDN, SCSI, Smart Cards, ...
... can handle up to 12Mbits/sec (USB 1.1) and 480Mbits/sec (USB 2.0). USB 2.0 Ports The Universal Serial Bus is a direct line of Notebook PC expansion options such as additional plug-in high-end digital equipment and should be connected or disconnected without a network. To prevent damage to the... Notebook PC and battery pack, always use with peripherals such as USB keyboards and some newer monitors acting as ISDN, SCSI, Smart Cards, ...
User Manual
Page 22
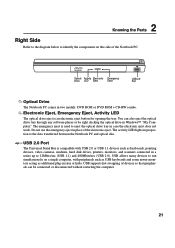
... also eject the optical drive tray through any software player or by right clicking the optical drive in proportion to the data transferred between the Notebook PC and optical disc. Electronic Eject, Emergency Eject, Activity LED The optical drive eject is an electronic eject button for opening the tray.... ROM or DVD ROM + CD-RW combo. Optical Activity Electronic Emergency Drive LED Eject Eject USB 2.0 Port Optical Drive The Notebook PC comes in sites or hubs. USB supports hot-swapping of the Notebook PC. Do not use the emergency eject in case the electronic eject does not work.
... also eject the optical drive tray through any software player or by right clicking the optical drive in proportion to the data transferred between the Notebook PC and optical disc. Electronic Eject, Emergency Eject, Activity LED The optical drive eject is an electronic eject button for opening the tray.... ROM or DVD ROM + CD-RW combo. Optical Activity Electronic Emergency Drive LED Eject Eject USB 2.0 Port Optical Drive The Notebook PC comes in sites or hubs. USB supports hot-swapping of the Notebook PC. Do not use the emergency eject in case the electronic eject does not work.

User Manual
Page 23
...you use the built-in digital phone systems. Do not connect the modem port to a digital phone system or else damage will occur to the Notebook PC. The internal LAN supports 10Base-T or 100BaseTX standard or duplex networks. LAN Modem TV-Out PS/2 Port Port Port Port External Monitor Port... Air Vent for use of the Notebook PC. Simultaneous use with RCA inputs available on this side of two PS/2 devices requires an optional PS/2 Y-adapter. 2 Knowing the Parts Rear ...
...you use the built-in digital phone systems. Do not connect the modem port to a digital phone system or else damage will occur to the Notebook PC. The internal LAN supports 10Base-T or 100BaseTX standard or duplex networks. LAN Modem TV-Out PS/2 Port Port Port Port External Monitor Port... Air Vent for use of the Notebook PC. Simultaneous use with RCA inputs available on this side of two PS/2 devices requires an optional PS/2 Y-adapter. 2 Knowing the Parts Rear ...


