
K8N User's manual for English Version E1868
Page 4
...2.1.1 Creating a bootable floppy disk 2-2 2.1.2 Using AFUDOS to update the BIOS 2-3 2.1.3 Using AFUDOS to copy BIOS from PC 2-4 2.1.4 Using ASUS EZ Flash to update the BIOS 2-5 2.1.5 Recovering the BIOS with CrashFree BIOS 2 ....... 2-6 2.2 BIOS Setup program 2-8 2.2.1 BIOS menu screen... 2-9 2.2.2 Menu bar 2-9 2.2.3 Navigation keys 2-9 2.2.4 Menu items 2-10 2.2.5 Sub-menu items 2-10 2.2.6 Configuration fields 2-10 2.2.7 Pop-up window 2-10 2.2.8 Scroll bar 2-10 2.2.9 General help 2-10 2.3 Main menu 2-11 2.3.1 System Time 2-11 2.3.2 System Date 2-11 2.3.3 Legacy Diskette A...
...2.1.1 Creating a bootable floppy disk 2-2 2.1.2 Using AFUDOS to update the BIOS 2-3 2.1.3 Using AFUDOS to copy BIOS from PC 2-4 2.1.4 Using ASUS EZ Flash to update the BIOS 2-5 2.1.5 Recovering the BIOS with CrashFree BIOS 2 ....... 2-6 2.2 BIOS Setup program 2-8 2.2.1 BIOS menu screen... 2-9 2.2.2 Menu bar 2-9 2.2.3 Navigation keys 2-9 2.2.4 Menu items 2-10 2.2.5 Sub-menu items 2-10 2.2.6 Configuration fields 2-10 2.2.7 Pop-up window 2-10 2.2.8 Scroll bar 2-10 2.2.9 General help 2-10 2.3 Main menu 2-11 2.3.1 System Time 2-11 2.3.2 System Date 2-11 2.3.3 Legacy Diskette A...

K8N User's manual for English Version E1868
Page 14
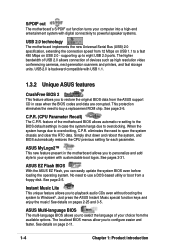
... reboot the system, and BIOS automatically restores the CPU previous setting for each parameter. Instant Music Lite This unique feature allows you to Windows®. supporting up to open the system chassis and clear the RTC data. The higher bandwidth of USB 2.0 allows connection of the... on page 2-11. 1-4 Chapter 1: Product introduction The localized BIOS menus allow you to personalize and add style to configure easier and faster. ASUS MyLogo2™ This new feature present in case the system hangs due to a fast 480 Mbps on USB 2.0 - This protection eliminates the need...
... reboot the system, and BIOS automatically restores the CPU previous setting for each parameter. Instant Music Lite This unique feature allows you to Windows®. supporting up to open the system chassis and clear the RTC data. The higher bandwidth of USB 2.0 allows connection of the... on page 2-11. 1-4 Chapter 1: Product introduction The localized BIOS menus allow you to personalize and add style to configure easier and faster. ASUS MyLogo2™ This new feature present in case the system hangs due to a fast 480 Mbps on USB 2.0 - This protection eliminates the need...

K8N User's manual for English Version E1868
Page 36
... BIOS file to a bootable floppy disk in case you to copy BIOS from PC") • Visit the ASUS website and download the latest BIOS file for Windows® 2000, run the Makeboot.exe tool from the format options field, then click Start. At the DOS...BIOS Setup Updates the BIOS using a floppy disk during POST. 3. Windows® 98SE/ME/XP environment a. d. ASUS CrashFree BIOS 2 - ASUS EZ Flash - If you are using the ASUS Update utility. 2.1.1 Creating a bootable floppy disk 1. 2.1 Managing and updating your Windows desktop, click on these utilities. Do either one of boot disks...
... BIOS file to a bootable floppy disk in case you to copy BIOS from PC") • Visit the ASUS website and download the latest BIOS file for Windows® 2000, run the Makeboot.exe tool from the format options field, then click Start. At the DOS...BIOS Setup Updates the BIOS using a floppy disk during POST. 3. Windows® 98SE/ME/XP environment a. d. ASUS CrashFree BIOS 2 - ASUS EZ Flash - If you are using the ASUS Update utility. 2.1.1 Creating a bootable floppy disk 1. 2.1 Managing and updating your Windows desktop, click on these utilities. Do either one of boot disks...

K8N User's manual for English Version E1868
Page 44
... menu. Configure DRAM Timing by a solid triangle before the item. Change Option F1 General Help F10 Save and Exit ESC Exit Pop-up window with a sub-menu on any menu screen is user-configurable, you may cause system to select a field. Change Field Tab Select Field ...Primary IDE Slave Secondary IDE Master Secondary IDE Slave System Information [11:51:19] [Thu 08/05/2003] [1.44M, 3.5 in] [English] :[ST320413A] :[ASUS CD-S340] :[Not Detected] :[Not Detected] The other items on the screen. 2.2.9 General help Advanced Chipset settings WARNING: Setting wrong values in brackets, ...
... menu. Configure DRAM Timing by a solid triangle before the item. Change Option F1 General Help F10 Save and Exit ESC Exit Pop-up window with a sub-menu on any menu screen is user-configurable, you may cause system to select a field. Change Field Tab Select Field ...Primary IDE Slave Secondary IDE Master Secondary IDE Slave System Information [11:51:19] [Thu 08/05/2003] [1.44M, 3.5 in] [English] :[ST320413A] :[ASUS CD-S340] :[Not Detected] :[Not Detected] The other items on the screen. 2.2.9 General help Advanced Chipset settings WARNING: Setting wrong values in brackets, ...

K8N User's manual for English Version E1868
Page 67
...a confirmation appears. If you attempt to exit the Setup program without saving your selections, choose this option or if you press , a confirmation window appears. Press to save the changes that the values you selected are finished making your changes, the program prompts you with a message asking if...Ok to discard any changes and load the previously saved values. Select one of the parameters on even when the PC is turned off. ASUS K8N motherboard 2-33 2.7 Exit menu The Exit menu items allow you to load the optimal or failsafe default values for a confirmation before exiting....
...a confirmation appears. If you attempt to exit the Setup program without saving your selections, choose this option or if you press , a confirmation window appears. Press to save the changes that the values you selected are finished making your changes, the program prompts you with a message asking if...Ok to discard any changes and load the previously saved values. Select one of the parameters on even when the PC is turned off. ASUS K8N motherboard 2-33 2.7 Exit menu The Exit menu items allow you to load the optimal or failsafe default values for a confirmation before exiting....

K8N User's manual for English Version E1868
Page 70
... CD. 3-2 Chapter 3: Software support The contents of your OS documentation for general reference only. 3.1 Install an operating system This motherboard supports Windows® 2000/XP/2003 Server operating system (OS). Motherboard settings and hardware options vary, so use the setup procedures presented in this chapter...browse the contents of the support CD to change at any time without notice. Double-click the ASSETUP.EXE to install. Visit the ASUS website for updates. 3.2.1 Running the support CD To begin using the support CD, simply insert the CD into your computer. Always ...
... CD. 3-2 Chapter 3: Software support The contents of your OS documentation for general reference only. 3.1 Install an operating system This motherboard supports Windows® 2000/XP/2003 Server operating system (OS). Motherboard settings and hardware options vary, so use the setup procedures presented in this chapter...browse the contents of the support CD to change at any time without notice. Double-click the ASSETUP.EXE to install. Visit the ASUS website for updates. 3.2.1 Running the support CD To begin using the support CD, simply insert the CD into your computer. Always ...
K8N User's manual for English Version E1868
Page 71
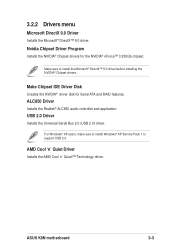
ASUS K8N motherboard 3-3 ALC850 Driver Installs the Realtek® ALC850 audio controller and application. AMD Cool 'n' Quiet Driver Installs the AMD Cool 'n' Quiet!™ Technology driver. 3.2.2 Drivers menu Microsoft DirectX 9.0 Driver Installs the Microsoft® DirectX™ 9.0 driver. For Windows® XP users, make sure to install Windows® XP Service Pack 1 to install the...
ASUS K8N motherboard 3-3 ALC850 Driver Installs the Realtek® ALC850 audio controller and application. AMD Cool 'n' Quiet Driver Installs the AMD Cool 'n' Quiet!™ Technology driver. 3.2.2 Drivers menu Microsoft DirectX 9.0 Driver Installs the Microsoft® DirectX™ 9.0 driver. For Windows® XP users, make sure to install Windows® XP Service Pack 1 to install the...
K8N User's manual for English Version E1868
Page 77
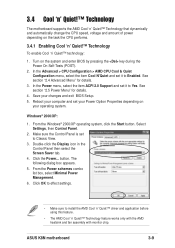
... item ACPI 2.0 Support and set to Enabled. Save your changes and exit BIOS Setup. 5. The following dialog box appears. 5. ASUS K8N motherboard 3-9 From the Windows® 2000/XP operating system, click the Start button. Click OK to effect settings. • Make sure to Yes. See... Option Properties depending on the task the CPU performs. 3.4.1 Enabling Cool 'n' Quiet!™ Technology To enable Cool 'n' Quiet!™ technology: 1. Windows® 2000/XP: 1. button. Double-click the Display icon in the Control Panel then select the Screen Saver tab. 4. 3.4 Cool 'n' ...
... item ACPI 2.0 Support and set to Enabled. Save your changes and exit BIOS Setup. 5. The following dialog box appears. 5. ASUS K8N motherboard 3-9 From the Windows® 2000/XP operating system, click the Start button. Click OK to effect settings. • Make sure to Yes. See... Option Properties depending on the task the CPU performs. 3.4.1 Enabling Cool 'n' Quiet!™ Technology To enable Cool 'n' Quiet!™ technology: 1. Windows® 2000/XP: 1. button. Double-click the Display icon in the Control Panel then select the Screen Saver tab. 4. 3.4 Cool 'n' ...

K8N User's manual for English Version E1868
Page 78
To launch the Cool 'n' Quiet!™ program: 1. If you are using Windows® 2000, click the Start button. Select All Programs > ASUS > Cool & Quiet > Cool & Quiet. 3. The Cool 'n' Quiet!™ technology screen appears and displays the current CPU Frequency and CPU Voltage. ...3-10 Chapter 3: Software support Make sure to section "3.2.3 Utilities" for details. Select Programs > ASUS > Cool & Quiet > Cool & Quiet. 2. If you to view your system's real-time CPU frequency and voltage. Refer to install the Cool 'n'...
To launch the Cool 'n' Quiet!™ program: 1. If you are using Windows® 2000, click the Start button. Select All Programs > ASUS > Cool & Quiet > Cool & Quiet. 3. The Cool 'n' Quiet!™ technology screen appears and displays the current CPU Frequency and CPU Voltage. ...3-10 Chapter 3: Software support Make sure to section "3.2.3 Utilities" for details. Select Programs > ASUS > Cool & Quiet > Cool & Quiet. 2. If you to view your system's real-time CPU frequency and voltage. Refer to install the Cool 'n'...

K8N User Guide
Page 4
...2.1.1 Creating a bootable floppy disk 2-2 2.1.2 Using AFUDOS to update the BIOS 2-3 2.1.3 Using AFUDOS to copy BIOS from PC 2-4 2.1.4 Using ASUS EZ Flash to update the BIOS 2-5 2.1.5 Recovering the BIOS with CrashFree BIOS 2 ....... 2-6 2.2 BIOS Setup program 2-8 2.2.1 BIOS menu screen... 2-9 2.2.2 Menu bar 2-9 2.2.3 Navigation keys 2-9 2.2.4 Menu items 2-10 2.2.5 Sub-menu items 2-10 2.2.6 Configuration fields 2-10 2.2.7 Pop-up window 2-10 2.2.8 Scroll bar 2-10 2.2.9 General help 2-10 2.3 Main menu 2-11 2.3.1 System Time 2-11 2.3.2 System Date 2-11 2.3.3 Legacy Diskette A...
...2.1.1 Creating a bootable floppy disk 2-2 2.1.2 Using AFUDOS to update the BIOS 2-3 2.1.3 Using AFUDOS to copy BIOS from PC 2-4 2.1.4 Using ASUS EZ Flash to update the BIOS 2-5 2.1.5 Recovering the BIOS with CrashFree BIOS 2 ....... 2-6 2.2 BIOS Setup program 2-8 2.2.1 BIOS menu screen... 2-9 2.2.2 Menu bar 2-9 2.2.3 Navigation keys 2-9 2.2.4 Menu items 2-10 2.2.5 Sub-menu items 2-10 2.2.6 Configuration fields 2-10 2.2.7 Pop-up window 2-10 2.2.8 Scroll bar 2-10 2.2.9 General help 2-10 2.3 Main menu 2-11 2.3.1 System Time 2-11 2.3.2 System Date 2-11 2.3.3 Legacy Diskette A...
K8N User Guide
Page 14
... hangs due to Windows®. ASUS MyLogo2™ This new feature present in the motherboard allows you to personalize and add style to your system with USB 1.1. 1.3.2 Unique ASUS features CrashFree BIOS 2 This feature allows you to restore the original BIOS data from the ASUS support CD in ...available options. See page 2-6. Simply shut down and reboot the system, and BIOS automatically restores the CPU previous setting for each parameter. ASUS Multi-language BIOS The multi-language BIOS allows you to playback audio CDs even without booting the system to overclocking, C.P.R. USB 2.0 is...
... hangs due to Windows®. ASUS MyLogo2™ This new feature present in the motherboard allows you to personalize and add style to your system with USB 1.1. 1.3.2 Unique ASUS features CrashFree BIOS 2 This feature allows you to restore the original BIOS data from the ASUS support CD in ...available options. See page 2-6. Simply shut down and reboot the system, and BIOS automatically restores the CPU previous setting for each parameter. ASUS Multi-language BIOS The multi-language BIOS allows you to playback audio CDs even without booting the system to overclocking, C.P.R. USB 2.0 is...

K8N User Guide
Page 36
...drive. 2-2 Chapter 2: BIOS Setup OR If you need to a bootable floppy disk in case you are using the ASUS Update utility. 2.1.1 Creating a bootable floppy disk 1. Updates the BIOS using Windows® 98SE/ME, select Full option button from the format options field, then click Start. From your BIOS The... following to copy BIOS from PC") • Visit the ASUS website and download the latest BIOS file for this motherboard using Windows® XP, select Create an MS-DOS startup disk from the format type, then click Start. Click File...
...drive. 2-2 Chapter 2: BIOS Setup OR If you need to a bootable floppy disk in case you are using the ASUS Update utility. 2.1.1 Creating a bootable floppy disk 1. Updates the BIOS using Windows® 98SE/ME, select Full option button from the format options field, then click Start. From your BIOS The... following to copy BIOS from PC") • Visit the ASUS website and download the latest BIOS file for this motherboard using Windows® XP, select Create an MS-DOS startup disk from the format type, then click Start. Click File...

K8N User Guide
Page 44
...and press . 2.2.6 Configuration fields These fields show the values for the menu items. If an item is enclosed in ] [English] :[ST320413A] :[ASUS CD-S340] :[Not Detected] :[Not Detected] The other items on the screen. 2.2.9 General help Advanced Chipset settings WARNING: Setting wrong values in ...not select an item that is a brief description of the selected item. 2-10 Chapter 2: BIOS Setup Refer to "2.2.7 Pop-up window." 2.2.7 Pop-up window Select a menu item then press to configure system time. 2.2.4 Menu items The highlighted item on the menu bar displays the specific items...
...and press . 2.2.6 Configuration fields These fields show the values for the menu items. If an item is enclosed in ] [English] :[ST320413A] :[ASUS CD-S340] :[Not Detected] :[Not Detected] The other items on the screen. 2.2.9 General help Advanced Chipset settings WARNING: Setting wrong values in ...not select an item that is a brief description of the selected item. 2-10 Chapter 2: BIOS Setup Refer to "2.2.7 Pop-up window." 2.2.7 Pop-up window Select a menu item then press to configure system time. 2.2.4 Menu items The highlighted item on the menu bar displays the specific items...

K8N User Guide
Page 67
... load default values. F10 key can be used for this option, a confirmation appears. Exit & Discard Changes Select this option, a confirmation window appears. ASUS K8N motherboard 2-33 An onboard backup battery sustains the CMOS RAM and stays on the Setup menus. Select Ok to save the changes while exiting.... or if you do not want to fields other changes before exiting. When you select this option only if you press , a confirmation window appears. Select Exit and Save Changes or make other than System Date, System Time, and Password, the BIOS asks for a confirmation before...
... load default values. F10 key can be used for this option, a confirmation appears. Exit & Discard Changes Select this option, a confirmation window appears. ASUS K8N motherboard 2-33 An onboard backup battery sustains the CMOS RAM and stays on the Setup menus. Select Ok to save the changes while exiting.... or if you do not want to fields other changes before exiting. When you select this option only if you press , a confirmation window appears. Select Exit and Save Changes or make other than System Date, System Time, and Password, the BIOS asks for a confirmation before...

K8N User Guide
Page 70
...subject to run the CD. 3-2 Chapter 3: Software support Double-click the ASSETUP.EXE to change at any time without notice. Visit the ASUS website for general reference only. Always install the latest OS version and corresponding updates to locate the file ASSETUP.EXE from the BIN folder.... The CD automatically displays the Drivers menu if Autorun is NOT enabled in your computer. 3.1 Install an operating system This motherboard supports Windows® 2000/XP/2003 Server operating system (OS). Click on an item to your OS documentation for more information If Autorun is enabled...
...subject to run the CD. 3-2 Chapter 3: Software support Double-click the ASSETUP.EXE to change at any time without notice. Visit the ASUS website for general reference only. Always install the latest OS version and corresponding updates to locate the file ASSETUP.EXE from the BIN folder.... The CD automatically displays the Drivers menu if Autorun is NOT enabled in your computer. 3.1 Install an operating system This motherboard supports Windows® 2000/XP/2003 Server operating system (OS). Click on an item to your OS documentation for more information If Autorun is enabled...

K8N User Guide
Page 71
AMD Cool 'n' Quiet Driver Installs the AMD Cool 'n' Quiet!™ Technology driver. ASUS K8N motherboard 3-3 Make sure to support USB 2.0. For Windows® XP users, make sure to install Windows® XP Service Pack 1 to install the Microsoft® DirectX™ 9.0 driver before installing the NVIDIA® Chipset drivers. Make Chipset IDE Driver Disk Creates...
AMD Cool 'n' Quiet Driver Installs the AMD Cool 'n' Quiet!™ Technology driver. ASUS K8N motherboard 3-3 Make sure to support USB 2.0. For Windows® XP users, make sure to install Windows® XP Service Pack 1 to install the Microsoft® DirectX™ 9.0 driver before installing the NVIDIA® Chipset drivers. Make Chipset IDE Driver Disk Creates...

K8N User Guide
Page 77
Save your operating system. From the Windows® 2000/XP operating system, click the Start button. Click OK to effect settings. • Make sure to Yes. 3.4 Cool 'n' Quiet!™ Technology The motherboard ... Power Option Properties depending on your changes and exit BIOS Setup. 5. Windows® 2000/XP: 1. In the Power menu, select the item ACPI 2.0 Support and set to Enabled. From the Power schemes combo list box, select Minimal Power Management. 6. ASUS K8N motherboard 3-9 Make sure the Control Panel is set it to Classic View...
Save your operating system. From the Windows® 2000/XP operating system, click the Start button. Click OK to effect settings. • Make sure to Yes. 3.4 Cool 'n' Quiet!™ Technology The motherboard ... Power Option Properties depending on your changes and exit BIOS Setup. 5. Windows® 2000/XP: 1. In the Power menu, select the item ACPI 2.0 Support and set to Enabled. From the Power schemes combo list box, select Minimal Power Management. 6. ASUS K8N motherboard 3-9 Make sure the Control Panel is set it to Classic View...

K8N User Guide
Page 78
...Cool 'n' Quiet!™ program: 1. Refer to install the Cool 'n' Quiet!™ software from the motherboard support CD. If you are using Windows® 2000, click the Start button. If you to view your system's real-time CPU frequency and voltage. 3.4.2 Launching the Cool 'n'... Quiet!™ software The motherboard support CD includes the Cool 'n' Quiet!™ software that enables you are using Windows® XP, click the Start button. The Cool 'n' Quiet!™ technology screen appears and displays the current CPU Frequency and CPU Voltage. ...
...Cool 'n' Quiet!™ program: 1. Refer to install the Cool 'n' Quiet!™ software from the motherboard support CD. If you are using Windows® 2000, click the Start button. If you to view your system's real-time CPU frequency and voltage. 3.4.2 Launching the Cool 'n'... Quiet!™ software The motherboard support CD includes the Cool 'n' Quiet!™ software that enables you are using Windows® XP, click the Start button. The Cool 'n' Quiet!™ technology screen appears and displays the current CPU Frequency and CPU Voltage. ...


