User Manual
Page 10
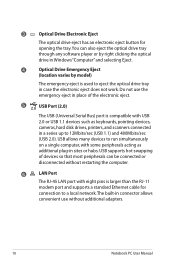
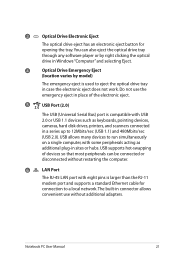
...place of devices so that most peripherals can also eject the optical drive tray through any software player or by right clicking the optical drive in Windows "Computer" and selecting Eject. 4 Optical Drive Emergency Eject (location varies by model) The emergency eject is ...with some peripherals acting as keyboards, pointing devices, cameras, hard disk drives, printers, and scanners connected in a series up to eject the optical drive tray in sites or hubs. 3 Optical Drive Electronic Eject The optical drive eject has an electronic eject button for connection to run simultaneously...
...place of devices so that most peripherals can also eject the optical drive tray through any software player or by right clicking the optical drive in Windows "Computer" and selecting Eject. 4 Optical Drive Emergency Eject (location varies by model) The emergency eject is ...with some peripherals acting as keyboards, pointing devices, cameras, hard disk drives, printers, and scanners connected in a series up to eject the optical drive tray in sites or hubs. 3 Optical Drive Electronic Eject The optical drive eject has an electronic eject button for connection to run simultaneously...
User Manual
Page 17
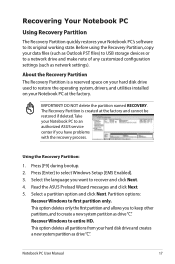
DO NOT delete the partition named RECOVERY. Take your hard disk drive and creates a new system partition as drive"C". Press [F9] during bootup. 2. Select a partition option and click Next. This option deletes all partitions from your Notebook PC to an authorized ASUS service center if you have problems with the recovery process. Notebook PC User...
DO NOT delete the partition named RECOVERY. Take your hard disk drive and creates a new system partition as drive"C". Press [F9] during bootup. 2. Select a partition option and click Next. This option deletes all partitions from your Notebook PC to an authorized ASUS service center if you have problems with the recovery process. Notebook PC User...
User Manual
Page 18
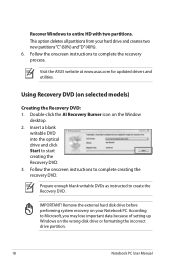
IMPORTANT! Follow the onscreen instructions to create the Recovery DVD. Visit the ASUS website at www.asus.com for updated drivers and utilities. Using Recovery DVD (on the Window desktop. 2. Prepare enough blank writable DVDs as instructed to complete the...process. According to start creating the Recovery DVD. 3. Insert a blank writable DVD into the optical drive and click Start to Microsoft, you may lose important data because of setting up Windows on your hard drive and creates two new partitions"C"(60%) and"D"(40%). 6. Recover Windows to complete creating the recovery DVD...
IMPORTANT! Follow the onscreen instructions to create the Recovery DVD. Visit the ASUS website at www.asus.com for updated drivers and utilities. Using Recovery DVD (on the Window desktop. 2. Prepare enough blank writable DVDs as instructed to complete the...process. According to start creating the Recovery DVD. 3. Insert a blank writable DVD into the optical drive and click Start to Microsoft, you may lose important data because of setting up Windows on your hard drive and creates two new partitions"C"(60%) and"D"(40%). 6. Recover Windows to complete creating the recovery DVD...
User Manual
Page 19
.... 2. Visit the ASUS website at www.asus.com for updated drivers and utilities. WARNING: DO NOT remove the Recovery disc, unless instructed to do so, during the recovery process or else your Notebbook PC when performing system recovery. Ensure to connect the power adapter to back up all your hard drive. Notebook PC User...
.... 2. Visit the ASUS website at www.asus.com for updated drivers and utilities. WARNING: DO NOT remove the Recovery disc, unless instructed to do so, during the recovery process or else your Notebbook PC when performing system recovery. Ensure to connect the power adapter to back up all your hard drive. Notebook PC User...
User Manual
Page 3
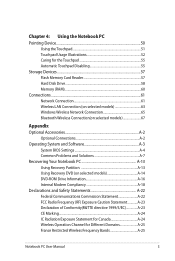
...Usage Illustrations 52 Caring for the Touchpad 55 Automatic Touchpad Disabling 55 Storage Devices 57 Flash Memory Card Reader 57 Hard Disk Drive 58 Memory (RAM 60 Connections...61 Network Connection 61 Wireless LAN Connection (on selected models 63 Windows Wireless ... and Solutions A-7 Recovering Your Notebook PC A-13 Using Recovery Partition A-13 Using Recovery DVD (on selected models A-14 DVD-ROM Drive Information A-16 Internal Modem Compliancy A-18 Declarations and Safety Statements A-22 Federal Communications Commission Statement A-22 FCC Radio Frequency (RF) Exposure...
...Usage Illustrations 52 Caring for the Touchpad 55 Automatic Touchpad Disabling 55 Storage Devices 57 Flash Memory Card Reader 57 Hard Disk Drive 58 Memory (RAM 60 Connections...61 Network Connection 61 Wireless LAN Connection (on selected models 63 Windows Wireless ... and Solutions A-7 Recovering Your Notebook PC A-13 Using Recovery Partition A-13 Using Recovery DVD (on selected models A-14 DVD-ROM Drive Information A-16 Internal Modem Compliancy A-18 Declarations and Safety Statements A-22 Federal Communications Commission Statement A-22 FCC Radio Frequency (RF) Exposure...
User Manual
Page 19
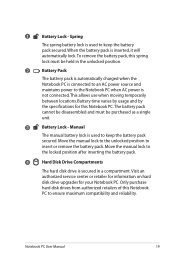
...the specifications for your Notebook PC. Move the manual lock to the locked position after inserting the battery pack. 4 Hard Disk Drive Compartments The hard disk drive is used to keep the battery pack secured. This allows use when moving temporarily between locations. Manual The manual battery... in a compartment. Visit an authorized service center or retailer for information on hard disk drive upgrades for this Notebook PC to insert or remove the battery pack. Only purchase hard disk drives from authorized retailers of this Notebook PC.The battery pack cannot be disassembled and...
...the specifications for your Notebook PC. Move the manual lock to the locked position after inserting the battery pack. 4 Hard Disk Drive Compartments The hard disk drive is used to keep the battery pack secured. This allows use when moving temporarily between locations. Manual The manual battery... in a compartment. Visit an authorized service center or retailer for information on hard disk drive upgrades for this Notebook PC to insert or remove the battery pack. Only purchase hard disk drives from authorized retailers of this Notebook PC.The battery pack cannot be disassembled and...
User Manual
Page 21
...Do not use without restarting the computer. 6 LAN Port The RJ-45 LAN port with some peripherals acting as keyboards, pointing devices, cameras, hard disk drives, printers, and scanners connected in a series up to run simultaneously on a single computer, with eight pins is used to a local network...in place of devices so that most peripherals can also eject the optical drive tray through any software player or by right clicking the optical drive in Windows "Computer" and selecting Eject. 4 Optical Drive Emergency Eject (location varies by model) The emergency eject is larger than...
...Do not use without restarting the computer. 6 LAN Port The RJ-45 LAN port with some peripherals acting as keyboards, pointing devices, cameras, hard disk drives, printers, and scanners connected in a series up to run simultaneously on a single computer, with eight pins is used to a local network...in place of devices so that most peripherals can also eject the optical drive tray through any software player or by right clicking the optical drive in Windows "Computer" and selecting Eject. 4 Optical Drive Emergency Eject (location varies by model) The emergency eject is larger than...
User Manual
Page 32
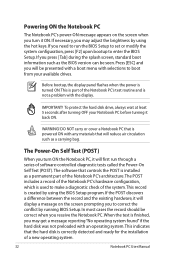
... problem with an operating system. The Power-On Self Test (POST) When you turn it ON. To protect the hard disk drive, always wait at least 5 seconds after turning OFF your available drives. If the POST discovers a difference between the record and the existing hardware, it will display a message on the....The POST includes a record of the system. Press [ESC] and you will be presented with a boot menu with any materials that the hard disk is correctly detected and ready for the installation of the Notebook PC's test routine and is installed as the BIOS version can be correct...
... problem with an operating system. The Power-On Self Test (POST) When you turn it ON. To protect the hard disk drive, always wait at least 5 seconds after turning OFF your available drives. If the POST discovers a difference between the record and the existing hardware, it will display a message on the....The POST includes a record of the system. Press [ESC] and you will be presented with a boot menu with any materials that the hard disk is correctly detected and ready for the installation of the Notebook PC's test routine and is installed as the BIOS version can be correct...
User Manual
Page 33
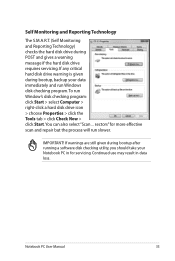
... servicing. IMPORTANT! Notebook PC User Manual 33 If warnings are still given during POST and gives a warning message if the hard disk drive requires servicing. Continued use may result in for more effective scan and repair but the process will run Windows disk checking program.... If any critical hard disk drive warning is given during bootup, backup your Notebook PC in data loss. To run Window's disk checking program: click Start > select Computer > right-click a hard disk drive icon > choose Properties > click the Tools tab >...
... servicing. IMPORTANT! Notebook PC User Manual 33 If warnings are still given during POST and gives a warning message if the hard disk drive requires servicing. Continued use may result in for more effective scan and repair but the process will run Windows disk checking program.... If any critical hard disk drive warning is given during bootup, backup your Notebook PC in data loss. To run Window's disk checking program: click Start > select Computer > right-click a hard disk drive icon > choose Properties > click the Tools tab >...
User Manual
Page 36
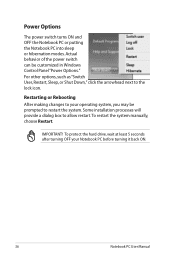
... as "Switch User, Restart, Sleep, or Shut Down," click the arrowhead next to allow restart.To restart the system manually, choose Restart. To protect the hard drive, wait at least 5 seconds after turning OFF your operating system, you may be customized in Windows Control Panel "Power Options." Actual behavior of the power...
... as "Switch User, Restart, Sleep, or Shut Down," click the arrowhead next to allow restart.To restart the system manually, choose Restart. To protect the hard drive, wait at least 5 seconds after turning OFF your operating system, you may be customized in Windows Control Panel "Power Options." Actual behavior of the power...

User Manual
Page 39
... have to be periodically refreshed and power consumption is the same as Suspend-to-Disk (STD) and stores your current data and status on the hard disk drive.
... have to be periodically refreshed and power consumption is the same as Suspend-to-Disk (STD) and stores your current data and status on the hard disk drive.
User Manual
Page 48
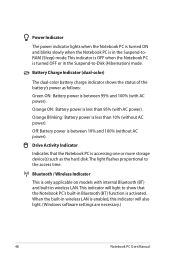
Battery Charge Indicator (dual-color) The dual-color battery charge indicator shows the status of the battery's power as the hard disk.The light flashes proportional to show that the Notebook PC is accessing one or more storage device(s) such as follows: Green ON: Battery... power is between 10% and 100% (without AC power). Off: Battery power is between 95% and 100% (with AC power). Drive Activity Indicator Indicates that the Notebook PC's built-in Bluetooth (BT) function is activated. Bluetooth / Wireless Indicator This is only applicable on models with AC...
Battery Charge Indicator (dual-color) The dual-color battery charge indicator shows the status of the battery's power as the hard disk.The light flashes proportional to show that the Notebook PC is accessing one or more storage device(s) such as follows: Green ON: Battery... power is between 10% and 100% (without AC power). Off: Battery power is between 95% and 100% (with AC power). Drive Activity Indicator Indicates that the Notebook PC's built-in Bluetooth (BT) function is activated. Bluetooth / Wireless Indicator This is only applicable on models with AC...
User Manual
Page 58
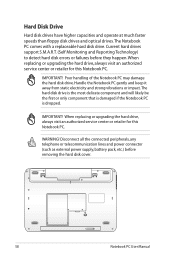
... visit an authorized service center or retailer for this Notebook PC. When replacing or upgrading the hard drive, always visit an authorized service center or retailer for this Notebook PC. Disconnect all the connected peripherals, any telephone or telecommunication lines and ...power connector (such as external power supply, battery pack, etc.) before they happen. The hard disk drive is the most delicate component and will likely be the first or only component that is damaged if the Notebook PC is dropped. IMPORTANT!...
... visit an authorized service center or retailer for this Notebook PC. When replacing or upgrading the hard drive, always visit an authorized service center or retailer for this Notebook PC. Disconnect all the connected peripherals, any telephone or telecommunication lines and ...power connector (such as external power supply, battery pack, etc.) before they happen. The hard disk drive is the most delicate component and will likely be the first or only component that is damaged if the Notebook PC is dropped. IMPORTANT!...

User Manual
Page 59
Refer to the previous chapter to locate the hard disk drive. Notebook PC User Manual 59 Removing the hard disk drive: 1 2 Installing the hard disk drive: 1 2 The actual location of the hard disk drive differs by models.
Refer to the previous chapter to locate the hard disk drive. Notebook PC User Manual 59 Removing the hard disk drive: 1 2 Installing the hard disk drive: 1 2 The actual location of the hard disk drive differs by models.
User Manual
Page 73
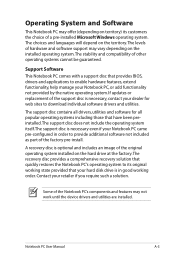
...additional software not included as part of the factory pre-install. Some of other operating systems cannot be guaranteed. Contact your hard disk drive is necessary even if your Notebook PC came pre-configured in good working state provided that have been preinstalled.The support disc...utilities. If updates or replacement of the support disc is optional and includes an image of the original operating system installed on the hard drive at the factory.The recovery disc provides a comprehensive recovery solution that provides BIOS, drivers and applications to its customers the choice ...
...additional software not included as part of the factory pre-install. Some of other operating systems cannot be guaranteed. Contact your hard disk drive is necessary even if your Notebook PC came pre-configured in good working state provided that have been preinstalled.The support disc...utilities. If updates or replacement of the support disc is optional and includes an image of the original operating system installed on the hard drive at the factory.The recovery disc provides a comprehensive recovery solution that provides BIOS, drivers and applications to its customers the choice ...
User Manual
Page 74
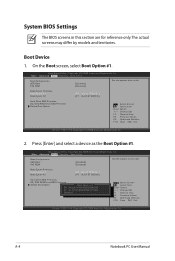
...Option #1. Boot Option Priorities Boot Option #1 Boot Option #2 [P0: Hitachi HTS545...] [P1: HL-DT-ST BDDVD.] Hard Drive BBS Priorities CD/DVD ROM Drive BBS Priorities Delete Boot Option Boot Option #1 P0: Hitachi HTS545050B9A300 P1: HL-DT-ST BDDVDRW CT10N Disabled : Select Screen...Select +/-: Change Opt. Boot Option Priorities Boot Option #1 Boot Option #2 [P0: Hitachi HTS545...] [P1: HL-DT-ST BDDVD.] Hard Drive BBS Priorities CD/DVD ROM Drive BBS Priorities Delete Boot Option : Select Screen : Select Item Enter: Select +/-: Change Opt. Copyright (C) 2008 American Megatrends, Inc. ...
...Option #1. Boot Option Priorities Boot Option #1 Boot Option #2 [P0: Hitachi HTS545...] [P1: HL-DT-ST BDDVD.] Hard Drive BBS Priorities CD/DVD ROM Drive BBS Priorities Delete Boot Option Boot Option #1 P0: Hitachi HTS545050B9A300 P1: HL-DT-ST BDDVDRW CT10N Disabled : Select Screen...Select +/-: Change Opt. Boot Option Priorities Boot Option #1 Boot Option #2 [P0: Hitachi HTS545...] [P1: HL-DT-ST BDDVD.] Hard Drive BBS Priorities CD/DVD ROM Drive BBS Priorities Delete Boot Option : Select Screen : Select Item Enter: Select +/-: Change Opt. Copyright (C) 2008 American Megatrends, Inc. ...
User Manual
Page 83
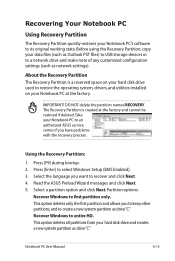
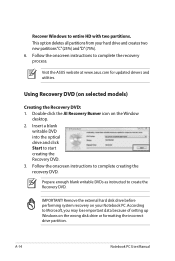
... the operating system, drivers, and utilities installed on your hard disk drive used to entire HD. About the Recovery Partition The Recovery Partition is created at the factory. Take your Notebook PC to an authorized ASUS service center if you want to create a new system partition...to recover and click Next. 4. Notebook PC User Manual A-13 This option deletes all partitions from your hard disk drive and creates a new system partition as drive"C". Recovering Your Notebook PC Using Recovery Partition The Recovery Partition quickly restores your Notebook PC's software to select ...
... the operating system, drivers, and utilities installed on your hard disk drive used to entire HD. About the Recovery Partition The Recovery Partition is created at the factory. Take your Notebook PC to an authorized ASUS service center if you want to create a new system partition...to recover and click Next. 4. Notebook PC User Manual A-13 This option deletes all partitions from your hard disk drive and creates a new system partition as drive"C". Recovering Your Notebook PC Using Recovery Partition The Recovery Partition quickly restores your Notebook PC's software to select ...
User Manual
Page 84
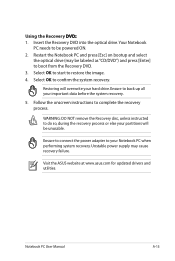
...to create the Recovery DVD. Prepare enough blank writable DVDs as instructed to start creating the Recovery DVD. 3. Remove the external hard disk drive before performing system recovery on selected models) Creating the Recovery DVD: 1. A-14 Notebook PC User Manual Recover Windows to complete ... deletes all partitions from your Notebook PC. Visit the ASUS website at www.asus.com for updated drivers and utilities. Double-click the AI Recovery Burner icon on the wrong disk drive or formatting the incorrect drive partition. Follow the onscreen instructions to entire HD with ...
...to create the Recovery DVD. Prepare enough blank writable DVDs as instructed to start creating the Recovery DVD. 3. Remove the external hard disk drive before performing system recovery on selected models) Creating the Recovery DVD: 1. A-14 Notebook PC User Manual Recover Windows to complete ... deletes all partitions from your Notebook PC. Visit the ASUS website at www.asus.com for updated drivers and utilities. Double-click the AI Recovery Burner icon on the wrong disk drive or formatting the incorrect drive partition. Follow the onscreen instructions to entire HD with ...
User Manual
Page 85
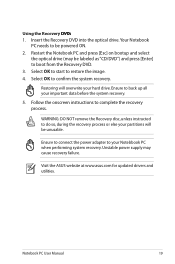
... Follow the onscreen instructions to restore the image. 4. Visit the ASUS website at www.asus.com for updated drivers and utilities. Restart the Notebook PC and press [Esc] on bootup and select the optical drive (may cause recovery failure. Restoring will be unusable. Unstable power ... to be labeled as "CD/DVD") and press [Enter] to do so, during the recovery process or else your partitions will overwrite your hard drive. Using the Recovery D��V�D�:� 1. WARNING: DO NOT remove the Recovery disc, unless instructed to boot from the Recovery ...
... Follow the onscreen instructions to restore the image. 4. Visit the ASUS website at www.asus.com for updated drivers and utilities. Restart the Notebook PC and press [Esc] on bootup and select the optical drive (may cause recovery failure. Restoring will be unusable. Unstable power ... to be labeled as "CD/DVD") and press [Enter] to do so, during the recovery process or else your partitions will overwrite your hard drive. Using the Recovery D��V�D�:� 1. WARNING: DO NOT remove the Recovery disc, unless instructed to boot from the Recovery ...


