User Manual
Page 2
... FITNESS FOR A PARTICULAR PURPOSE. SPECIFICATIONS AND INFORMATION CONTAINED IN THIS MANUAL ARE FURNISHED FOR INFORMATIONAL USE ONLY, AND ARE SUBJECT TO CHANGE AT ANY TIME WITHOUT NOTICE, AND SHOULD NOT BE CONSTRUED AS A COMMITMENT BY ASUS. All Rights Reserved. No part of this manual may or may be registered trademarks or copyrights of the product is authorized in any...
... FITNESS FOR A PARTICULAR PURPOSE. SPECIFICATIONS AND INFORMATION CONTAINED IN THIS MANUAL ARE FURNISHED FOR INFORMATIONAL USE ONLY, AND ARE SUBJECT TO CHANGE AT ANY TIME WITHOUT NOTICE, AND SHOULD NOT BE CONSTRUED AS A COMMITMENT BY ASUS. All Rights Reserved. No part of this manual may or may be registered trademarks or copyrights of the product is authorized in any...
User Manual
Page 3
... Product features 1-3 1.4.1 Front panel 1-3 1.4.2 Side panel 1-4 1.4.3 Rear panel 1-5 1.4.4 Remote control 1-6 1.5 Technical specifications 1-8 Chapter 2: Setup information 2.1 Connecting the O!Play HD media player 2-2 2.2 Setting up the HD media player 2-3 2.2.1 Network setup 2-3 2.2.2 Network neighborhood setup 2-4 2.2.3 System setup 2-5 Chapter 3: Enjoying media contents 3.1 Home screen menu 3-2 3.2 Playing video 3-3 3.2.1 Selecting and playing video 3-3 3.2.2 Video setup 3-4 3.3 Listening to music 3-5 3.3.1 Selecting and playing music 3-5 3.3.2 Audio setup 3-6 3.4 Viewing...
... Product features 1-3 1.4.1 Front panel 1-3 1.4.2 Side panel 1-4 1.4.3 Rear panel 1-5 1.4.4 Remote control 1-6 1.5 Technical specifications 1-8 Chapter 2: Setup information 2.1 Connecting the O!Play HD media player 2-2 2.2 Setting up the HD media player 2-3 2.2.1 Network setup 2-3 2.2.2 Network neighborhood setup 2-4 2.2.3 System setup 2-5 Chapter 3: Enjoying media contents 3.1 Home screen menu 3-2 3.2 Playing video 3-3 3.2.1 Selecting and playing video 3-3 3.2.2 Video setup 3-4 3.3 Listening to music 3-5 3.3.1 Selecting and playing music 3-5 3.3.2 Audio setup 3-6 3.4 Viewing...

User Manual
Page 5
... compliance could void the user's authority to operate this equipment does cause harmful interference to radio or television reception, which the receiver is subject to which can radiate radio frequency energy and, if not installed and used in accordance with manufacturer's instructions, may not cause harmful interference, and • This device must accept any interference received including interference that...
... compliance could void the user's authority to operate this equipment does cause harmful interference to radio or television reception, which the receiver is subject to which can radiate radio frequency energy and, if not installed and used in accordance with manufacturer's instructions, may not cause harmful interference, and • This device must accept any interference received including interference that...

User Manual
Page 7
... satisfactory operation, use the product only with UL listed devices which have fallen into your safety. Install in any heat sources such as power-supply cord or plug is required when the apparatus has been damaged in accordance with the manufacturer's instructions. • Do not install near water. • Clean only with dry cloth. • Do not block any ventilation openings. A polarized plug...
... satisfactory operation, use the product only with UL listed devices which have fallen into your safety. Install in any heat sources such as power-supply cord or plug is required when the apparatus has been damaged in accordance with the manufacturer's instructions. • Do not install near water. • Clean only with dry cloth. • Do not block any ventilation openings. A polarized plug...
User Manual
Page 10
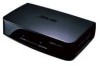
1.1 Introduction Thank you to enjoy digital media files from your PC or portable USB/eSATA storage devices to your system meets the following items: • O!Play HD Media Player • Remote control • Composite AV cable • Power cord • AC Adapter • Quick Installation Guide • Support CD If any of the above items is damaged or missing, contact your retailer. 1.3 PC system requirements Make sure your TV or entertainment...
1.1 Introduction Thank you to enjoy digital media files from your PC or portable USB/eSATA storage devices to your system meets the following items: • O!Play HD Media Player • Remote control • Composite AV cable • Power cord • AC Adapter • Quick Installation Guide • Support CD If any of the above items is damaged or missing, contact your retailer. 1.3 PC system requirements Make sure your TV or entertainment...

User Manual
Page 12
... USB 2.0 media device, such as a flash disk or a removable hard disk. • Reset button. In case the HD media player cannot properly turn OFF or restart, the reset button can be depressed with a pin or a straightened paper clip to the rear panel connector descriptions below. • eSATA / USB 2.0 combo port. 1.4.2 Side panel The side panel features one USB port and one eSATA / USB combo port for connecting both an external USB 2.0 media device and an eSATA storage device, such as a USB flash disk or a removable USB hard disk. 1-4 Chapter 1: Product...
... USB 2.0 media device, such as a flash disk or a removable hard disk. • Reset button. In case the HD media player cannot properly turn OFF or restart, the reset button can be depressed with a pin or a straightened paper clip to the rear panel connector descriptions below. • eSATA / USB 2.0 combo port. 1.4.2 Side panel The side panel features one USB port and one eSATA / USB combo port for connecting both an external USB 2.0 media device and an eSATA storage device, such as a USB flash disk or a removable USB hard disk. 1-4 Chapter 1: Product...

User Manual
Page 13
...cable. • HDMI port. This port is for video and audio cables, the power socket, and a LAN port. Digital audio output (Optical S/PDIF) Analog video output Analog audio output HDMI port LAN (RJ-45) port Power socket Refer to a Local Area Network (LAN) through a network hub. • Power socket. This port allows connection to the rear panel connector descriptions below. • Analog audio output (red and white). ASUS O!Play HD media player 1-5 This port connects a composite cable to the television or video player/recorder. • Analog video output (yellow). These ports...
...cable. • HDMI port. This port is for video and audio cables, the power socket, and a LAN port. Digital audio output (Optical S/PDIF) Analog video output Analog audio output HDMI port LAN (RJ-45) port Power socket Refer to a Local Area Network (LAN) through a network hub. • Power socket. This port allows connection to the rear panel connector descriptions below. • Analog audio output (red and white). ASUS O!Play HD media player 1-5 This port connects a composite cable to the television or video player/recorder. • Analog video output (yellow). These ports...

User Manual
Page 15
... the previous screen Press to repeat playback Press to select the language of the video you are watching Open the Setup menu Press to quickly enter Photos mode Toggles to the previous video clip Display the home menu Move up, down, right, and left through selections on /off Press to rewind playback Stops playback Switches to shuffle the order of the music files in the connected storage device ASUS O!Play HD media player 1-7 Remote control button table No...
... the previous screen Press to repeat playback Press to select the language of the video you are watching Open the Setup menu Press to quickly enter Photos mode Toggles to the previous video clip Display the home menu Move up, down, right, and left through selections on /off Press to rewind playback Stops playback Switches to shuffle the order of the music files in the connected storage device ASUS O!Play HD media player 1-7 Remote control button table No...

User Manual
Page 16
..., GIF, TIFF Supported subtitile formats SRT, SUB, SMI, SSA Outputs HDMI (High-Definition Multimedia Interface) Composite Video and Audio Optical Digital Audio Inputs DC Power in USB 2.0 port x1 USB / eSATA combo port x1 RJ-45 LAN port Dimensions W x D x H: 181.0mm x 125.32mm x 47.73mm Weight: 480g Power Source 12Vdc, 2A Power Consumption 24W Operating Temperature 5˚C (41˚F) - 35˚C (95˚F) *Specifications are subject to change without notice. 1-8 Chapter 1: Product introduction
..., GIF, TIFF Supported subtitile formats SRT, SUB, SMI, SSA Outputs HDMI (High-Definition Multimedia Interface) Composite Video and Audio Optical Digital Audio Inputs DC Power in USB 2.0 port x1 USB / eSATA combo port x1 RJ-45 LAN port Dimensions W x D x H: 181.0mm x 125.32mm x 47.73mm Weight: 480g Power Source 12Vdc, 2A Power Consumption 24W Operating Temperature 5˚C (41˚F) - 35˚C (95˚F) *Specifications are subject to change without notice. 1-8 Chapter 1: Product introduction
User Manual
Page 18
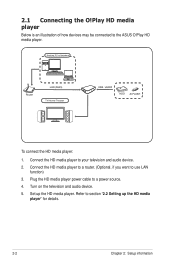
... a power source. 4. Turn on the television and audio device. 5. Plug the HD media player power cable to use LAN function) 3. Set up the HD media player" for details. 2-2 Chapter 2: Setup information 2.1 Connecting the O!Play HD media player Below is an illustration of how devices may be connected to your television and audio device. 2. Connect the HD media player to the ASUS O!Play HD media player. Desktop PC or Notebook SPLENDID MENU Router LAN (RJ45) TV/Home Theater USB / eSATA HDD AI-FLASH To connect the HD media player: 1. Refer...
... a power source. 4. Turn on the television and audio device. 5. Plug the HD media player power cable to use LAN function) 3. Set up the HD media player" for details. 2-2 Chapter 2: Setup information 2.1 Connecting the O!Play HD media player Below is an illustration of how devices may be connected to your television and audio device. 2. Connect the HD media player to the ASUS O!Play HD media player. Desktop PC or Notebook SPLENDID MENU Router LAN (RJ45) TV/Home Theater USB / eSATA HDD AI-FLASH To connect the HD media player: 1. Refer...
User Manual
Page 19
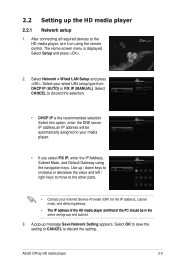
... IP is displayed. Select OK to save the setting or CANCEL to your Internet Service Provider (ISP) for the IP address, subnet mask, and default gateway. Select CANCEL to the HD media player, turn it on using the navigation keys. A pop-up the HD media player 2.2.1 Network setup 1. The Home screen menu is the recommended selection Select this option, enter the DNS server IP address,an IP address will be automatically...
... IP is displayed. Select OK to save the setting or CANCEL to your Internet Service Provider (ISP) for the IP address, subnet mask, and default gateway. Select CANCEL to the HD media player, turn it on using the navigation keys. A pop-up the HD media player 2.2.1 Network setup 1. The Home screen menu is the recommended selection Select this option, enter the DNS server IP address,an IP address will be automatically...
User Manual
Page 20
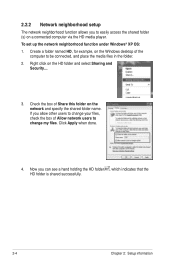
... that the HD folder is shared successfully. 2-4 Chapter 2: Setup information If you allow other users to change your files, check the box of Share this folder on the HD folder and select Sharing and Security.... 3. Check the box of Allow network users to be connected, and place the media files in the folder. 2. To set up the network neighborhood function under Windows® XP OS: 1.
... that the HD folder is shared successfully. 2-4 Chapter 2: Setup information If you allow other users to change your files, check the box of Share this folder on the HD folder and select Sharing and Security.... 3. Check the box of Allow network users to be connected, and place the media files in the folder. 2. To set up the network neighborhood function under Windows® XP OS: 1.
User Manual
Page 21
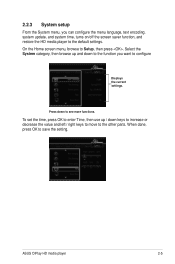
... to configure Displays the current settings. To set the time, press OK to enter Time, then use up and down to the other parts. ASUS O!Play HD media player 2-5 Press down to the function you can configure the menu language, text encoding, system update, and system time, turns on/off the screen saver function, and restore the HD media player to Setup, then press . On the Home screen menu, browse to the default settings. 2.2.3 System setup From the...
... to configure Displays the current settings. To set the time, press OK to enter Time, then use up and down to the other parts. ASUS O!Play HD media player 2-5 Press down to the function you can configure the menu language, text encoding, system update, and system time, turns on/off the screen saver function, and restore the HD media player to Setup, then press . On the Home screen menu, browse to the default settings. 2.2.3 System setup From the...

User Manual
Page 24
Home screen options There are five main Home options for you to the succeeding sections for remote control key functions. Refer to choose from: Movies, Music, Photo, Setup, and File Copy. 3.1 Home screen menu Below is currently selected. Refer to navigate through the menus. Use the remote control to Chapter 1 for detailed information about seach Home option. 3-2 Chapter 3: Enjoying media content The highlighted icon indicates the option that is the Home screen menu of the HD media player.
Home screen options There are five main Home options for you to the succeeding sections for remote control key functions. Refer to choose from: Movies, Music, Photo, Setup, and File Copy. 3.1 Home screen menu Below is currently selected. Refer to navigate through the menus. Use the remote control to Chapter 1 for detailed information about seach Home option. 3-2 Chapter 3: Enjoying media content The highlighted icon indicates the option that is the Home screen menu of the HD media player.

User Manual
Page 26
...) Stop the playback Change the repeat mode Zoom DISPLAY in on the screen, and use the navigation buttons to move to a certain area of the enlarged screen DISPLAY Skip to the previous video file Skip to configure. Select the Video category, then browse up and down to Setup, then press . Press down to the function you want to the next video file 3.2.2 Video setup Configure several video settings including the aspect...
...) Stop the playback Change the repeat mode Zoom DISPLAY in on the screen, and use the navigation buttons to move to a certain area of the enlarged screen DISPLAY Skip to the previous video file Skip to configure. Select the Video category, then browse up and down to Setup, then press . Press down to the function you want to the next video file 3.2.2 Video setup Configure several video settings including the aspect...

User Manual
Page 28
..., x32, or normal speed (x1) Forward Press the button repeatedly to change the forward speed to x1.5, x2, x4, x8, x16, x32, or normal speed (x1) DISPLAY Stop the playback Skip to the previous music file Skip to the next music file Change the repeat mode Open the Setup menu Toggles to shuffle the order of the music files in the connected storage device 3.3.2 Audio setup Configure the audio settings including Night Mode and Digital Output.
..., x32, or normal speed (x1) Forward Press the button repeatedly to change the forward speed to x1.5, x2, x4, x8, x16, x32, or normal speed (x1) DISPLAY Stop the playback Skip to the previous music file Skip to the next music file Change the repeat mode Open the Setup menu Toggles to shuffle the order of the music files in the connected storage device 3.3.2 Audio setup Configure the audio settings including Night Mode and Digital Output.
User Manual
Page 34
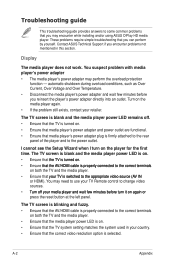
...;�I turn on . • Ensure that media player's power adapter and power outlet are functional. • Ensure that you can perform by yourself. You may need to use your TV Remote control to the power outlet. The TV screen is blank and the media player power LED remains off. • Ensure that the correct video resolution option is firmly attached to the rear panel of the player and to change video sources...
...;�I turn on . • Ensure that media player's power adapter and power outlet are functional. • Ensure that you can perform by yourself. You may need to use your TV Remote control to the power outlet. The TV screen is blank and the media player power LED remains off. • Ensure that the correct video resolution option is firmly attached to the rear panel of the player and to change video sources...
User Manual
Page 35
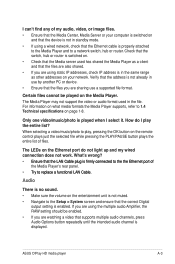
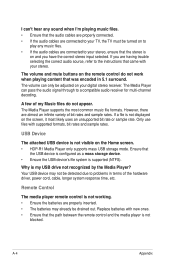
... Media Player's rear panel. Audio There is no sound. • Make sure the volume on the entertainment unit is not muted. • Navigate to 1.4 Technical specifications on and that the device is not in standby mode. • If using a wired network, check that the correct Digital output setting is switched on. • Check that the Media server used in use a supported file format. The LEDs on the remote control plays just the selected file while pressing the PLAY/PAUSE button plays...
... Media Player's rear panel. Audio There is no sound. • Make sure the volume on the entertainment unit is not muted. • Navigate to 1.4 Technical specifications on and that the device is not in standby mode. • If using a wired network, check that the correct Digital output setting is switched on. • Check that the Media server used in use a supported file format. The LEDs on the remote control plays just the selected file while pressing the PLAY/PAUSE button plays...
User Manual
Page 36
... uses an unsupported bit rate or sample rate. Replace batteries with new ones. • Ensure that the path between the remote control and the media player is supported (NTFS). A few of the hardware driver, power cord, cable, longer system response time, etc. I can't hear any sound when I'm playing music files. • Ensure that the audio cables are properly connected. • If the audio cables are connected to your TV, the TV must be turned...
... uses an unsupported bit rate or sample rate. Replace batteries with new ones. • Ensure that the path between the remote control and the media player is supported (NTFS). A few of the hardware driver, power cord, cable, longer system response time, etc. I can't hear any sound when I'm playing music files. • Ensure that the audio cables are properly connected. • If the audio cables are connected to your TV, the TV must be turned...
User Manual
Page 37
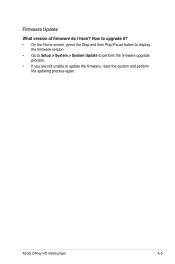
ASUS O!Play HD media player A-5 Firmware Update What version of firmware do I have? How to upgrade it? • On the Home screen, press the Stop and then Play/Pause button to display the firmware version. • Go to Setup > System > System Update to perform the firmware upgrade process. • If you are still unable to update the firmware, reset the system and perform the updating process again.
ASUS O!Play HD media player A-5 Firmware Update What version of firmware do I have? How to upgrade it? • On the Home screen, press the Stop and then Play/Pause button to display the firmware version. • Go to Setup > System > System Update to perform the firmware upgrade process. • If you are still unable to update the firmware, reset the system and perform the updating process again.


