H61M-E User's Manual
Page 31
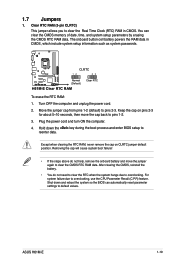
...reset parameter settings to overclocking. The onboard button cell battery powers the RAM data in CMOS. CLRTC H61M-E 12 23 Normal (Default) Clear RTC H61M-E Clear RTC RAM To erase the RTC RAM: 1. Turn OFF the computer and unplug the power cord. 2. Hold down and reboot the system so the BIOS... due to default values. For system failure due to pins 2-3. Clear RTC RAM (3-pin CLRTC) This jumper allows you to reenter data. ASUS H61M-E 1-19 Move the jumper cap from pins 1-2 (default) to overclocking, use the CPU Parameter Recall (C.P.R) feature. Shut down the key ...
...reset parameter settings to overclocking. The onboard button cell battery powers the RAM data in CMOS. CLRTC H61M-E 12 23 Normal (Default) Clear RTC H61M-E Clear RTC RAM To erase the RTC RAM: 1. Turn OFF the computer and unplug the power cord. 2. Hold down and reboot the system so the BIOS... due to default values. For system failure due to pins 2-3. Clear RTC RAM (3-pin CLRTC) This jumper allows you to reenter data. ASUS H61M-E 1-19 Move the jumper cap from pins 1-2 (default) to overclocking, use the CPU Parameter Recall (C.P.R) feature. Shut down the key ...
H61M-E User's Manual
Page 42
...2-2 Chapter 2: Getting started The ASUS Update utility is done. • This function supports USB flash disks with FAT 32/16 format and single partition only. • DO NOT shut down or reset the system while updating the BIOS to perform the BIOS update process. Updating from the... Internet a. b. Locate the BIOS file from the ASUS website at www.asus.com. Follow the onscreen instructions to complete the updating process. 2.1.2 ASUS EZ Flash 2 The ASUS EZ Flash 2 feature...
...2-2 Chapter 2: Getting started The ASUS Update utility is done. • This function supports USB flash disks with FAT 32/16 format and single partition only. • DO NOT shut down or reset the system while updating the BIOS to perform the BIOS update process. Updating from the... Internet a. b. Locate the BIOS file from the ASUS website at www.asus.com. Follow the onscreen instructions to complete the updating process. 2.1.2 ASUS EZ Flash 2 The ASUS EZ Flash 2 feature...
H61M-E User's Manual
Page 43
... when it fails or gets corrupted during the updating process. ASUS H61M-E 2-3 2.1.3 ASUS CrashFree BIOS 3 utility The ASUS CrashFree BIOS 3 is an auto recovery tool that allows you to recover BIOS setting. DO NOT shut down or reset the system while updating the BIOS! Recovering the BIOS To recover the BIOS: 1. You can cause system boot failure! When found, the utility...
... when it fails or gets corrupted during the updating process. ASUS H61M-E 2-3 2.1.3 ASUS CrashFree BIOS 3 utility The ASUS CrashFree BIOS 3 is an auto recovery tool that allows you to recover BIOS setting. DO NOT shut down or reset the system while updating the BIOS! Recovering the BIOS To recover the BIOS: 1. You can cause system boot failure! When found, the utility...
H61M-E User's Manual
Page 45
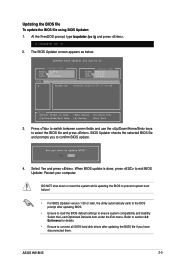
... all SATA hard disk drives after updating BIOS. • Ensure to load the BIOS default settings to confirm BIOS update. 4. When BIOS update is done, press to select the BIOS file and press . ASUS H61M-E 2-5 The BIOS Updater screen appears as below. DO NOT shut down or reset the system while updating the BIOS to prevent system boot failure! •...
... all SATA hard disk drives after updating BIOS. • Ensure to load the BIOS default settings to confirm BIOS update. 4. When BIOS update is done, press to select the BIOS file and press . ASUS H61M-E 2-5 The BIOS Updater screen appears as below. DO NOT shut down or reset the system while updating the BIOS to prevent system boot failure! •...

H61M-E User's Manual
Page 46
.... • Press the reset button on the system chassis. • Press the power button to turn the system off then back on your screen. • Visit the ASUS website at startup: • Press during the Power-On Self Test (POST). BIOS menu screen The BIOS setup program can change modes... if you in the EZ Mode/Advanced Mode screen. 2-6 Chapter 2: Getting started Entering BIOS Setup after POST To enter BIOS Setup after changing any BIOS setting, try to clear the CMOS and reset the motherboard to the default value. See section 1.7 Jumpers for reference purposes only, and...
.... • Press the reset button on the system chassis. • Press the power button to turn the system off then back on your screen. • Visit the ASUS website at startup: • Press during the Power-On Self Test (POST). BIOS menu screen The BIOS setup program can change modes... if you in the EZ Mode/Advanced Mode screen. 2-6 Chapter 2: Getting started Entering BIOS Setup after POST To enter BIOS Setup after changing any BIOS setting, try to clear the CMOS and reset the motherboard to the default value. See section 1.7 Jumpers for reference purposes only, and...
H61M-E User's Manual
Page 47
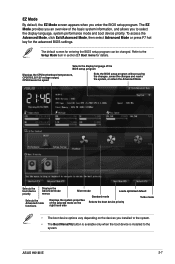
... on the right hand side Selects the boot device priority • The boot device options vary depending on the devices you enter the BIOS setup program. ASUS H61M-E 2-7 The default screen for details. Refer to the Setup Mode item in section 2.7 Boot menu for entering the... program Displays the CPU/motherboard temperature, CPU/5V/3.3V/12V voltage output, CPU/chassis fan speed Exits the BIOS setup program without saving the changes, saves the changes and resets the system, or enters the Advanced Mode Selects the boot device priority Displays the Advanced mode menus Silent mode Loads...
... on the right hand side Selects the boot device priority • The boot device options vary depending on the devices you enter the BIOS setup program. ASUS H61M-E 2-7 The default screen for details. Refer to the Setup Mode item in section 2.7 Boot menu for entering the... program Displays the CPU/motherboard temperature, CPU/5V/3.3V/12V voltage output, CPU/chassis fan speed Exits the BIOS setup program without saving the changes, saves the changes and resets the system, or enters the Advanced Mode Selects the boot device priority Displays the Advanced mode menus Silent mode Loads...

H61M-E User's Manual
Page 72
...label of the DIMM module installed on the selected slot. Load from the same memory/ CPU configuration and BIOS version. 2-32 Chapter 2: Getting started Configuration options: [DIMM_A1] [DIMM_B1] 2.8.3 ASUS O.C. The Setup Profile Status items show Not Installed if no profile is created. Press [Enter] to ... update the BIOS file only coming from Profile Allows you to configure options for special functions. Key in the profile number that saved your CMOS settings, press , and then select Yes. • DO NOT shut down or reset the system while updating the BIOS to run ASUS EZ Flash...
...label of the DIMM module installed on the selected slot. Load from the same memory/ CPU configuration and BIOS version. 2-32 Chapter 2: Getting started Configuration options: [DIMM_A1] [DIMM_B1] 2.8.3 ASUS O.C. The Setup Profile Status items show Not Installed if no profile is created. Press [Enter] to ... update the BIOS file only coming from Profile Allows you to configure options for special functions. Key in the profile number that saved your CMOS settings, press , and then select Yes. • DO NOT shut down or reset the system while updating the BIOS to run ASUS EZ Flash...

H61M-E User's Manual
Page 73
...screen. ASUS EZ Mode This option allows you to discard changes and exit. 2.9 Exit menu The Exit menu items allow you to load the optimal default values for each of the available devices that have a filesystem. Select Yes to save or discard your changes. Save Changes & Reset Once... (shellx64.efi) from the Exit menu to load the default values for the BIOS items, and save changes and exit. Select Yes to load the default values. When you press , a confirmation window appears. ASUS H61M-E 2-33 Load Optimized Defaults This option allows you to ensure the values you ...
...screen. ASUS EZ Mode This option allows you to discard changes and exit. 2.9 Exit menu The Exit menu items allow you to load the optimal default values for each of the available devices that have a filesystem. Select Yes to save or discard your changes. Save Changes & Reset Once... (shellx64.efi) from the Exit menu to load the default values for the BIOS items, and save changes and exit. Select Yes to load the default values. When you press , a confirmation window appears. ASUS H61M-E 2-33 Load Optimized Defaults This option allows you to ensure the values you ...


