User Guide
Page 3
Contents Safety information iv About this guide iv Package contents vi H110S1 specifications summary vi Chapter 1: Product introduction Motherboard overview 1-1 Central Processing Unit (CPU 1-7 System memory 1-8 Chapter 2: BIOS information BIOS setup program 2-1 EZ Mode...2-2 Advanced Mode 2-3 Exit menu...2-4 Appendix Notices...A-1 ASUS contact information A-5 iii
Contents Safety information iv About this guide iv Package contents vi H110S1 specifications summary vi Chapter 1: Product introduction Motherboard overview 1-1 Central Processing Unit (CPU 1-7 System memory 1-8 Chapter 2: BIOS information BIOS setup program 2-1 EZ Mode...2-2 Advanced Mode 2-3 Exit menu...2-4 Appendix Notices...A-1 ASUS contact information A-5 iii

User Guide
Page 4
... it may be exposed to moisture. • Place the product on the motherboard. • Chapter 2: BIOS information This chapter discusses changing system settings through the BIOS Setup menus. If you need when installing and configuring the motherboard. It includes descriptions of the switches, jumpers... relocating the system. • When adding or removing devices to or from the system, ensure that the power cables for the BIOS parameters are also provided. iv Operation safety • Before installing the motherboard and adding components, carefully read all power cables from...
... it may be exposed to moisture. • Place the product on the motherboard. • Chapter 2: BIOS information This chapter discusses changing system settings through the BIOS Setup menus. If you need when installing and configuring the motherboard. It includes descriptions of the switches, jumpers... relocating the system. • When adding or removing devices to or from the system, ensure that the power cables for the BIOS parameters are also provided. iv Operation safety • Before installing the motherboard and adding components, carefully read all power cables from...
User Guide
Page 7
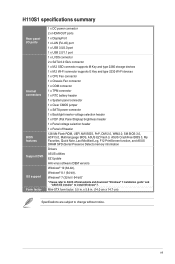
...-STX form factor: 5.5 in . (14.0 cm x 14.7 cm) Specifications are subject to install Windows® 7. x 5.8 in . H110S1 specifications summary Rear panel I/O ports Internal connectors BIOS features Support DVD OS support Form factor 1 x DC power connector 2 x HDMI-OUT ports 1 x DisplayPort 1 x LAN (RJ-45) ... UEFI AMI BIOS, PnP, DMI 2.0, WfM2.0, SM BIOS 3.0, ACPI 5.0, Multi-language BIOS, ASUS EZ Flash 3, ASUS CrashFree BIOS 3, My Favorites, Quick Note, Last Modified Log, F12 PrintScreen function, and ASUS DRAM SPD (Serial Presence Detect) memory information Drivers ASUS utilities EZ Update...
...-STX form factor: 5.5 in . (14.0 cm x 14.7 cm) Specifications are subject to install Windows® 7. x 5.8 in . H110S1 specifications summary Rear panel I/O ports Internal connectors BIOS features Support DVD OS support Form factor 1 x DC power connector 2 x HDMI-OUT ports 1 x DisplayPort 1 x LAN (RJ-45) ... UEFI AMI BIOS, PnP, DMI 2.0, WfM2.0, SM BIOS 3.0, ACPI 5.0, Multi-language BIOS, ASUS EZ Flash 3, ASUS CrashFree BIOS 3, My Favorites, Quick Note, Last Modified Log, F12 PrintScreen function, and ASUS DRAM SPD (Serial Presence Detect) memory information Drivers ASUS utilities EZ Update...
User Guide
Page 8
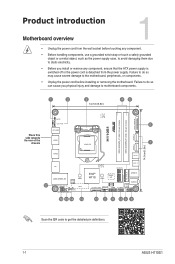
Failure to do so may cause severe damage to get the detailed pin definitions. 1-1 ASUS H110S1 Product introduction Motherboard overview 1 • Unplug the power cord from the wall socket before installing or removing the motherboard. Failure to do so...Intel® I219V 2280 BLKT_PWR_SEL LVDS BATT_CON VCC_PWR_SEL PANEL_SW 16 15 14 13 ASM1480 M.2(WIFI) USB3_C1 M2_TYPE_M Intel® H110 2230 Super I/O CHA_FAN LCD_BLKT_PANEL 128Mb BIOS TPM F_PANEL USB3_3 AUDIO ALC 3236 COM 12 2 11 10 9 8 Scan the QR code to the motherboard, peripherals, or components. • Unplug ...
Failure to do so may cause severe damage to get the detailed pin definitions. 1-1 ASUS H110S1 Product introduction Motherboard overview 1 • Unplug the power cord from the wall socket before installing or removing the motherboard. Failure to do so...Intel® I219V 2280 BLKT_PWR_SEL LVDS BATT_CON VCC_PWR_SEL PANEL_SW 16 15 14 13 ASM1480 M.2(WIFI) USB3_C1 M2_TYPE_M Intel® H110 2230 Super I/O CHA_FAN LCD_BLKT_PANEL 128Mb BIOS TPM F_PANEL USB3_3 AUDIO ALC 3236 COM 12 2 11 10 9 8 Scan the QR code to the motherboard, peripherals, or components. • Unplug ...

User Guide
Page 9
... power. This socket supports M Key and type 2280 storage devices. Find the proper orientation and push down the key during the boot process and enter BIOS setup to re-enter data. +3V_BAT GND CLRTC PIN 1 If the steps above do not help, remove the onboard battery and short the two pins...
... power. This socket supports M Key and type 2280 storage devices. Find the proper orientation and push down the key during the boot process and enter BIOS setup to re-enter data. +3V_BAT GND CLRTC PIN 1 If the steps above do not help, remove the onboard battery and short the two pins...
User Guide
Page 16
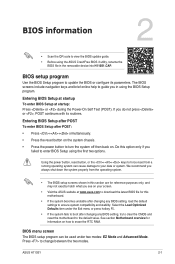
... ensure system compatibility and stability. See section Motherboard overview for this option only if you see on . Press to your screen. • Visit the ASUS website at startup: Press or during the Power-On Self Test (POST). BIOS menu screen The BIOS setup program can cause damage to change between the two modes. ASUS H110S1 2-1
... ensure system compatibility and stability. See section Motherboard overview for this option only if you see on . Press to your screen. • Visit the ASUS website at startup: Press or during the Power-On Self Test (POST). BIOS menu screen The BIOS setup program can cause damage to change between the two modes. ASUS H110S1 2-1
User Guide
Page 17
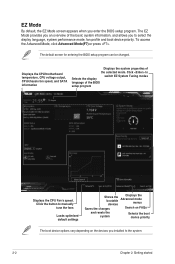
... CPU/motherboard temperature, CPU voltage output, CPU/chassis fan speed, and SATA information Displays the system properties of the BIOS setup program Displays the CPU Fan's speed. The default screen for entering the BIOS setup program can be changed. EZ Mode By default, the EZ Mode screen appears when you enter the...
... CPU/motherboard temperature, CPU voltage output, CPU/chassis fan speed, and SATA information Displays the system properties of the BIOS setup program Displays the CPU Fan's speed. The default screen for entering the BIOS setup program can be changed. EZ Mode By default, the EZ Mode screen appears when you enter the...
User Guide
Page 18
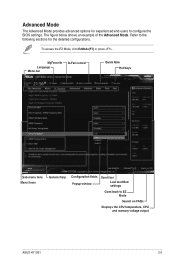
MyFavorite Language Menu bar Q-Fan control Quick Note Hot Keys Sub-menu item Menu items General help Configuration fields Popup window Scroll bar Last modified settings Goes back to configure the BIOS settings. Advanced Mode The Advanced Mode provides advanced options for the detailed configurations. To access the EZ Mode, click EzMode(F7) or press . The figure below shows an example of the Advanced Mode. Refer to the following sections for experienced end-users to EZ Mode Search on FAQs Displays the CPU temperature, CPU and memory voltage output ASUS H110S1 2-3
MyFavorite Language Menu bar Q-Fan control Quick Note Hot Keys Sub-menu item Menu items General help Configuration fields Popup window Scroll bar Last modified settings Goes back to configure the BIOS settings. Advanced Mode The Advanced Mode provides advanced options for the detailed configurations. To access the EZ Mode, click EzMode(F7) or press . The figure below shows an example of the Advanced Mode. Refer to the following sections for experienced end-users to EZ Mode Search on FAQs Displays the CPU temperature, CPU and memory voltage output ASUS H110S1 2-3

User Guide
Page 19
...and exit. Select OK to show a QR code. When you select this option or if you are finished making your changes to the BIOS items. Load Optimized Defaults This option allows you to ensure the values you to attempt to launch the EFI Shell application (shellx64.efi) ...for each of the available USB devices. 2-4 Chapter 2: Getting started Save Changes & Reset Once you press , a confirmation window appears. Select OK to the ASUS BIOS FAQ web page. When you select this option or if you press , a confirmation window appears. Scan this option or if you press , a confirmation ...
...and exit. Select OK to show a QR code. When you select this option or if you are finished making your changes to the BIOS items. Load Optimized Defaults This option allows you to ensure the values you to attempt to launch the EFI Shell application (shellx64.efi) ...for each of the available USB devices. 2-4 Chapter 2: Getting started Save Changes & Reset Once you press , a confirmation window appears. Select OK to the ASUS BIOS FAQ web page. When you select this option or if you press , a confirmation window appears. Scan this option or if you press , a confirmation ...


