
User Guide
Page 17
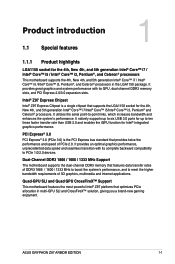
... Core™ i7/Intel® Core™ i5/Intel® Core™ i3, Pentium® and Celeron® processors. Chapter 1 ASUS GRYPHON Z97 ARMOR EDITION 1-1 Chapter 1: Product Introduction Product introduction 1.1 Special features 1 1.1.1 Product highlights LGA1150 socket for the 4th, New 4th, and 5th generation Intel... PCIe 2.0. Quad-GPU SLI and Quad GPU CrossFireX™ Support This motherboard features the most powerful Intel® Z97 platform that features data transfer rates of 3D graphics, multimedia and Internet applications. It provides an optimal graphics performance,...
... Core™ i7/Intel® Core™ i5/Intel® Core™ i3, Pentium® and Celeron® processors. Chapter 1 ASUS GRYPHON Z97 ARMOR EDITION 1-1 Chapter 1: Product Introduction Product introduction 1.1 Special features 1 1.1.1 Product highlights LGA1150 socket for the 4th, New 4th, and 5th generation Intel... PCIe 2.0. Quad-GPU SLI and Quad GPU CrossFireX™ Support This motherboard features the most powerful Intel® Z97 platform that features data transfer rates of 3D graphics, multimedia and Internet applications. It provides an optimal graphics performance,...

User Guide
Page 19
..., and MOSFETs. Guardian Angel TUF Fortifier The metal base TUF Fortifier strengthens the base of the motherboard and secures the Thermal Armor and the motherboard in place. TUF ESD Guards TUF ESD (Electrostatic Discharge) Guards provides protection against electrostatic discharges, which can ... Stable!" It also makes the motherboard easier to the components' optimal functions, data transfer efficiency, and system performance. Chapter 1 ASUS GRYPHON Z97 ARMOR EDITION 1-3 MemOK! These controllers offers ultra-precise memory and voltage tuning for extra unbeatable durability.
..., and MOSFETs. Guardian Angel TUF Fortifier The metal base TUF Fortifier strengthens the base of the motherboard and secures the Thermal Armor and the motherboard in place. TUF ESD Guards TUF ESD (Electrostatic Discharge) Guards provides protection against electrostatic discharges, which can ... Stable!" It also makes the motherboard easier to the components' optimal functions, data transfer efficiency, and system performance. Chapter 1 ASUS GRYPHON Z97 ARMOR EDITION 1-3 MemOK! These controllers offers ultra-precise memory and voltage tuning for extra unbeatable durability.

User Guide
Page 21
...to transfer files between your ultimate convenience. It allows you to 170% faster than the already impressive USB 3.0 transfer speed. Chapter 1 ASUS GRYPHON Z97 ARMOR EDITION 1-5 USB BIOS Flashback USB BIOS Flashback offers a hassle-free updating solution for about three seconds, and the UEFI BIOS is powered off...file, press the BIOS Flashback button for your computer and smart device. This all across cloud services in a few clicks. • ASUS Media Streamer: Allows you to stream media files to a DLNA-supported devices. • Remote Desktop: Allows you can wirelessly stream ...
...to transfer files between your ultimate convenience. It allows you to 170% faster than the already impressive USB 3.0 transfer speed. Chapter 1 ASUS GRYPHON Z97 ARMOR EDITION 1-5 USB BIOS Flashback USB BIOS Flashback offers a hassle-free updating solution for about three seconds, and the UEFI BIOS is powered off...file, press the BIOS Flashback button for your computer and smart device. This all across cloud services in a few clicks. • ASUS Media Streamer: Allows you to stream media files to a DLNA-supported devices. • Remote Desktop: Allows you can wirelessly stream ...

User Guide
Page 23
... install or remove any component, ensure that the ATX power supply is switched off or the power cord is detached from the power supply. Chapter 1 ASUS GRYPHON Z97 ARMOR EDITION 1-7
... install or remove any component, ensure that the ATX power supply is switched off or the power cord is detached from the power supply. Chapter 1 ASUS GRYPHON Z97 ARMOR EDITION 1-7
User Guide
Page 25
...) Page 1-36 1-34 1-10 1-11 1-25 1-31 1-30 1-37 1-38 1-27 1-28 1-26 1-33 1-38 1-39 1-35 1-35 1-32 Chapter 1 ASUS GRYPHON Z97 ARMOR EDITION 1-9 ATX power connectors (24-pin EATXPWR, 8-pin EATX12V) 2. Intel® Z97 Serial ATA 6.0 Gb/s connectors (7-pin SATA6G_1-6 [brown]) 8. Thermal sensor connectors (T_SENSOR1, T_SENSOR2, T_ SENSOR3) 17. System panel connector (20-8 pin...
...) Page 1-36 1-34 1-10 1-11 1-25 1-31 1-30 1-37 1-38 1-27 1-28 1-26 1-33 1-38 1-39 1-35 1-35 1-32 Chapter 1 ASUS GRYPHON Z97 ARMOR EDITION 1-9 ATX power connectors (24-pin EATXPWR, 8-pin EATX12V) 2. Intel® Z97 Serial ATA 6.0 Gb/s connectors (7-pin SATA6G_1-6 [brown]) 8. Thermal sensor connectors (T_SENSOR1, T_SENSOR2, T_ SENSOR3) 17. System panel connector (20-8 pin...
User Guide
Page 27
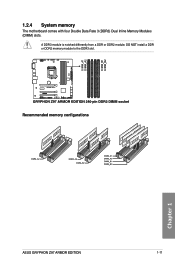
DO NOT install a DDR or DDR2 memory module to the DDR3 slot. 1.2.4 System memory The motherboard comes with four Double Data Rate 3 (DDR3) Dual Inline Memory Modules (DIMM) slots. Recommended memory configurations Chapter 1 ASUS GRYPHON Z97 ARMOR EDITION 1-11 A DDR3 module is notched differently from a DDR or DDR2 module.
DO NOT install a DDR or DDR2 memory module to the DDR3 slot. 1.2.4 System memory The motherboard comes with four Double Data Rate 3 (DDR3) Dual Inline Memory Modules (DIMM) slots. Recommended memory configurations Chapter 1 ASUS GRYPHON Z97 ARMOR EDITION 1-11 A DDR3 module is notched differently from a DDR or DDR2 module.
User Guide
Page 29
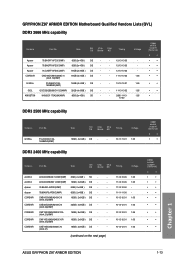
...• • • • • • • • • • • • • • • • • Chapter 1 ASUS GRYPHON Z97 ARMOR EDITION 1-13 Timing Voltage Apacer 78.BAGFF.AFC0C(XMP) 8GB (2x 4GB ) DS - - 12-13-13-35 - Apacer 78.CAGFF.AFD0C(XMP) 16GB (2x 8GB ) DS... - - 12-13-13-35 - GRYPHON Z97 ARMOR EDITION Motherboard Qualified Vendors Lists (QVL) DDR3 2666 MHz capability Vendors Part No. Size SS/ DS Chip Chip Brand NO. Timing Voltage ...
...• • • • • • • • • • • • • • • • • Chapter 1 ASUS GRYPHON Z97 ARMOR EDITION 1-13 Timing Voltage Apacer 78.BAGFF.AFC0C(XMP) 8GB (2x 4GB ) DS - - 12-13-13-35 - Apacer 78.CAGFF.AFD0C(XMP) 16GB (2x 8GB ) DS... - - 12-13-13-35 - GRYPHON Z97 ARMOR EDITION Motherboard Qualified Vendors Lists (QVL) DDR3 2666 MHz capability Vendors Part No. Size SS/ DS Chip Chip Brand NO. Timing Voltage ...

User Guide
Page 35
...; • • • • • • • • • • • • • • • • • • • (continued on the next page) Chapter 1 ASUS GRYPHON Z97 ARMOR EDITION 1-19 Size SS/ DS Crucial Crucial Elixir Elixir G.SKILL G.SKILL G.Skill G.SKILL GEIL KINGMAX KINGMAX KINGSTON KINGSTON KINGSTON KINGSTON KINGSTON KINGSTON KINGSTON KINGSTON KINGSTON KINGSTON...
...; • • • • • • • • • • • • • • • • • • • (continued on the next page) Chapter 1 ASUS GRYPHON Z97 ARMOR EDITION 1-19 Size SS/ DS Crucial Crucial Elixir Elixir G.SKILL G.SKILL G.Skill G.SKILL GEIL KINGMAX KINGMAX KINGSTON KINGSTON KINGSTON KINGSTON KINGSTON KINGSTON KINGSTON KINGSTON KINGSTON KINGSTON...

User Guide
Page 37
...; KINGSTON KVR1333D3N9H/4G 4GB DS ELPIDA J2108BDBG-GN-F - 1.5 • • KINGSTON KVR13N9S8H/4 4GB SS ELPIDA J4208BBBG-GN-F - 1.5 • • (continued on the next page) Chapter 1 ASUS GRYPHON Z97 ARMOR EDITION 1-21 J1108BFBG-DJ-F NT5CB256M8BNCG - 9-9-9-24 N/A 9-9-9-24 Voltage 1.5 1.5 - - - AM5D5908CEHSBG 9 302G08-DJ1C - 304G08-DJ1B 9-1010-26 304G08-DJ1B 9-9-9-24 J1108BFBG-DJ-F - DXX-15A 4GB DS KINGMAX KFC8FNLXF...
...; KINGSTON KVR1333D3N9H/4G 4GB DS ELPIDA J2108BDBG-GN-F - 1.5 • • KINGSTON KVR13N9S8H/4 4GB SS ELPIDA J4208BBBG-GN-F - 1.5 • • (continued on the next page) Chapter 1 ASUS GRYPHON Z97 ARMOR EDITION 1-21 J1108BFBG-DJ-F NT5CB256M8BNCG - 9-9-9-24 N/A 9-9-9-24 Voltage 1.5 1.5 - - - AM5D5908CEHSBG 9 302G08-DJ1C - 304G08-DJ1B 9-1010-26 304G08-DJ1B 9-9-9-24 J1108BFBG-DJ-F - DXX-15A 4GB DS KINGMAX KFC8FNLXF...

User Guide
Page 39
1.2.5 Expansion slots Unplug the power cord before adding or removing expansion cards. Slot No. 1 PCIe 3.0/2.0 x16_1 slot 2 PCIe 2.0 x1_1 slot 3 PCIe 3.0/2.0 x16_2 slot 4 PCIe 2.0 x16_3 slot Slot Description ASUS GRYPHON Z97 ARMOR EDITION 1-23 Chapter 1 Failure to do so may cause you physical injury and damage motherboard components.
1.2.5 Expansion slots Unplug the power cord before adding or removing expansion cards. Slot No. 1 PCIe 3.0/2.0 x16_1 slot 2 PCIe 2.0 x1_1 slot 3 PCIe 3.0/2.0 x16_2 slot 4 PCIe 2.0 x16_3 slot Slot Description ASUS GRYPHON Z97 ARMOR EDITION 1-23 Chapter 1 Failure to do so may cause you physical injury and damage motherboard components.

User Guide
Page 41
... recommended in the Memory QVL (Qualified Vendors Lists) in this user manual or on the ASUS website at www.asus.com. • If you download and update to the latest BIOS version from the ASUS website at www.asus.com after using the MemOK! 1.2.6 Onboard buttons Onboard buttons allow you to fine-tune performance... speed of failsafe settings. If the test fails, the system reboots and test the next set is ideal for the exact location of failsafe settings. ASUS GRYPHON Z97 ARMOR EDITION 1-25 Chapter 1 switch lights continuously.
... recommended in the Memory QVL (Qualified Vendors Lists) in this user manual or on the ASUS website at www.asus.com. • If you download and update to the latest BIOS version from the ASUS website at www.asus.com after using the MemOK! 1.2.6 Onboard buttons Onboard buttons allow you to fine-tune performance... speed of failsafe settings. If the test fails, the system reboots and test the next set is ideal for the exact location of failsafe settings. ASUS GRYPHON Z97 ARMOR EDITION 1-25 Chapter 1 switch lights continuously.

User Guide
Page 43
... cell battery powers the RAM data in CMOS. Plug the power cord and turn off is required to pins 2-3. You must turn ON the computer. 4. ASUS GRYPHON Z97 ARMOR EDITION 1-27 Chapter 1 Move the jumper cap from pins 1-2 (default) to enable C.P.R. Clear RTC RAM (3-pin CLRTC) This jumper allows you to re-enter data. Hold...
... cell battery powers the RAM data in CMOS. Plug the power cord and turn off is required to pins 2-3. You must turn ON the computer. 4. ASUS GRYPHON Z97 ARMOR EDITION 1-27 Chapter 1 Move the jumper cap from pins 1-2 (default) to enable C.P.R. Clear RTC RAM (3-pin CLRTC) This jumper allows you to re-enter data. Hold...

User Guide
Page 45
POST State LEDs The POST State LEDs provide the status of this user guide. If an error is found, the critical component's LED stays lit up until the problem is solved. 2. For more information on how to update the BIOS, refer to Chapter 2 of these key components during POST (Power-On-Self Test): CPU, memory modules, VGA card, and hard disk drives. USB BIOS Flashback LED (FLBK_LED) This LED flashes when you press the BIOS Flashback button for BIOS update. ASUS GRYPHON Z97 ARMOR EDITION 1-29 Chapter 1 1.2.8 Onboard LEDs 1.
POST State LEDs The POST State LEDs provide the status of this user guide. If an error is found, the critical component's LED stays lit up until the problem is solved. 2. For more information on how to update the BIOS, refer to Chapter 2 of these key components during POST (Power-On-Self Test): CPU, memory modules, VGA card, and hard disk drives. USB BIOS Flashback LED (FLBK_LED) This LED flashes when you press the BIOS Flashback button for BIOS update. ASUS GRYPHON Z97 ARMOR EDITION 1-29 Chapter 1 1.2.8 Onboard LEDs 1.

User Guide
Page 47
... speeds of up to fully use the USB 3.0 ports under Windows® 7 or later Windows® OS. These connectors are based on xHCI specification. Chapter 1 ASUS GRYPHON Z97 ARMOR EDITION 1-31
... speeds of up to fully use the USB 3.0 ports under Windows® 7 or later Windows® OS. These connectors are based on xHCI specification. Chapter 1 ASUS GRYPHON Z97 ARMOR EDITION 1-31

User Guide
Page 49
Chapter 1 ASUS GRYPHON Z97 ARMOR EDITION 1-33 DO NOT connect a 1394 cable to the USB connector onboard if your chassis supports front panel USB ports. You can connect the front panel USB cable to the ASUS Q-Connector (USB, dark brown) first, and then install the Q-Connector (USB) to the USB connectors. Connect the USB module cable to...
Chapter 1 ASUS GRYPHON Z97 ARMOR EDITION 1-33 DO NOT connect a 1394 cable to the USB connector onboard if your chassis supports front panel USB ports. You can connect the front panel USB cable to the ASUS Q-Connector (USB, dark brown) first, and then install the Q-Connector (USB) to the USB connectors. Connect the USB module cable to...

User Guide
Page 51
... connect a high-definition front panel audio module to this connector, set the Front Panel Type item in the BIOS setup to [HD] or [AC97]. 7. Chapter 1 ASUS GRYPHON Z97 ARMOR EDITION 1-35
... connect a high-definition front panel audio module to this connector, set the Front Panel Type item in the BIOS setup to [HD] or [AC97]. 7. Chapter 1 ASUS GRYPHON Z97 ARMOR EDITION 1-35

User Guide
Page 53
... connector is in sleep or soft-off mode depending on the system power, and blinks when the system is for the system power LED. Chapter 1 ASUS GRYPHON Z97 ARMOR EDITION 1-37 The system power LED lights up or flashes when data is read from or written to this connector.
... connector is in sleep or soft-off mode depending on the system power, and blinks when the system is for the system power LED. Chapter 1 ASUS GRYPHON Z97 ARMOR EDITION 1-37 The system power LED lights up or flashes when data is read from or written to this connector.

User Guide
Page 55
Chapter 1 ASUS GRYPHON Z97 ARMOR EDITION 1-39 The add-on Thunderbolt I /O card and Thunderbolt cables are purchased separately. 12. Thunderbolt header (5-pin TB_HEADER) This connector is for the add-on Thunderbolt I /O card that supports Intel's Thunderbolt Technology, allowing you to connect up to six Thunderbolt-enabled devices and a DisplayPort-enabled display in a daisy-chain configuration.
Chapter 1 ASUS GRYPHON Z97 ARMOR EDITION 1-39 The add-on Thunderbolt I /O card and Thunderbolt cables are purchased separately. 12. Thunderbolt header (5-pin TB_HEADER) This connector is for the add-on Thunderbolt I /O card that supports Intel's Thunderbolt Technology, allowing you to connect up to six Thunderbolt-enabled devices and a DisplayPort-enabled display in a daisy-chain configuration.

User Guide
Page 57
Install the ASUS Q-Shield to the chassis' rear I /O panel. 2. Place the motherboard into the chassis, ensuring that its rear I/O ports are aligned to the chassis rear I /O panel. The motherboard layout may vary with models, but the installation steps are for all models. 1. Chapter 2 ASUS GRYPHON Z97 ARMOR EDITION 2-1 Chapter 2: Basic installation Basic installation 2.1 Building your PC system 2 2.1.1 Motherboard installation The diagrams in this section are the same for reference only.
Install the ASUS Q-Shield to the chassis' rear I /O panel. 2. Place the motherboard into the chassis, ensuring that its rear I/O ports are aligned to the chassis rear I /O panel. The motherboard layout may vary with models, but the installation steps are for all models. 1. Chapter 2 ASUS GRYPHON Z97 ARMOR EDITION 2-1 Chapter 2: Basic installation Basic installation 2.1 Building your PC system 2 2.1.1 Motherboard installation The diagrams in this section are the same for reference only.

User Guide
Page 59
DO NOT install a CPU designed for LGA1150 socket only. Chapter 2 ASUS GRYPHON Z97 ARMOR EDITION 2-3 2.1.2 CPU installation Ensure that you install the correct CPU designed for LGA1155 and LGA1156 sockets on the LGA1150 socket.
DO NOT install a CPU designed for LGA1150 socket only. Chapter 2 ASUS GRYPHON Z97 ARMOR EDITION 2-3 2.1.2 CPU installation Ensure that you install the correct CPU designed for LGA1155 and LGA1156 sockets on the LGA1150 socket.


