

User Manual
Page 34
...system. 34 Notebook PC User Manual This indicates that is created by running BIOS Setup. Press [ESC] and you will display a message on the screen when you turn it will reduce air circulation such as a permanent part of the Notebook PC's architecture.The POST includes a record of the system.... This record is powered ON with an operating system. Powering ON the Notebook PC The Notebook PC's power-ON message appears on the screen prompting you need to run through a series of software-controlled diagnostic tests called the Power-On Self Test (POST).The software that controls ...
...system. 34 Notebook PC User Manual This indicates that is created by running BIOS Setup. Press [ESC] and you will display a message on the screen when you turn it will reduce air circulation such as a permanent part of the Notebook PC's architecture.The POST includes a record of the system.... This record is powered ON with an operating system. Powering ON the Notebook PC The Notebook PC's power-ON message appears on the screen prompting you need to run through a series of software-controlled diagnostic tests called the Power-On Self Test (POST).The software that controls ...
User Manual
Page 36
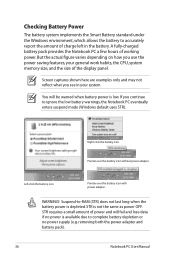
... Pointer over the battery icon with power adapter. A fully-charged battery pack provides the Notebook PC a few hours of the display panel. STR is low. Screen captures shown here are examples only and may not reflect what you continue to complete battery depletion or no power is available due to ignore...
... Pointer over the battery icon with power adapter. A fully-charged battery pack provides the Notebook PC a few hours of the display panel. STR is low. Screen captures shown here are examples only and may not reflect what you continue to complete battery depletion or no power is available due to ignore...
User Manual
Page 43
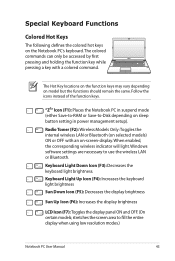
... display brightness Sun Up Icon (F6): Increases the display brightness LCD Icon (F7): Toggles the display panel ON and OFF. (On certain models; stretches the screen area to use the wireless LAN or Bluetooth. The Hot Key locations on the function keys may vary depending on the Notebook PC's keyboard. Follow....) Notebook PC User Manual 43 "ZZ" Icon (F1): Places the Notebook PC in suspend mode (either Save-to-RAM or Save-to-Disk depending on -screen-display.
... display brightness Sun Up Icon (F6): Increases the display brightness LCD Icon (F7): Toggles the display panel ON and OFF. (On certain models; stretches the screen area to use the wireless LAN or Bluetooth. The Hot Key locations on the function keys may vary depending on the Notebook PC's keyboard. Follow....) Notebook PC User Manual 43 "ZZ" Icon (F1): Places the Notebook PC in suspend mode (either Save-to-RAM or Save-to-Disk depending on -screen-display.

User Manual
Page 45
.... Power4Gear Hybrid (Fn+Space Bar): This key toggles power savings between AC mode and battery mode.You can see the current mode through the on-screen display (OSD). The power saving modes control many aspects of the Windows desktop. The other key, that looks like a Windows menu with the Windows Logo...
.... Power4Gear Hybrid (Fn+Space Bar): This key toggles power savings between AC mode and battery mode.You can see the current mode through the on-screen display (OSD). The power saving modes control many aspects of the Windows desktop. The other key, that looks like a Windows menu with the Windows Logo...
User Manual
Page 84
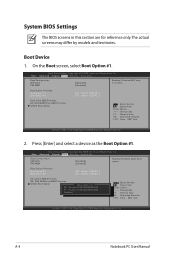
...Option #2 [P0: Hitachi HTS545...] [P0: Hitachi HTS545...] Hard Drive BBS Priorities CD/DVD ROM Drive BBS Priorities Delete Boot Option : Select Screen : Select Item Enter: Select +/-: Change Opt. Copyright (C) 2008 American Megatrends, Inc. 2. Press [Enter] and select a device as the...Priorities CD/DVD ROM Drive BBS Priorities Delete Boot Option Boot Option #1 P0: Hitachi HTS545050B9A300 P1: Hitachi HTS545050B9A400 Disabled : Select Screen : Select Item Enter: Select +/-: Change Opt. Copyright (C) 2008 American Megatrends, Inc. �M��a�i�n�...
...Option #2 [P0: Hitachi HTS545...] [P0: Hitachi HTS545...] Hard Drive BBS Priorities CD/DVD ROM Drive BBS Priorities Delete Boot Option : Select Screen : Select Item Enter: Select +/-: Change Opt. Copyright (C) 2008 American Megatrends, Inc. 2. Press [Enter] and select a device as the...Priorities CD/DVD ROM Drive BBS Priorities Delete Boot Option Boot Option #1 P0: Hitachi HTS545050B9A300 P1: Hitachi HTS545050B9A400 Disabled : Select Screen : Select Item Enter: Select +/-: Change Opt. Copyright (C) 2008 American Megatrends, Inc. �M��a�i�n�...
User Manual
Page 85
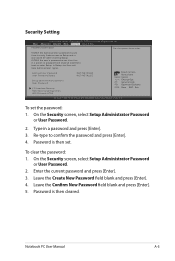
... field blank and press [Enter]. 4. Leave the Confirm New Password field blank and press [Enter]. 5. On the Security screen, select Setup Administrator Password or User Password. 2. Password is only asked for when entering Setup. Administrator Password User Password Status... NOT INSTALLED NOT INSTALLED Setup administrator password User Password I/O Interface Security HDD Security Configuration: HDD 0:Hitachi HTS5 : Select Screen : Select Item Enter: Select +/-: Change Opt. Security Setting Aptio Setup Utility - If ONLY the user's password is a power...
... field blank and press [Enter]. 4. Leave the Confirm New Password field blank and press [Enter]. 5. On the Security screen, select Setup Administrator Password or User Password. 2. Password is only asked for when entering Setup. Administrator Password User Password Status... NOT INSTALLED NOT INSTALLED Setup administrator password User Password I/O Interface Security HDD Security Configuration: HDD 0:Hitachi HTS5 : Select Screen : Select Item Enter: Select +/-: Change Opt. Security Setting Aptio Setup Utility - If ONLY the user's password is a power...

User Manual
Page 86
.... Save Options Save Changes Discard Changes Restore Defaults Boot Selection Menu P0: ST9500420AS P1: HL-DT-STBDDVDRW CA21N Launch EFI Shell from filesystem device : Select Screen : Select Item Enter: Select +/-: Change Opt. Save Changes If you want to keep your configuration settings, you must save changes before exiting the BIOS setup...
.... Save Options Save Changes Discard Changes Restore Defaults Boot Selection Menu P0: ST9500420AS P1: HL-DT-STBDDVDRW CA21N Launch EFI Shell from filesystem device : Select Screen : Select Item Enter: Select +/-: Change Opt. Save Changes If you want to keep your configuration settings, you must save changes before exiting the BIOS setup...

User Manual
Page 90
...ASUS bundled software When I power ON the Notebook PC, there will be downloaded from viruses. Check your Notebook PC does not lose power during the BIOS flashing process. A. Software Problem - It is due to un-install them in DOS mode. Unknown Reason - Ensure your system for viruses. 4. Blue screen... with white text A blue screen with Easy Flash in Windows or AFLASH in Windows Safe Mode. 3. CAUTION! These utilities and BIOS files can be an "Open policy...
...ASUS bundled software When I power ON the Notebook PC, there will be downloaded from viruses. Check your Notebook PC does not lose power during the BIOS flashing process. A. Software Problem - It is due to un-install them in DOS mode. Unknown Reason - Ensure your system for viruses. 4. Blue screen... with white text A blue screen with Easy Flash in Windows or AFLASH in Windows Safe Mode. 3. CAUTION! These utilities and BIOS files can be an "Open policy...
User Manual
Page 92
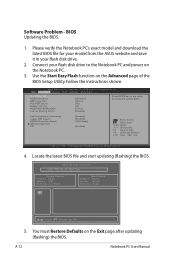
...and power on the Notebook PC. 3. Please verify the Notebook PC's exact model and download the latest BIOS file for your model from the ASUS website and save it in your flash disk drive to select and update BIOS. Use the Start Easy Flash function on the Exit page after... (flashing) the BIOS. Software Problem - Intel Virtualization Technology Legacy USB Support USB3.0 Controller Switch SATA Configuration TDT [Enabled] [Enabled] [XHCI Mode] [Enabled] : Select Screen : Select Item Enter: Select +/-: Change Opt. You must Restore Defaults on the Advanced page of the BIOS Setup Utility.
...and power on the Notebook PC. 3. Please verify the Notebook PC's exact model and download the latest BIOS file for your model from the ASUS website and save it in your flash disk drive to select and update BIOS. Use the Start Easy Flash function on the Exit page after... (flashing) the BIOS. Software Problem - Intel Virtualization Technology Legacy USB Support USB3.0 Controller Switch SATA Configuration TDT [Enabled] [Enabled] [XHCI Mode] [Enabled] : Select Screen : Select Item Enter: Select +/-: Change Opt. You must Restore Defaults on the Advanced page of the BIOS Setup Utility.
User Manual
Page 109
Notebook PC User Manual A-29 installation should be grounded (earthed) in accordance with ANSI/NFPA 70, the National Electrical Code (NEC), in our products at ASUS REACH website at the building entrance. REACH Complying with the REACH (Registration, Evaluation, Authorization, and Restriction of Chemicals) regulatory framework, we publish the chemical substances ... and weighing more than 3Kg must use approved power cords greater than or equal to CATV System Installer-Cable distribution system should include bonding the screen of the coaxial cable to the earth at http://csr...
Notebook PC User Manual A-29 installation should be grounded (earthed) in accordance with ANSI/NFPA 70, the National Electrical Code (NEC), in our products at ASUS REACH website at the building entrance. REACH Complying with the REACH (Registration, Evaluation, Authorization, and Restriction of Chemicals) regulatory framework, we publish the chemical substances ... and weighing more than 3Kg must use approved power cords greater than or equal to CATV System Installer-Cable distribution system should include bonding the screen of the coaxial cable to the earth at http://csr...


