User's Manual for English Edition
Page 32
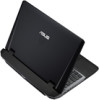
Press [ESC] and you will display a message on the screen when you turn ON the Notebook PC, it will be correct when you receive the Notebook PC. IMPORTANT! To protect the hard disk drive, always ... When the test is created by using the BIOS Setup program. Powering ON the Notebook PC The Notebook PC's power-ON message appears on the screen prompting you to enter the BIOS Setup. WARNING!
Press [ESC] and you will display a message on the screen when you turn ON the Notebook PC, it will be correct when you receive the Notebook PC. IMPORTANT! To protect the hard disk drive, always ... When the test is created by using the BIOS Setup program. Powering ON the Notebook PC The Notebook PC's power-ON message appears on the screen prompting you to enter the BIOS Setup. WARNING!

User's Manual for English Edition
Page 34
... Power The battery system implements the Smart Battery standard under the Windows environment, which allows the battery to accurately report the amount of working power. Screen captures shown here are examples only and may not reflect what you continue to ignore the low battery warnings, the Notebook PC eventually enters suspend...
... Power The battery system implements the Smart Battery standard under the Windows environment, which allows the battery to accurately report the amount of working power. Screen captures shown here are examples only and may not reflect what you continue to ignore the low battery warnings, the Notebook PC eventually enters suspend...

User's Manual for English Edition
Page 41
The Hot Key locations on the function keys may vary depending on -screen-display. f1 fn f2 Radf3 io Tof4 werf5(F2):f6 Wiref7less fM8 odef9ls Onf10 ly: Tof11 gglef12s the internal wireless LAN or Bluetooth (on selected ... accessed by first pressing and holding the function key while pressing a key with an on model but the functions should remain the same. stretches the screen area to use the wireless LAN or Bluetooth. Special Keyboard Functions Hot Keys The following defines the hot keys on sleep button setting in power...
The Hot Key locations on the function keys may vary depending on -screen-display. f1 fn f2 Radf3 io Tof4 werf5(F2):f6 Wiref7less fM8 odef9ls Onf10 ly: Tof11 gglef12s the internal wireless LAN or Bluetooth (on selected ... accessed by first pressing and holding the function key while pressing a key with an on model but the functions should remain the same. stretches the screen area to use the wireless LAN or Bluetooth. Special Keyboard Functions Hot Keys The following defines the hot keys on sleep button setting in power...

User's Manual for English Edition
Page 42
... not work in 256 Colors, select High Color in order to maximize performance versus battery time. You can see the current mode through the on-screen display (OSD). 42 Notebook PC User Manual The power saving modes control many aspects of the Notebook PC to improve contrast,brightness,skin tone,and...
... not work in 256 Colors, select High Color in order to maximize performance versus battery time. You can see the current mode through the on-screen display (OSD). 42 Notebook PC User Manual The power saving modes control many aspects of the Notebook PC to improve contrast,brightness,skin tone,and...

User's Manual for English Edition
Page 82
... #2 [P0: Hitachi HTS545...] [P1: Hitachi HTS545...] Hard Drive BBS Priorities CD/DVD ROM Drive BBS Priorities Delete Boot Option : Select Screen : Select Item Enter: Select +/-: Change Opt. F1: General Help F9: Optimized Defaults F10: Save ESC: Exit Version 2.01.1208. ... Option #1 Hard Drive BBS Priorities P0: Hitachi HTS545050B9A300 CD/DVD ROM Drive BBS PrioritiePs2: SlimTypeDVD A DS8A5SH Delete Boot Option Disabled : Select Screen : Select Item Enter: Select +/-: Change Opt. Main Advanced Chipset Boot Security Save & Exit Boot Configuration UEFI Boot PXE ROM [Disabled] ...
... #2 [P0: Hitachi HTS545...] [P1: Hitachi HTS545...] Hard Drive BBS Priorities CD/DVD ROM Drive BBS Priorities Delete Boot Option : Select Screen : Select Item Enter: Select +/-: Change Opt. F1: General Help F9: Optimized Defaults F10: Save ESC: Exit Version 2.01.1208. ... Option #1 Hard Drive BBS Priorities P0: Hitachi HTS545050B9A300 CD/DVD ROM Drive BBS PrioritiePs2: SlimTypeDVD A DS8A5SH Delete Boot Option Disabled : Select Screen : Select Item Enter: Select +/-: Change Opt. Main Advanced Chipset Boot Security Save & Exit Boot Configuration UEFI Boot PXE ROM [Disabled] ...
User's Manual for English Edition
Page 83
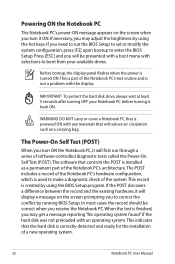
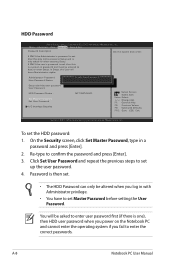
... In Setup, the User will be entered to confirm the password and press [Enter]. 4. Notebook PC User Manual A-5 On the Security screen, select Setup Administrator Password or User Password. 2. Copyright (C) 2010 American Megatrends, Inc. F1: General Help F2: Previous Values F9: ... Password HDD Password Status : Set Master Password Set User Password I/O Interface Security NOT INSTALLED : Select Screen : Select Item Enter: Select +/-: Change Opt. On the Security screen, select Setup Administrator Password or User Password. 2. To clear the password: 1. Leave the Create New...
... In Setup, the User will be entered to confirm the password and press [Enter]. 4. Notebook PC User Manual A-5 On the Security screen, select Setup Administrator Password or User Password. 2. Copyright (C) 2010 American Megatrends, Inc. F1: General Help F2: Previous Values F9: ... Password HDD Password Status : Set Master Password Set User Password I/O Interface Security NOT INSTALLED : Select Screen : Select Item Enter: Select +/-: Change Opt. On the Security screen, select Setup Administrator Password or User Password. 2. To clear the password: 1. Leave the Create New...
User's Manual for English Edition
Page 84
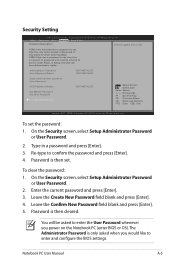
...: General Help F9: Optimized Defaults F10: Save ESC: Exit Version 2.01.1208. Copyright (C) 2010 American Megatrends, Inc. To lock the I /O Interface Security. 2. On the Security screen, select I /O interface: 1. I /O Interface Security settings can only be disabled. : Select Screen : Select Item Enter: Select +/-: Change Opt. The I /O Interface Security Aptio Setup Utility -
...: General Help F9: Optimized Defaults F10: Save ESC: Exit Version 2.01.1208. Copyright (C) 2010 American Megatrends, Inc. To lock the I /O Interface Security. 2. On the Security screen, select I /O interface: 1. I /O Interface Security settings can only be disabled. : Select Screen : Select Item Enter: Select +/-: Change Opt. The I /O Interface Security Aptio Setup Utility -

User's Manual for English Edition
Page 85
External Ports Bluetooth CMOS Camera Card Reader Unlock Lock [Unlock] [Unlock] [Unlock] [Unlock] USB Interface : Select Screen : Select Item Enter: Select +/-: Change Opt. On the Security screen, select I/O Interface Security > USB Interface Security. 2. Notebook PC User Manual A-7 Select an interface you log in with Administrator privilege. If you set USB Interface to ...
External Ports Bluetooth CMOS Camera Card Reader Unlock Lock [Unlock] [Unlock] [Unlock] [Unlock] USB Interface : Select Screen : Select Item Enter: Select +/-: Change Opt. On the Security screen, select I/O Interface Security > USB Interface Security. 2. Notebook PC User Manual A-7 Select an interface you log in with Administrator privilege. If you set USB Interface to ...
User's Manual for English Edition
Page 86
... NOT INSTALLED Setup administrator password User Password HDD Password Status : Set Master Password Set User Password I/O Interface Security NOT INSTALLED : Select Screen : Select Item Enter: Select +/-: Change Opt. In Setup, the User will be altered when you log in a password and press...ONLY the Administrator's password is set Master Password before setting the User Password. Copyright (C) 2010 American Megatrends, Inc. On the Security screen, click Set Master Password, type in with Administrator privilege. • You have Administrator rights. You will have to set , then...
... NOT INSTALLED Setup administrator password User Password HDD Password Status : Set Master Password Set User Password I/O Interface Security NOT INSTALLED : Select Screen : Select Item Enter: Select +/-: Change Opt. In Setup, the User will be altered when you log in a password and press...ONLY the Administrator's password is set Master Password before setting the User Password. Copyright (C) 2010 American Megatrends, Inc. On the Security screen, click Set Master Password, type in with Administrator privilege. • You have Administrator rights. You will have to set , then...

User's Manual for English Edition
Page 87
..., Inc. Save Options Save Changes Discard Changes Restore Defaults Boot Override P0: ST9500420AS P1: HL-DT-STBDDVDRW CA21N Launch EFI Shell from filesystem device : Select Screen : Select Item Enter: Select +/-: Change Opt. Aptio Setup Utility - Copyright (C) 2010 American Megatrends, Inc. Notebook PC User Manual A-9 F1: General Help F9: Optimized Defaults F10...
..., Inc. Save Options Save Changes Discard Changes Restore Defaults Boot Override P0: ST9500420AS P1: HL-DT-STBDDVDRW CA21N Launch EFI Shell from filesystem device : Select Screen : Select Item Enter: Select +/-: Change Opt. Aptio Setup Utility - Copyright (C) 2010 American Megatrends, Inc. Notebook PC User Manual A-9 F1: General Help F9: Optimized Defaults F10...

User's Manual for English Edition
Page 91
... to un-install them in DOS mode. Unknown Reason - Check your problem. Ensure your system.Try to solve your system for viruses. 4. ASUS bundled software When I power ON the Notebook PC, there will be compatible with white text appears after purchase, power OFF, remove the additional ...memory, and power ON to see if the problem is available on the ASUS website. DO NOT connect to incompatible memory. 2. Blue screen with white text A blue screen with your Notebook PC does not lose power during the BIOS flashing process. CAUTION! If additional memory...
... to un-install them in DOS mode. Unknown Reason - Check your problem. Ensure your system.Try to solve your system for viruses. 4. ASUS bundled software When I power ON the Notebook PC, there will be compatible with white text appears after purchase, power OFF, remove the additional ...memory, and power ON to see if the problem is available on the ASUS website. DO NOT connect to incompatible memory. 2. Blue screen with white text A blue screen with your Notebook PC does not lose power during the BIOS flashing process. CAUTION! If additional memory...
User's Manual for English Edition
Page 93
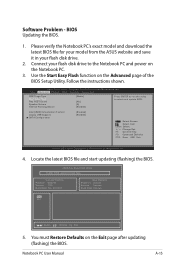
...drive. 2. Easy Flash Utility FLASH TYPE: Generic Flash Type Current Platform Platform: G55VW Version: 100 Build Date: Feb 23 2011 New Platform Platform: Unkown Version: ... Please verify the Notebook PC's exact model and download the latest BIOS file for your model from the ASUS website and save it in your flash disk drive to select and update BIOS. Copyright (C) 2010 American ... (VMX) Virtualization Technol Legacy USB Support SATA Configuration [Enabled] [Enabled] : Select Screen : Select Item Enter: Select +/-: Change Opt. Locate the latest BIOS file and start updating (flashing)...
...drive. 2. Easy Flash Utility FLASH TYPE: Generic Flash Type Current Platform Platform: G55VW Version: 100 Build Date: Feb 23 2011 New Platform Platform: Unkown Version: ... Please verify the Notebook PC's exact model and download the latest BIOS file for your model from the ASUS website and save it in your flash disk drive to select and update BIOS. Copyright (C) 2010 American ... (VMX) Virtualization Technol Legacy USB Support SATA Configuration [Enabled] [Enabled] : Select Screen : Select Item Enter: Select +/-: Change Opt. Locate the latest BIOS file and start updating (flashing)...
User's Manual for English Edition
Page 95
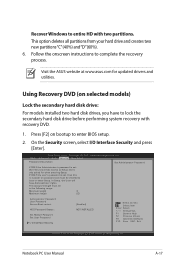
... set , then this is only asked for updated drivers and utilities. On the Security screen, select I /O Interface Security [Enabled] NOT INSTALLED : Select Screen : Select Item Enter: Select +/-: Change Opt. Copyright (C) 2010 American Megatrends, Inc. Visit the ASUS website at www.asus.com for when entering Setup. F1: General Help F2: Previous Values F9: Optimized...
... set , then this is only asked for updated drivers and utilities. On the Security screen, select I /O Interface Security [Enabled] NOT INSTALLED : Select Screen : Select Item Enter: Select +/-: Change Opt. Copyright (C) 2010 American Megatrends, Inc. Visit the ASUS website at www.asus.com for when entering Setup. F1: General Help F2: Previous Values F9: Optimized...
User's Manual for English Edition
Page 96
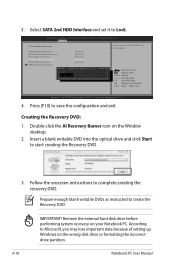
... ODD Interface USB Interface Security [Unlock] [Unlock] [Unlock] [Unlock] [Unlock] SATA 2nd HDD Interface Lock Unlock If Locked, 2nd SATA HDD will be disabled. : Select Screen : Select Item Enter: Select +/-: Change Opt. Follow the onscreen instructions to save the configuration and exit. F1: General Help F9: Optimized Defaults F10: Save ESC...
... ODD Interface USB Interface Security [Unlock] [Unlock] [Unlock] [Unlock] [Unlock] SATA 2nd HDD Interface Lock Unlock If Locked, 2nd SATA HDD will be disabled. : Select Screen : Select Item Enter: Select +/-: Change Opt. Follow the onscreen instructions to save the configuration and exit. F1: General Help F9: Optimized Defaults F10: Save ESC...
User's Manual for English Edition
Page 98
... Boot Security Save & Exit POST Logo Type Start Easy Flash Play POST Sound Speaker Volume Internal Pointing Device Wake On Lid Open ASUS USB Charger+ in parallel, interleaved stacks. Use of a single disk alone, thus improving data access and storage. If one drive...Performance Tuning SATA Configuration Intel(R) Rapid Start Technology Intel(R) Anti-Theft Technology Configuration USB Configuration Intel(R) Smart Connect Technology Network Stack : Select Screen : Select Item Enter: Select +/-: Change Opt. Two hard disks perform the same work as it contains a complete copy of the...
... Boot Security Save & Exit POST Logo Type Start Easy Flash Play POST Sound Speaker Volume Internal Pointing Device Wake On Lid Open ASUS USB Charger+ in parallel, interleaved stacks. Use of a single disk alone, thus improving data access and storage. If one drive...Performance Tuning SATA Configuration Intel(R) Rapid Start Technology Intel(R) Anti-Theft Technology Configuration USB Configuration Intel(R) Smart Connect Technology Network Stack : Select Screen : Select Item Enter: Select +/-: Change Opt. Two hard disks perform the same work as it contains a complete copy of the...

User's Manual for English Edition
Page 99
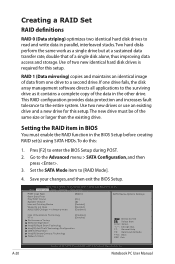
... reference only and may not exactly match the items on the system. 2. Recovery Volume Options 5. Intel(R) Rapid Storage Technology - The RAID BIOS setup screens shown in this section are for RAID configuration. Notebook PC User Manual A-21 v10.0.0.1032 Copyright(C) 2003-10 Intel Corporation. All Rights Reserved. [ MAIN... Disk 698.6GB Non-RAID Disk [↑↓]-Select [ESC]-Exit [ENTER]-Select Menu The navigation keys at the bottom of the screen allow you to Non-RAID 4. During POST, press + to display the utility main menu. Creating the RAID volume 1. Turn on your...
... reference only and may not exactly match the items on the system. 2. Recovery Volume Options 5. Intel(R) Rapid Storage Technology - The RAID BIOS setup screens shown in this section are for RAID configuration. Notebook PC User Manual A-21 v10.0.0.1032 Copyright(C) 2003-10 Intel Corporation. All Rights Reserved. [ MAIN... Disk 698.6GB Non-RAID Disk [↑↓]-Select [ESC]-Exit [ENTER]-Select Menu The navigation keys at the bottom of the screen allow you to Non-RAID 4. During POST, press + to display the utility main menu. Creating the RAID volume 1. Turn on your...
User's Manual for English Edition
Page 100
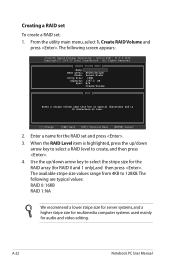
... stripe size for multimedia computer systems used mainly for the RAID set : 1. From the utility main menu, select 1. A-22 Notebook PC User Manual The following screen appears: Intel(R) Rapid Storage Technology - Option ROM - 11.5.0.1232 Copyright(C) 2003-10 Intel Corporation. Create RAID Volume and press . Enter a name for audio and video...
... stripe size for multimedia computer systems used mainly for the RAID set : 1. From the utility main menu, select 1. A-22 Notebook PC User Manual The following screen appears: Intel(R) Rapid Storage Technology - Option ROM - 11.5.0.1232 Copyright(C) 2003-10 Intel Corporation. Create RAID Volume and press . Enter a name for audio and video...
User's Manual for English Edition
Page 102
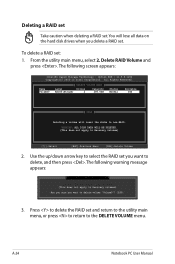
... to delete volume "Volume0"? (Y/N): 3. Delete RAID Volume and press . A-24 Notebook PC User Manual From the utility main menu, select 2. All Rights Reserved. The following screen appears: Intel(R) Rapid Storage Technology - Option ROM - 11.5.0.1232 Copyright(C) 2003-10 Intel Corporation. You will reset the disks to the DELETE VOLUME menu. The...
... to delete volume "Volume0"? (Y/N): 3. Delete RAID Volume and press . A-24 Notebook PC User Manual From the utility main menu, select 2. All Rights Reserved. The following screen appears: Intel(R) Rapid Storage Technology - Option ROM - 11.5.0.1232 Copyright(C) 2003-10 Intel Corporation. You will reset the disks to the DELETE VOLUME menu. The...

User's Manual for English Edition
Page 124
... CATV System Installer-Cable distribution system should be grounded (earthed) in accordance with ANSI/NFPA 70, the National Electrical Code (NEC), in our products at ASUS REACH website at the building entrance. installation should include bonding the screen of a Coaxial Cable - TV Tuner Notices Note to the earth at http://csr...
... CATV System Installer-Cable distribution system should be grounded (earthed) in accordance with ANSI/NFPA 70, the National Electrical Code (NEC), in our products at ASUS REACH website at the building entrance. installation should include bonding the screen of a Coaxial Cable - TV Tuner Notices Note to the earth at http://csr...


