User Manual
Page 22
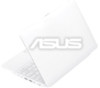
...-pin D-sub monitor port supports a standard VGAcompatible device such as a monitor or projector to 12Mbits/sec (USB 1.1) and 480Mbits/sec (USB 2.0). Right Side Refer to the illustration below to identify the components on this side of the Eee PC. 1 2 3 4 1 Memory Card Slot The built-in memory card reader can read MMC/SD cards from...
...-pin D-sub monitor port supports a standard VGAcompatible device such as a monitor or projector to 12Mbits/sec (USB 1.1) and 480Mbits/sec (USB 2.0). Right Side Refer to the illustration below to identify the components on this side of the Eee PC. 1 2 3 4 1 Memory Card Slot The built-in memory card reader can read MMC/SD cards from...
User Manual
Page 24
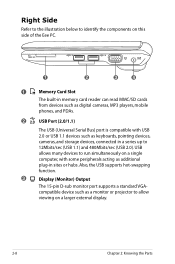
...with USB 2.0 or USB 1.1 devices such as additional plugin sites or hubs. USB allows many devices to run simultaneously on this side of the Eee PC. 12 3 45 1 Kensington® Lock Port The Kensington® lock port allows the Eee PC to 12Mbits/sec (USB 1.1) and 480Mbits/sec (USB 2.0). ... keyboards, pointing devices, cameras, and storage devices, connected in connector allows convenient use without additional adapters. 3 2.0 USB Port (2.0/1.1) The USB (Universal Serial Bus) port is designed to connect the microphone used for connection to be secured using Kensington® ...
...with USB 2.0 or USB 1.1 devices such as additional plugin sites or hubs. USB allows many devices to run simultaneously on this side of the Eee PC. 12 3 45 1 Kensington® Lock Port The Kensington® lock port allows the Eee PC to 12Mbits/sec (USB 1.1) and 480Mbits/sec (USB 2.0). ... keyboards, pointing devices, cameras, and storage devices, connected in connector allows convenient use without additional adapters. 3 2.0 USB Port (2.0/1.1) The USB (Universal Serial Bus) port is designed to connect the microphone used for connection to be secured using Kensington® ...

User Manual
Page 3
... selected territories 2-46 Task Manager 2-47 Favorites...2-48 Customize...2-48 System Recovery 3-1 Chapter 3: System Recovery System Recovery 3-2 Using Hidden Partition 3-2 Using the Recovery DVD 3-3 Using USB Flash Disk 3-4 Chapter 4: Installing Windows® XP Preparing to install Windows® XP 4-2 Installing Windows® XP 4-2 Support CD information 4-4 ASUS Eee PC iii
... selected territories 2-46 Task Manager 2-47 Favorites...2-48 Customize...2-48 System Recovery 3-1 Chapter 3: System Recovery System Recovery 3-2 Using Hidden Partition 3-2 Using the Recovery DVD 3-3 Using USB Flash Disk 3-4 Chapter 4: Installing Windows® XP Preparing to install Windows® XP 4-2 Installing Windows® XP 4-2 Support CD information 4-4 ASUS Eee PC iii
User Manual
Page 29
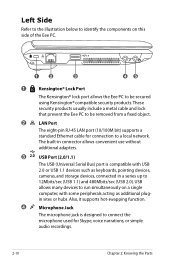
I. Starts File Manager. Connect your USB flash memory disk or USB portable hard disk drive containing desired data to your file: 1. ASUS Eee PC 2-21 To locate and open your Eee PC. 2. Highlight and select Open in a zip and tgz file format only, and file extraction from zip, gz, tar, and rar formats. Eee PC supports file compression in File Manager at the prompt. File Manager provides an overview of all your files and enables easy management of data. Management software Your Eee PC includes two management-related applications.
I. Starts File Manager. Connect your USB flash memory disk or USB portable hard disk drive containing desired data to your file: 1. ASUS Eee PC 2-21 To locate and open your Eee PC. 2. Highlight and select Open in a zip and tgz file format only, and file extraction from zip, gz, tar, and rar formats. Eee PC supports file compression in File Manager at the prompt. File Manager provides an overview of all your files and enables easy management of data. Management software Your Eee PC includes two management-related applications.
User Manual
Page 30
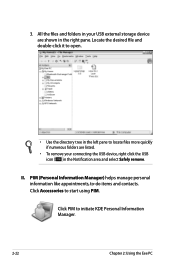
... the directory tree in the left pane to initiate KDE Personal Information Manager. 2-22 Chapter 2: Using the Eee PC All the files and folders in your connecting the USB device, right click the USB icon in the right pane. Click Accessories to -do items and contacts. Click PIM to locate files more... quickly if numerous folders are listed. • To remove your USB external storage device are shown in the ...
... the directory tree in the left pane to initiate KDE Personal Information Manager. 2-22 Chapter 2: Using the Eee PC All the files and folders in your connecting the USB device, right click the USB icon in the right pane. Click Accessories to -do items and contacts. Click PIM to locate files more... quickly if numerous folders are listed. • To remove your USB external storage device are shown in the ...
User Manual
Page 59
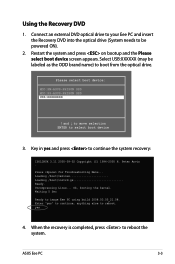
...system and press on bootup and the Please select boot device screen appears. Select USB:XXXXXX (may be powered ON). 2. Please select boot device: HDD:SM-ASUS-PHISON SSD HDD:SS-ASUS-PHISON SSD USB:XXXXXXXX ↑ and ↓ to move selection ENTER to boot from the optical... Loading /boot/initrd.gz Ready. ASUS Eee PC 3-3 Key in yes and press to reboot the system. yes 4. Using the Recovery DVD 1. Press for Troubleshooting Menu... Enter "yes" to continue, anything else to image Eee PC using build 2008.03.05_21.08. Uncompressing Linux... Waiting 5 Sec Ready to reboot...
...system and press on bootup and the Please select boot device screen appears. Select USB:XXXXXX (may be powered ON). 2. Please select boot device: HDD:SM-ASUS-PHISON SSD HDD:SS-ASUS-PHISON SSD USB:XXXXXXXX ↑ and ↓ to move selection ENTER to boot from the optical... Loading /boot/initrd.gz Ready. ASUS Eee PC 3-3 Key in yes and press to reboot the system. yes 4. Using the Recovery DVD 1. Press for Troubleshooting Menu... Enter "yes" to continue, anything else to image Eee PC using build 2008.03.05_21.08. Uncompressing Linux... Waiting 5 Sec Ready to reboot...
User Manual
Page 60
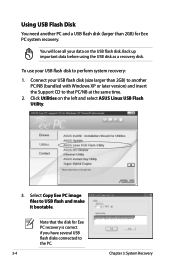
... or later version) and insert the Support CD to that the disk for Eee PC system recovery. Back up important data before using the USB disk as a recovery disk. To use your data on the left and select ASUS Linux USB Flash Utility. 3. You will lose all your USB flash disk to USB flash and make it bootable.
... or later version) and insert the Support CD to that the disk for Eee PC system recovery. Back up important data before using the USB disk as a recovery disk. To use your data on the left and select ASUS Linux USB Flash Utility. 3. You will lose all your USB flash disk to USB flash and make it bootable.
User Manual
Page 61
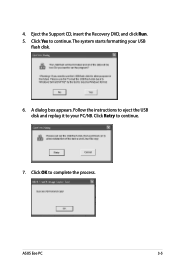
Click Retry to continue.The system starts formatting your PC/NB. A dialog box appears. Click Yes to continue. 7. Follow the instructions to eject the USB disk and replug it to complete the process. Click OK to your USB flash disk. 6. 4. ASUS Eee PC 3-5 Eject the Support CD, insert the Recovery DVD, and click Run. 5.
Click Retry to continue.The system starts formatting your PC/NB. A dialog box appears. Click Yes to continue. 7. Follow the instructions to eject the USB disk and replug it to complete the process. Click OK to your USB flash disk. 6. 4. ASUS Eee PC 3-5 Eject the Support CD, insert the Recovery DVD, and click Run. 5.
User Manual
Page 62
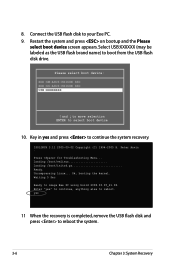
...and the Please select boot device screen appears. Uncompressing Linux... yes 11 When the recovery is completed, remove the USB flash disk and press to select boot device 10. Please select boot device: HDD:SM-ASUS-PHISON SSD HDD:SS-ASUS-PHISON SSD USB:XXXXXXXX ↑ and ↓ to move selection... booting the kernel. Waiting 5 Sec Ready to boot from the USB flash disk drive. Select USB:XXXXXX (may be labeled as the USB flash brand name) to image Eee PC using build 2008.03.05_21.08. Peter Anvin . Connect the USB flash disk to continue the system recovery. Key in yes and ...
...and the Please select boot device screen appears. Uncompressing Linux... yes 11 When the recovery is completed, remove the USB flash disk and press to select boot device 10. Please select boot device: HDD:SM-ASUS-PHISON SSD HDD:SS-ASUS-PHISON SSD USB:XXXXXXXX ↑ and ↓ to move selection... booting the kernel. Waiting 5 Sec Ready to boot from the USB flash disk drive. Select USB:XXXXXX (may be labeled as the USB flash brand name) to image Eee PC using build 2008.03.05_21.08. Peter Anvin . Connect the USB flash disk to continue the system recovery. Key in yes and ...
User Manual
Page 63
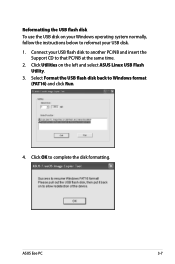
Select Format the USB flash disk back to complete the disk formatting. ASUS Eee PC 3-7 Click Utilities on your Windows operating system normally, follow the instructions below to reformat your USB flash disk to another PC/NB and insert the Support CD to that PC/NB at the same time. 2. Click OK to Windows format (FAT16) and click Run. 4. Connect your USB disk. 1. Reformatting the USB flash disk To use the USB disk on the left and select ASUS Linux USB Flash Utility. 3.
Select Format the USB flash disk back to complete the disk formatting. ASUS Eee PC 3-7 Click Utilities on your Windows operating system normally, follow the instructions below to reformat your USB flash disk to another PC/NB and insert the Support CD to that PC/NB at the same time. 2. Click OK to Windows format (FAT16) and click Run. 4. Connect your USB disk. 1. Reformatting the USB flash disk To use the USB disk on the left and select ASUS Linux USB Flash Utility. 3.
User Manual
Page 66
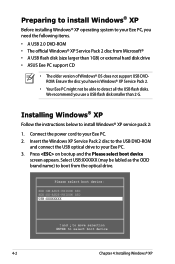
... and the Please select boot device screen appears. Select USB:XXXXXX (may be able to your Eee PC. 2. Please select boot device: HDD:SM-ASUS-PHISON SSD HDD:SS-ASUS-PHISON SSD USB:XXXXXXXX ↑ and ↓ to move selection ENTER to your Eee PC. 3. Insert the Windows XP Service Pack 2 disc ... XP service pack 2: 1. Preparing to install Windows® XP Before installing Windows® XP operating system to your Eee PC, you use a USB flash disk smaller than 1GB) or external hard disk drive • ASUS Eee PC support CD • The older version of Windows® OS does not support...
... and the Please select boot device screen appears. Select USB:XXXXXX (may be able to your Eee PC. 2. Please select boot device: HDD:SM-ASUS-PHISON SSD HDD:SS-ASUS-PHISON SSD USB:XXXXXXXX ↑ and ↓ to move selection ENTER to your Eee PC. 3. Insert the Windows XP Service Pack 2 disc ... XP service pack 2: 1. Preparing to install Windows® XP Before installing Windows® XP operating system to your Eee PC, you use a USB flash disk smaller than 1GB) or external hard disk drive • ASUS Eee PC support CD • The older version of Windows® OS does not support...
User Manual
Page 67
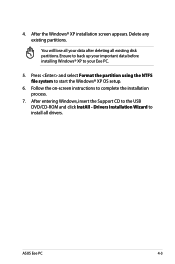
4. Delete any existing partitions. Press and select Format the partition using the NTFS file system to install all drivers. ASUS Eee PC 4-3 Drivers Installation Wizard to start the Windows® XP OS setup. 6. Ensure to back up your important data before installing Windows®... process. 7. After the Windows® XP installation screen appears. Follow the on-screen instructions to your data after deleting all your Eee PC. 5. After entering Windows, insert the Support CD to the USB DVD/CD-ROM and click InstAll - You will lose all existing disk partitions.
4. Delete any existing partitions. Press and select Format the partition using the NTFS file system to install all drivers. ASUS Eee PC 4-3 Drivers Installation Wizard to start the Windows® XP OS setup. 6. Ensure to back up your important data before installing Windows®... process. 7. After the Windows® XP installation screen appears. Follow the on-screen instructions to your data after deleting all your Eee PC. 5. After entering Windows, insert the Support CD to the USB DVD/CD-ROM and click InstAll - You will lose all existing disk partitions.

